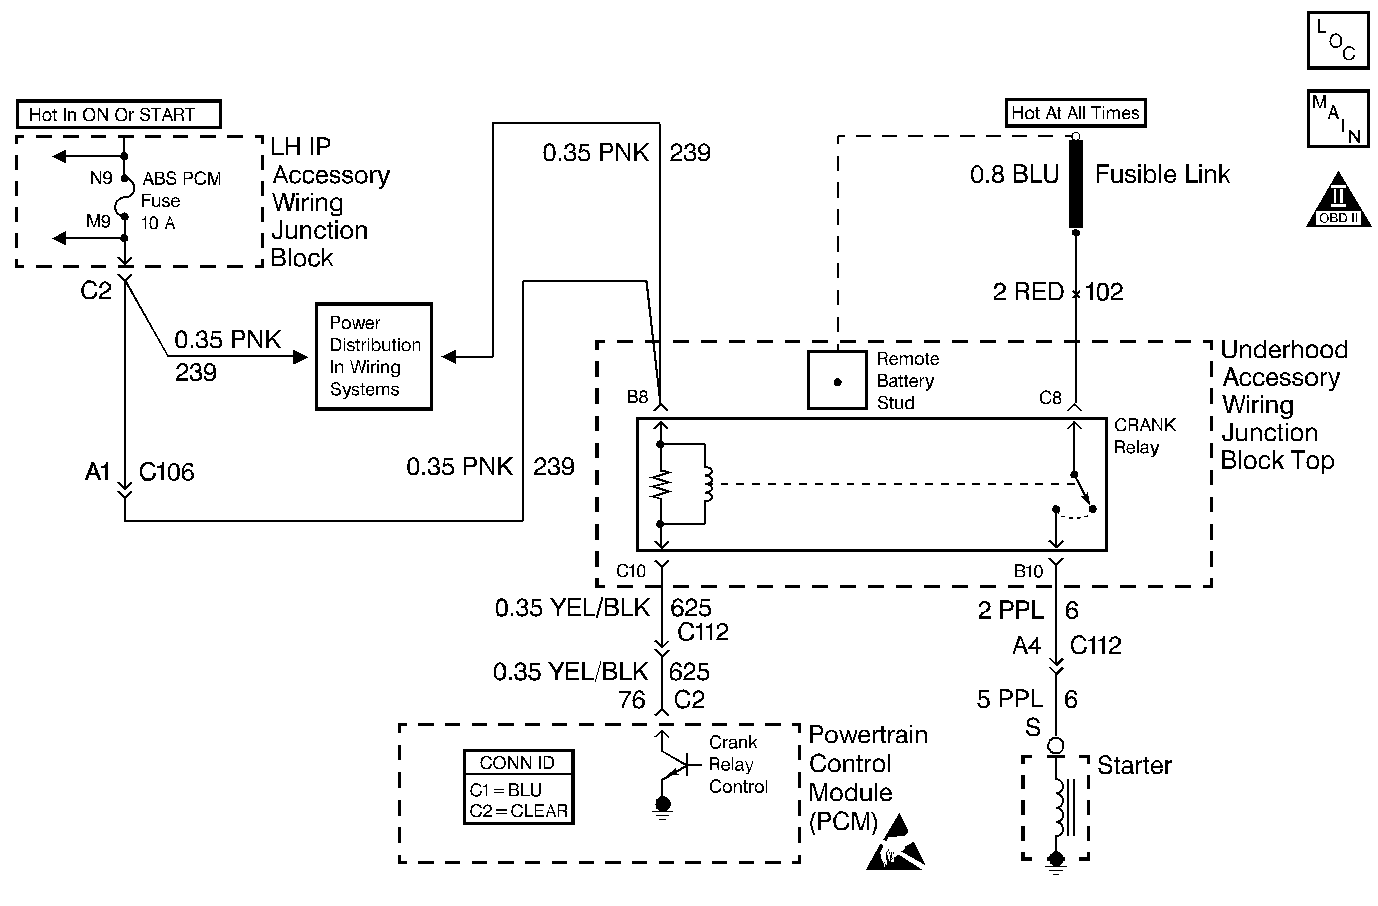
Circuit Description
The PCM has the ability to disable starter operation if conditions inappropriate for starter operation exist. The PCM disables the starter if the engine is running, if a correct VTD password is not received from the VTD system or if the vehicle operator attempts to engage the starter for an extended period of time.
The PCM controlled starter system consists of the following components:
| • | Crank relay |
| • | The ignition switch |
| • | The starter solenoid |
| • | The PCM |
Diagnostic Aids
The PCM Controlled Starter Diagnosis table is intended to identify electrical malfunctions that can occur with the system. For starter motor diagnosis and on-vehicle service, refer to Diagnostic System Check - Engine Electrical in Engine Electrical.
Check for the following conditions:
| • | Poor connection at the PCM , the crank relay, the ignition switch or the starter solenoid. |
| Inspect harness connectors for the following conditions: |
| - | Backed out terminals |
| - | Improper mating |
| - | Broken locks |
| - | Improperly formed or damaged terminals |
| - | Poor terminal to wire connection |
| • | Damaged harness |
| Inspect the wiring harness for damage. |
| • | Either of the following conditions can cause the PCM to disable starter operation: |
| - | The engine is running. |
| - | The starter has been continuously engaged for more than 15 seconds. |
| - | A correct VTD password has not been received from the VTD system. |
Step | Action | Value(s) | Yes | No | ||||||
|---|---|---|---|---|---|---|---|---|---|---|
1 | Does the starter run continuously? | -- | ||||||||
2 | Did you perform the Powertrain On-Board Diagnostic System Check? | -- | ||||||||
3 | Are any other DTCs set? | |||||||||
4 |
Does the scan tool indicate that the transmission is in PARK? | -- | Go to Symptom Diagnosis in Automatic Transaxle | |||||||
5 | Remove starter relay and probe relay switch feed with a test lamp connected to ground. Does the test lamp illuminate? | -- | ||||||||
6 |
Important: When performing this step, the engine may crank. Ensure that the following
conditions are met:
Does the engine crank? | -- | ||||||||
7 |
Does the test lamp illuminate? | -- | ||||||||
8 |
Does the test lamp illuminate? | -- | ||||||||
9 | Remove the starter relay Does the starter run continuously? | -- | ||||||||
10 |
Does the test lamp illuminate? | -- | ||||||||
11 | Is the relay switch feed fuse blown? | -- | ||||||||
12 | Is the relay coil feed fuse blown? | -- | ||||||||
13 | Test the feed circuit of the relay switch for a short to ground and repair if necessary. Refer to Wiring Repairs in Wiring Systems. Was a repair necessary? | -- | ||||||||
14 | Test the feed circuit of the relay switch for an open and repair if necessary. Refer to Wiring Repairs in Wiring Systems. Was a repair necessary? | -- | -- | |||||||
15 | Test the feed circuit of the relay coil and all shared circuits for a short to voltage and repair if necessary. Refer to Wiring Repairs in Wiring Systems. Was a repair necessary? | -- | ||||||||
16 | Test the feed circuit of the relay coil and all shared circuits for a short to ground and repair if necessary. Refer to Wiring Repairs in Wiring Systems. Was a repair necessary? | -- | ||||||||
17 |
Is the current reading within the specified values? | 0.5A -1.5A | ||||||||
18 | Test the feed circuit for the relay coil for an open and repair if necessary. Refer to Wiring Repairs in Wiring Systems. Was a repair necessary? | -- | ||||||||
19 | Test the feed circuit for the ignition switch for an open and repair if necessary. Refer to Wiring Repairs in Wiring Systems. Was a repair necessary? | -- | ||||||||
20 | Test the feed circuit for the starter solenoid for a short to voltage and repair if necessary. Refer to Wiring Repairs in Wiring Systems Was a repair necessary? | -- | ||||||||
21 | Test the feed circuit for the starter solenoid for a short to ground and repair if necessary. Refer to Wiring Repairs in Wiring Systems. Was a repair necessary? | -- | ||||||||
22 |
Does the test lamp illuminate for more than five seconds? | -- | ||||||||
23 | Test the feed for the starter solenoid for an open and repair if necessary. Refer to Wiring Repairs in Wiring Systems. Was a repair necessary? | -- | ||||||||
24 | Test the control circuit for the starter relay for an open or a short to voltage and repair if necessary. Refer to Wiring Repairs in Wiring Systems. Was a repair necessary? | -- | ||||||||
25 | Inspect for a poor connection at the relay and repair if necessary. Refer to Wiring Repairs in Wiring Systems. Was a repair necessary? | -- | ||||||||
26 | Inspect for a poor connection in the feed circuit for the starter solenoid at the starter solenoid and repair if necessary. Refer to Wiring Repairs in Wiring Systems. Was a repair necessary? | -- | ||||||||
27 | Inspect for a poor connection in the control circuit for the relay at the PCM and repair if necessary. Refer to Wiring Repairs in Wiring Systems. Was a repair necessary? | -- | ||||||||
28 | Inspect for a poor connection in the feed circuits for the relay and the ignition switch at the ignition switch and repair if necessary. Refer to Wiring Repairs in Wiring Systems. Was a repair necessary? | -- | ||||||||
29 | Replace the ignition switch. Refer to Ignition and Start Switch Replacement in Instrument Panel, Gauges and Console. Is the action complete? | -- | -- | |||||||
30 | Replace the starter solenoid. Refer to Starter Motor Replacement in Engine Electrical. Is the action complete? | -- | -- | |||||||
31 | Replace the starter relay. Is the action complete? | -- | -- | |||||||
32 |
Important: The replacement PCM must be programmed. Replace the PCM. Refer to Powertrain Control Module Replacement/ProgrammingIs action complete? | -- | -- | |||||||
33 |
Does the engine crank normally? | -- | System OK. |
