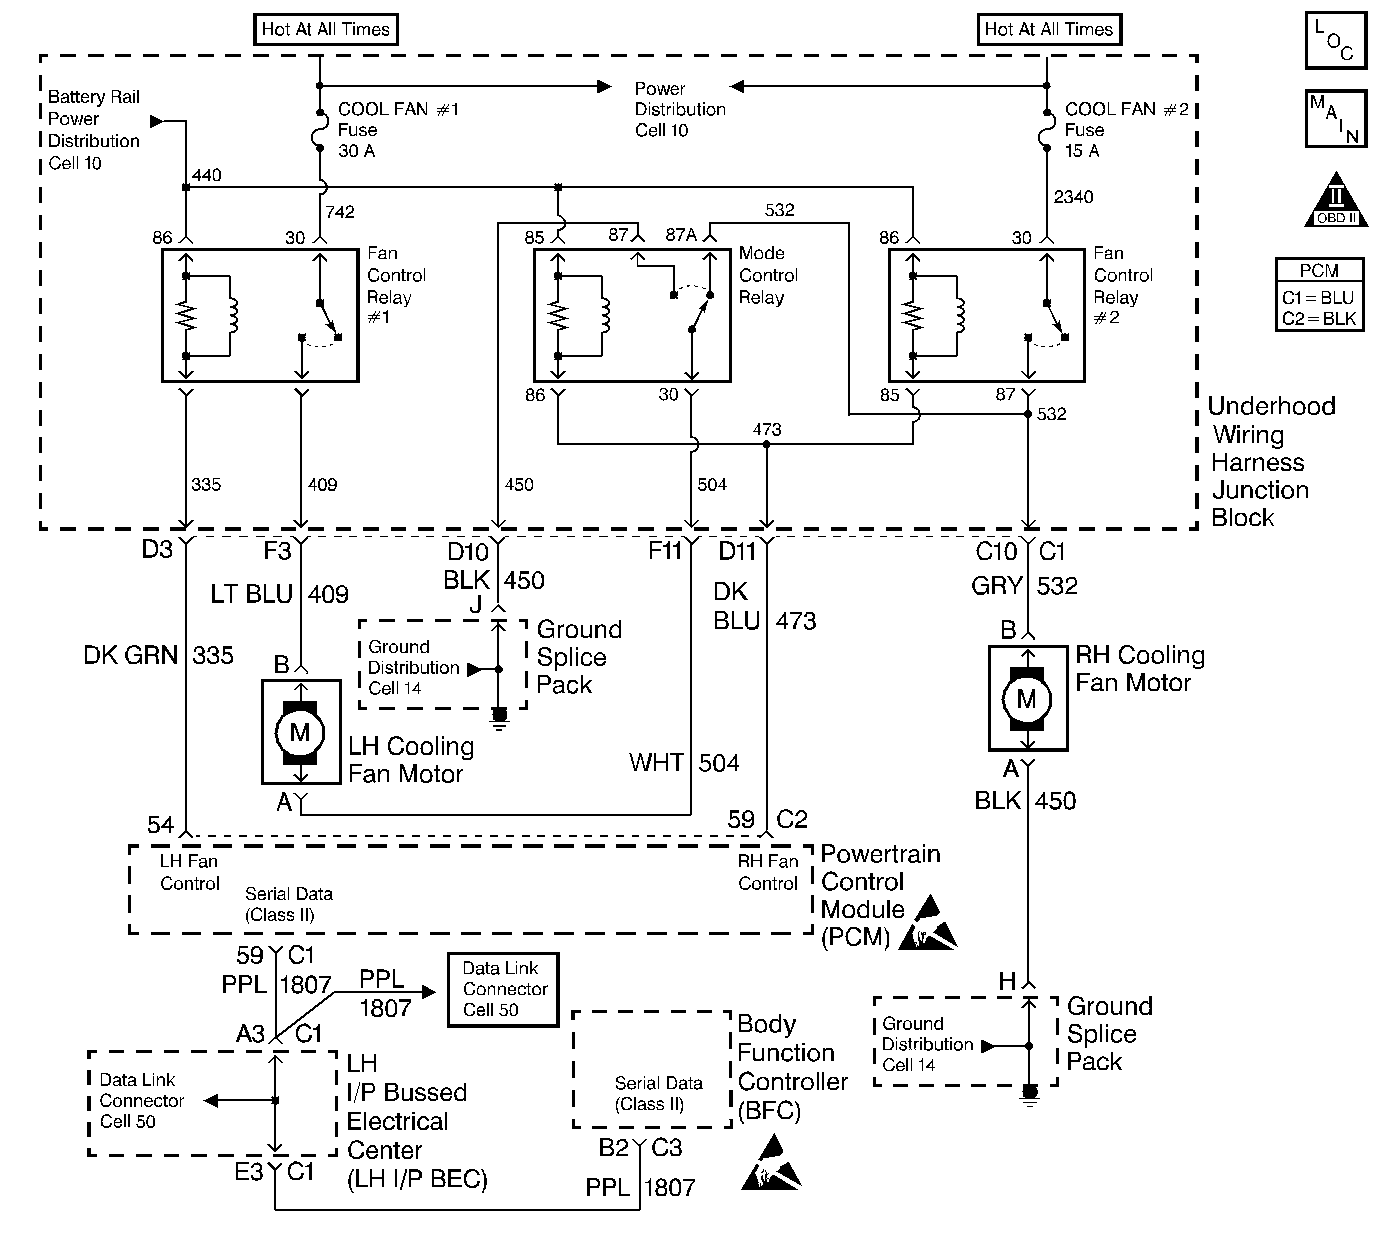
Circuit Description
The Body Control Module (BCM) request the cooling fans. The BCM sends a Class 2 message to the PCM in order to enable the fans based on various inputs. Thebattery voltage travels to all three cooling fan relay coils. The PCM enables cooling fan relay #1 by providing the ground path. The PCM enables cooling fan relays #2 and mode control together by providing a ground path. The left and right cooling fans are connected in series. This will enable both fans on low speed when the fan #1 relay is energized. When all three fan relays are energized, both fans will operate at high speed. The high speed is possible because the fan relays are wired in a parallel circuit. When the PCM detects that certain DTCs are set, the PCM will enable the cooling fans.
The PCM will enable the engine cooling fans when certain Diagnostic Trouble Codes are set.
Conditions for Setting the DTC
| • | The PCM detects that the commanded state of the driver and the actual state of the control circuit do not match. |
| • | The condition must be present for a minimum of 6 seconds. |
Action Taken When the DTC Sets
| • | The PCM will illuminate the Malfunction Indicator Lamp (MIL) when the diagnostic runs and fails. |
| • | The PCM will record the operating conditions at the time during which the diagnostic fails. This information will store in the Freeze Frame and/or Failure Records. |
Conditions for Clearing the MIL/DTC
| • | The PCM will turn the MIL OFF after three consecutive drive trips that the diagnostic runs and does not fail. |
| • | A last test failed (Current DTC) will clear when the diagnostic runs and does not fail. |
| • | A History DTC will clear after forty consecutive warm-up cycles if no failures report by this diagnostic or any other emission related diagnostic. |
| • | The PCM battery voltage is interrupted. |
| • | A scan tool will clear the MIL/DTCs. |
Diagnostic Aids
The Freeze Frame and/or Failure Records data may aid in locating an intermittent condition. If the DTC cannot be duplicated, the information included in the Freeze Frame and/or Failure Records data can be useful in determining how many miles since the DTC set. You can also use the Fail Counter and the Pass Counter in order to determine how many ignition cycles during which the diagnostic reported a pass and/or a fail. Operate the vehicle within the same freeze frame conditions (the RPM, the load, the vehicle speed, the temperature, etc.) that were noted. This will isolate when the DTC failed.
Test Description
The number(s) below refer(s) to the step numbers on the diagnostic table.
-
Listen for an audible click when the fan control relay #2 operates. Be sure that both the ON and the OFF states are commanded. Repeat the commands as necessary.
-
This check can detect a partially shorted coil which would cause an excessive current flow. Allow the coil to warm up by leaving the circuit energized for 2 minutes. When warm the coil may open (Amps drop to 0), or short (goes above 0.75 amp).
-
It is important to identify and test the fan control relay #2 coil terminals to avoid improper diagnosis.
-
Reprogram the replacement PCM and perform the crankshaft position system variation learn procedure. Refer to the latest Techline information for PCM programming and Crankshaft Position System Variation Learn for the Crankshaft Position System Variation Procedure.
Step | Action | Value(s) | Yes | No | ||||||
|---|---|---|---|---|---|---|---|---|---|---|
1 | Did you perform the Powertrain On-Board Diagnostic (OBD) System Check? | -- | ||||||||
2 |
Does the fan control relay #2 turn ON and OFF with each command? | -- | ||||||||
3 |
Does the current draw measure less than the specified value shown (but not 0)? | 0.75 A | ||||||||
Does the DMM display infinite resistance? | -- | |||||||||
Does the test light turn ON and OFF with each command? | -- | |||||||||
6 |
Does the test light illuminate? | -- | ||||||||
Does the relay operate? | -- | |||||||||
8 |
Does the relay turn ON? | -- | ||||||||
9 | Measure the current from the mode control relay control circuit in the PCM harness electrical connector to ground for 2 minutes using a DMM on a 10 amp scale. Does the current draw measure less than the specified value shown (but not 0)? | 0.75 A | Go to Diagnostic Aids | |||||||
10 |
Does the test light turn ON? | -- | ||||||||
11 |
Does the test light illuminate? | -- | ||||||||
12 |
Was a problem found and corrected? | -- | ||||||||
13 |
Was a problem found and corrected? | -- | ||||||||
14 |
Is the action complete? | -- | -- | |||||||
15 |
Is the action complete? | -- | -- | |||||||
16 |
Is the action complete? | -- | -- | |||||||
Replace the PCM. Refer to the Powertrain Control Module Replacement . Is the action complete? | -- | -- | ||||||||
18 |
Does the scan tool indicate that this test ran and passed? | -- | ||||||||
19 | Check to see if any additional DTCs are set. Does the scan tool display any DTCs that you have not diagnosed? | -- | Go to the applicable DTC table | System OK |
