Steering Column Replacement LHD
Removal Procedure
- Disconnect the battery ground cable. Refer to Battery Negative Cable Disconnection and Connection .
- Disable the SIR system. Refer to SIR Disabling and Enabling .
- Remove the inflatable restraint steering wheel module. Refer to Inflatable Restraint Steering Wheel Module Replacement .
- Remove the steering wheel. Refer to Steering Wheel Replacement .
- Remove the steering column trim covers. Refer to Steering Column Trim Covers Replacement .
- Remove the theft deterrent exciter module. Refer to Theft Deterrent Module Replacement .
- Remove the turn signal switch. Refer to Turn Signal Switch Replacement .
- Remove the wipers/washer switch. Refer to Windshield Wiper and Washer Switch Replacement .
- Remove the inflatable restraint steering wheel module coil. Refer to Inflatable Restraint Steering Wheel Module Coil Replacement .
- Remove the ignition switch. Refer to Ignition and Start Switch Replacement .
- Remove the driver side instrument panel lower trim panel assembly. Refer to Knee Bolster Replacement .
- Remove the driver side instrument panel lower left trim plate assembly. Refer to Instrument Panel Retainer Replacement .
- Remove the driver side instrument panel lower trim panel retainer. Refer to Instrument Panel Retainer Replacement .
- Remove the driver side floor air outlet duct. Refer to Instrument Panel Outer Air Outlet Deflector Replacement - Left Side
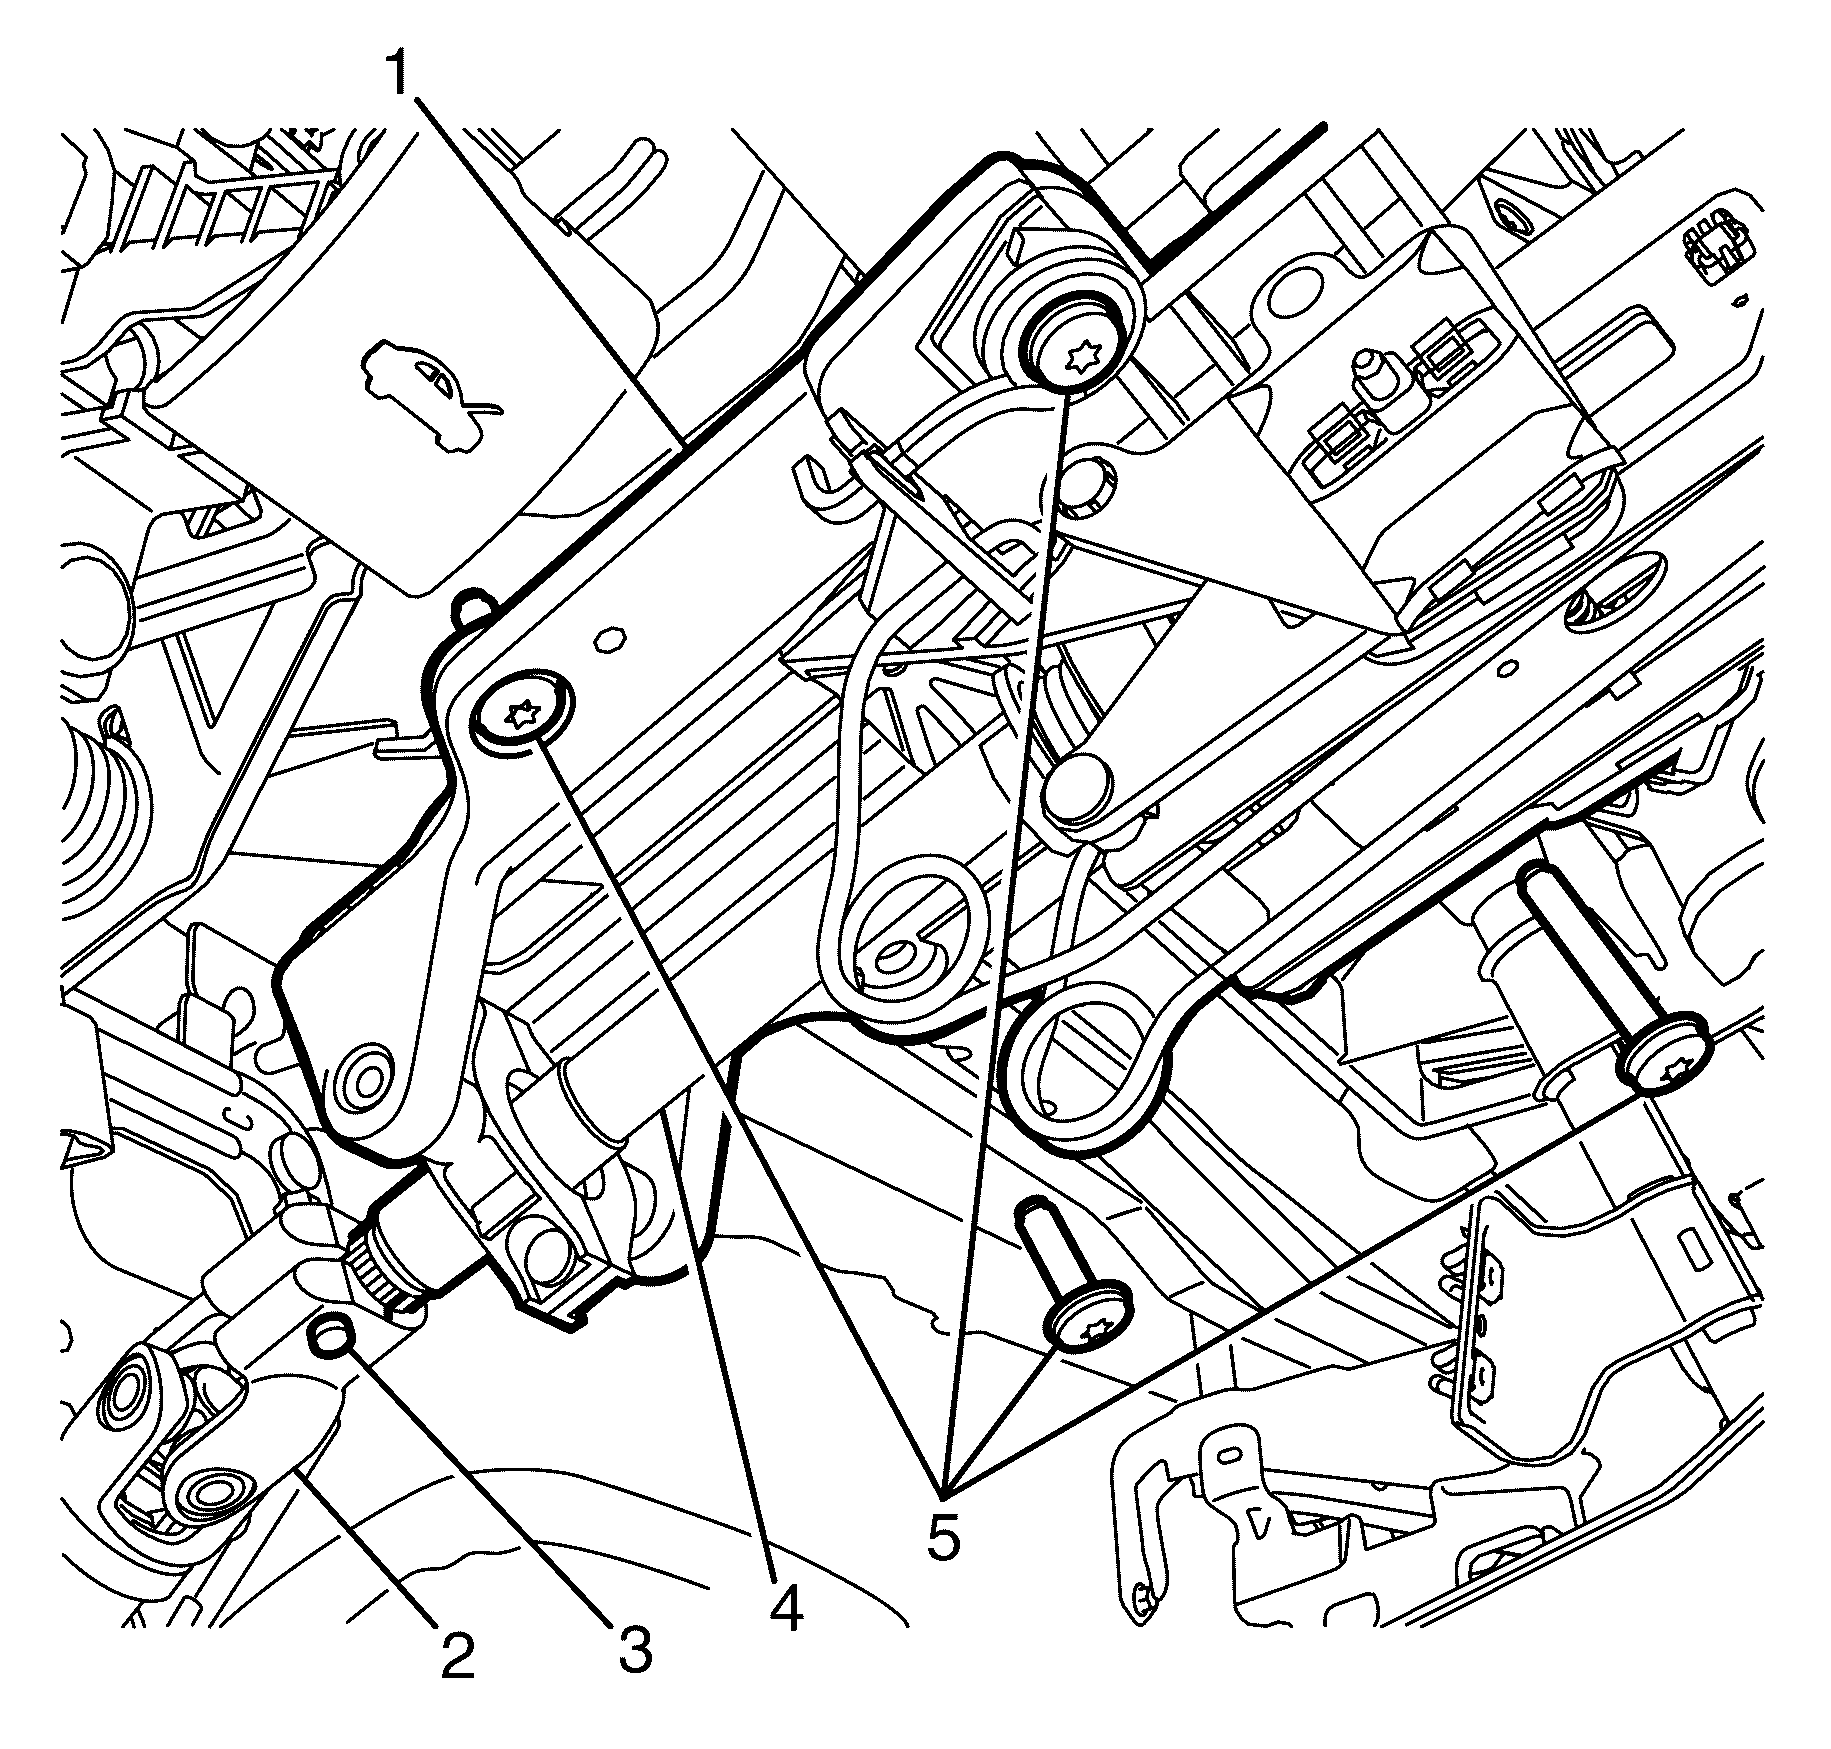
- Mark the steering column shaft (4) in relation to the intermediate steering shaft (2).
- Remove the steering column shaft to intermediate steering shaft retaining bolt (3).
- Disconnect the steering column shaft (4) from the intermediate steering shaft (2).
- Remove the steering column assembly to body retaining bolts (5).
- Remove the steering column assembly (1).
Caution: Refer to SIR Caution in the Preface section.

Important: Observing the orientation of the steering column shaft (4) with reference to the intermediate steering shaft (2) will minimise the potential of incorrect steering column assembly alignment.
Important: Secure the steering wheel to prevent rotation otherwise damage to the SIR coil will occur.
Important: Bolts with micro-encapsulated thread sealant must be discarded after removal.
Discard the bolt.
Important: The steering column assembly (1) must be supported before removing the steering column assembly to body retaining bolts (5).
Important: Bolts with micro-encapsulated thread sealant must be discarded after removal.
Discard the bolts.
Installation Procedure
- Connect the steering column shaft (4) to the intermediate shaft (2).
- Install the steering column assembly (1) to the vehicle.
- Install the NEW steering column assembly to body retaining bolts (5).
- Install the NEW steering column shaft to intermediate steering shaft retaining bolt (3).
- Install the driver side floor air outlet duct Instrument Panel Outer Air Outlet Deflector Replacement - Left Side .
- Install the driver side instrument panel lower trim panel retainer. Refer to Instrument Panel Retainer Replacement .
- Install the driver side instrument panel lower left trim plate assembly. Refer to Instrument Panel Retainer Replacement .
- Install the driver side instrument panel lower trim panel assembly. Refer to Knee Bolster Replacement .
- Install the ignition switch. Refer to Ignition and Start Switch Replacement .
- Install the inflatable restraint steering wheel module coil. Refer to Inflatable Restraint Steering Wheel Module Coil Replacement .
- Install the wipers/washer switch. Refer to Windshield Wiper and Washer Switch Replacement .
- Install the turn signal switch replacement. Refer to Turn Signal Switch Replacement .
- Install the theft deterrent exciter module. Refer to Theft Deterrent Module Replacement .
- Install the steering column trim covers. Refer to Steering Column Trim Covers Replacement .
- Install the steering wheel. Refer to Steering Wheel Replacement .
- Install the inflatable restraint steering wheel module. Refer to Inflatable Restraint Steering Wheel Module Replacement .
- Enable the SIR system. Refer to SIR Disabling and Enabling .

Important: The steering column shaft (4) and intermediate shaft (2) splines must be installed in the position recorded during removal and aligned with the marks previously made.
Notice: Refer to Fastener Notice in the Preface section.
Tighten
Tighten the bolts to 22 N·m (16 lb ft).
Tighten
Tighten the bolt to 28 N·m (21 lb ft).
Steering Column Replacement RHD
Removal Procedure
- Disconnect the battery ground cable. Refer to Battery Negative Cable Disconnection and Connection .
- Disable the SIR system. Refer to SIR Disabling and Enabling .
- Remove the inflatable restraint steering wheel module. Refer to Inflatable Restraint Steering Wheel Module Replacement .
- Remove the steering wheel. Refer to Steering Wheel Replacement .
- Remove the steering column trim covers. Refer to Steering Column Trim Covers Replacement .
- Remove the theft deterrent exciter module. Refer to Theft Deterrent Module Replacement .
- Remove the turn signal switch. Refer to Turn Signal Switch Replacement .
- Remove the wipers/washer switch. Refer to Windshield Wiper and Washer Switch Replacement .
- Remove the inflatable restraint steering wheel module coil. Refer to Inflatable Restraint Steering Wheel Module Coil Replacement .
- Remove the ignition switch. Refer to Ignition and Start Switch Replacement .
- Remove the driver side instrument panel lower trim panel assembly. Refer to Knee Bolster Replacement .
- Remove the driver side instrument panel lower right trim plate assembly. Refer to Instrument Panel Outer Trim Cover Replacement .
- Remove the driver side instrument panel lower trim panel retainer. Refer to Instrument Panel Retainer Replacement .
- Remove the driver side floor air outlet duct. Refer to Instrument Panel Outer Air Outlet Deflector Replacement - Right Side .
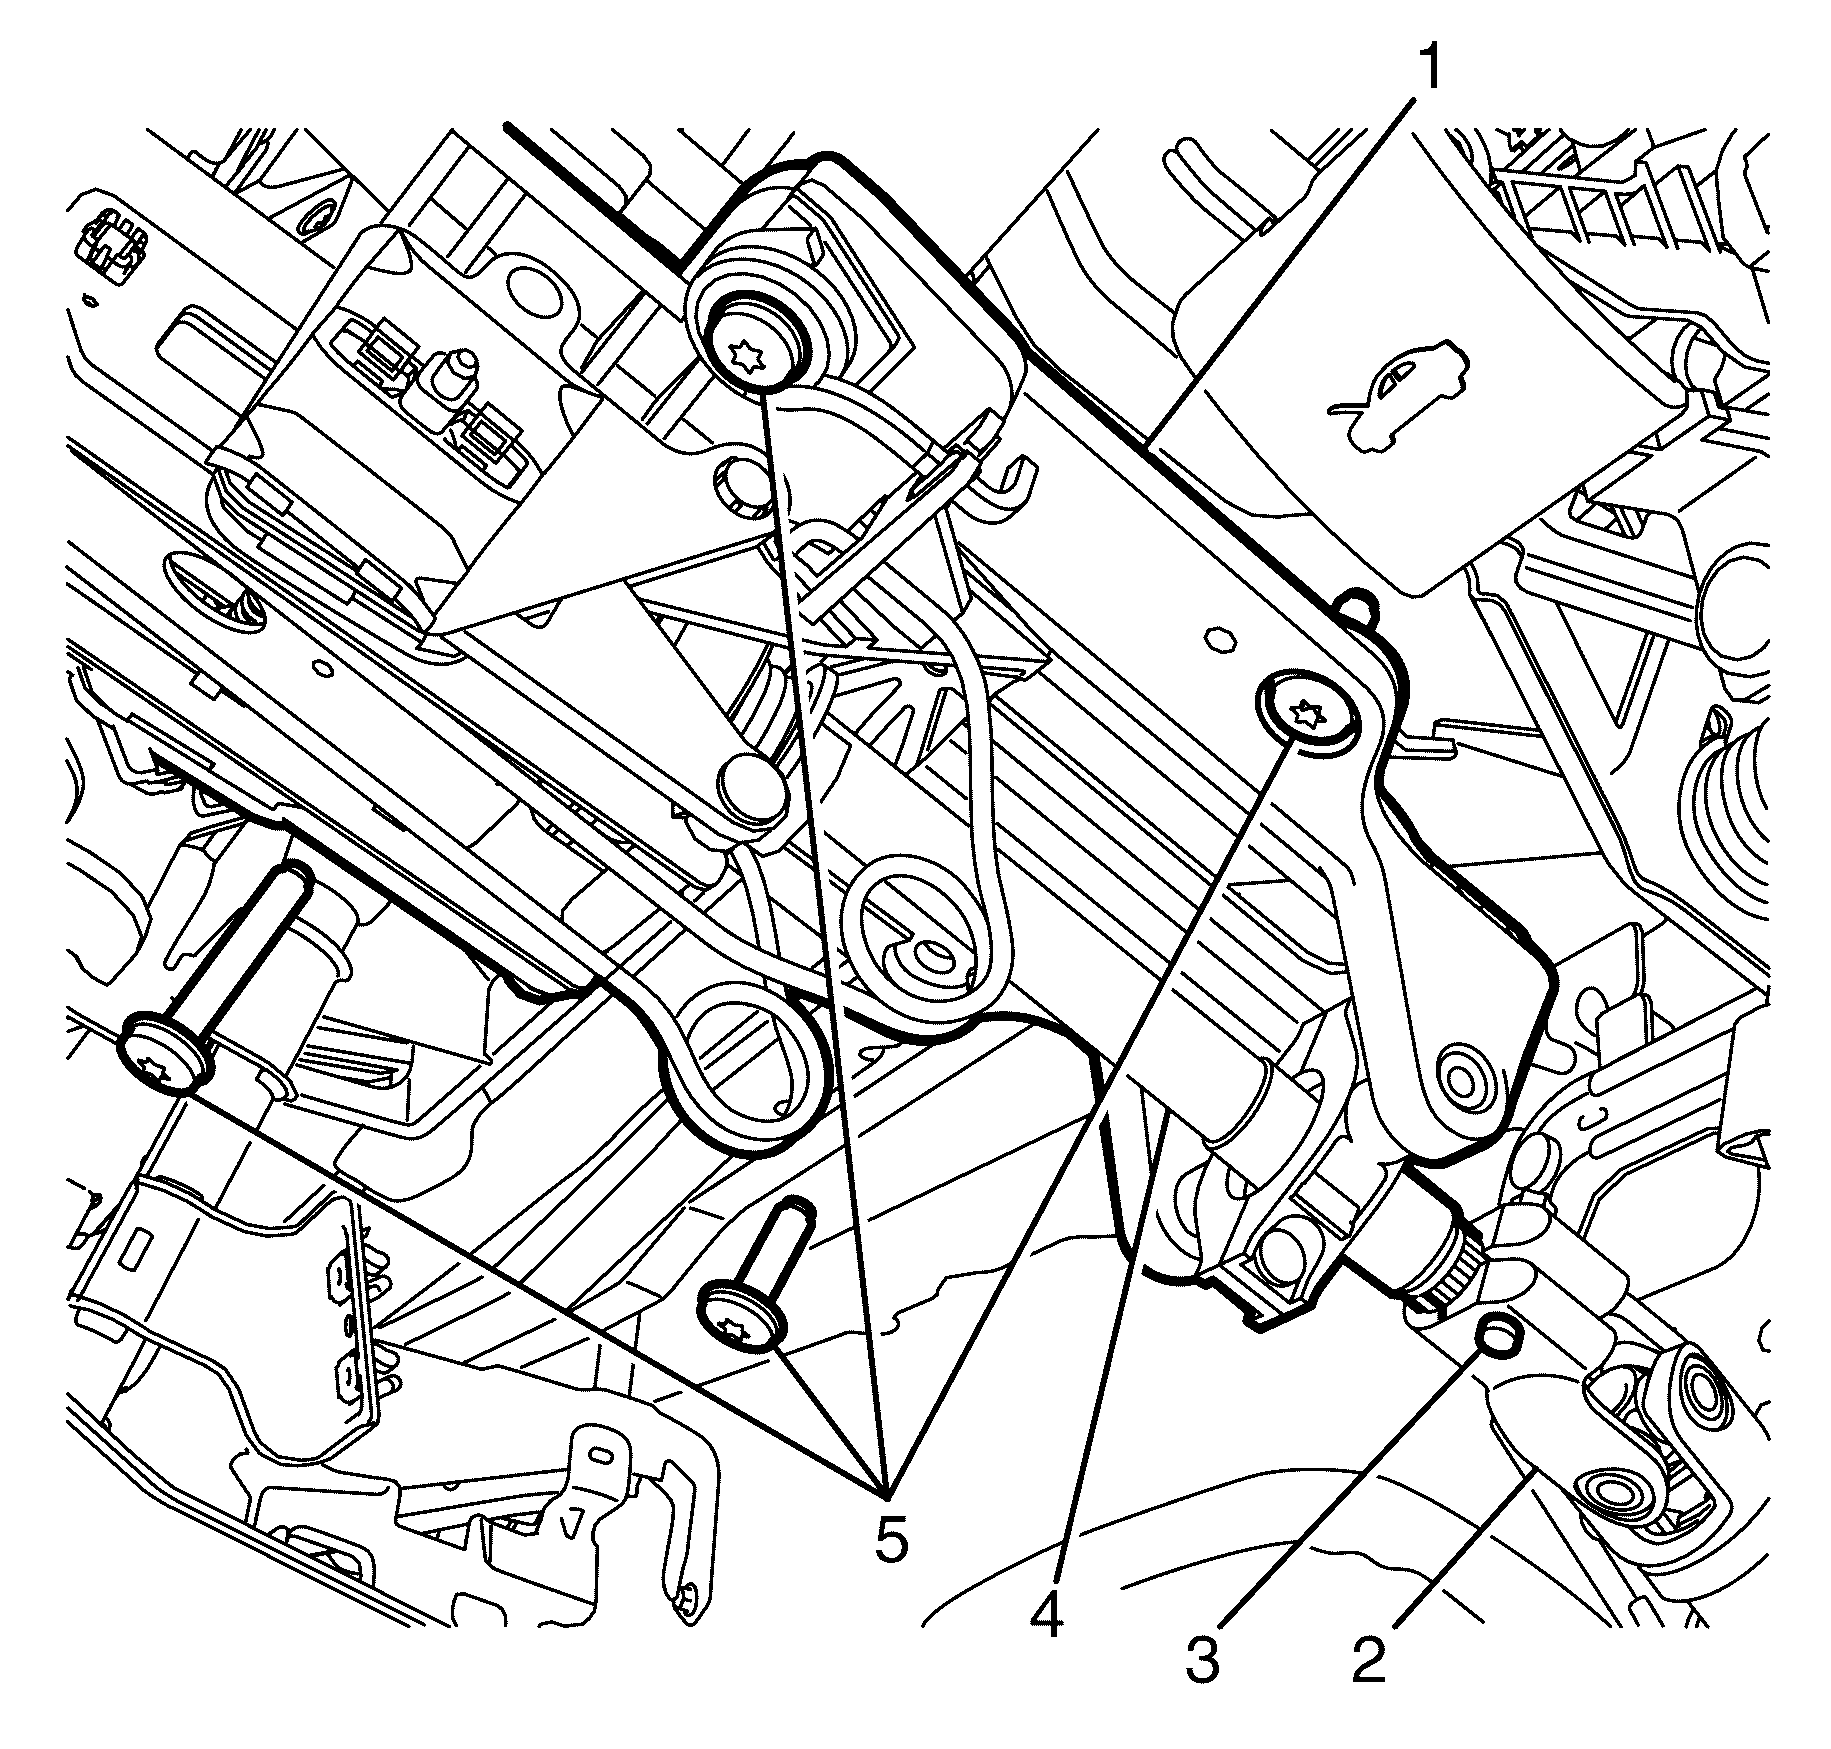
- Mark the steering column shaft (4) in relation to the intermediate steering shaft (2).
- Remove the steering column shaft to intermediate steering shaft retaining bolt (3).
- Disconnect the steering column shaft (4) from the intermediate steering shaft (2).
- Remove the steering column assembly to body retaining bolts (5).
- Remove the steering column assembly (1).
Caution: Refer to SIR Caution in the Preface section.

Important: Observing the orientation of the steering column shaft (4) with reference to the intermediate steering shaft (2) will minimise the potential of incorrect steering column assembly alignment.
Important: Secure the steering wheel to prevent rotation otherwise damage to the SIR coil will occur.
Important: Bolts with micro-encapsulated thread sealant must be discarded after removal.
Discard the bolt.
Important: The steering column assembly (1) must be supported before removing the steering column assembly to body retaining bolts (5).
Important: Bolts with micro-encapsulated thread sealant must be discarded after removal.
Discard the bolts.
Installation Procedure
- Connect the steering column shaft (4) to the intermediate shaft (2).
- Install the steering column assembly (1) to the vehicle.
- Install the NEW steering column assembly to body retaining bolts (5).
- Install the NEW steering column shaft to intermediate steering shaft retaining bolt (3).
- Install the driver side floor air outlet duct Instrument Panel Outer Air Outlet Deflector Replacement - Right Side .
- Install the driver side instrument panel lower trim panel retainer. Refer to Instrument Panel Retainer Replacement .
- Install the driver side instrument panel lower right trim plate assembly. Refer to Instrument Panel Outer Trim Cover Replacement .
- Install the driver side instrument panel lower trim panel assembly. Refer to Knee Bolster Replacement .
- Install the ignition switch. Refer to Ignition and Start Switch Replacement .
- Install the inflatable restraint steering wheel module coil. Refer to Inflatable Restraint Steering Wheel Module Coil Replacement .
- Install the wipers/washer switch. Refer to Windshield Wiper and Washer Switch Replacement .
- Install the turn signal switch replacement. Refer to Turn Signal Switch Replacement .
- Install the theft deterrent exciter module. Refer to Theft Deterrent Module Replacement .
- Install the steering column trim covers. Refer to Steering Column Trim Covers Replacement .
- Install the steering wheel. Refer to Steering Wheel Replacement .
- Install the inflatable restraint steering wheel module. Refer to Inflatable Restraint Steering Wheel Module Replacement .
- Enable the SIR system. Refer to SIR Disabling and Enabling .

Important: The steering column shaft (4) and intermediate shaft (2) splines must be installed in the position recorded during removal and aligned with the marks previously made.
Notice: Refer to Fastener Notice in the Preface section.
Tighten
Tighten the bolts to 22 N·m (16 lb ft).
Tighten
Tighten the bolt to 28 N·m (21 lb ft).
