Brake Caliper Inspection LWB SWB
Caution: Refer to Brake Dust Caution in the Preface section.
Caution: Refer to Brake Fluid Irritant Caution in the Preface section.
- Inspect the fluid level in the master cylinder reservoir.
| • | If the brake fluid level is midway between the maximum--fill level
and the minimum allowable level, no brake fluid needs to be removed from the master
cylinder reservoir before proceeding. |
| | Important: DO NOT completely empty the master cylinder
reservoir or remove any brake lines otherwise complete bleeding of the braking system
will be necessary.
|
| | Important: DO NOT re use the removed fluid.
|
| • | If the brake fluid level is higher than midway between the maximum--fill
level and the minimum allowable level, syphon the brake fluid to the midway point
using a hand vacuum pump before proceeding. |
- Remove wheels. Refer to
Tire and Wheel Removal and Installation
in Tires and Wheels.
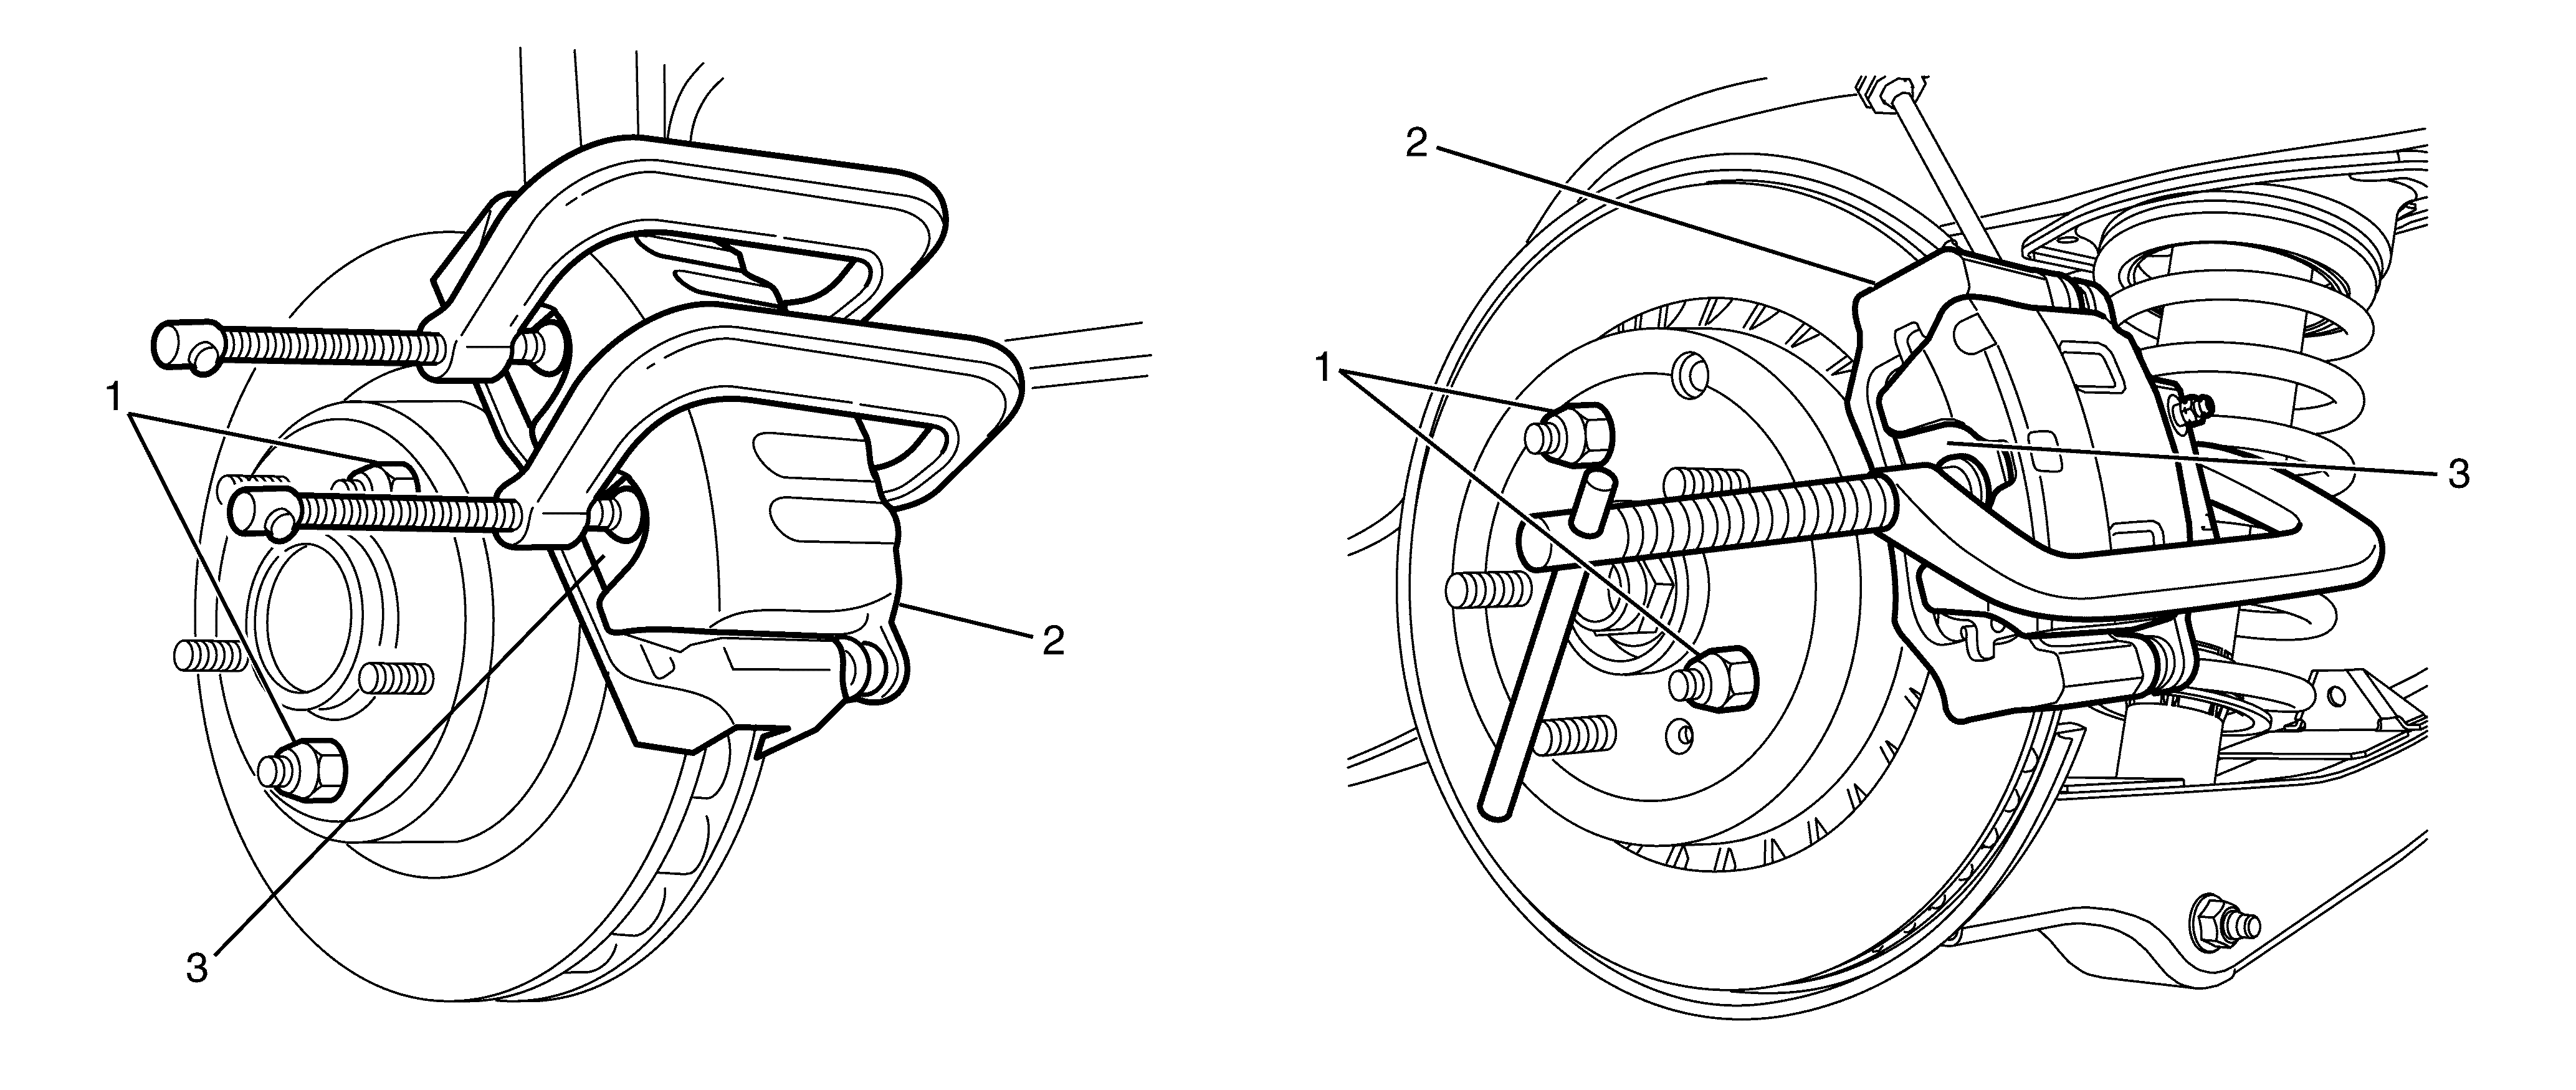
- Install 2 wheel nuts (1) in reverse to opposite wheel studs to retain
the brake disc to the hub.
Important: Position the ends of the G-clamps against
the rear of the brake caliper (2) and against the outboard brake pad (3).
- Install large G-clamps over the body of the brake caliper (3).
Important: The movement of a brake caliper piston into
a brake caliper bore should be smooth and even. If a brake caliper piston is frozen
or difficult to bottom out, the brake caliper requires overhaul or replacement.
- Inspect for smooth and complete travel of the brake caliper piston/s, into the
brake caliper bore/s:
Tighten the G-clamp/s until the brake caliper piston/s bottom out in the brake
caliper bore/s.
- Remove the G-clamp/s from the brake caliper (2).
- Grasp the brake caliper (2) and try to move the brake caliper (2)
up or down.
The brake caliper (2) should not have too much freeplay.
- Grasp the brake caliper (2) and try to move the brake caliper in
and out.
The brake caliper (2) should slide smoothly with minimal
force.
Important: DO NOT disconnect the hydraulic brake flexible
hose from the brake caliper.
- Remove the brake caliper. Refer to
Front Brake Rotor Replacement
or
Rear Brake Rotor Replacement
in Disc Brakes.
Notice: Support the brake caliper with heavy mechanic wire, or equivalent,
whenever it is separated from its mount and the hydraulic flexible brake hose is still connected. Failure to support the caliper in this manner will cause the flexible brake hose to bear the weight of the caliper, which may cause damage to the brake hose and
in turn may cause a brake fluid leak.
- Inspect the brake caliper to knuckle retaining bolts for the following:
| • | Bent or damaged brake caliper to knuckle retaining bolts. |
| • | Seizing in the knuckle. |
- If any of the conditions listed are found, replace the brake caliper to
knuckle retaining bolts.
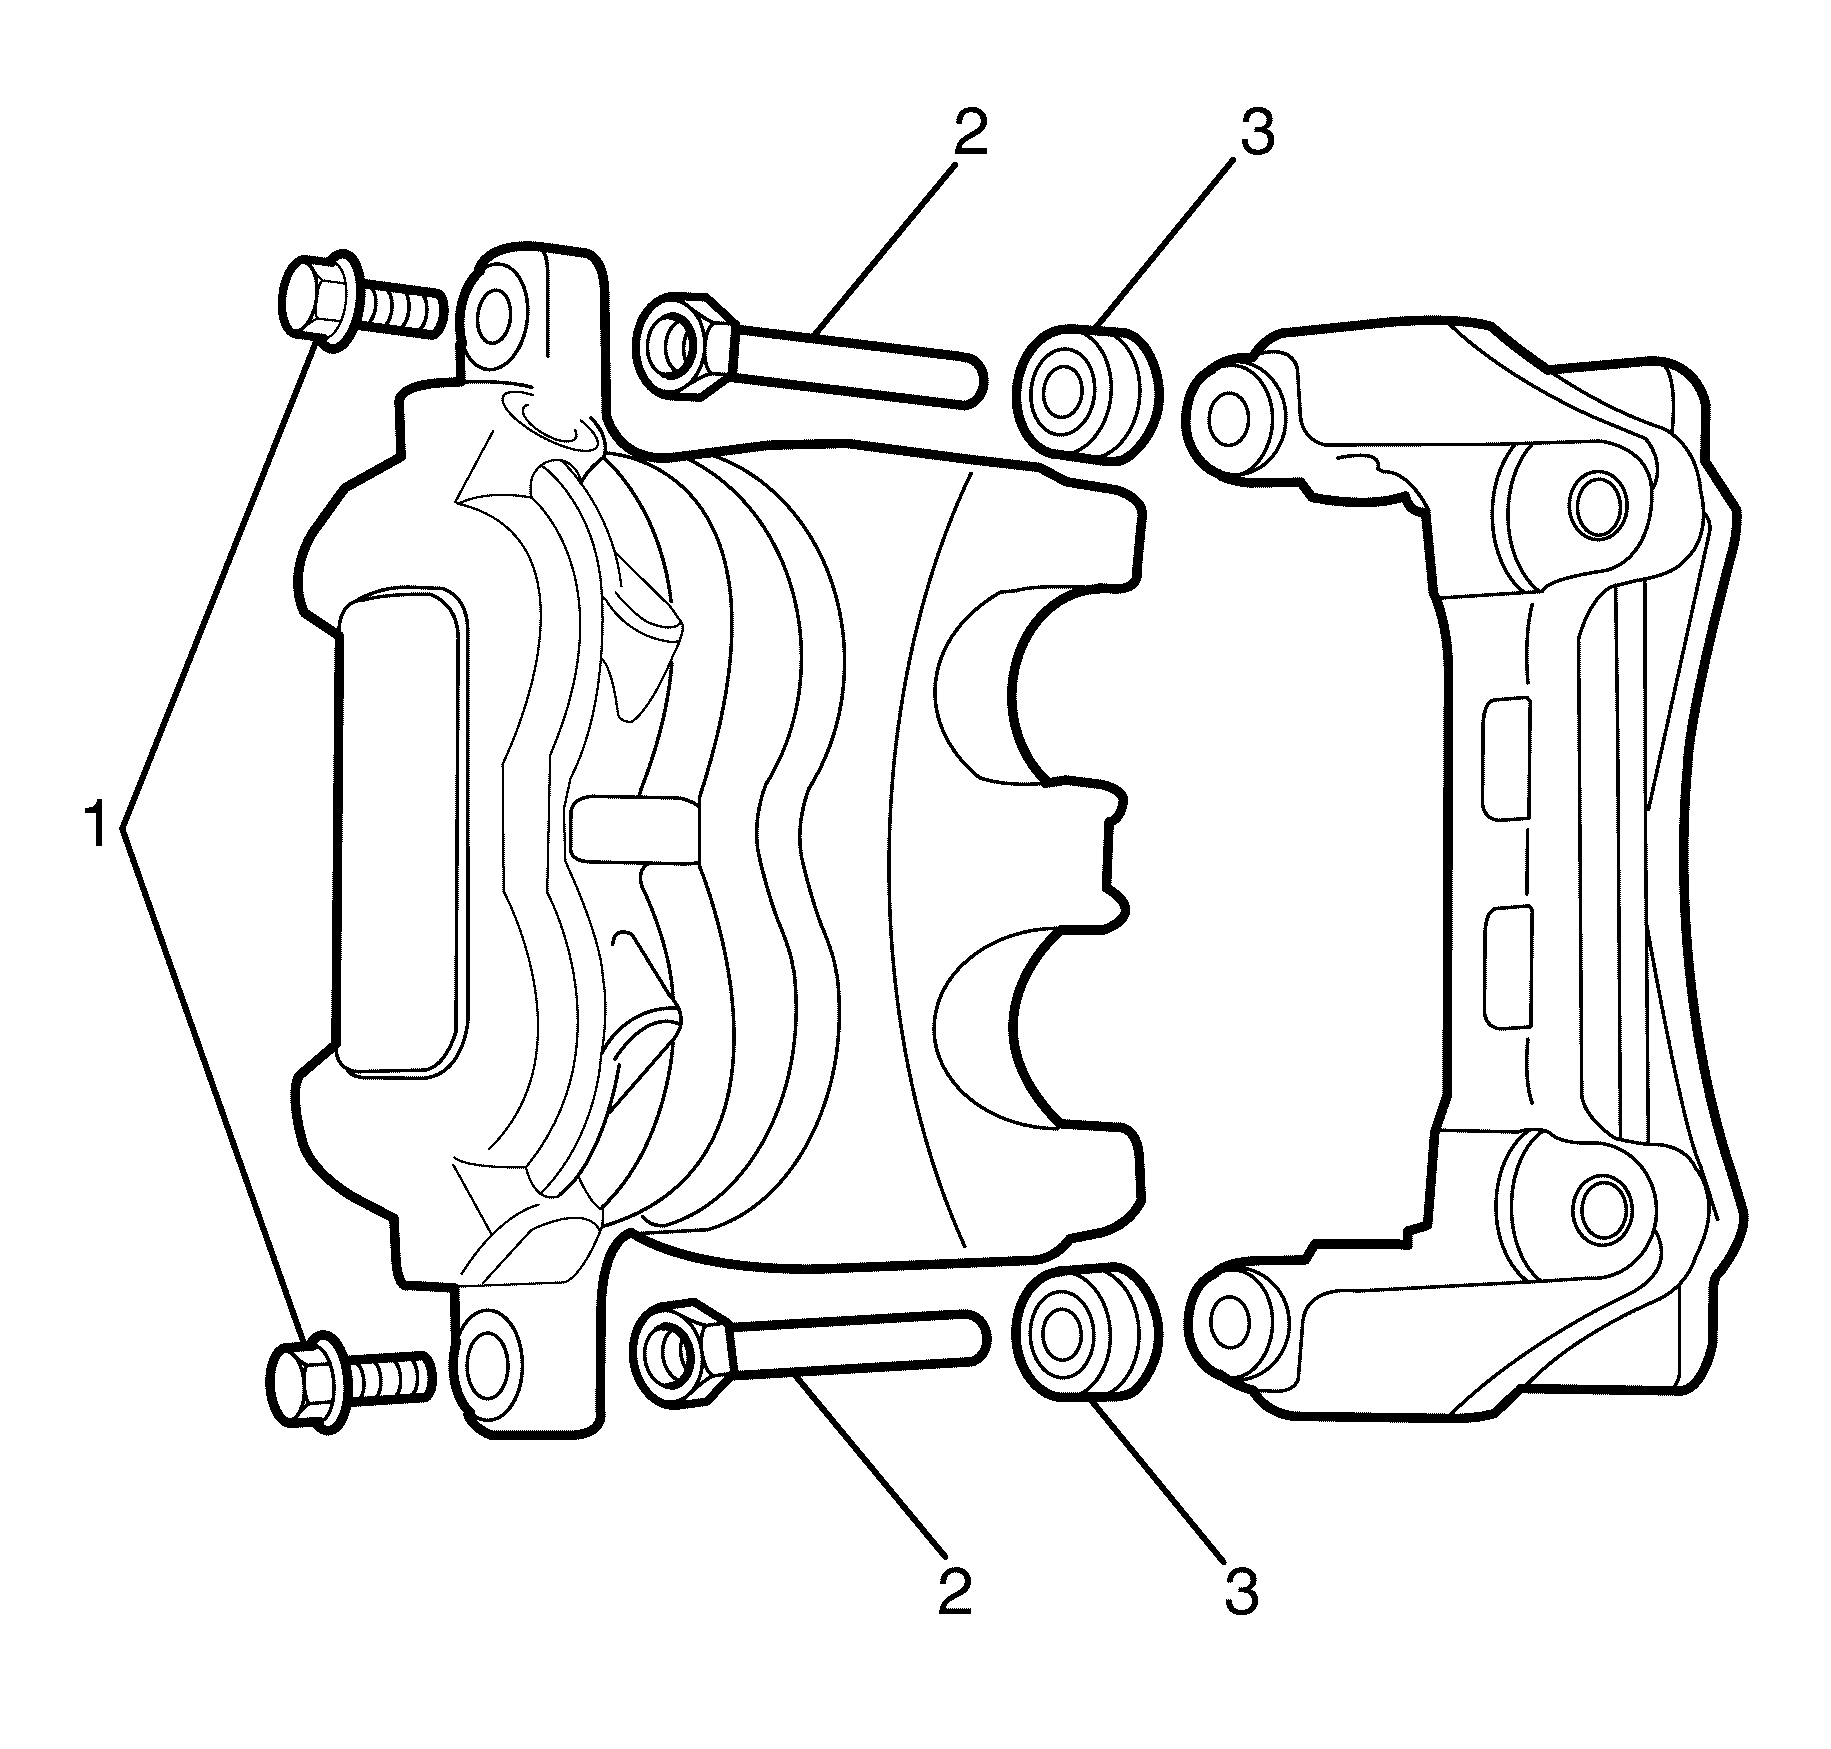
- Remove the brake caliper lower guide pin
retaining bolts (1).
- Inspect the brake caliper slide pins (2) gently pull the brake
caliper slide pins (2) outward without disengaging the slides from the boot),
then push inward, and inspect for the following:
| • | Bent or damaged brake caliper guide pin retaining bolts (1). |
| • | Bent or damaged brake caliper guide pins (2). |
- If any of the conditions listed are found, replace the brake caliper guide
pins (2).
- Inspect the brake caliper boots (3) for the following:
| • | Missing brake caliper boots (3). |
| • | Cracked or torn brake caliper boots (3). |
- If any of the conditions listed are found, replace the brake caliper boots (3).
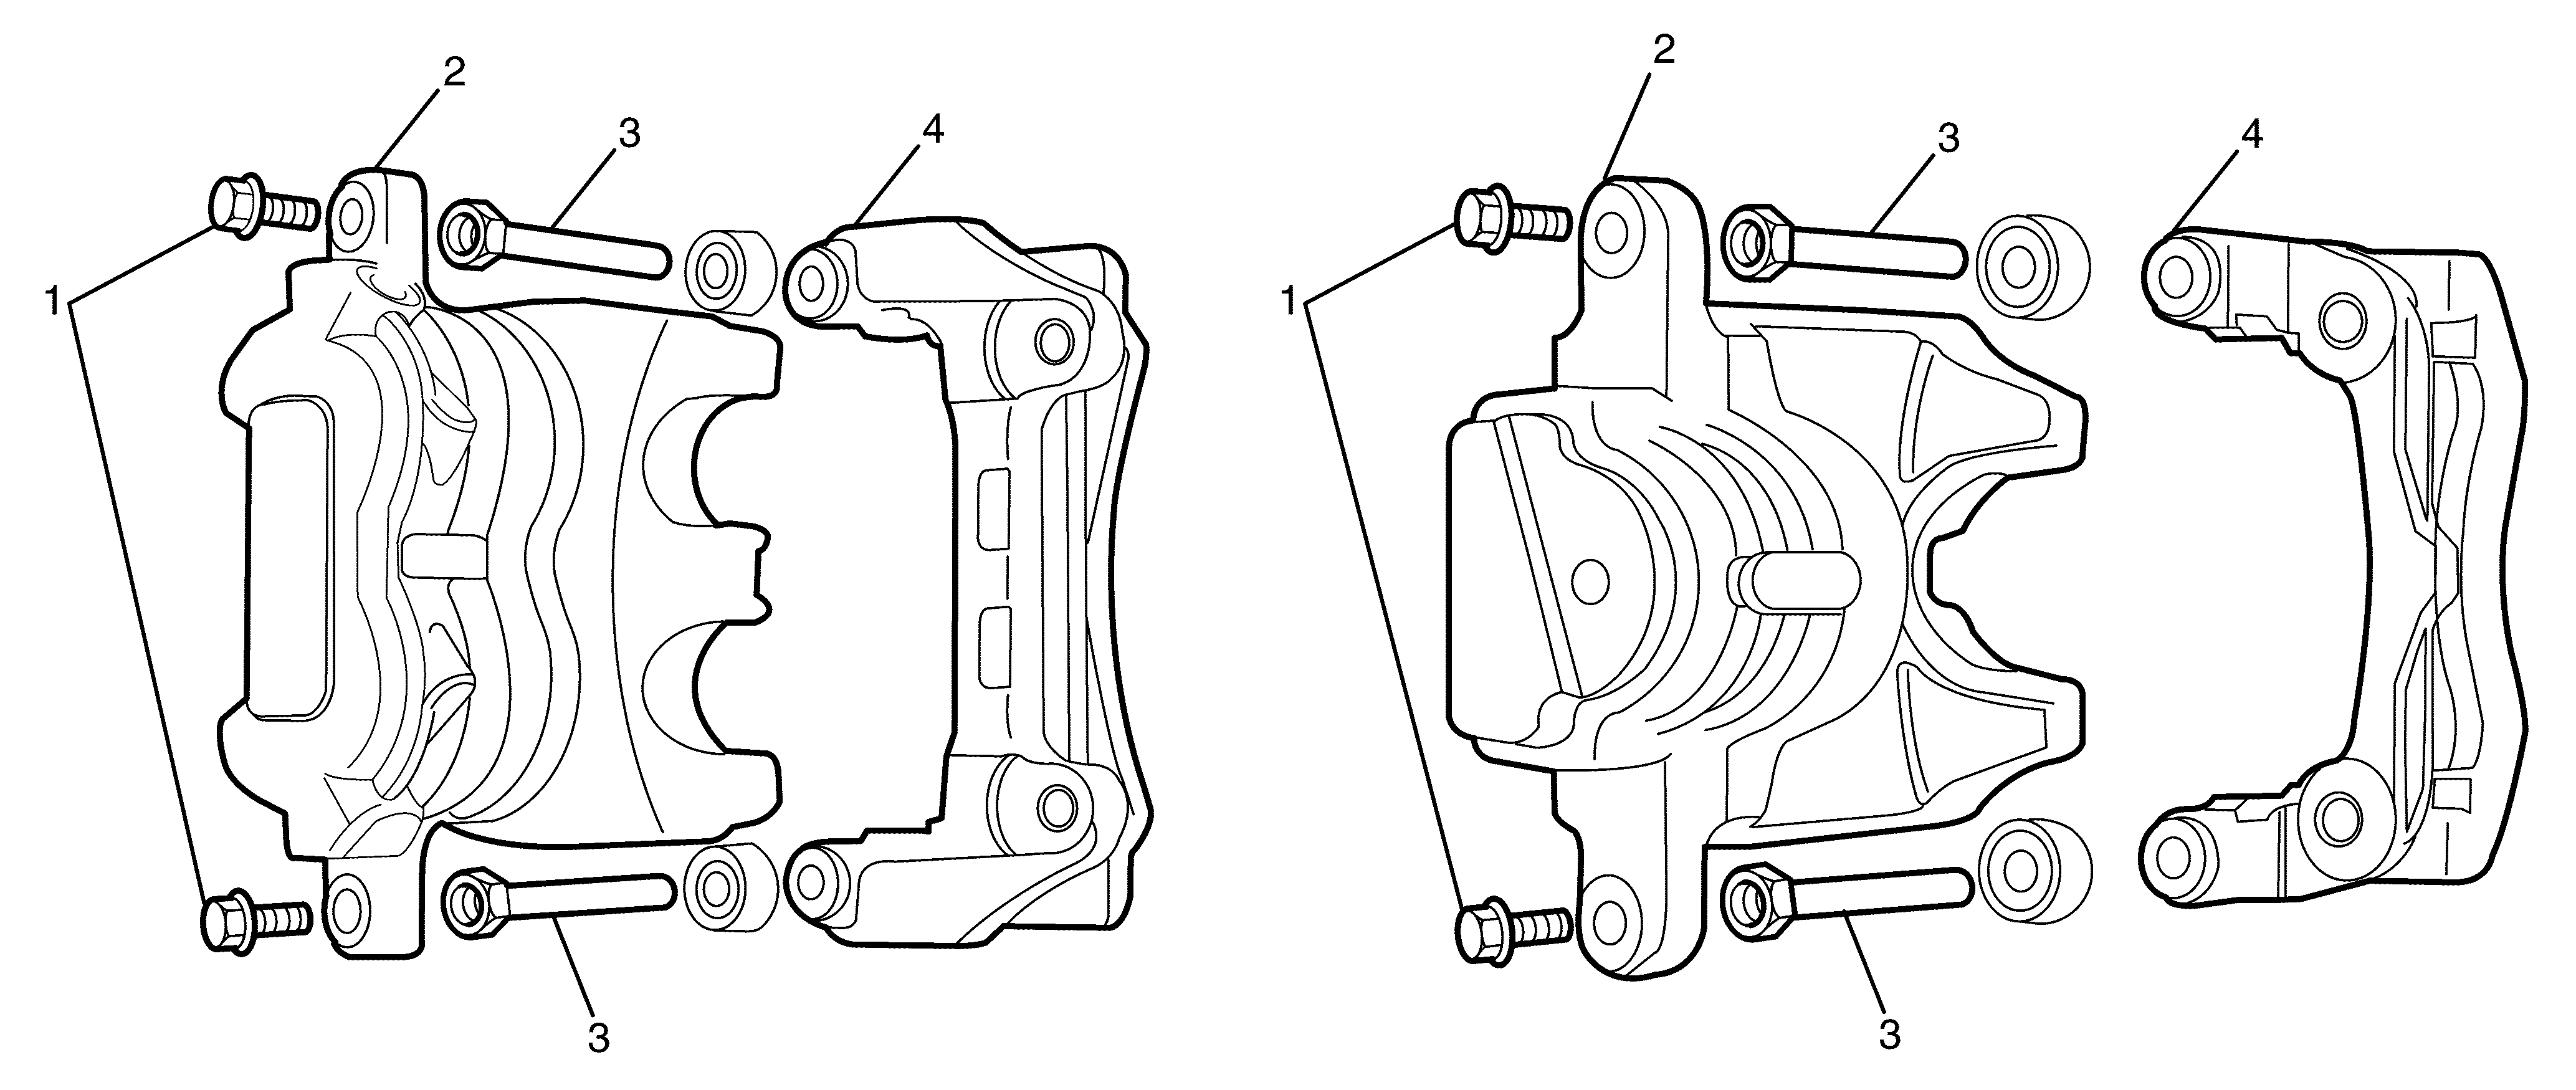
- Inspect the brake caliper (2) and brake caliper anchor plate (4)
for the following:
| • | Bent or damaged brake caliper anchor plate (4). |
| • | Too much brake caliper guide pin (3) play in the brake caliper
anchor plate (4). |
| • | Too much brake caliper guide bolt (1) play in the brake caliper (2). |
- If any of the conditions listed are found, replace the brake caliper (2).
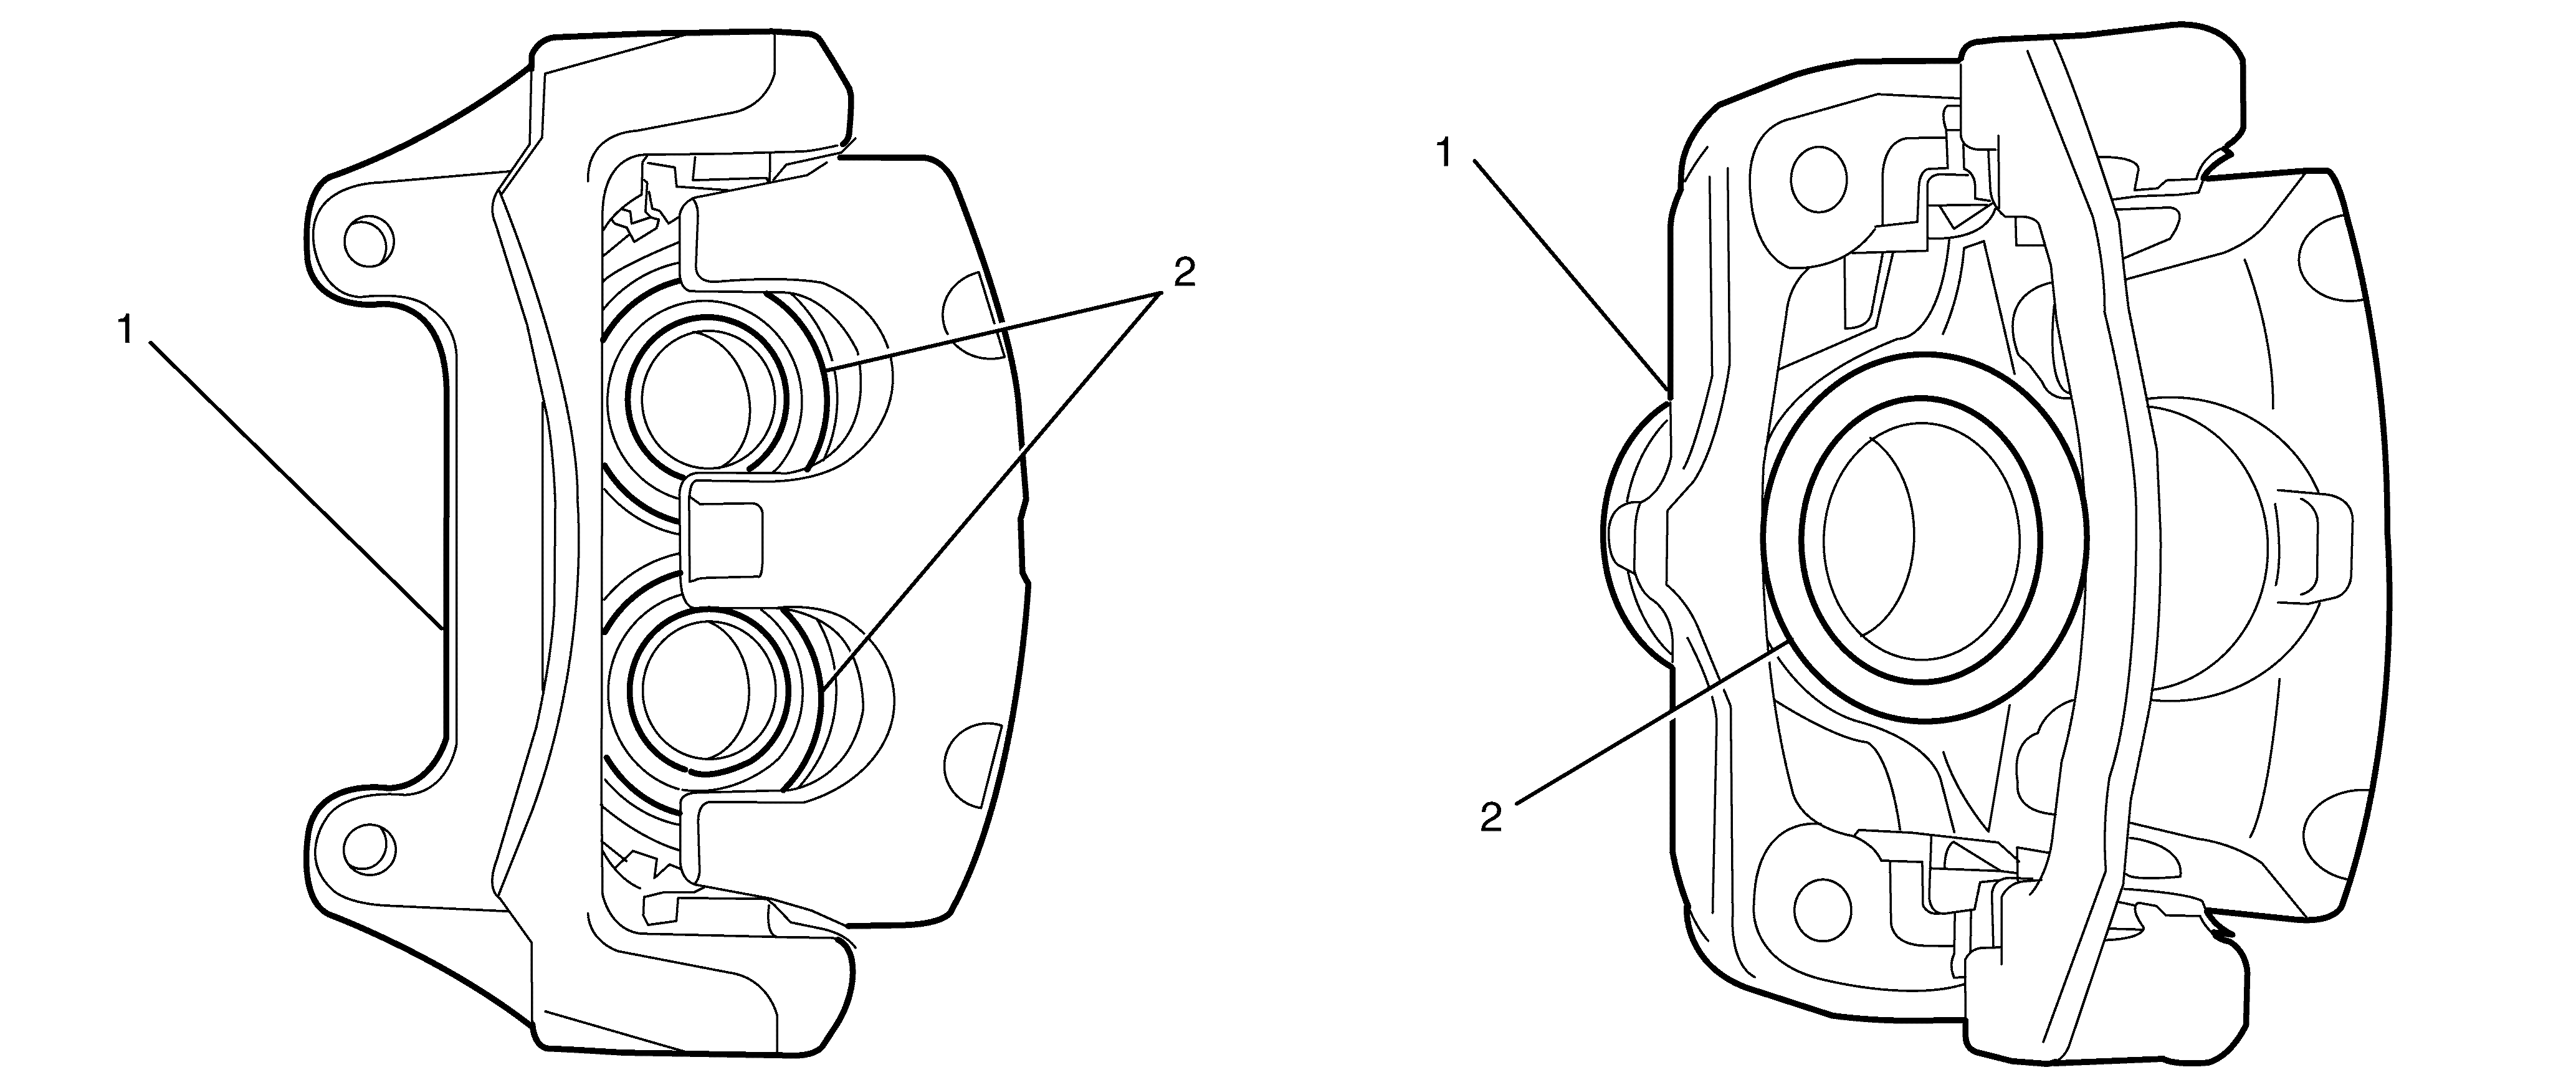
- Inspect the brake caliper piston dust boot seals (2) for cracks, tears,
cuts, deterioration and/or incorrect seating in the brake caliper (1). If any
of these conditions are present, the brake caliper requires overhaul or replacement.
- Inspect for brake fluid leakage around the brake caliper piston dust boot
seals (2) and on the brake pads. If there is any evidence of brake fluid leakage,
overhaul or replace the brake caliper (1).
Brake Caliper Inspection Rear CSV HSV VXR8
Type B
Caution: Refer to Safety Glasses Caution in the Preface section.
Caution: Refer to Vehicle Lifting Caution in the Preface section.
Caution: Refer to Brake Dust Caution in the Preface section.
Caution: Refer to Brake Fluid Irritant Caution in the Preface section.
- Inspect the fluid level in the master cylinder reservoir.
- Raise and support the vehicle. Refer to
Lifting and Jacking the Vehicle in
General Information.
| • | If the brake fluid level is midway between the maximum fill level and
the minimum allowable level, no brake fluid needs to be removed from the master cylinder
reservoir before proceeding. |
| | Important: DO NOT completely empty the master cylinder
reservoir or remove any brake lines otherwise complete bleeding of the braking system
will be necessary.
|
| | Important: DO NOT reuse the removed fluid.
|
| • | If the brake fluid level is higher than midway between the maximum fill level
and the minimum allowable level, syphon the brake fluid to the midway point using
a hand vacuum pump before proceeding. |
- Remove the rear wheels. Refer to
Tire and Wheel Removal and Installation in Tires
and Wheels.
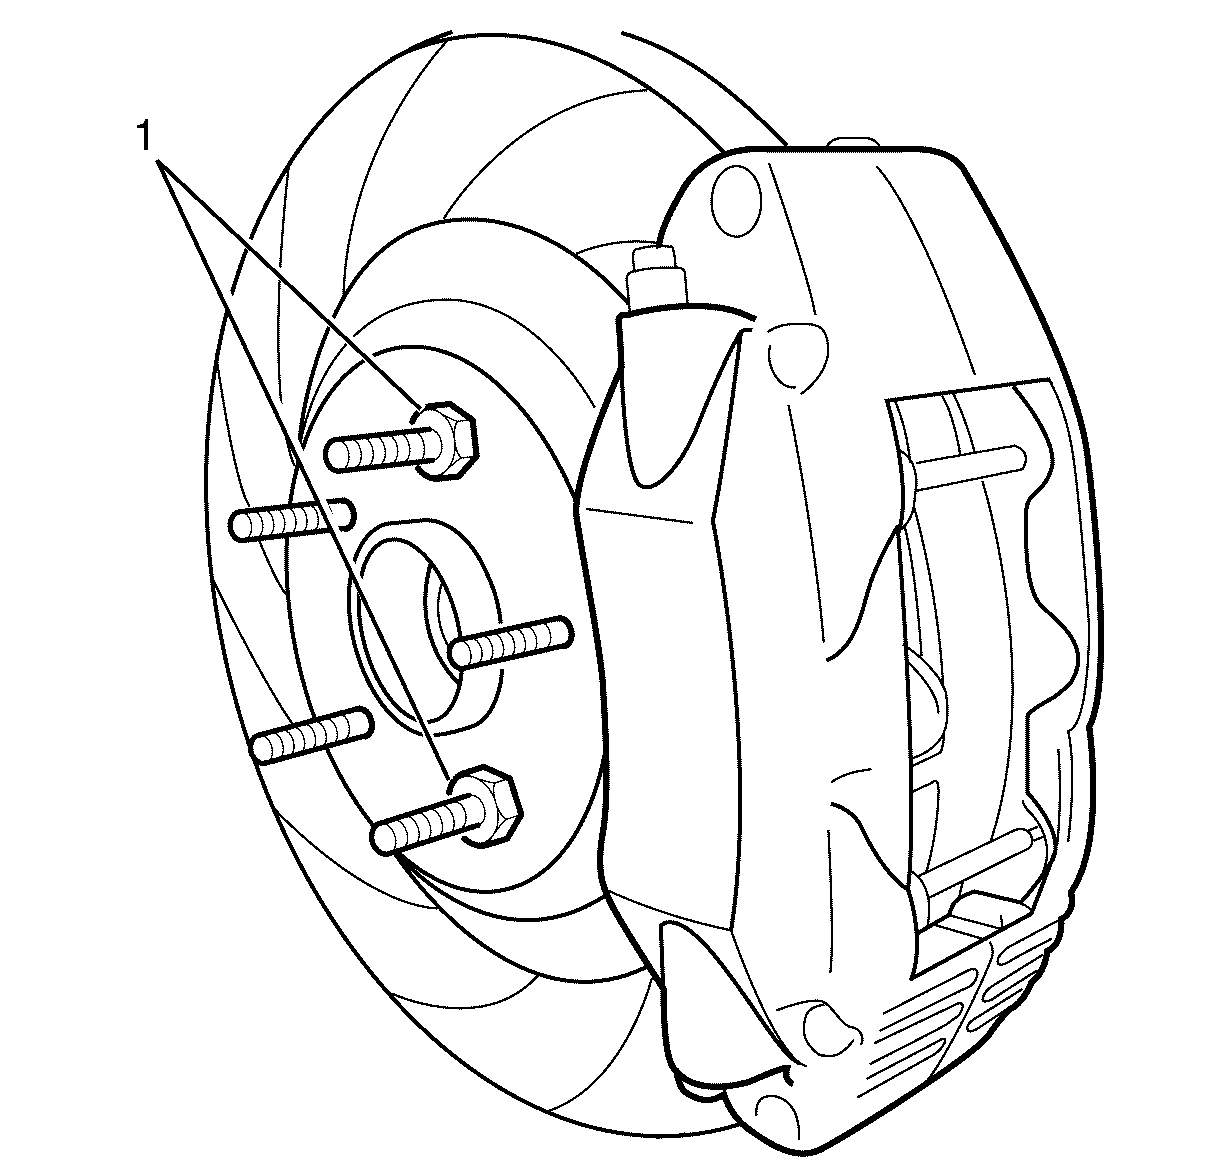
- Install 2 wheel nuts (1), in reverse, to opposite
wheel studs to retain the brake rotor to the wheel hub.
Important: A Type B Brake Caliper does not require removal
from the vehicle for Brake Caliper Inspection.
- Inspect the brake caliper to knuckle retaining bolts for corrosion.
- If corrosion is found, replace the brake caliper to knuckle retaining
bolts.
- Inspect the brake pad retainer pins and anti-rattle clip for the following:
- If any of the conditions listed are found, replace the affected component.
- Inspect the brake caliper for the following:
| • | Seizing caliper pistons. |
| • | Torn, Cracked, Incorrectly Seated or Deteriorating dust boot seals. |
| • | Brake Fluid Leakage around the dust boot seals and on the brake pads. |
- If any of the conditions listed are found, the brake caliper requires
overhaul or replacement.
- Remove the two wheel nuts retaining the brake rotor to the wheel hub.
- Install the rear wheels. Refer to
Tire and Wheel Removal and Installation in Tires
and Wheels.
- Lower the vehicle to the ground. Refer to
Lifting and Jacking the Vehicle in
General Information.
Brake Caliper Inspection Front CSV HSV VXR8
Type B
Caution: Refer to Safety Glasses Caution in the Preface section.
Caution: Refer to Vehicle Lifting Caution in the Preface section.
Caution: Refer to Brake Dust Caution in the Preface section.
Caution: Refer to Brake Fluid Irritant Caution in the Preface section.
- Inspect the fluid level in the master cylinder reservoir.
- Raise and support the vehicle. Refer to
Lifting and Jacking the Vehicle.
| • | If the brake fluid level is midway between the maximum fill level and
the minimum allowable level, no brake fluid needs to be removed from the master cylinder
reservoir before proceeding. |
| | Important: DO NOT completely empty the master cylinder
reservoir or remove any brake lines, otherwise complete bleeding of the braking system
will be necessary.
|
| | Important: DO NOT reuse the removed fluid.
|
| • | If the brake fluid level is higher than midway between the maximum fill level
and the minimum allowable level, syphon the brake fluid to the midway point using
a hand vacuum pump before proceeding. |
- Remove front wheels. Refer to
Tire and Wheel Removal and Installation.

- Install 2 wheel nuts (1), in reverse, to opposite
wheel studs to retain the brake rotor to the wheel hub.
Important: A Type B Brake Caliper does not require removal
from the vehicle for Brake Caliper Inspection.
- Inspect the brake caliper to knuckle retaining bolts for corrosion.
- If corrosion is found, replace the brake caliper to knuckle retaining
bolts.
- Inspect the brake pad retainer pins and anti-rattle clip for the following:
- If any of the conditions listed are found, replace the affected component.
- Inspect the brake caliper for the following :
| • | Seizing caliper pistons. |
| • | Torn, Cracked, Incorrectly Seated or Deteriorating dust boot seals. |
| • | Brake Fluid Leakage around the dust boot seals and on the brake pads. |
- Remove the two wheel nuts retaining the brake rotor to the wheel hub.
- If any of the conditions listed are found, the brake caliper requires
overhaul or replacement.
- Install the front wheels. Refer to
Tire and Wheel Removal and Installation.
- Lower the vehicle to the ground. Refer to
Lifting and Jacking the Vehicle.


