Fuel Leak Diagnosis Inside of Engine
Important:
| • | If you were directed here from Fuel Return System Diagnosis, go directly to step 16. This will be performed with the same components disconnected as stated in that test. |
| • | If you were directed here from the Engine Cranks but Does Not Run diagnostic, go directly to step 2. |
- Test the high pressure fuel system performance.
| 1.1. | Start and idle the engine. |
| 1.2. | Command the fuel pressure to 160 MPa with a scan tool. |
| 1.3. | Observe the Actual Fuel Rail Pressure parameter with a scan tool. |
| - | If the Actual Fuel Rail Pressure parameter is within 2 MPa of commanded pressure, continue this diagnostic. |
- Remove the air cleaner layer. Refer to
Air Cleaner Replacement
.
- Remove the air intake pipe. Refer to
Air Intake Pipe Replacement
.
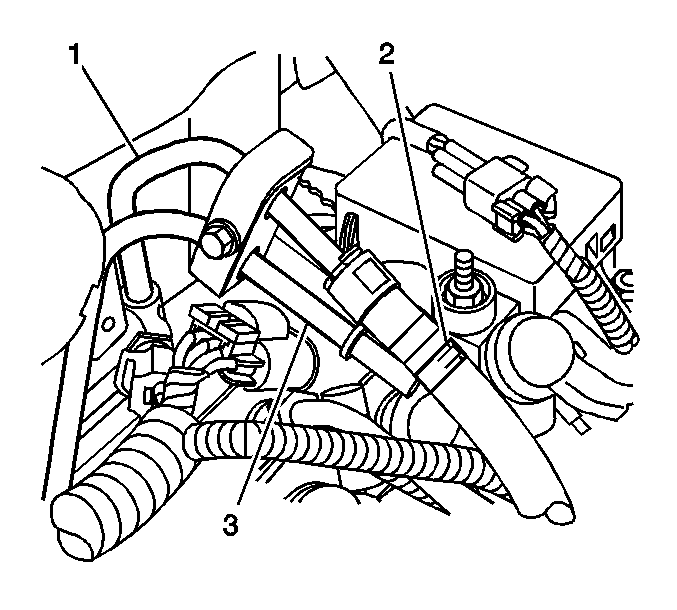
- Remove the fuel return rubber hose of the fuel injection pump from the junction block (2). Cap the fitting on the block with a 3/8 inch rubber
cap (1) to prevent fuel leakage.
- Disconnect the fuel return line (1) at the engine. Refer to
Metal Collar Quick Connect Fitting Service
.
- Install the
J 23738-A
Vacuum Pump at the fuel return pipe on the engine.
- Apply 15 inches Hg of vacuum to the pipe.
| • | If the vacuum holds, reinstall the disconnected components and go to step 23. |
| • | If the vacuum does not hold, go to step 8. |
- Remove the generator. Refer to
Generator Replacement
in Engine Electrical.
- Disconnect the fuel return line (1) from the right front cylinder head.
- Install a black hose (1) from the
J 45873
on to each cylinder head return port.
- Install the
J 23738-A
onto each black hose and apply 15 inches Hg of vacuum to each port and record if each side holds vacuum.
- Perform the lower valve cover removal procedure for the bank(s) that did not hold vacuum. Refer to
Valve Rocker Arm Cover Replacement - Lower Left Side
and
Valve Rocker Arm Cover Replacement - Lower Right Side
in Engine Mechanical - 6.6L. Then go to step 13.
Notice: Refer to Fastener Notice in the Preface section.
Important: When the fuel injector pressure lines are removed, debris will fall into the fuel injector inlet fitting. Vacuum the debris from the inlet fitting of the fuel injector before reconnecting fuel lines to the fuel injectors.
- Connect the fuel return lines on both cylinder heads.
Tighten
Tighten the bolts to 15 N·m (11 lb ft).
- Install the
J 42964-1
3/8 Fuel Pipe Shut Off Valve (2)
to the fuel return line (1).
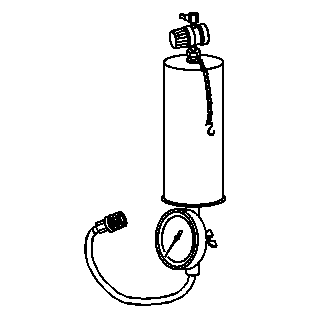
- Install the
J 35800-A
Fuel Injector Cleaner on the
J 42964-1
port closest to the fuel return line.
- Ensure that the shutoff valve is closed.
- Add 10 ounces of diesel fuel and 4 ounces of oil dye to the
J 35800-A
.
- Connect the shop air supply to the
J 35800-A
.
- Adjust the pressure regulator on the
J 35800-A
to 15 psi.
- Clean the fuel injectors and fuel return lines with brake cleaning solvent and let dry.
- Open the valve on the bottom of the
J 35800-A
canister.
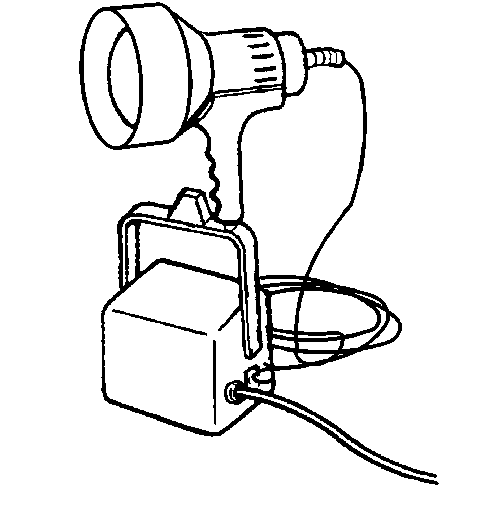
- Inspect for leaks around the fuel injectors and the spill lines with a
J 28428-E
High Intensity Black Light Kit. Then go to step 30.
- Remove both upper valve covers. Refer to
Valve Rocker Arm Cover Replacement - Upper Left Side
and
Valve Rocker Arm Cover Replacement - Upper Right Side
in Engine Mechanical -
6.6L.
- Remove the engine oil fill tube on the front engine cover. Refer to
Oil Filler Tube Replacement
in Engine Mechanical - 6.6L.
Important: When the fuel injector pressure lines are removed, debris will fall into the fuel injector inlet fitting. Vacuum the debris from the inlet fitting of the fuel injector before reconnecting fuel lines to the fuel injectors.
- Install the fuel injector feed pipes.
Tighten
Tighten the fuel feed pipes to 44 N·m (32 lb ft).
- Add 8 ounces of oil dye to the fuel tank. On dual tank systems add the dye to the front, or primary, tank. Refer to
Fuel System Description
.
Important: During this test the fuel dye may quickly dilute in the engine oil. Observe the internal fuel components for dye traces immediately after startup.
- Start the engine.
- Increase the fuel pressure to 160 MPa with a scan tool.
- Inspect for leaks around the fuel injectors and the fuel injection pump drive gear with a
J 28428-E
. Then go to step 30.
- Tighten or replace any leaking components or gaskets.
- Perform the lower valve cover installation procedures as necessary. Refer to
Valve Rocker Arm Cover Replacement - Lower Right Side
and
Valve Rocker Arm Cover Replacement - Lower Left Side
in Engine Mechanical - 6.6L.
- Retest the system for engine oil dilution by performing the following procedure:
| 32.1. | Drain the engine oil from the crankcase and refill. |
| 32.2. | Run the engine at idle for 10 minutes. |
| 32.3. | Stop the engine and wait 10 minutes, then check the oil level on the Dip Stick. This will be the initial oil level. |
| 32.4. | Run the engine at idle for 5 minutes while commanding the fuel pressure to 160 MPa with a scan tool. |
| 32.5. | Stop the engine and wait 10 minutes, then check the oil level on the Dip Stick. |
| • | If the engine oil level is not more than 3/16 inch above the initial oil level, the system is OK. |
| • | If the engine oil level is more than 3/16 inch above the initial oil level, go to step 32.F. |
| 32.6. | Run the engine at idle again for 5 minutes while commanding the fuel pressure to 160 MPa with a scan tool. |
| 32.7. | Stop the engine and wait 10 minutes, then check the oil level on the Dip Stick. |
| • | If the engine oil level is not more than 3/16 inch above the last oil level, the system is OK. |
| • | If the engine oil level is more than 3/16 inch above the last oil level, go back to step 1. |
Fuel Leak Diagnosis Outside of Engine
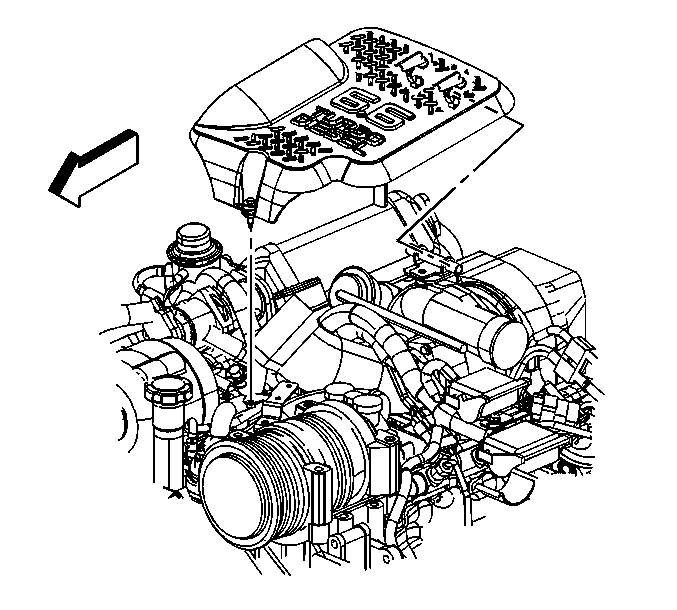
- Remove the upper intake manifold sight
shield using the following procedure:
| 1.1. | Remove the retaining bolt in the front of the shield. |
| 1.2. | Lift up on the front of the shield. |
| 1.3. | Lift the shield off the rear bracket. |
- Clean all of the fuel lines between the fuel injection pump and the fuel
injectors using brake cleaning solvent, and let dry.
- Add 8 ounces of oil dye to the fuel tank. On dual tanks add the
dye to the front, or primary, tank. Refer to
Fuel System Description
.
- Connect a scan tool to the DLC.
- Start and idle the engine for 3-5 minutes.
- Command the fuel pressure control to 160 MPa (23,206 psi)
with a scan tool.
- Inspect for fuel leaks around the fuel injection pump, junction block,
fuel rails, and fuel injector supply lines with a J 28428-E
High Intensity Black Light Kit.
Tighten or replace any
leaking lines or components. Refer to the following:
