Reverse Servo Replacement w 3.4L Engine
Removal Procedure
- Remove the air cleaner intake duct. Refer to Air Cleaner Inlet Duct Replacement in Engine Controls - 3.4L.
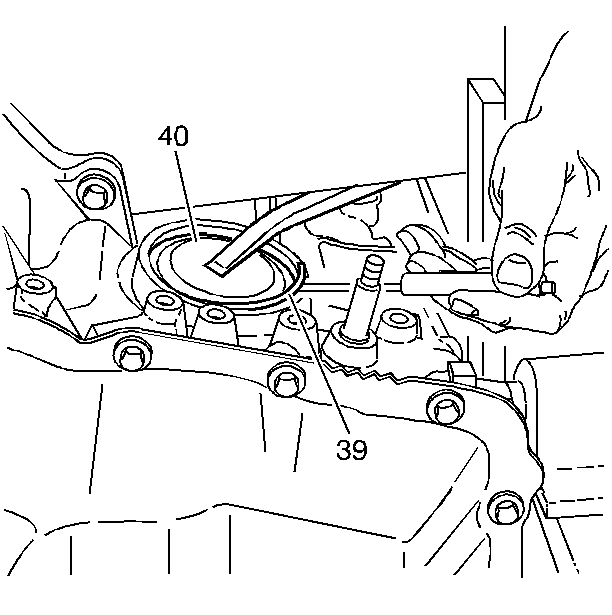
- Depress the reverse servo cover (40).
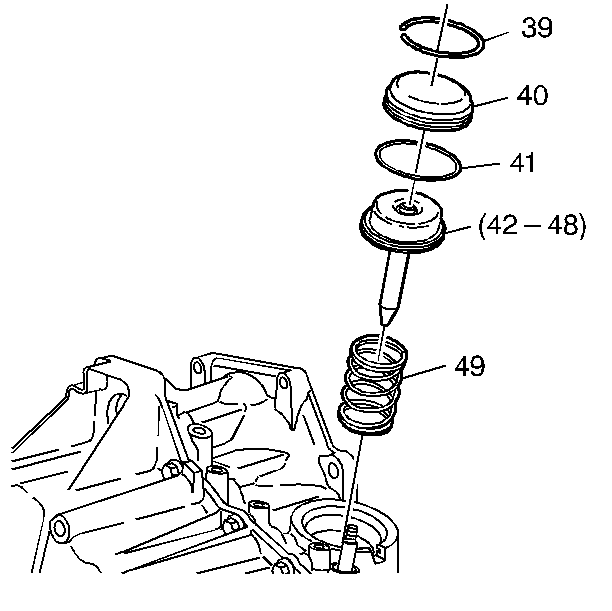
- Remove the snap ring (39).
- Pull the O-ring seal (41) out through the slot in the case.
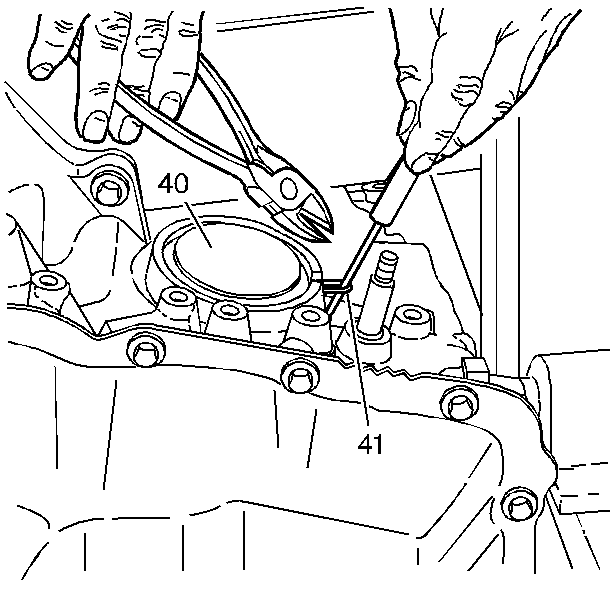
- Use side cutting pliers in order to cut the servo cover O-ring seal (41).
- Depress the reverse servo cover (40), grasp one end of the cut seal (41) and pull the seal (41) out of the servo cover (40).
- Remove the reverse servo cover (40).
- Remove the servo assembly (42-48).
- Remove the servo spring (49).
Installation Procedure
- Jack up the driver side of the car until the driver side is higher than the differential side. This ensures that the reverse band is in the proper location and not cocked to the channel plate side of the case.
- Install the servo spring (49).
- Install the servo assembly (42-48).
- Install the reverse servo cover (40) with the new O-ring seal (41).
- Compress the servo cover (40) and install the snap ring (39).
- Install the air cleaner intake duct. Refer to Air Cleaner Inlet Duct Replacement in Engine Controls - 3.4L.
- Reset the TAP values. Refer to Transmission Adaptive Functions .
Important: Follow this procedure exactly or the transaxle will have no reverse gear due to the servo pin missing the band.
Important: It is recommended that the transmission adaptive pressure (TAP) information be reset. Resetting the TAP values using a scan tool will erase all learned values in all cells. As a result, the ECM, PCM or TCM will need to relearn the TAP values. Transmission performance may be affected as new TAP values are learned.
Reverse Servo Replacement w 3.8L Engine
Removal Procedure
- Remove the exhaust crossover pipe. Refer to Exhaust Crossover Pipe Replacement in Engine Exhaust.
- Remove the right exhaust manifold. Refer to Exhaust Manifold Replacement - Right Side in Engine Exhaust.
- Depress the reverse servo cover (40).
- Remove the snap ring (39).
- Pull the O-ring seal (41) out through the slot in the case.
- Use side cutting pliers in order to cut the servo cover O-ring seal (41).
- Depress the reverse servo cover (40), grasp one end of the cut seal (41) and pull the seal (41) out of the servo cover (40).
- Remove the reverse servo cover (40).
- Remove the servo assembly (42-48).
- Remove the servo spring (49).
Installation Procedure
- Jack up the driver side of the car until the driver side is higher than the differential side. This ensures that the reverse band is in the proper location and not cocked to the channel plate side of the case.
- Install the servo spring (49).
- Install the servo assembly (42-48).
- Install the reverse servo cover (40) with the new O-ring seal (41).
- Compress the servo cover (40) and install the snap ring (39).
- Install the right exhaust manifold. Refer to Exhaust Manifold Replacement - Right Side in Engine Exhaust.
- Install the exhaust crossover pipe. Refer to Exhaust Crossover Pipe Replacement in Engine Exhaust.
- Reset the TAP values. Refer to Transmission Adaptive Functions .
Important: Follow this procedure exactly or the transaxle will have no reverse gear due to the servo pin missing the band.
Important: It is recommended that the transmission adaptive pressure (TAP) information be reset. Resetting the TAP values using a scan tool will erase all learned values in all cells. As a result, the ECM, PCM or TCM will need to relearn the TAP values. Transmission performance may be affected as new TAP values are learned.
