Fuel Tank Replacement Passenger/Cargo
Removal Procedure
- Relieve the fuel system pressure. Refer to Fuel Pressure Relief .
- Drain the fuel tank. Refer to Fuel Tank Draining .
- Raise the vehicle. Refer to Lifting and Jacking the Vehicle .
- Clean all the fuel pipe connections and the surrounding areas before disconnecting the fuel pipes in order to avoid possible contamination of the fuel system.
- Loosen the fuel fill hose clamp.
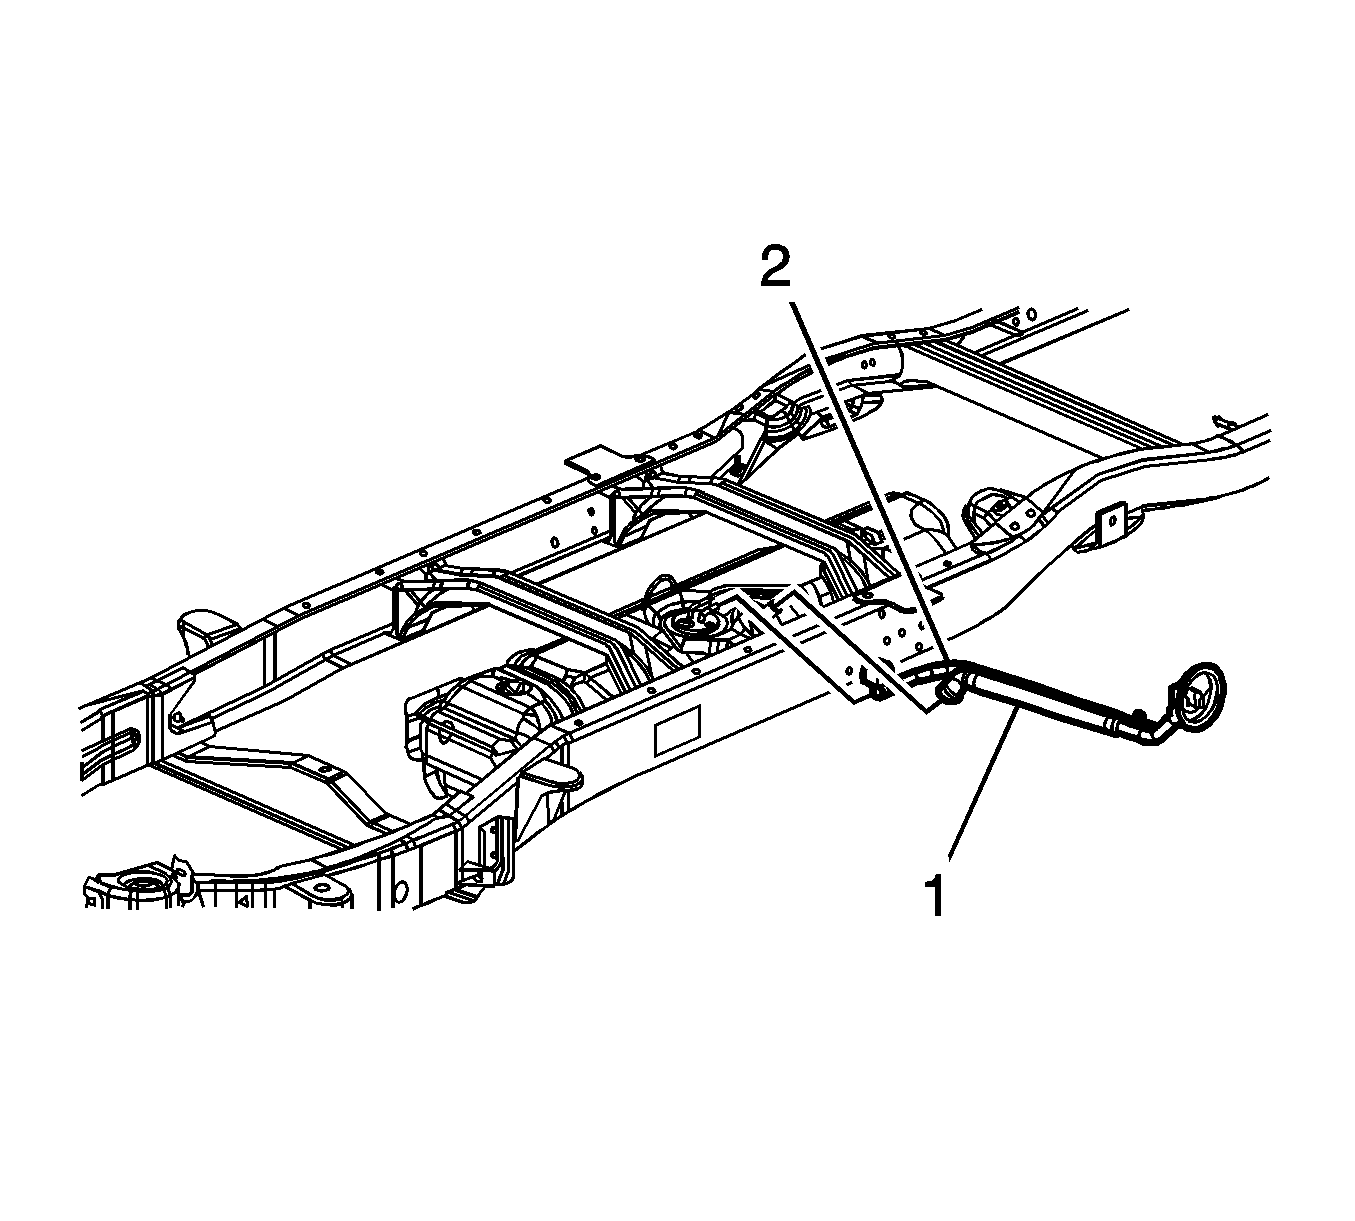
- Disconnect the fuel fill hose (1) from the filler tube.
- Disconnect the fuel fill vent hose (2) from the filler tube.
- Disconnect the rear fuel return pipe at the chassis fuel return pipe. Refer to Plastic Collar Quick Connect Fitting Service .
- Disconnect the rear fuel feed pipe at the chassis fuel feed pipe. Refer to Plastic Collar Quick Connect Fitting Service .
- With the aid of an assistant, support the fuel tank.
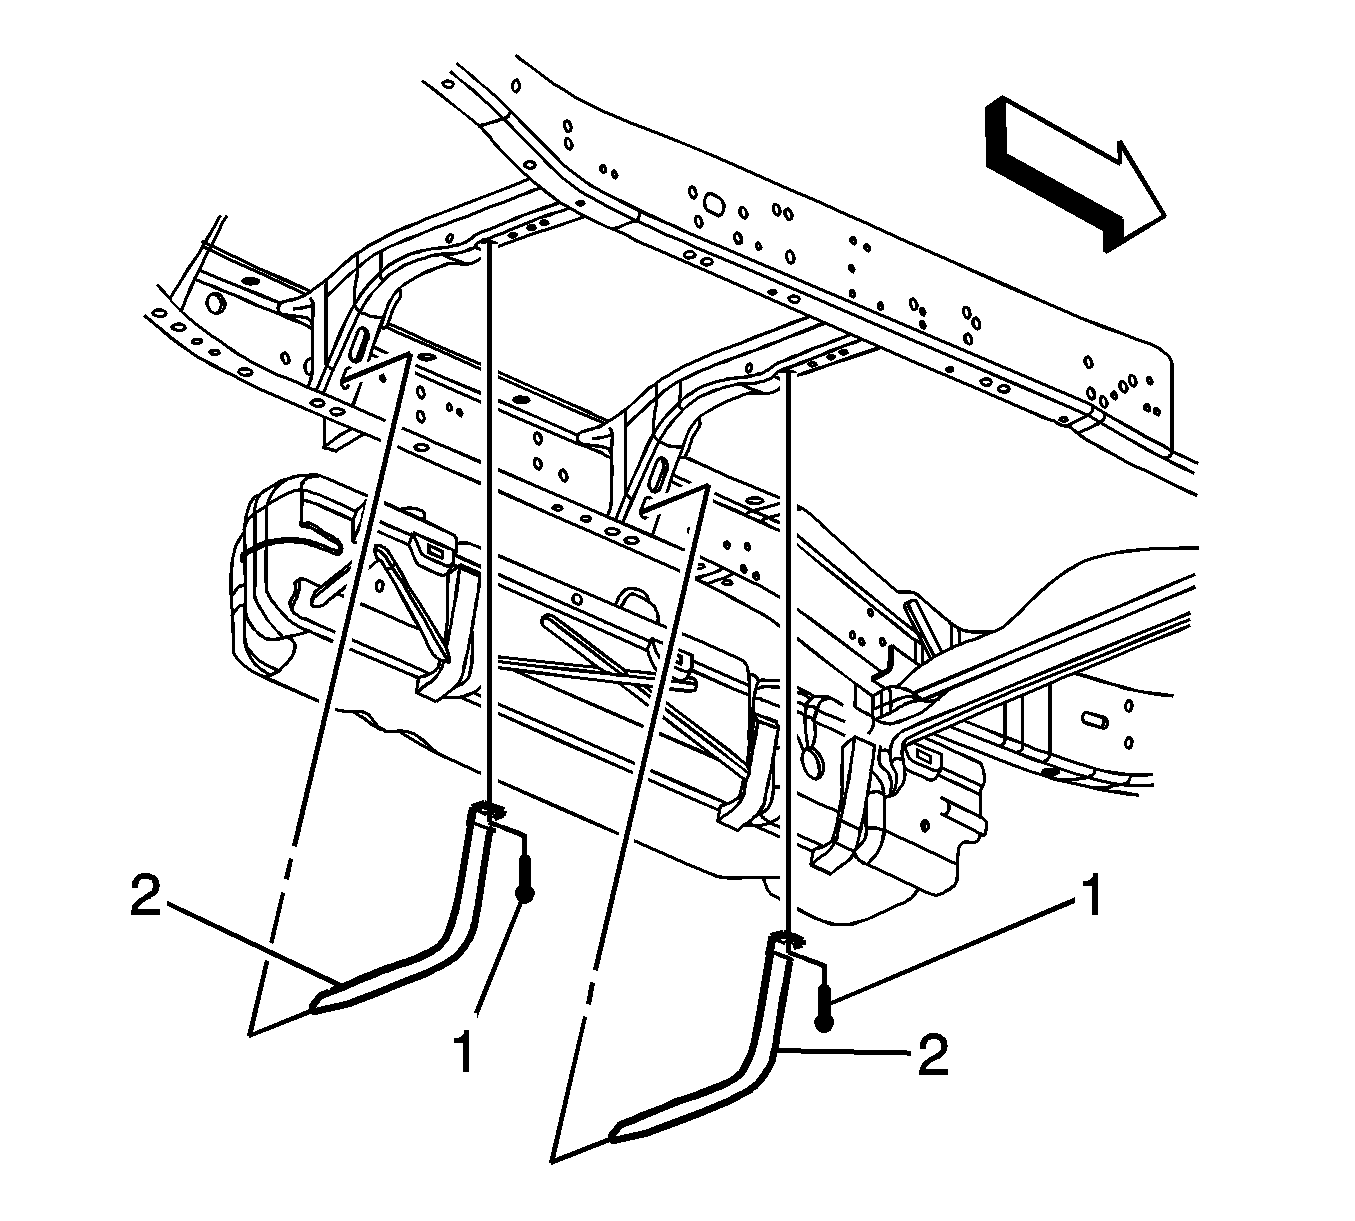
- Remove and discard the attaching bolts (1) from the fuel tank strap .
- Remove the fuel tank straps (2).
- Carefully lower the fuel tank.
- Disconnect the fuel sender and the fuel pump electrical connectors.
- Remove the fuel tank.
- Place the fuel tank in a suitable work area.
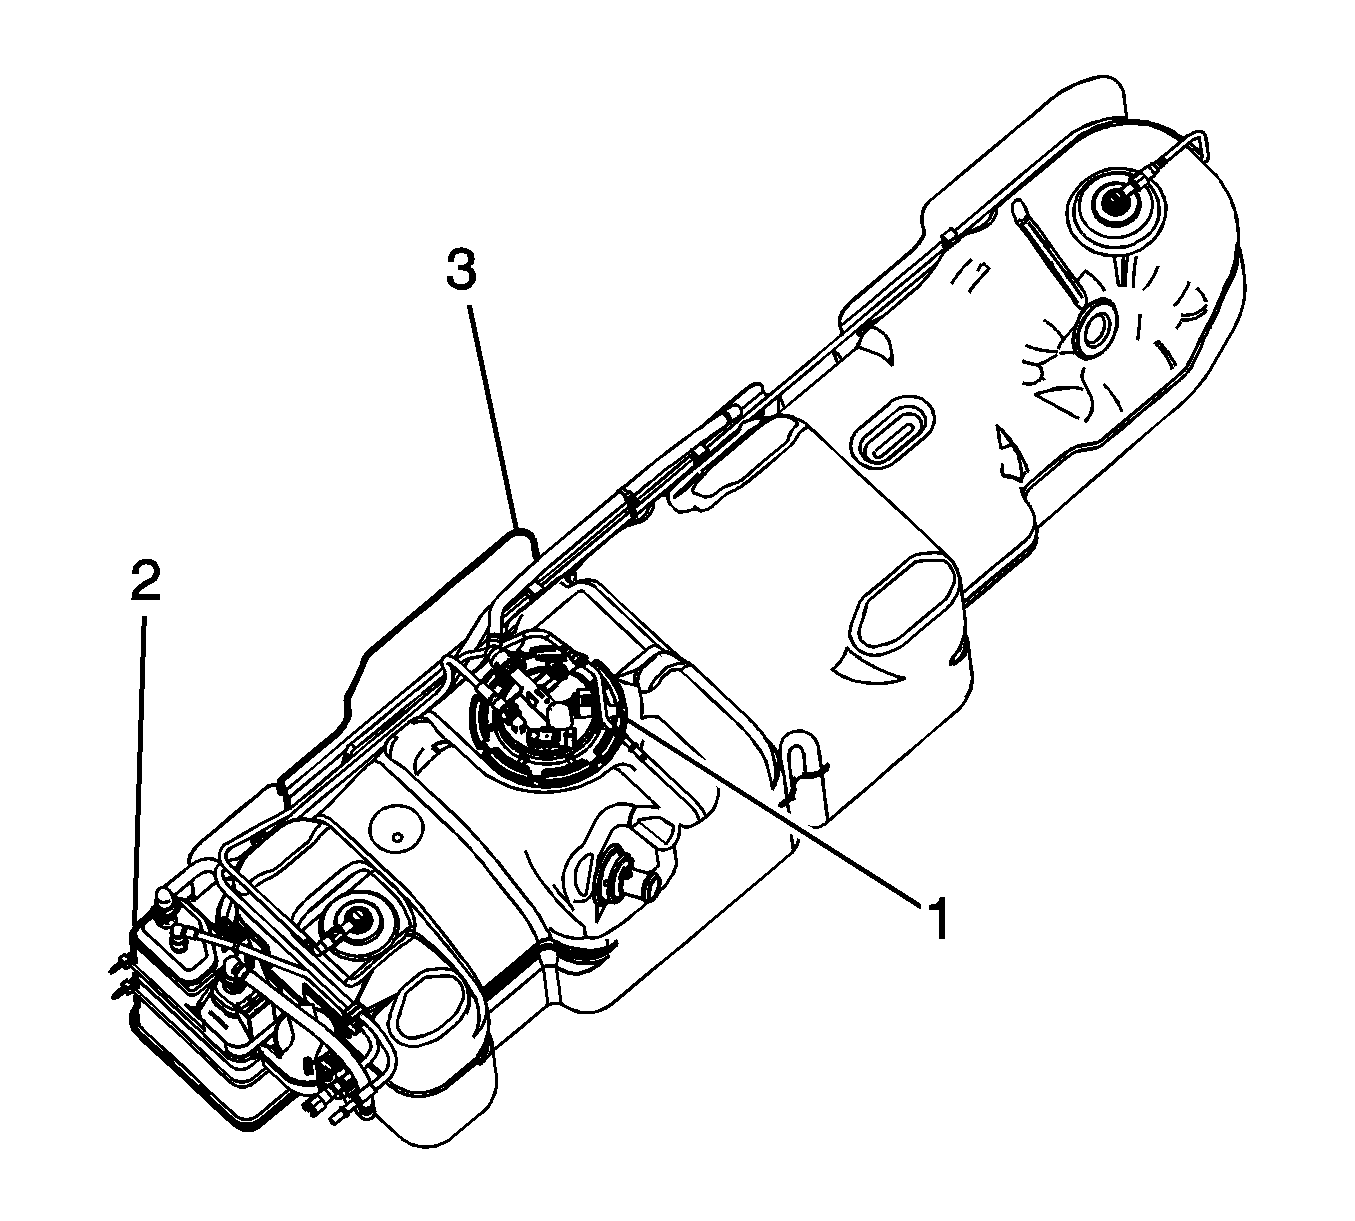
- Remove the fuel sender assembly (1) and the fuel pipes from the fuel tank. Refer to Fuel Sender Assembly Replacement .
- Remove the evaporative emission (EVAP) hoses from the fuel tank.
- On models with EVAP canister mounted to fuel tank, remove two tiedown straps from the (EVAP) canister (2) then remove the canister from the fuel tank. Discard tiedown straps.
- On all models, remove the fuel fill hose from the fuel tank.
- Remove the fuel tank from the fuel tank shield (3).
Installation Procedure
- Install the fuel tank into the fuel tank shield (3).
- Install the fuel fill hose to the fuel tank.
- On models with EVAP canister mounted to fuel tank, place the (EVAP) canister in position on the (EVAP) canister bracket, then install two new tiedown straps.
- On all models, install the (EVAP) hoses to the fuel tank.
- Install the fuel sender assembly (1) and the fuel pipes to the fuel tank. Refer to Fuel Sender Assembly Replacement .
- With the aid of an assistant, position and support the fuel tank.
- Raise the fuel tank slightly.
- Connect the electrical connectors to the fuel sender and fuel pump.
- Raise the tank fully.
- Install the fuel tank straps (2).
- Install the new attaching bolts (1) to the fuel tank strap .
- Connect the chassis fuel feed pipe to the rear fuel feed pipe. Refer to Plastic Collar Quick Connect Fitting Service .
- Connect the rear fuel return pipe to the chassis fuel return pipe. Refer to Plastic Collar Quick Connect Fitting Service .
- Connect the fuel fill vent hose (2) to the filler tube.
- Connect the fuel fill hose (1) to the fuel tank.
- Lower the vehicle.
- Refill the fuel tank.
- Tighten the fuel filler cap.
- Inspect for leaks:

Notice: Refer to Fastener Notice in the Preface section.
Tighten
Tighten the fuel fill hose clamp to 2.75 N·m (24 lb in).

Important: When removing or replacing the fuel tank, the fuel tank support fasteners should never be reused. Always use new fasteners when installing the fuel tank.
Tighten
Tighten the bolts to 20.5 N·m (15 lb ft).

Tighten
Tighten the fuel fill hose clamp to 2.75 N·m (24 lb in).
| 19.1. | Turn ON the ignition for 2 seconds. |
| 19.2. | Turn OFF the ignition for 10 seconds. |
| 19.3. | Turn ON the ignition. |
| 19.4. | Inspect for fuel leaks. |
Fuel Tank Replacement Cutaway Van Side Tank
Removal Procedure
- Relieve the fuel system pressure. Refer to Fuel Pressure Relief .
- Drain the fuel tank. Refer to Fuel Tank Draining .
- Raise the vehicle. Refer to Lifting and Jacking the Vehicle .
- Clean all fuel pipe and hose connections and surrounding areas before disconnecting the fuel pipes in order to avoid contamination of the fuel system.
- Loosen the fuel fill hose clamp.
- Disconnect the fuel fill hose from the fuel tank (1).
- Disconnect the fuel fill vent hose from the fill tube (2).
- Disconnect the rear evaporative emission (EVAP) pipe at the EVAP canister.
- With the aid of an assistant, support the fuel tank.
- Remove the attaching bolts (1) from the fuel tank straps. Discard attaching bolts.
- Remove the fuel tank straps (2).
- Carefully lower the fuel tank.
- Disconnect the fuel feed pipe and the fuel return pipe at the fuel sender. Refer to Plastic Collar Quick Connect Fitting Service .
- Disconnect the electrical connector from the fuel sender.
- Remove the fuel tank.
- Place the fuel tank in a suitable work area.
- Cap the open fuel and EVAP pipes on the vehicle in order to prevent possible fuel system contamination.
- Remove the EVAP pipe from the roll over valves and the retainer clips.
- Remove the fuel sender assembly from the fuel tank. Refer to Fuel Sender Assembly Replacement .
- Remove the fuel fill hose from the fuel tank.


Installation Procedure
- Install the fuel tank insulators (6).
- Remove the caps from the fuel and EVAP pipes.
- Install the fuel fill hose to the fuel tank.
- Install the fuel sender assembly to the fuel tank. Refer to Fuel Sender Assembly Replacement .
- Connect the EVAP pipe to the roll-over valves and the retainer clips.
- With the aid of an assistant, position and support the fuel tank.
- Raise the fuel tank slightly.
- Connect the electrical connector to the fuel sender.
- Connect the fuel feed pipe and the fuel return pipe to the fuel sender. Refer to Plastic Collar Quick Connect Fitting Service .
- Raise the tank fully.
- Install the fuel tank straps (2).
- Install the new attaching bolts (1) to the fuel tank straps.
- Connect the rear EVAP pipe (1) to the EVAP canister.
- Connect the fuel fill vent hose to the fill pipe.
- Connect the fuel fill hose to the fuel fill pipe (1).
- Lower the vehicle.
- Refill the fuel tank.
- Tighten the fuel filler cap.
- Inspect for leaks:

Notice: Refer to Fastener Notice in the Preface section.
Tighten
Tighten the fuel fill hose clamp to 2.75 N·m (24 lb in).

Important: When removing or replacing the fuel tank, the fuel tank support fasteners should never be reused. Always use new fasteners when installing the fuel tank.
Tighten
Tighten the fuel tank strap attaching bolts to 20.5 N·m (15 lb ft).

Tighten
Tighten the fuel fill hose clamp to 2.75 N·m (24 lb in).
| 19.1. | Turn ON the ignition for 2 seconds. |
| 19.2. | Turn OFF the ignition for 10 seconds. |
| 19.3. | Turn ON the ignition . |
| 19.4. | Inspect for fuel leaks. |
Fuel Tank Replacement Cutaway Van Rear Tank
Removal Procedure
- Relieve the fuel system pressure. Refer to Fuel Pressure Relief .
- Drain the fuel tank. Refer to Fuel Tank Draining .
- Raise the vehicle. This must be done with a frame hoist in order to allow the rear suspension to hang. Refer to Lifting and Jacking the Vehicle .
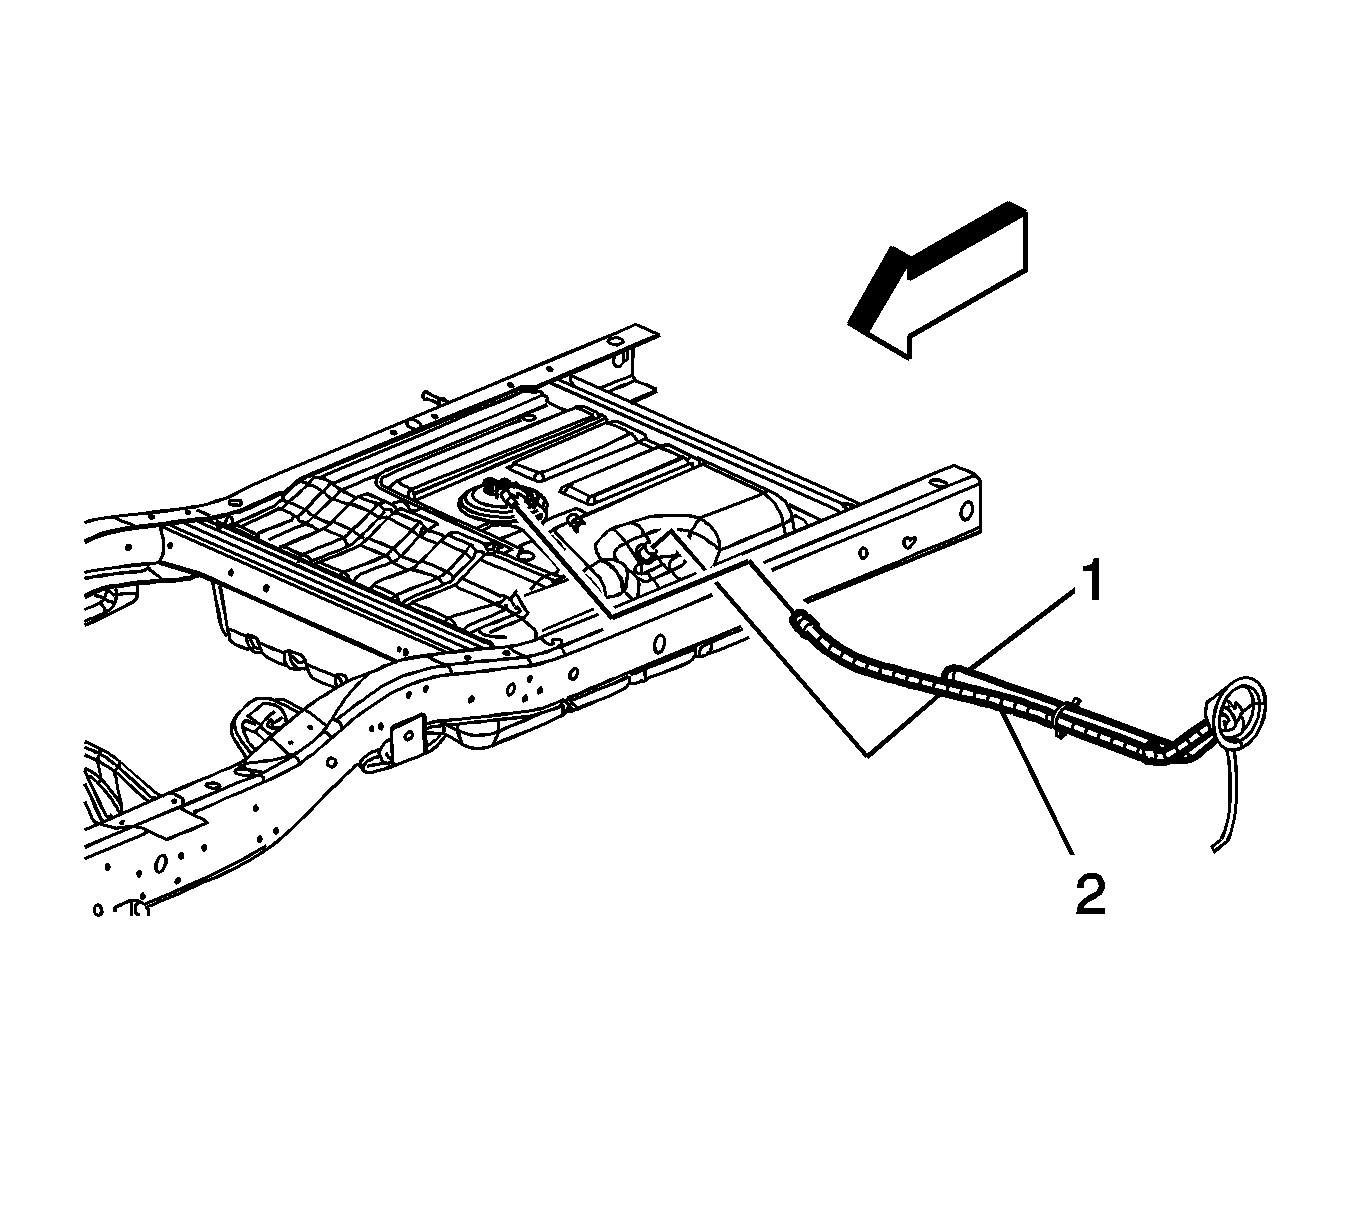
- Disconnect the fuel fill hose (1) from the fuel fill tube.
- Disconnect the fuel fill vent hose (2) from the fuel fill tube.
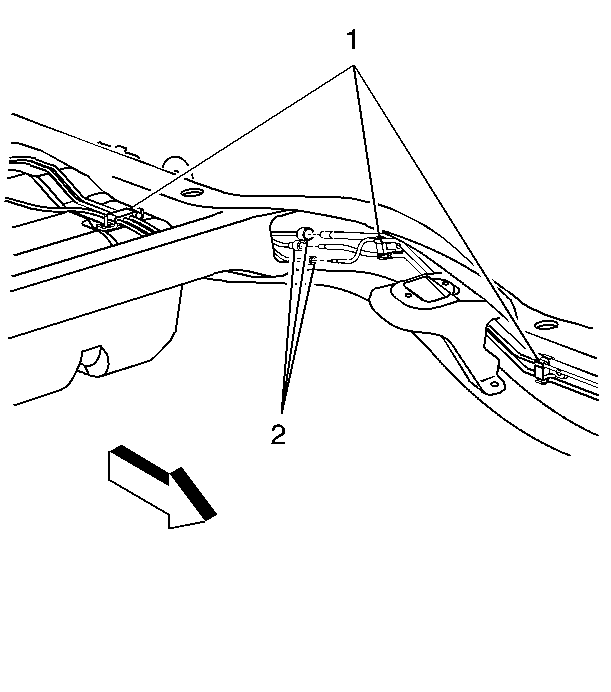
- Clean all the fuel pipe connections and the surrounding areas before disconnecting the fuel pipes in order to avoid contamination of the fuel system.
- Disconnect the rear fuel and evaporative emissions (EVAP) pipes (2) at the chassis fuel and EVAP pipes. Refer to Plastic Collar Quick Connect Fitting Service .
- Cap the fuel and EVAP pipes in order to prevent fuel system contamination.
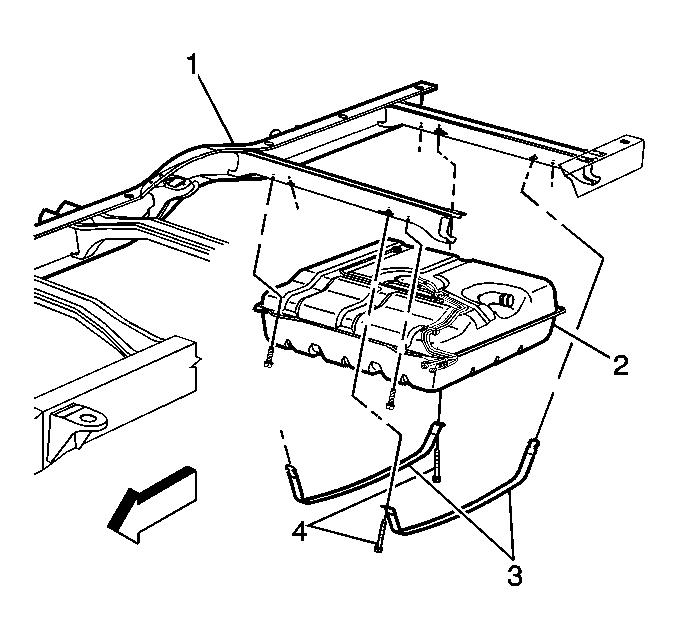
- With the aid of an assistant, support the fuel tank.
- Remove the attaching bolts (4) from the fuel tank straps. Discard attaching bolts.
- Remove the fuel tank straps (3) and two fuel tank strap insulators.
- Carefully lower the fuel tank.
- Disconnect the electrical connectors from the fuel sender and the fuel pressure sensor.
- Remove the fuel tank.
- Place the fuel tank in a suitable work area.
- Remove the fuel fill hose and fuel fill vent hose from the fuel tank.
- Remove the fuel sender assembly and the rear fuel and EVAP pipes from the fuel tank. Refer to Fuel Sender Assembly Replacement .
Installation Procedure
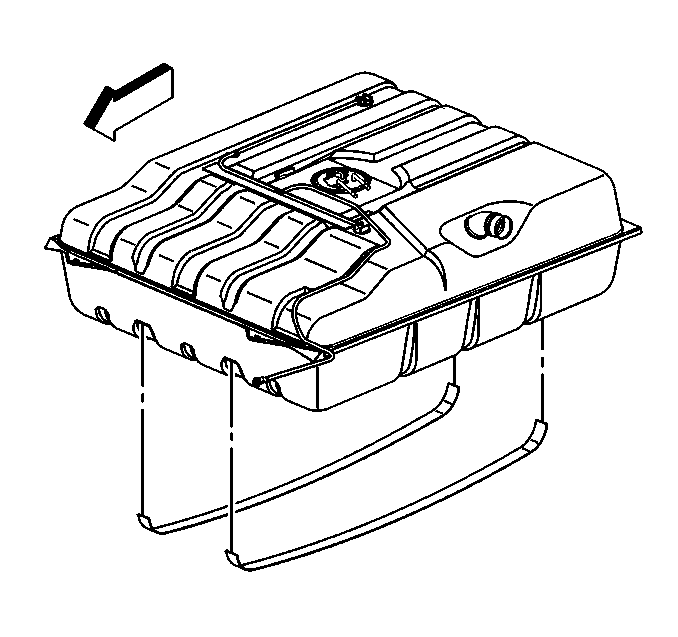
- Install the fuel tank insulators.
- Install the fuel sender assembly and the rear fuel and EVAP pipes to the fuel tank. Refer to Fuel Sender Assembly Replacement .
- Install the fuel fill hose and fuel fill vent hose to the fuel tank.
- With the aid of an assistant, position and support the fuel tank.
- Raise the fuel tank slightly.
- Connect the electrical connectors to the fuel sender and the fuel pressure sensor .
- Raise the tank fully.
- Install the fuel tank straps (3).
- Install the new attaching bolts (4) to the fuel tank straps.
- Remove the caps from the fuel and EVAP pipes.
- Connect the rear fuel and EVAP pipes (2) to the chassis fuel and EVAP pipes. Refer to Plastic Collar Quick Connect Fitting Service .
- Connect the fuel fill vent hose (2) to the full pipe.
- Connect the fuel fill hose to the fuel tank (1).
- Lower the vehicle.
- Refill the fuel tank.
- Tighten the fuel filler cap.
- Inspect for leaks:

Notice: Refer to Fastener Notice in the Preface section.
Important: When removing or replacing the fuel tank, the fuel tank support fasteners should never be reused. Always use new fasteners when installing the fuel tank.
Tighten
Tighten the bolts to 20.5 N·m (15 lb ft).


Tighten
Tighten the fuel fill hose clamp (2) to 2.75 N·m (24 lb in).
| 17.1. | Turn ON the ignition for 2 seconds. |
| 17.2. | Turn OFF the ignition for 10 seconds. |
| 17.3. | Turn ON the ignition . |
| 17.4. | Inspect for fuel leaks. |
