Removal Procedure

- Raise and support the vehicle. Refer to
Lifting and Jacking the Vehicle
.
- Remove the tire and wheel. Refer to
Tire and Wheel Removal and Installation
.
- Remove the stabilizer shaft links. Refer to
Stabilizer Shaft Link Replacement
.
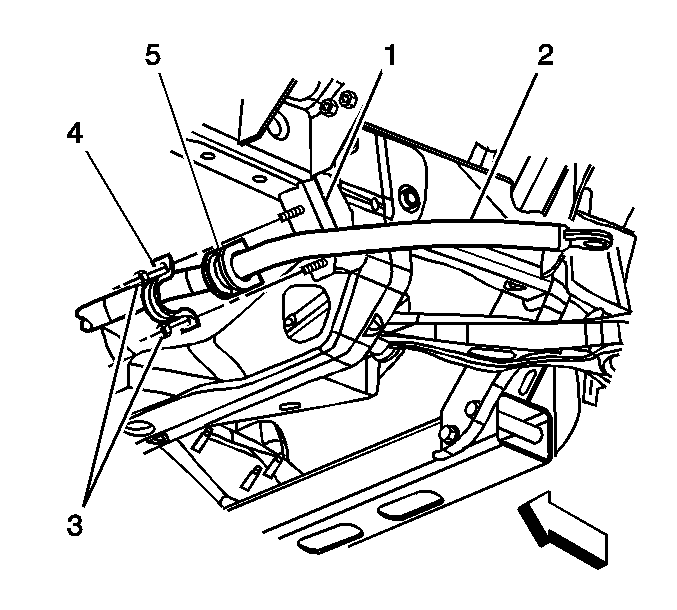
- For 4WD and G1, perform the following procedure:
| 4.1. | Remove the stabilizer shaft insulator clamps mounting bolts (4). |
| 4.2. | Remove the stabilizer shaft clamps (3). |
| 4.3. | Remove the stabilizer shaft (5). |
| 4.4. | Remove the stabilizer shaft insulators (2). |
- For G2 and G3, perform the following procedure:
| | Important: The stabilizer shaft insulator stud may come out of the frame when removing stabilizer shaft insulator mounting nuts.
|
| 5.1. | Remove the stabilizer shaft insulator clamps mounting bolts (3). |
| 5.2. | Remove the stabilizer shaft clamps (4). |
| 5.3. | Remove the stabilizer shaft (2). |
| 5.4. | Remove the stabilizer shaft insulators (5). |
- Inspect all of the parts for wear and damage.
Installation Procedure
Notice: Refer to Fastener Notice in the Preface section.
- For G2 and G3, perform the following procedure:
| 1.1. | Install the stabilizer shaft insulator clamp bolts. |
Tighten
Tighten the bolts to 25 N·m (18 lb ft).
| | Important: Place the stabilizer shaft insulators on the stabilizer shaft with the slits facing toward the front of the vehicle.
|
| 1.2. | Install the stabilizer shaft insulators (5) to the stabilizer shaft (2). |
| 1.3. | Install the stabilizer shaft (2). |
| 1.4. | Install the stabilizer shaft clamps (4) over the insulators and the stabilizer shaft (2). |
| 1.5. | Install stabilizer shaft insulator clamps mounting bolts (3). |
Tighten
Tighten the bolts to 46 N·m (34 lb ft).
- For 4WD and G1, perform the following procedure:
| | Important: Place the stabilizer shaft insulators on the stabilizer shaft with the slits facing toward the front of the vehicle.
|
| 2.1. | Install the stabilizer shaft insulators (2). |
| 2.2. | Install the stabilizer shaft (5). |
| 2.3. | Install the stabilizer shaft clamps (3). |
| 2.4. | Install the stabilizer shaft insulator clamps mounting bolts (4). |
Tighten
Tighten the bolts to 25 N·m (18 lb ft).
- Install the stabilizer shaft links. Refer to
Stabilizer Shaft Link Replacement
.
- Install the tire and wheel. Refer to
Tire and Wheel Removal and Installation
.
- Lower the vehicle.
