Rail Replacement - Front Section Corvette
Tools Required
J 42058 Frame Adapter Clamp
Removal Procedure
Caution: Refer to Approved Equipment for Collision Repair Caution in the Preface section.
- Disable the SIR system. Refer to SIR Disabling and Enabling .
- Disconnect the negative battery cable. Refer to Battery Negative Cable Disconnection and Connection .
- Remove all related panels and components.
- Remove the front impact bar. Refer to Front Bumper Impact Bar Replacement .
- Note the location and remove the sealers and anti-corrosion materials from the repair area, as necessary. Refer to Anti-Corrosion Treatment and Repair .
- Repair as much of the damage as possible to the factory specifications.
- Use J 42058 to secure the vehicle if pulling and straightening are required.
- Inspect the front of dash panel, floor panels, and all other sheet molded compound (SMC) for cracks or areas that may need to be repaired or resealed.
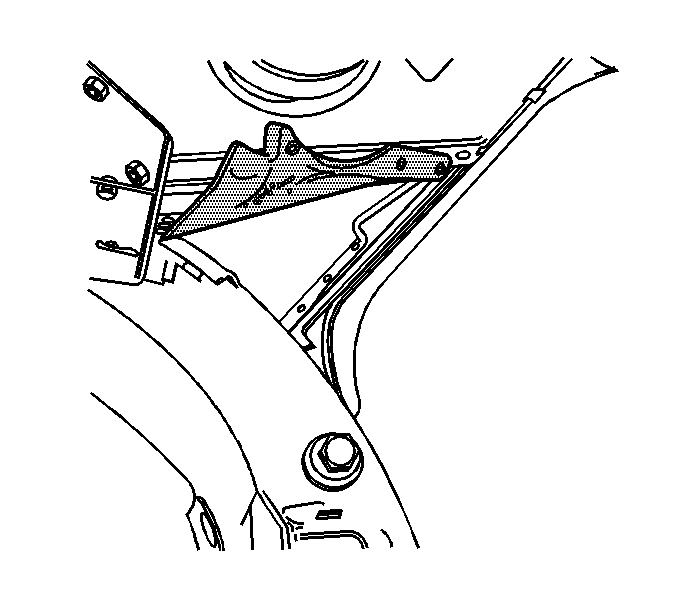
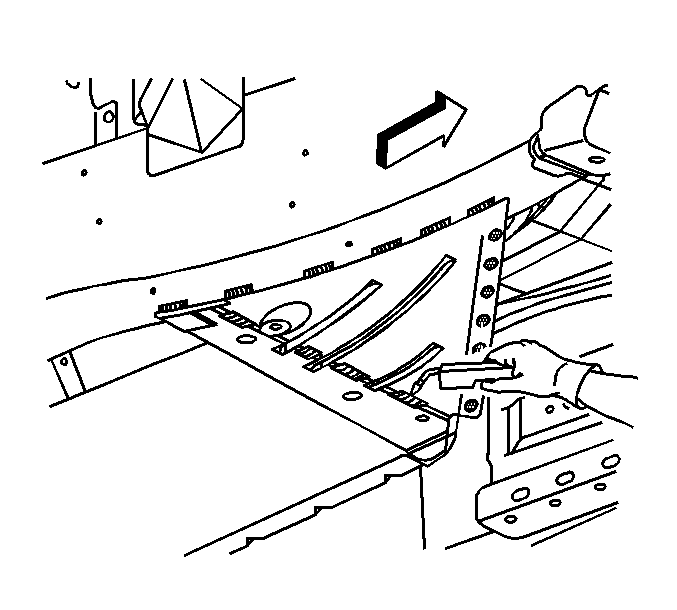
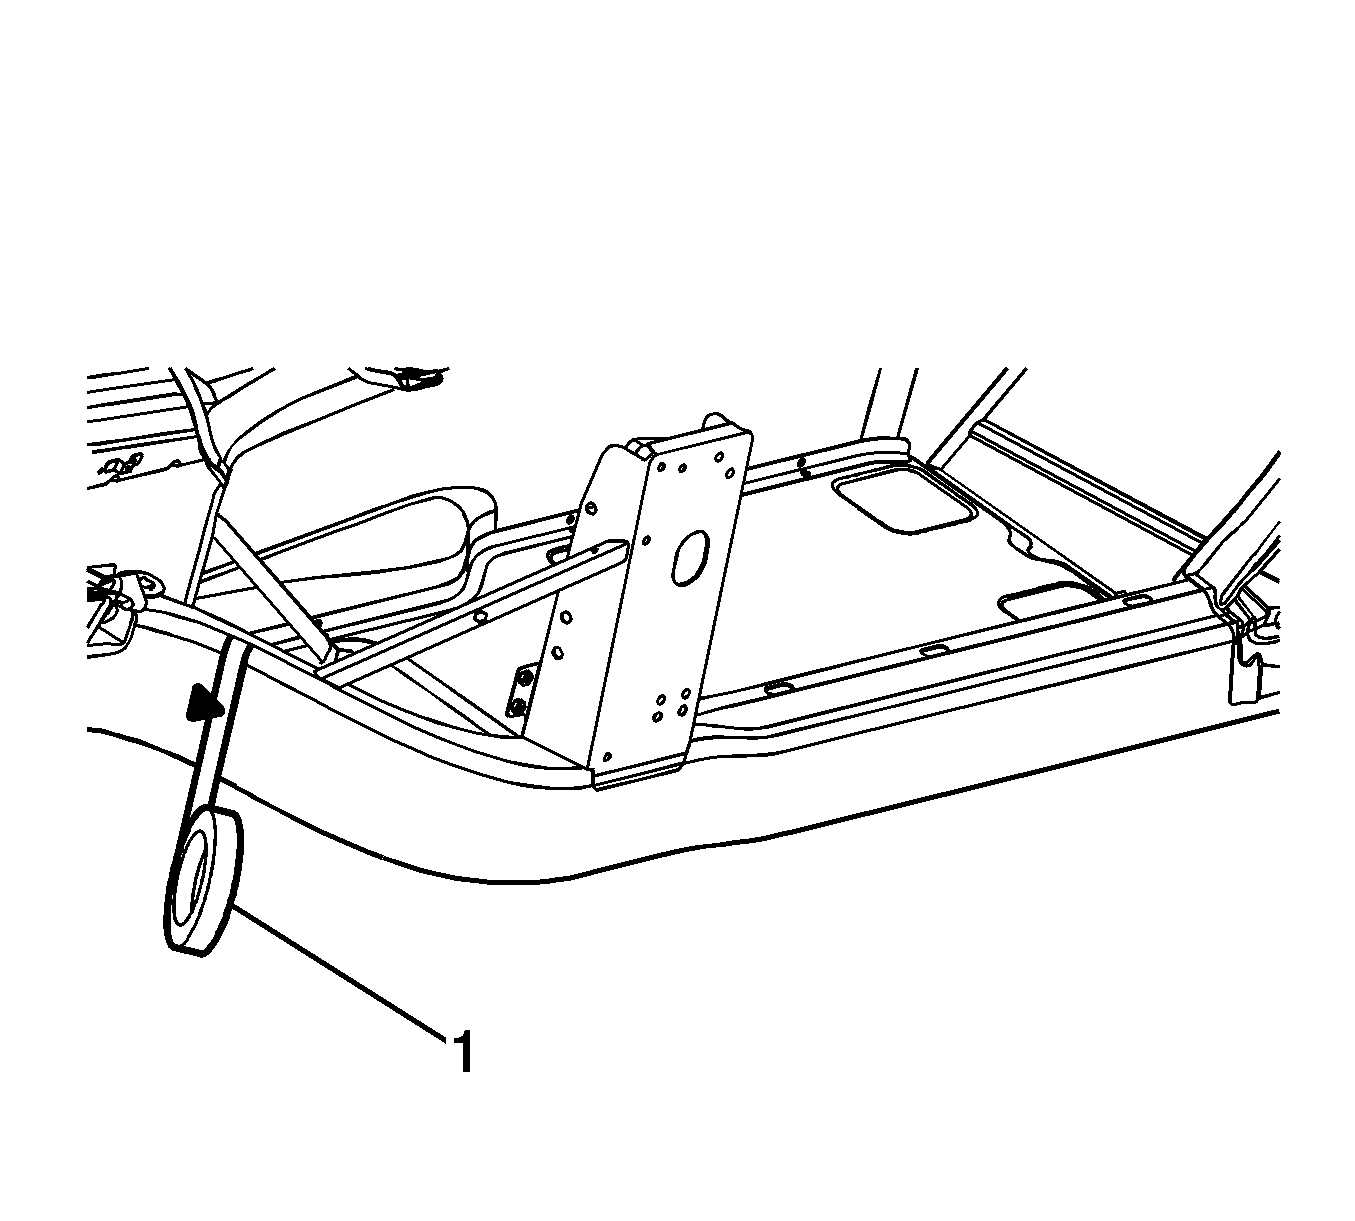
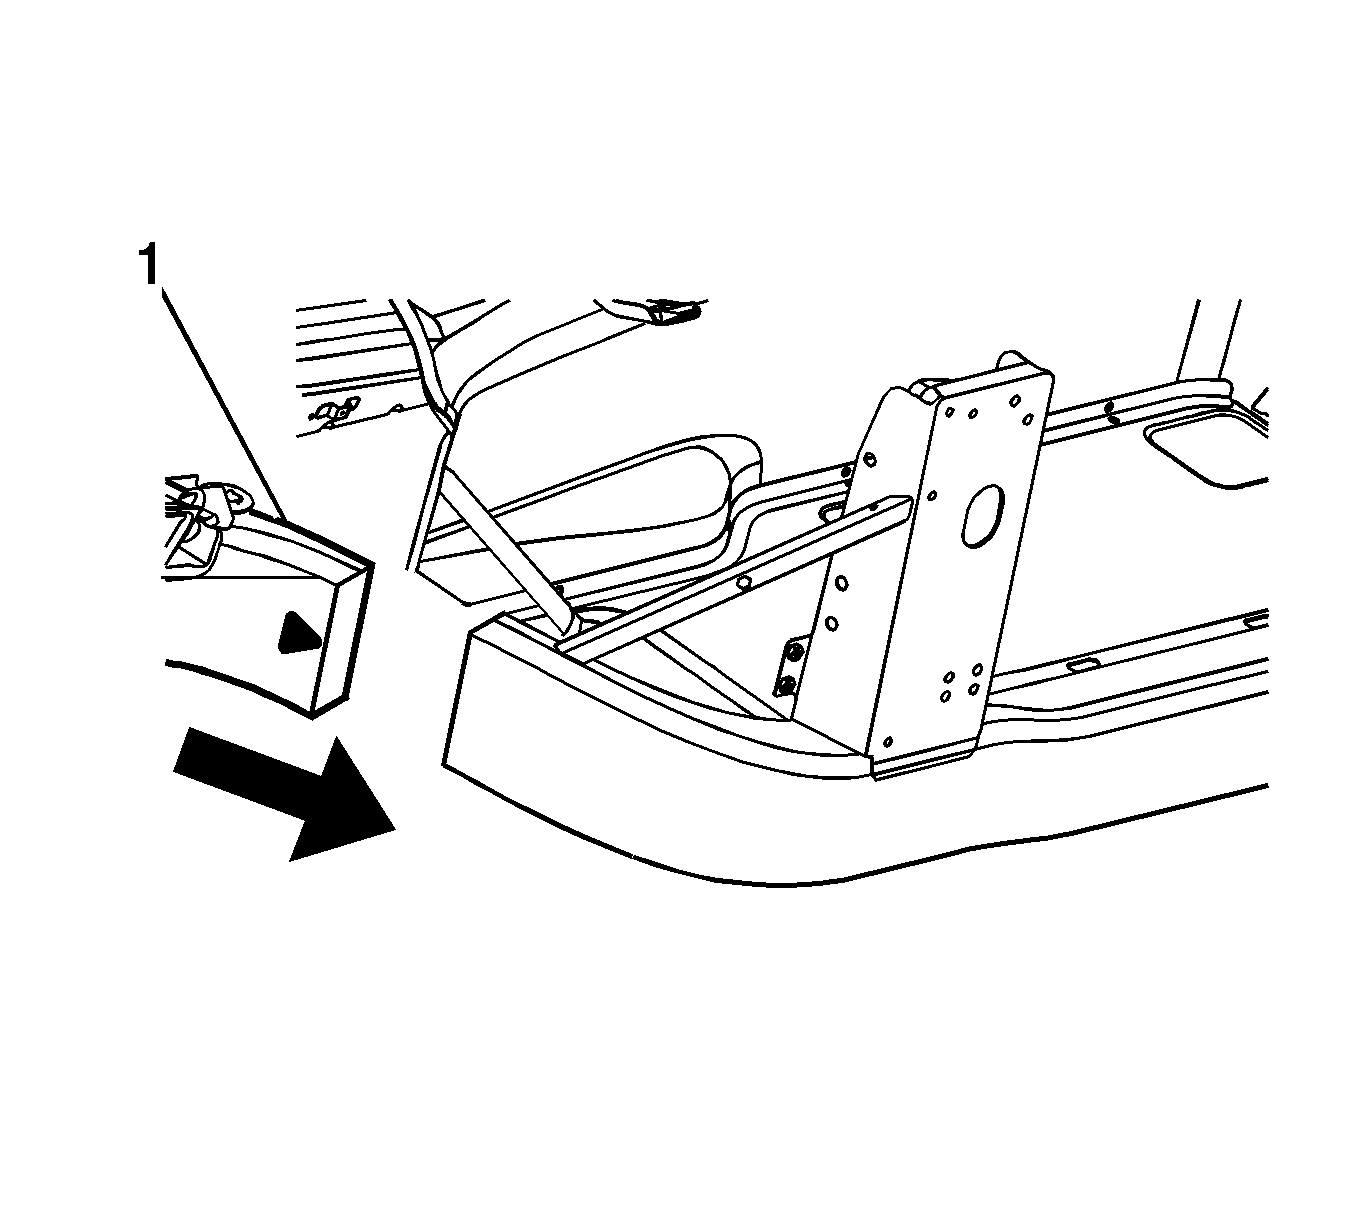
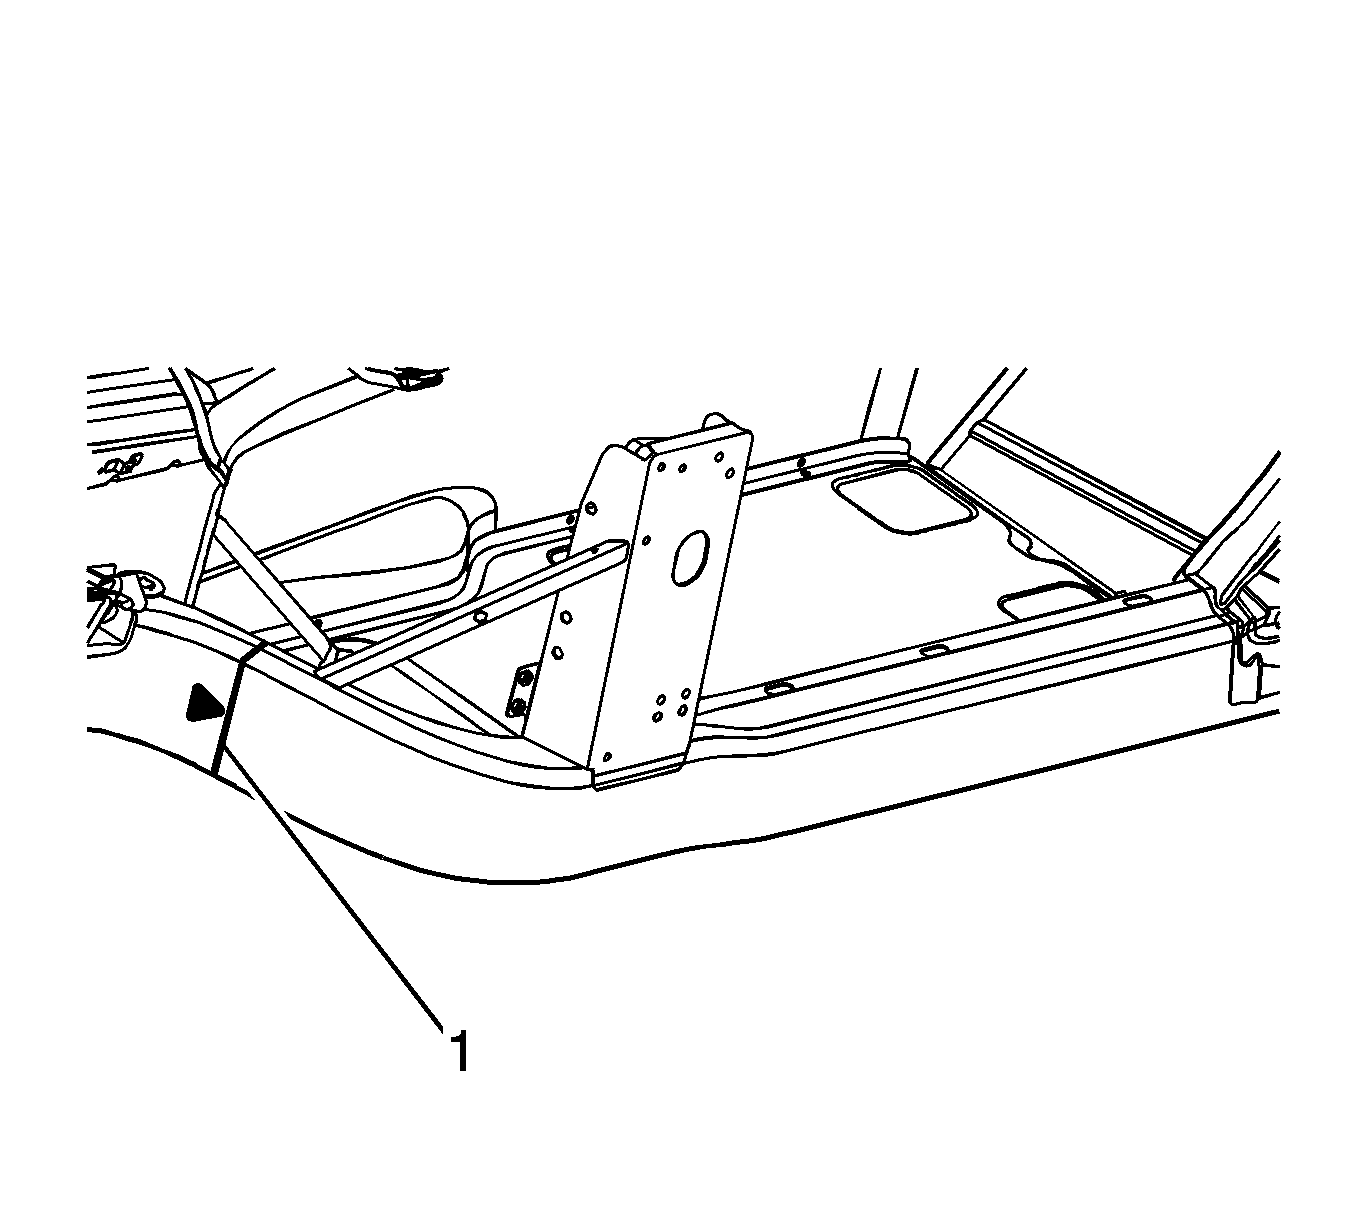
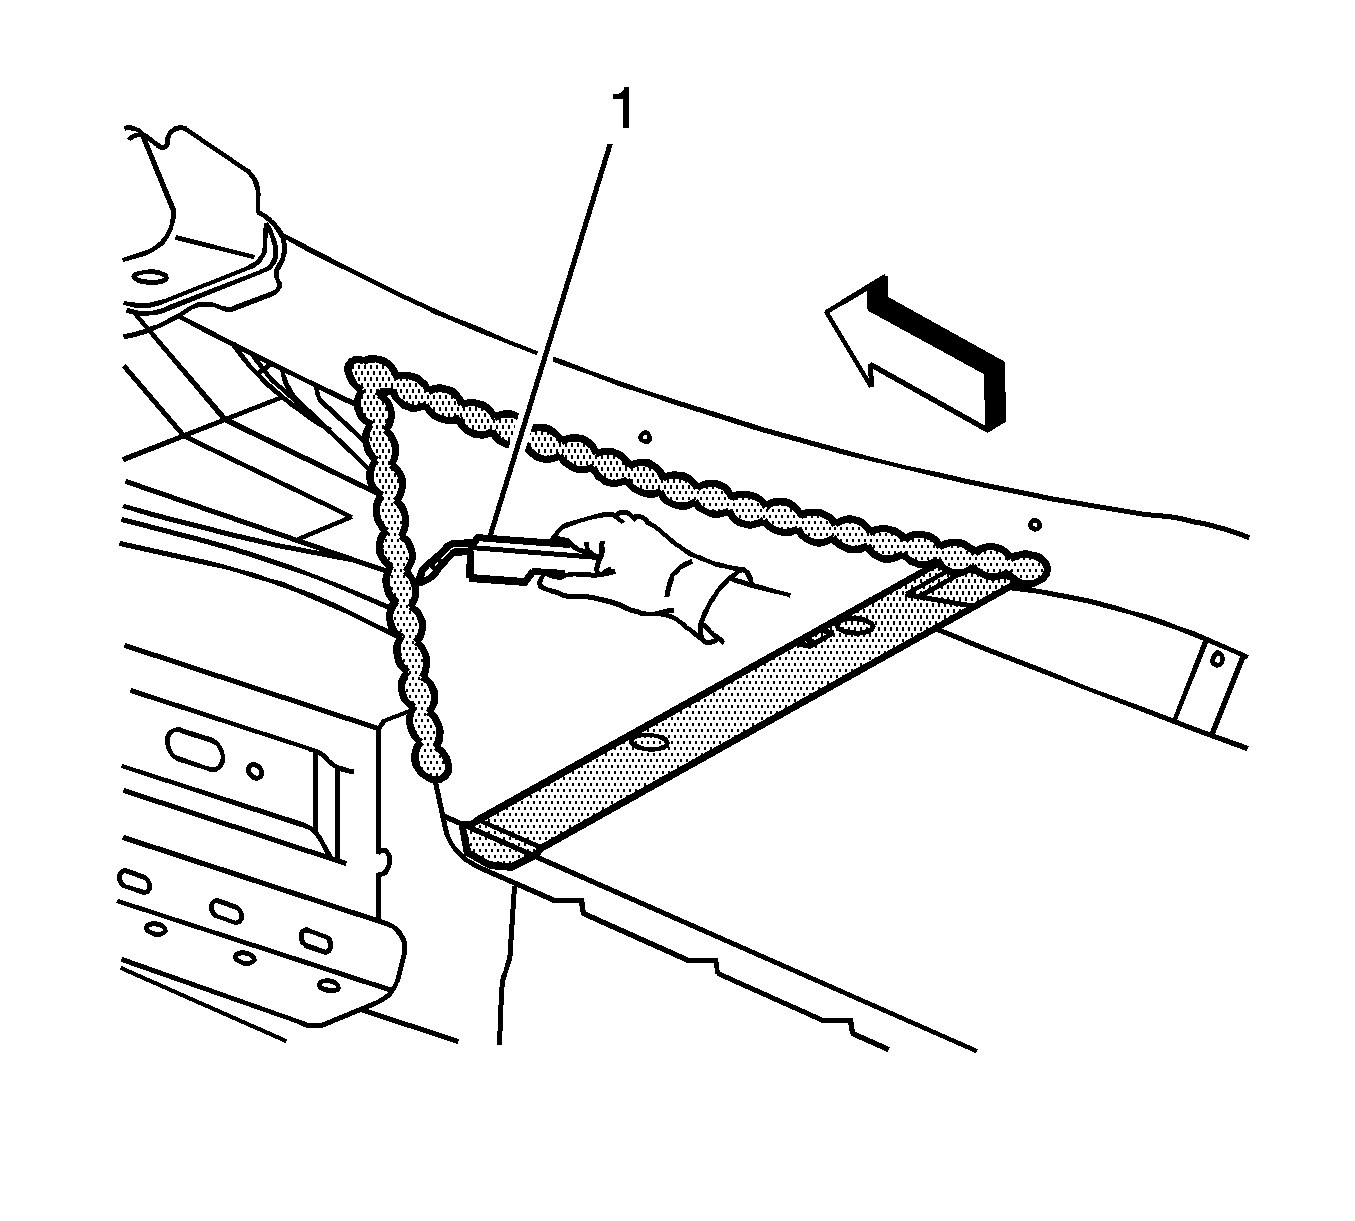
- Remove any welds as necessary and pry up the extension panel to expose the frame rail.
- Apply 50 mm (2 in) tape to the lower floor extension panel where the SMC front floor panel stops and the lower floor extension panel begins.
- Using a die grinder, cut along the forward edge of the tape to create a 50 mm (2 in) flange.
- Locate and drill out all factory welds. Note the number and location of the welds for installation of the new lower floor extension panel.
- Remove the lower floor extension panel.
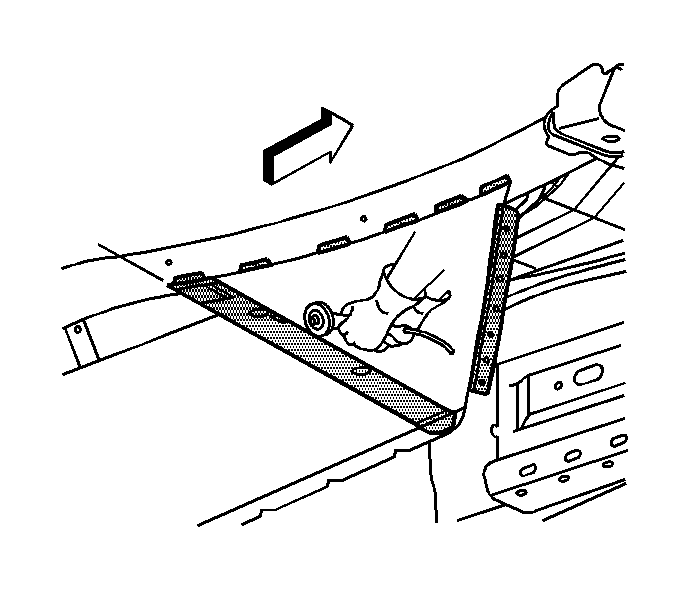
- Using a die grinder cut through the stitch welds that attach the tunnel brace to the frame rail. Make cuts favoring the frame rail side of the welds.
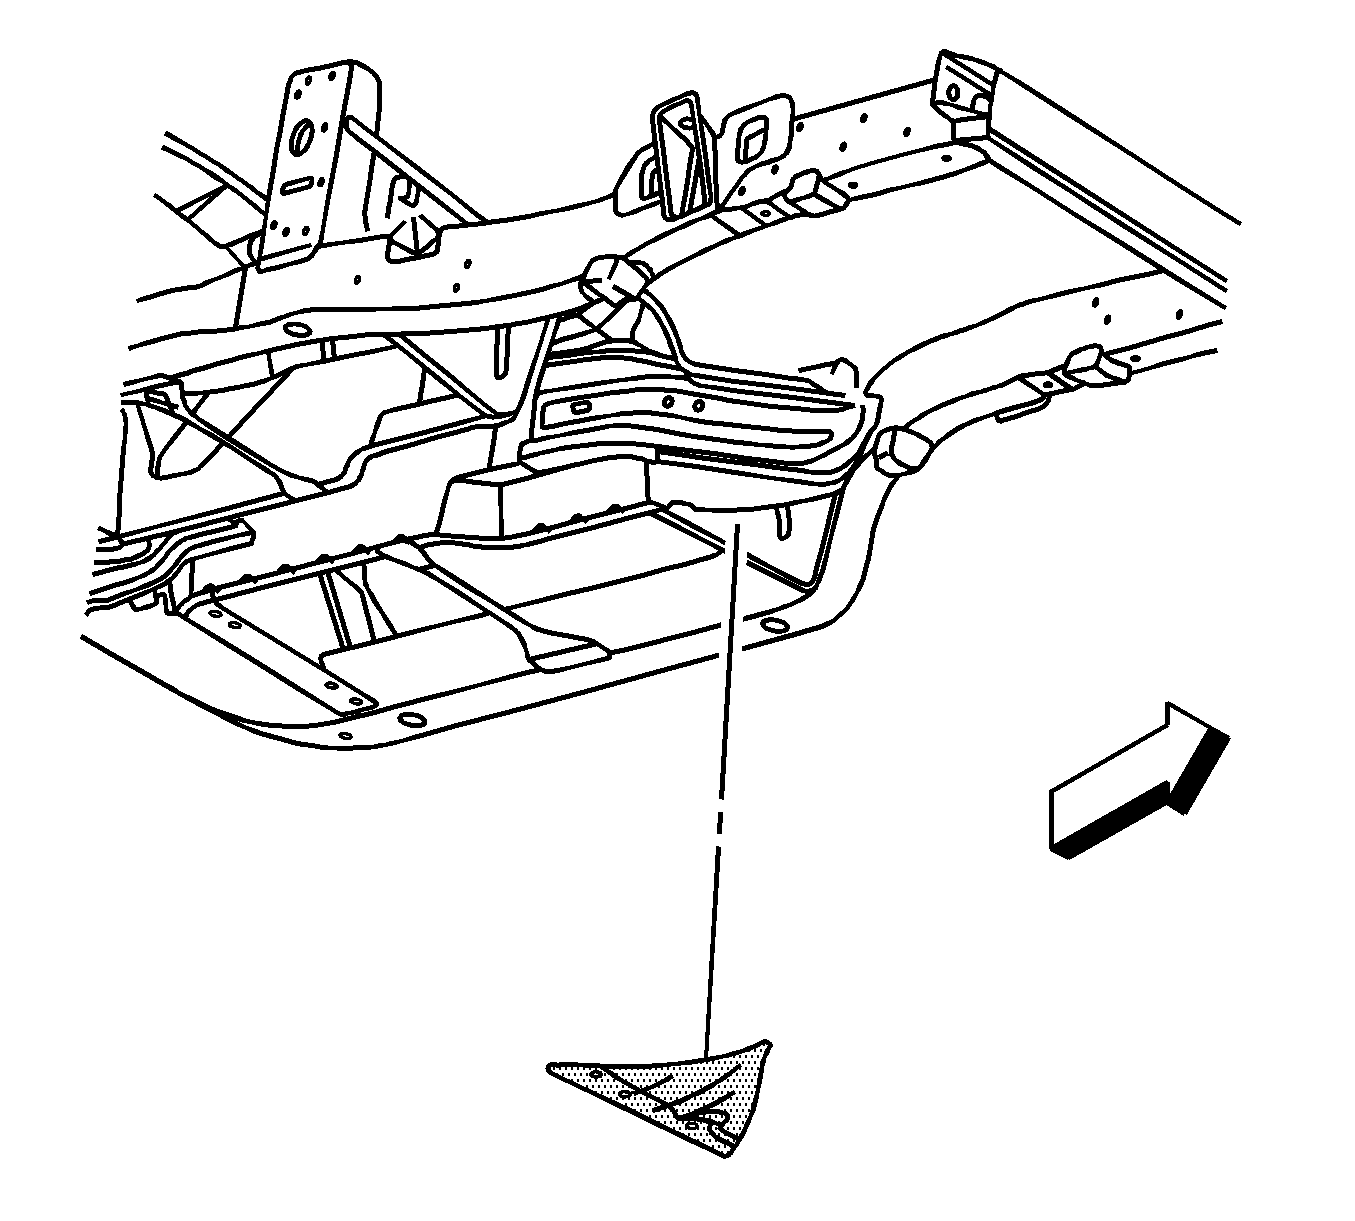
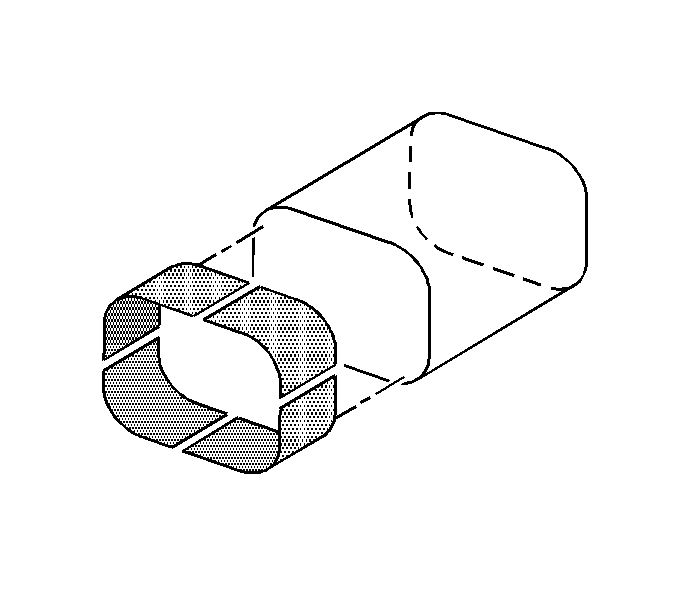
- Remove the damaged section of the frame rail within the shaded area.
Important: The new lower floor extension panel is to be reinstalled 50 mm (2 in) forward of the SMC front floor panel. This will eliminate the potential to de-bond the front floor panel when reinstalling the lower floor extension panel.
Installation Procedure
- Determine the sectioning joint location within the recommended area.
- Cut the new frame section from the new frame rail assembly.
- Perform the offset lap joint sectioning. Refer to Offset Lap Joint Repair .
- Clean and prepare all of the welded mating surfaces.
- Apply GM-approved Weld-Thru Coating or equivalent to all mating surfaces. Refr to Anti-Corrosion Treatment and Repair .
- Using a metal inert gas (MIG) welder, stitch weld the tunnel brace to the frame rail duplicating the factory welds.
- Drill 8 mm (5/16 in) holes in the new lower floor extension panel for plug welding.
- Replace the lower floor extension panel. Trim to fit and tuck the lower floor extension panel inside of the 50 mm (2 in) flange created from the original extension.
- Using a MIG welder, tack weld the lower floor extension panel in to place.
- Using a MIG welder, weld a 25 mm (1 in) stitch along the flange created from the original extension.
- Using a MIG welder, stitch weld the lower floor extension panel to the frame rail duplicating the factory welds.
- Using a MIG welder, plug weld the lower floor extension panel to the tunnel brace.
- Re-position the extension panel.
- Using a MIG welder, weld the extension panel duplicating the factory welds.
- Install the front impact bar. Refer to Front Bumper Impact Bar Replacement .
- Apply the sealers and anti-corrosion materials to the repair area, as necessary. Refer to Anti-Corrosion Treatment and Repair .
- Paint the repair area. Refer to Basecoat/Clearcoat Paint Systems .
- Install all related panels and components.
- Connect the negative battery cable. Refer to Battery Negative Cable Disconnection and Connection .
- Enable the SIR system. Refer to SIR Disabling and Enabling .
Caution: Refer to Collision Sectioning Caution in the Preface section.


Rail Replacement - Front Section Z06
Tools Required
J 42058 Frame Adapter Clamp
Removal Procedure
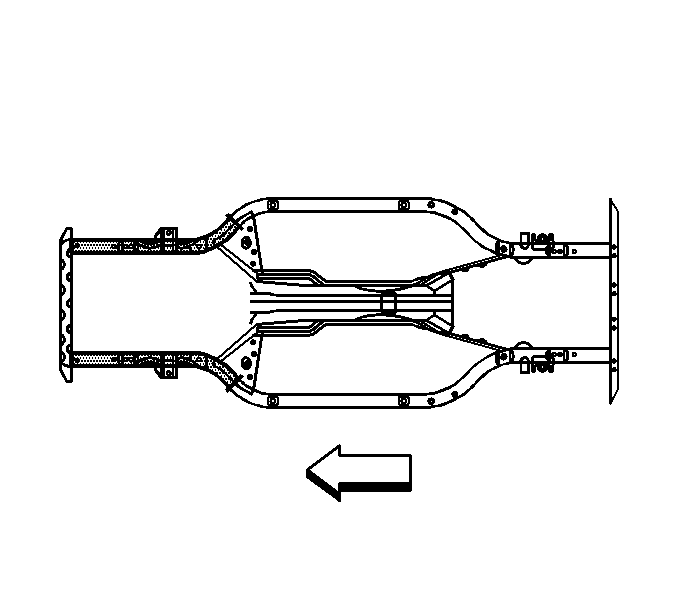
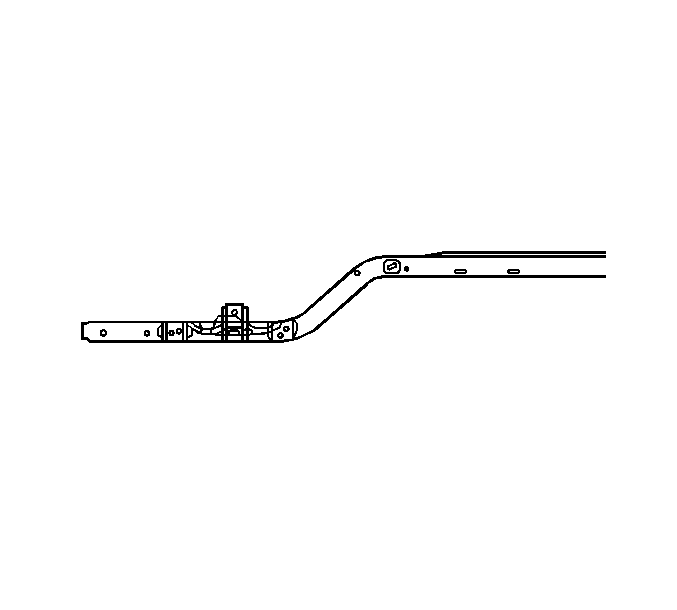
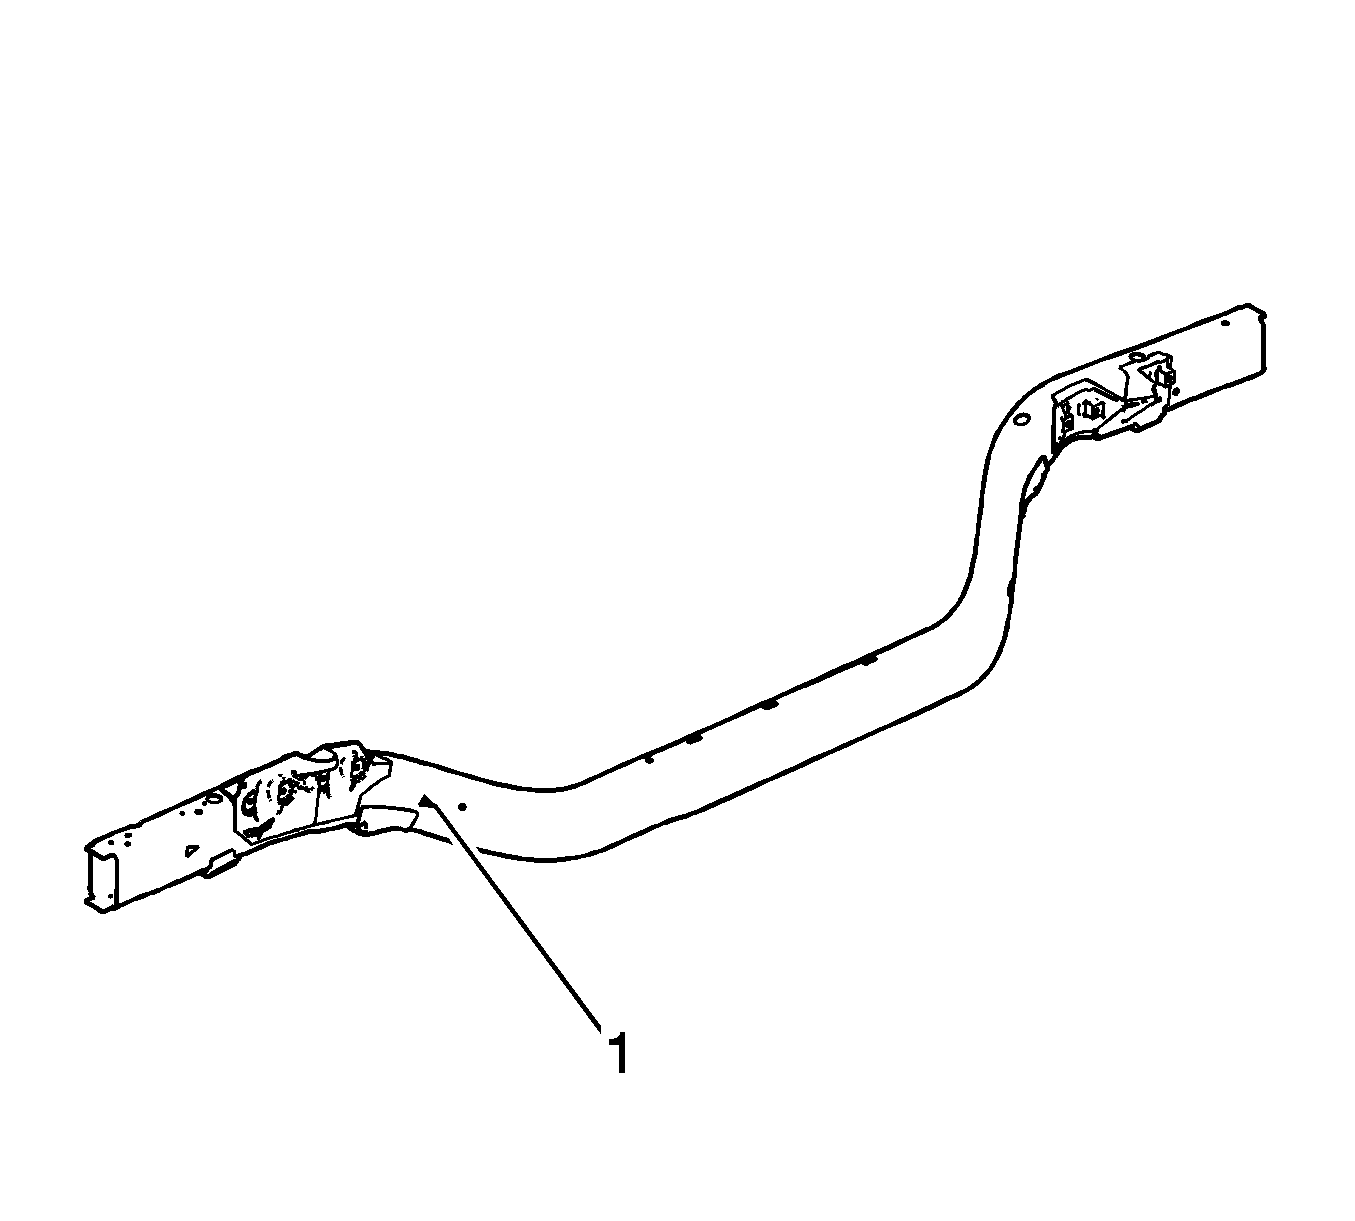
The service rails are complete rail assemblies for the left and the right sides, 6063-T7, hydro-formed aluminum parts, which correlate directly with the die mark (1) located on the front frame rails
Caution: Refer to Approved Equipment for Collision Repair Caution in the Preface section.
- Disable the SIR system. Refer to SIR Disabling and Enabling.
- Disconnect the negative battery cable. Refer to Battery Negative Cable Disconnection and Connection.
- Remove all related panels and components.
- Remove the front impact bar. Refer to Front Bumper Impact Bar Replacement.
- Note the location and remove the sealers and anti-corrosion materials from the repair area, as necessary. Refer to Anti-Corrosion Treatment and Repair.
- Repair as much of the damage as possible to the factory specifications.
- Use J 42058 to secure the vehicle if pulling and straightening are required.
- Inspect the front of the dash panel, floor panels, and all other sheet molded compound (SMC) and carbon fiber for cracks or areas that may need to be repaired or resealed.
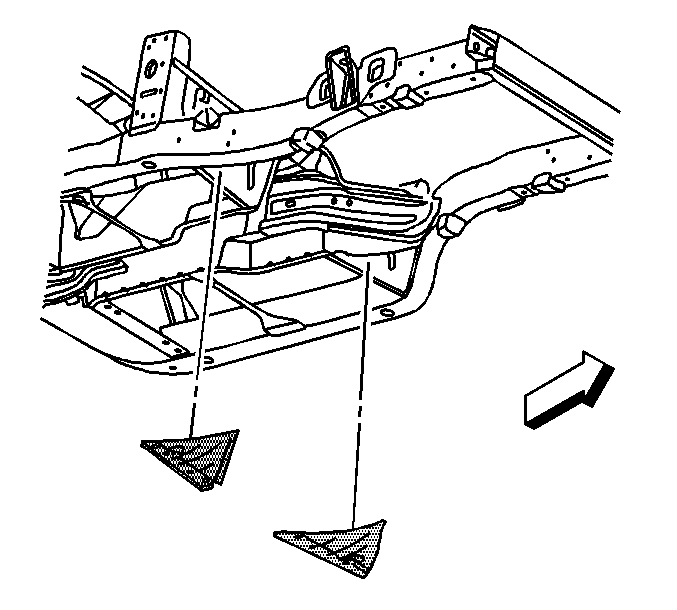
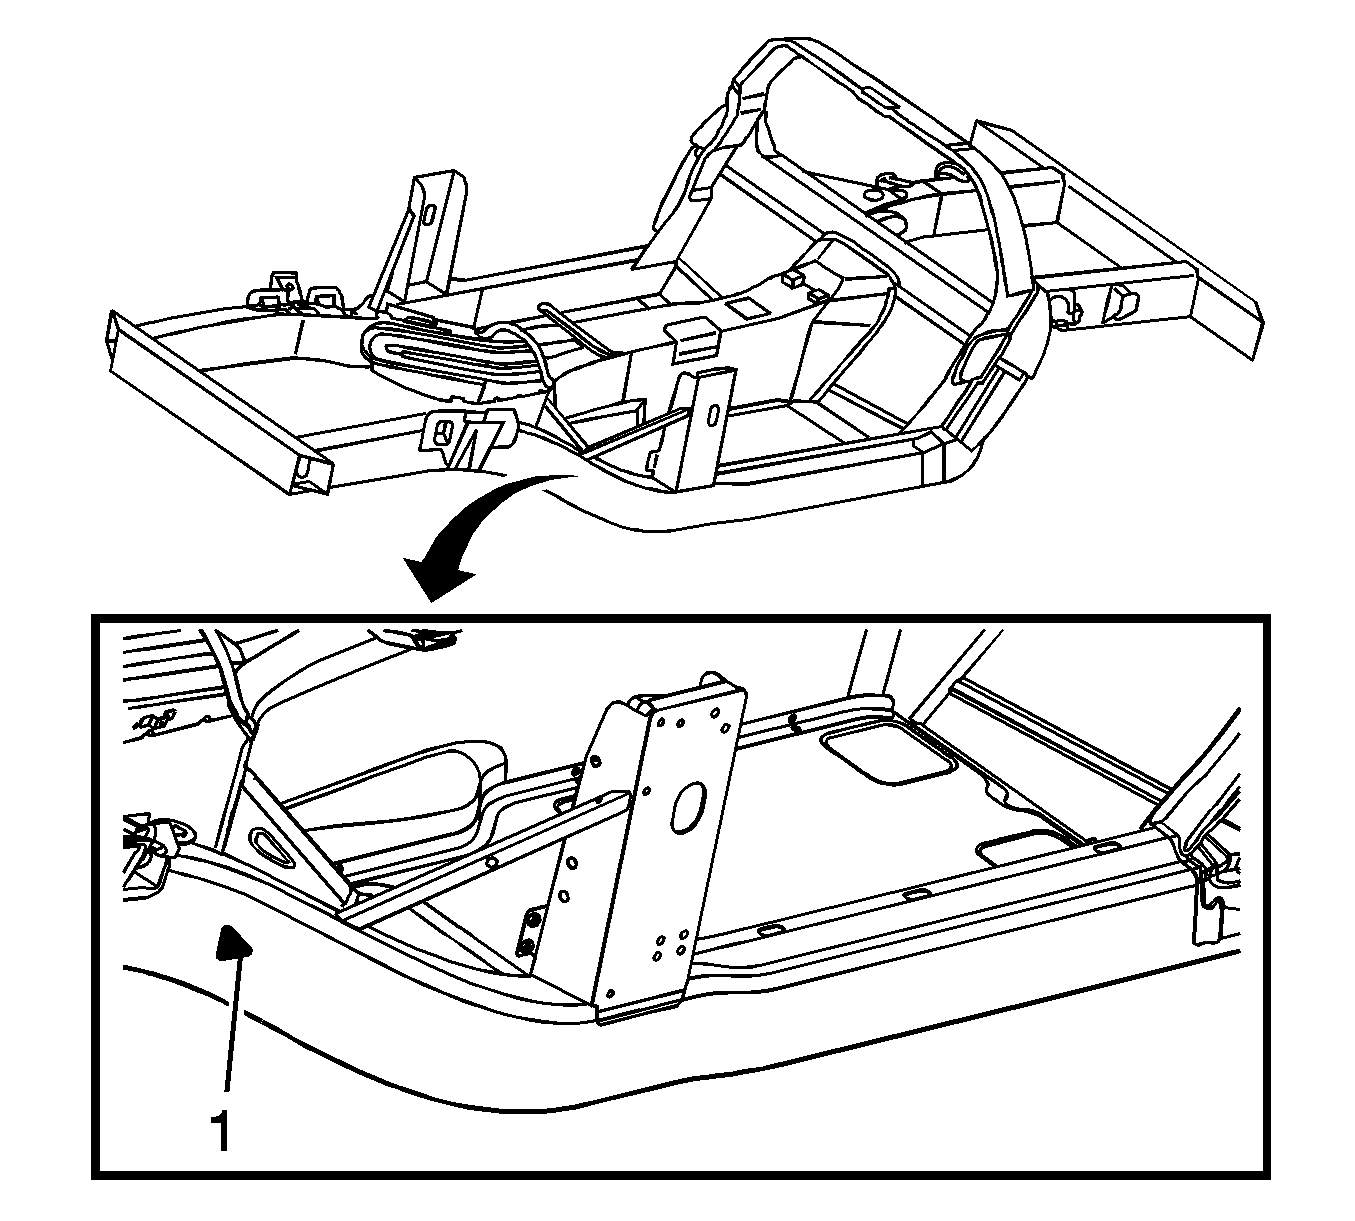
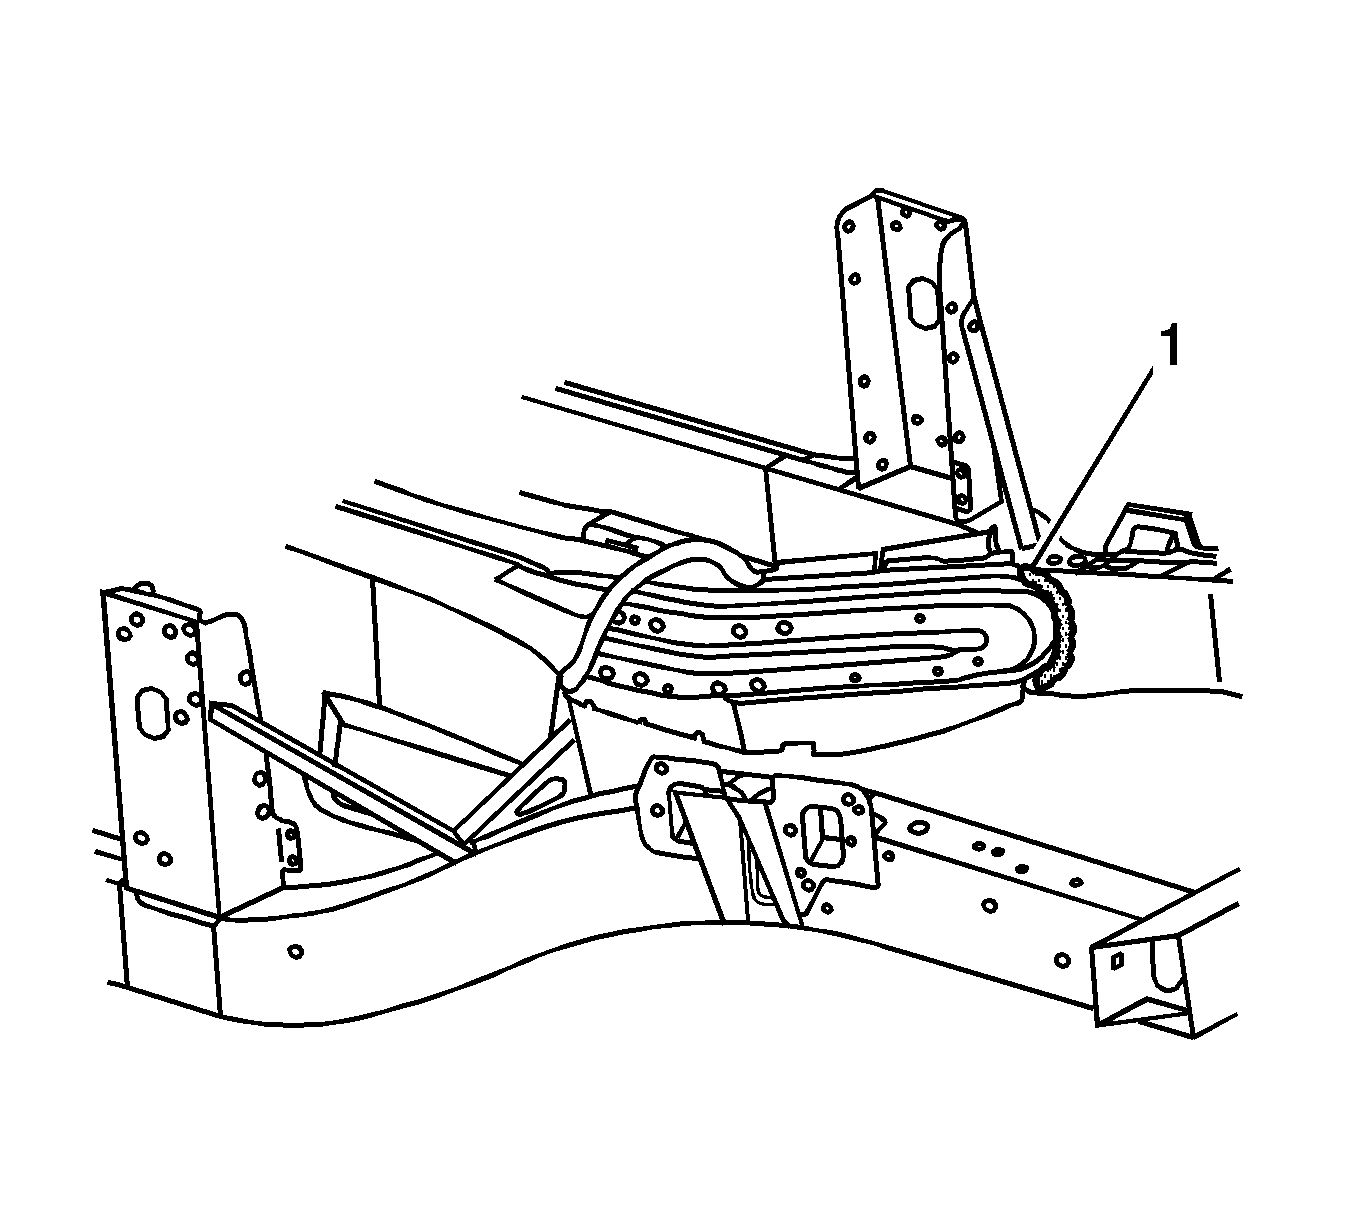
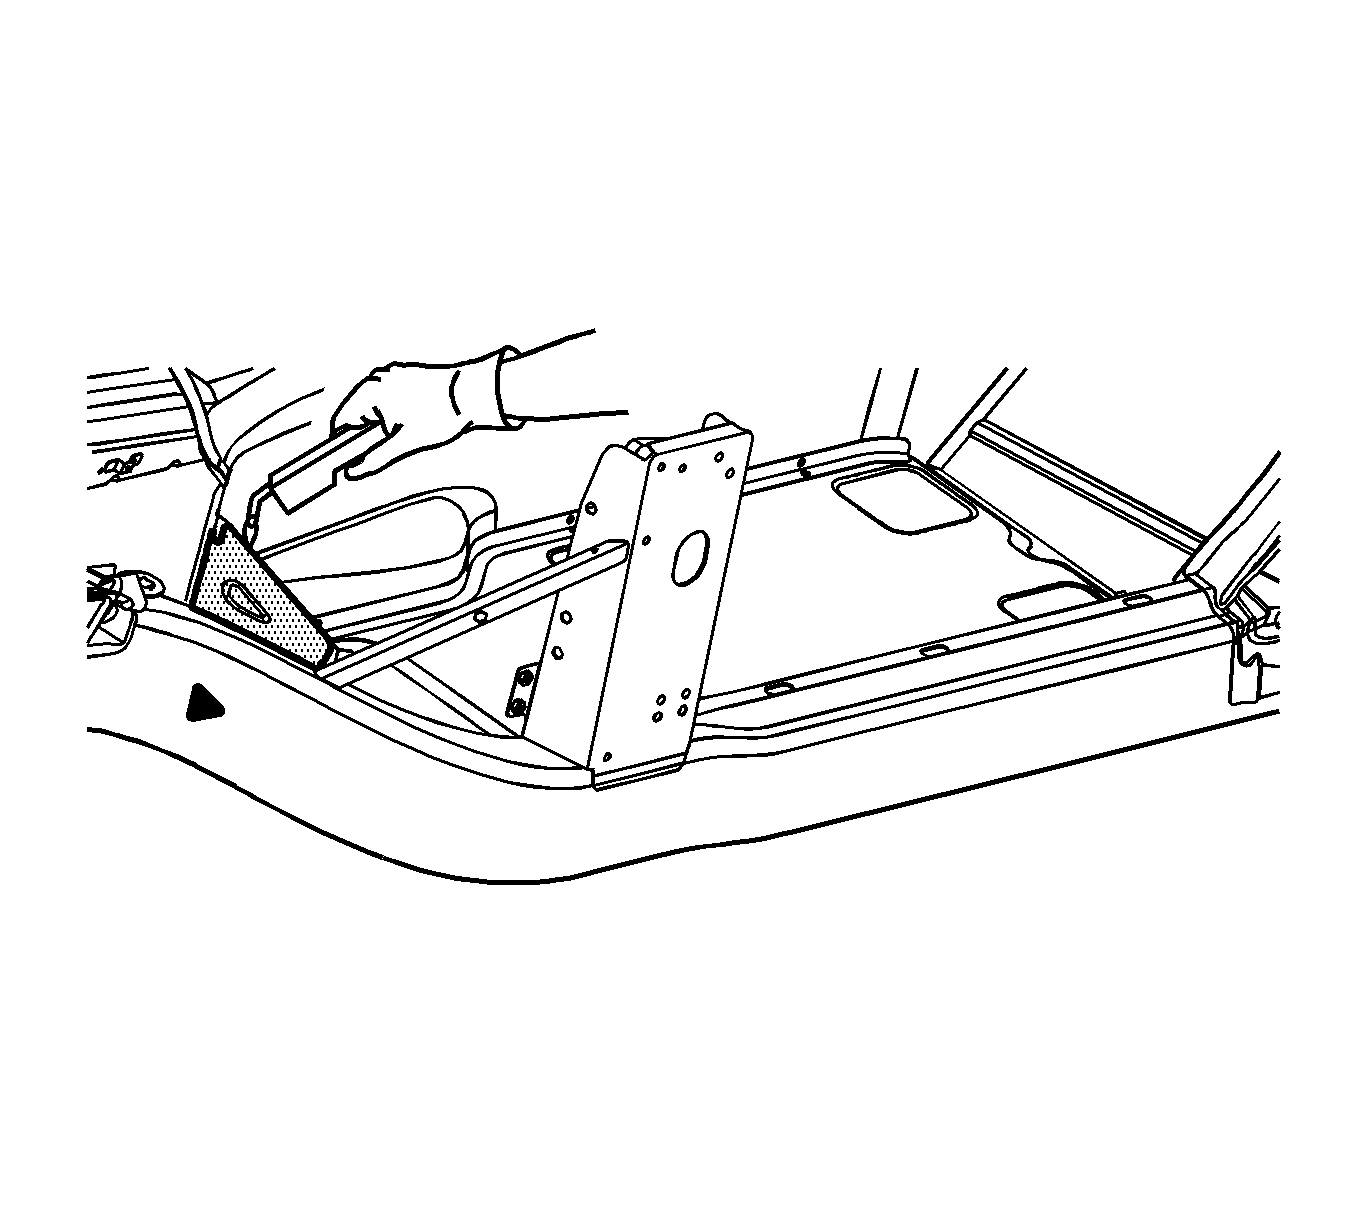
- Locate and remove all factory welds attaching the upper extension panel (1) to the structure. Note the location of the welds for installation of the upper extension panel.
- Using a drill with a 6 mm (1/4 in) bit, locate and remove all SPRs. Note the number and location of the SPRs for installation of the extension panel.
- Remove the upper extension panel (1).
- Remove the front floor panel. Refer to Floor Panel Replacement.
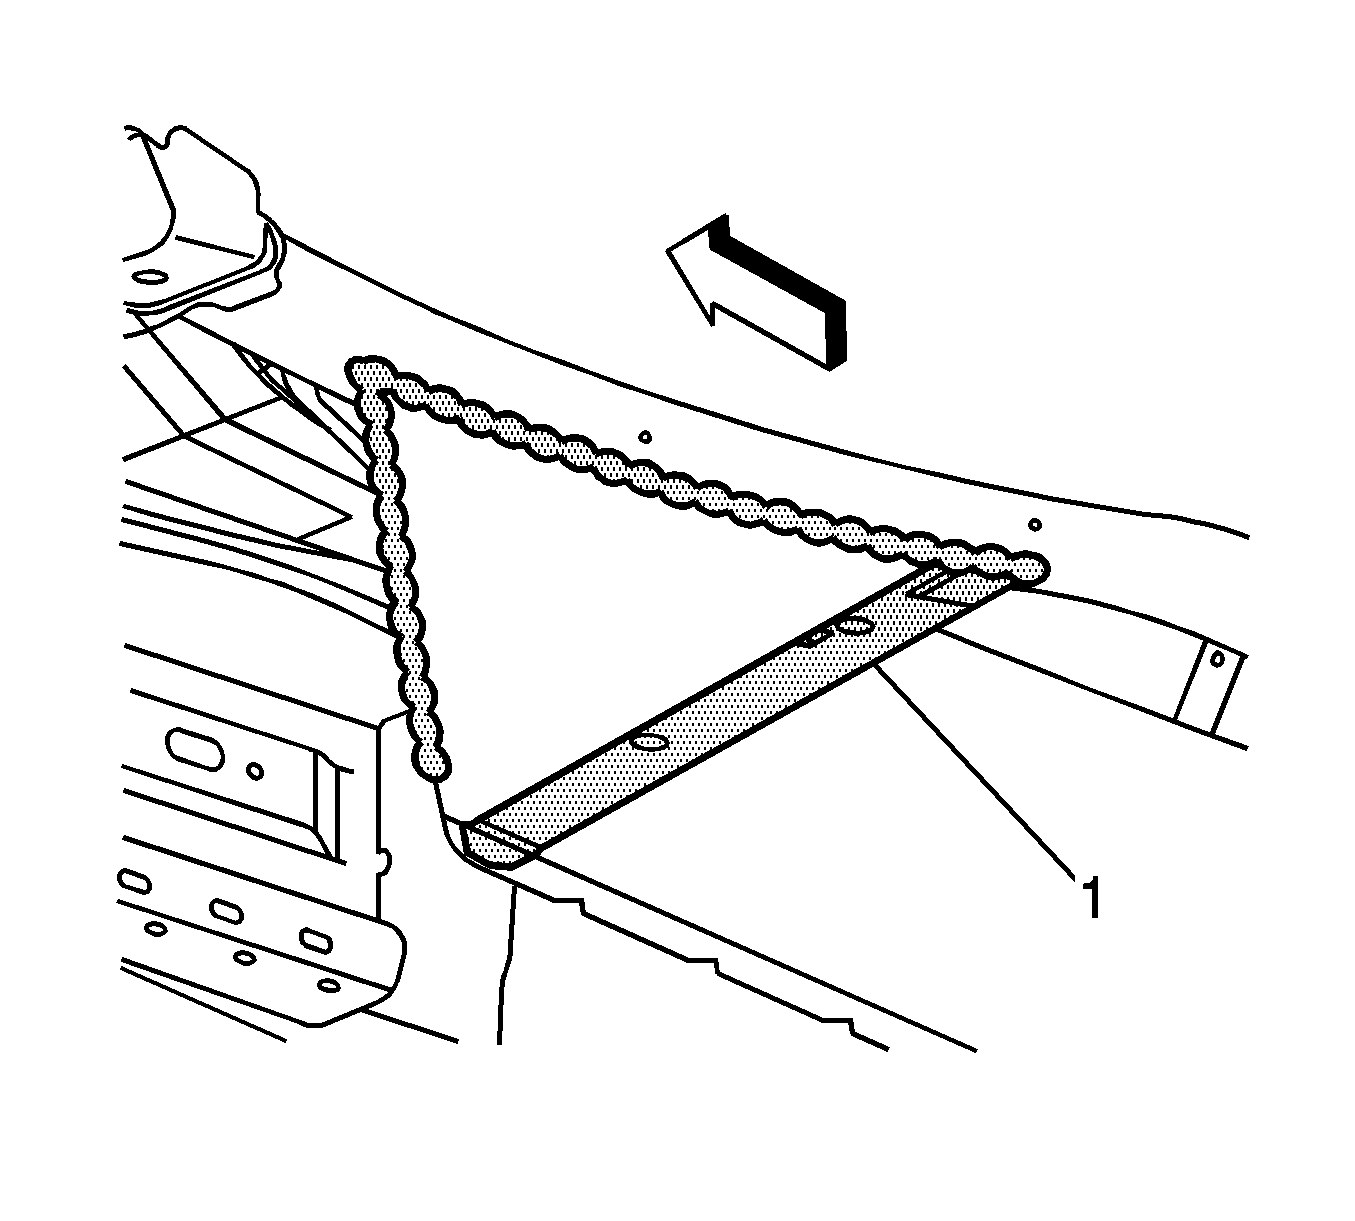
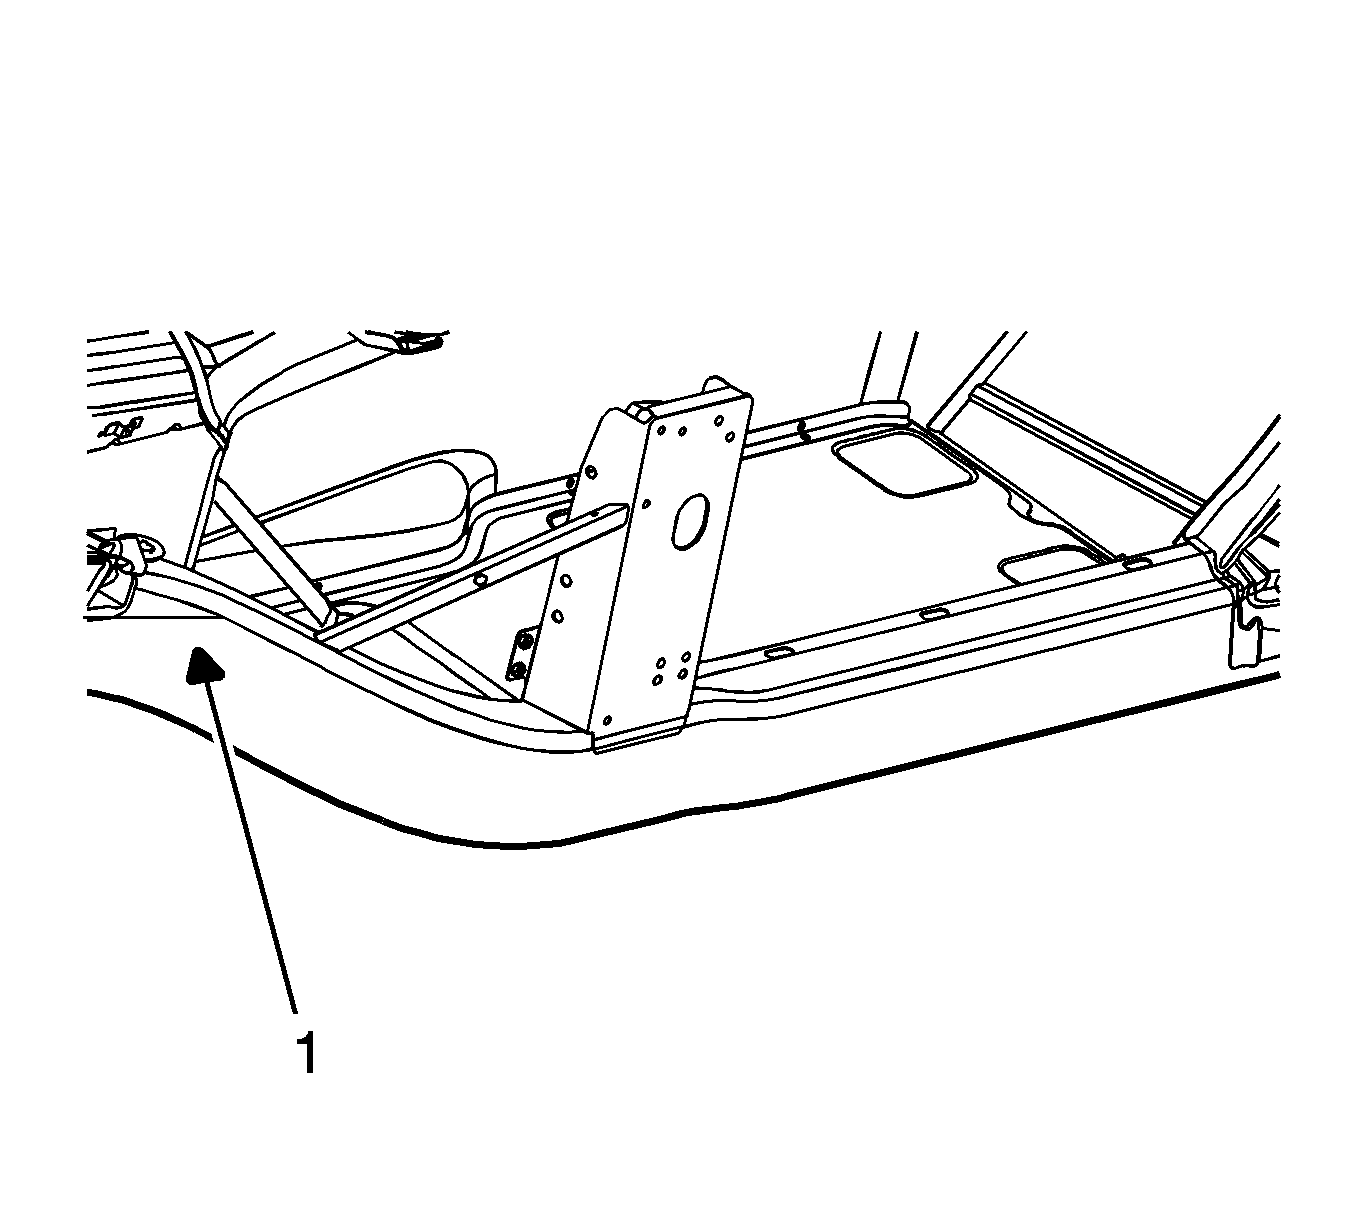
- Locate and remove all factory welds (1) attaching the lower extension panel to the structure. Note the location of the welds for installation of the lower extension panel.
- Locate and remove all factory SPRs attaching the lower extension panel to the structure. Note the location and number of SPRs for re-installation of the lower extension panel
- Remove the lower extension panel.
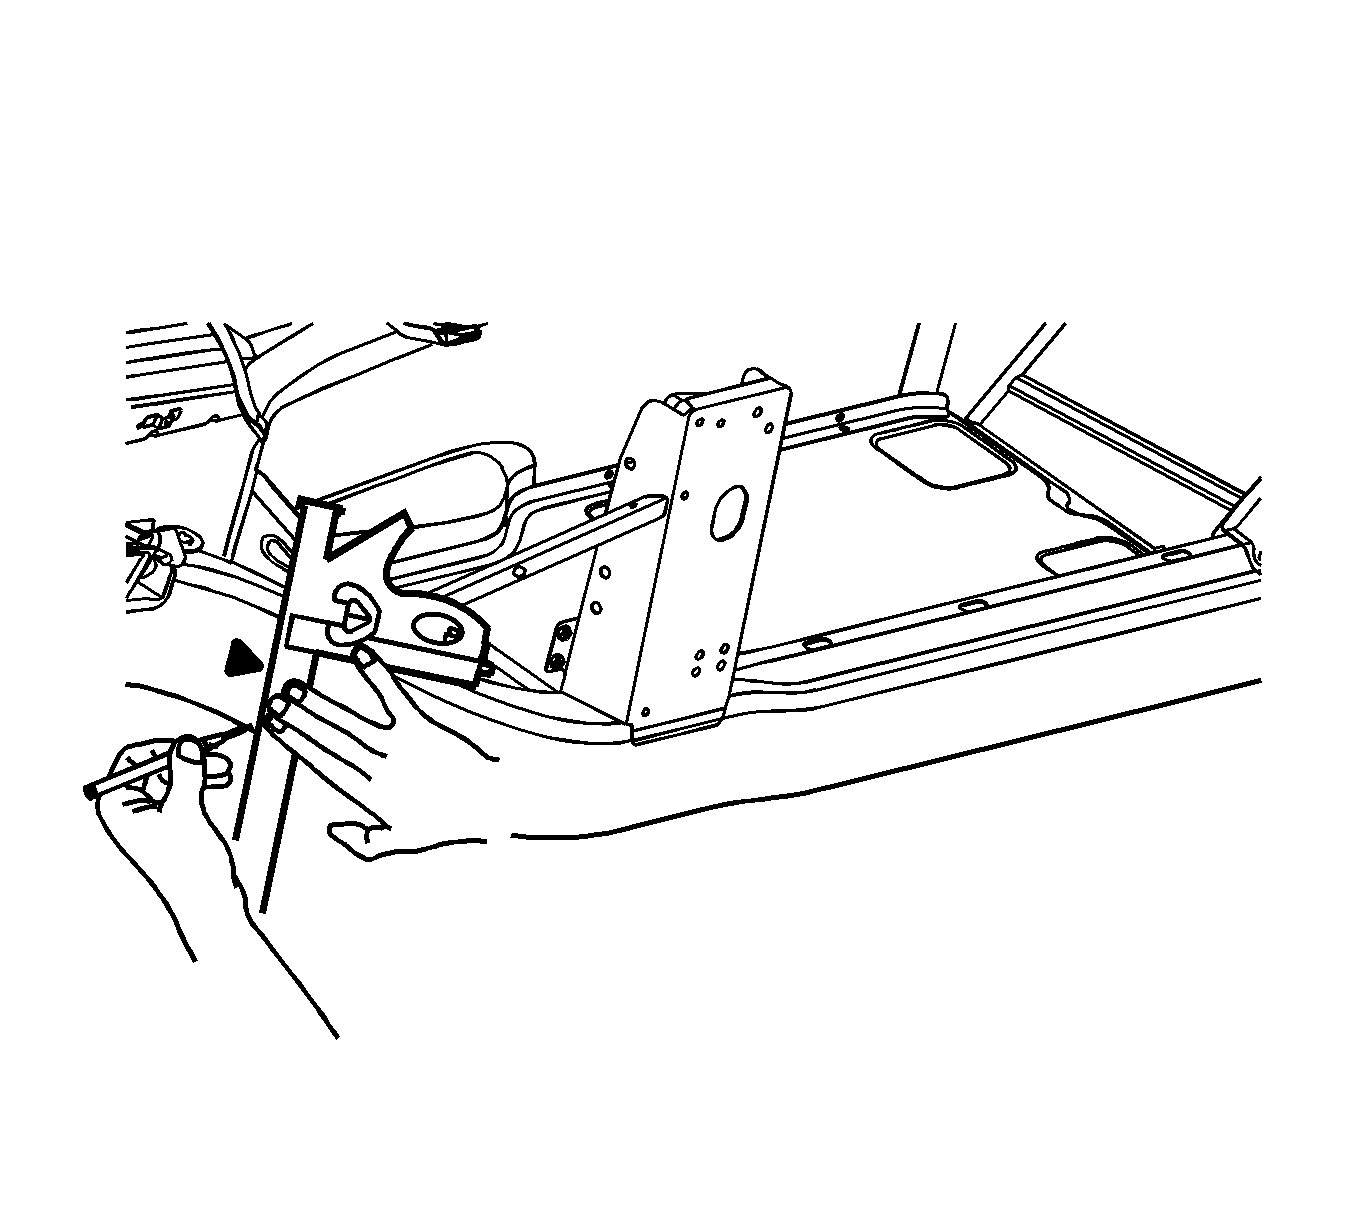
- Locate and remove all factory welds (1) attaching the 2 tunnel braces to the frame rail. Note the location of the welds for installation of the tunnel braces. Make cuts favoring the frame rail side of the welds.
- Locate the die-mark (1) on the damaged frame rail.
- At the die mark align a sliding square or similar tool square to surface to the vertical walls of the frame rail.
- Scribe a line to both sides of the frame rail.
- Apply masking tape (1) to the scribe line completely around the frame rail.
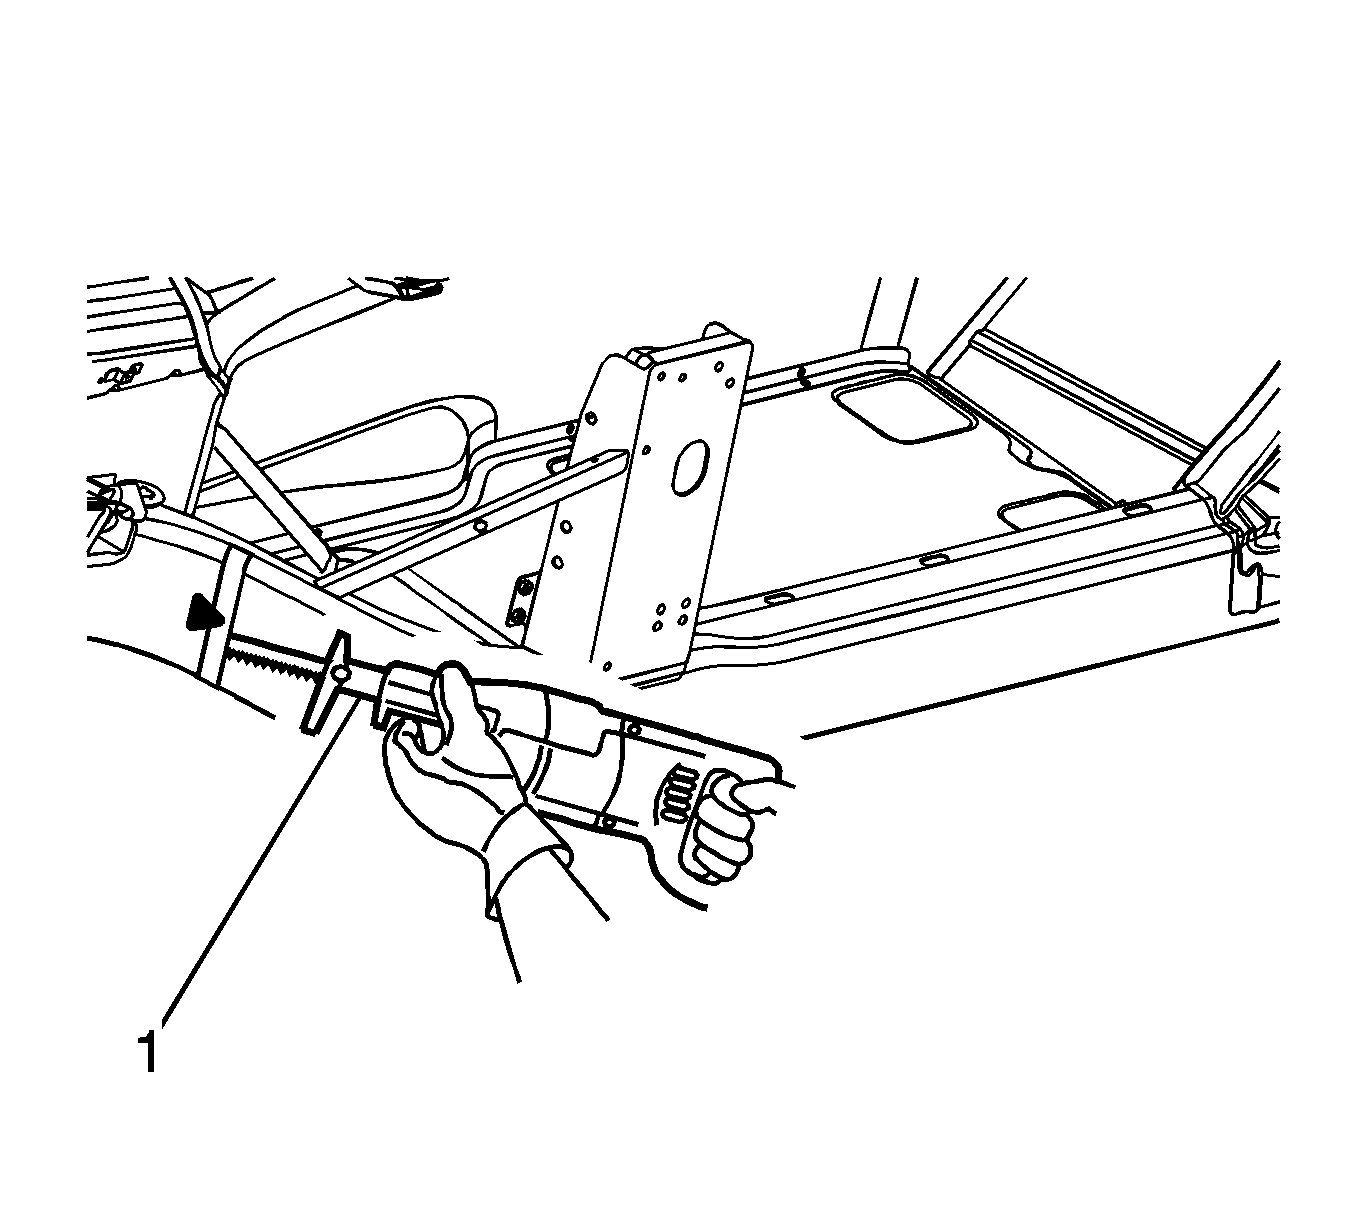
- Cut the frame rail at the rear edge of the tape line using a reciprocating saw (1) or equivalent tool.
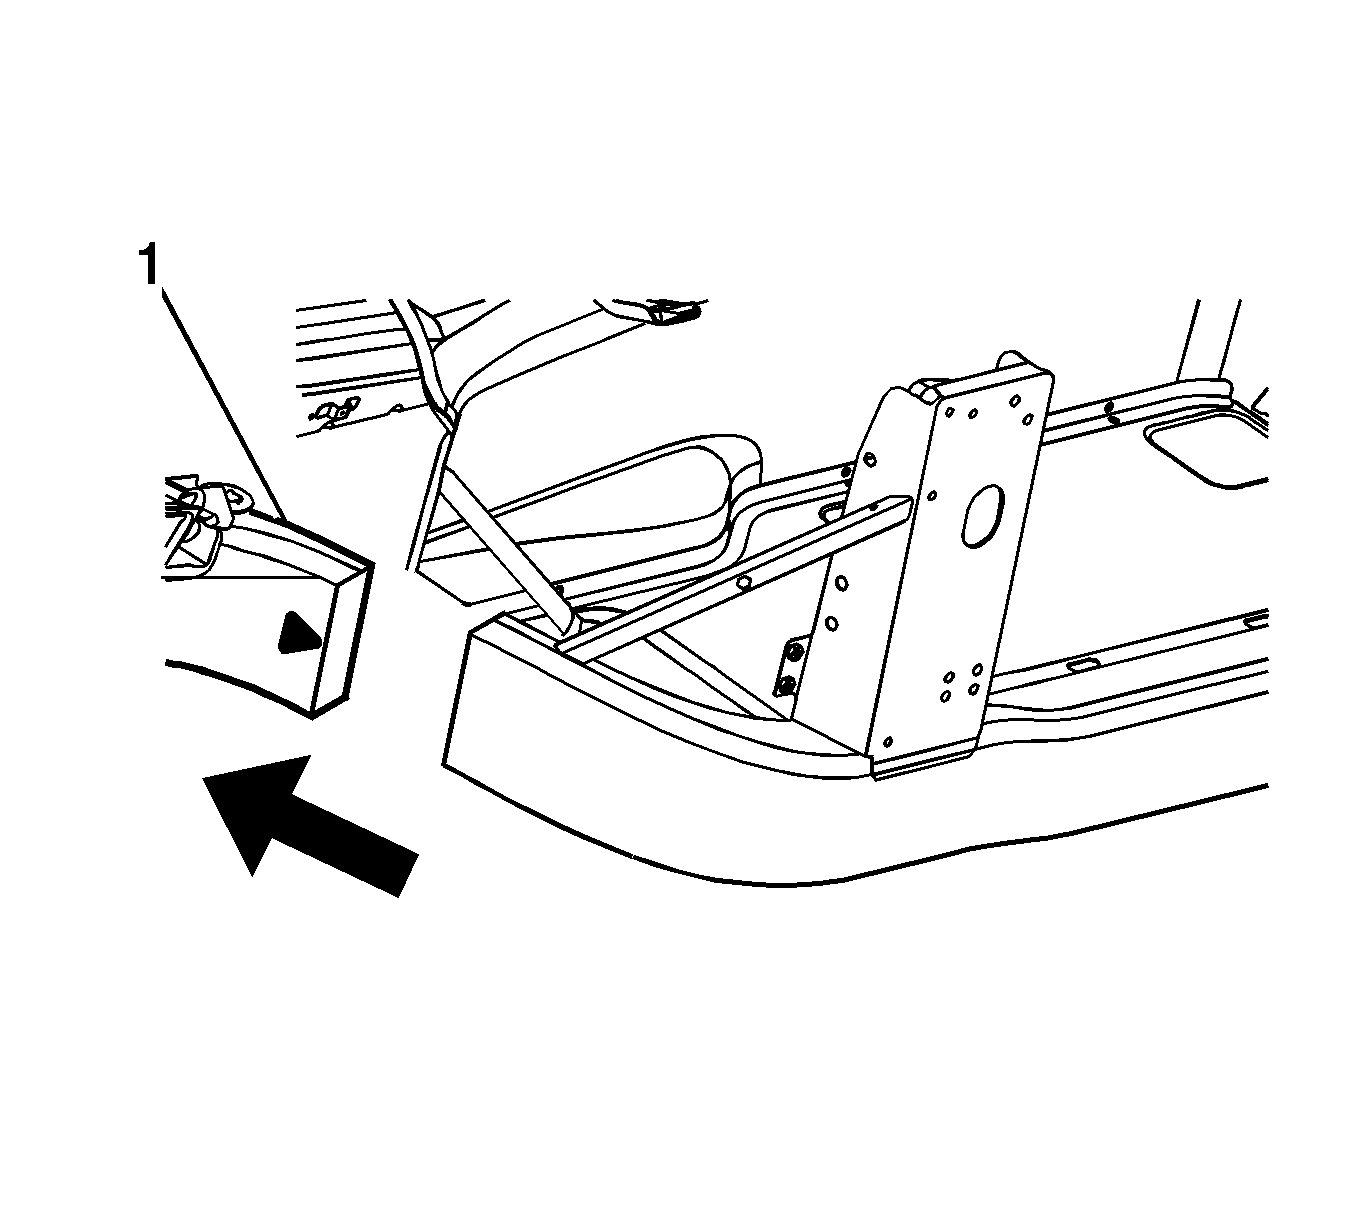
- Remove the damaged frame rail section (1).

Important: Hand tools, saw blades and abrasives used for aluminum repairs should be dedicated for aluminum only to prevent contamination.
Important: PULSED-MIG (P-MIG) welding is an OPTION for replacing self-piercing rivets (SPR). Drill 10 mm (3/8 in) plug weld holes for each SPR.

Caution: Refer to Collision Sectioning Caution in the Preface section.
Installation Procedure
- Grind the existing frame rail sectioning location to a 60 degree angle.
- Locate the die-mark on the service frame rail.
- Cut the new frame section from the service frame rail assembly.
- Perform the sleeved butt-joint sectioning. Refer to Sleeved Butt Joint Repair.
- Clean and prepare all of the welded mating surfaces.
- Position the service frame section (1) to the existing frame.
- Maintain a gap of one frame rail metal thickness at the sectioning joint (1) and clamp in place.
- Inspect the frame measurements three-dimensional to ensure proper position of the service frame section.
- Using a PULSED-MIG (P-MIG) welder, weld 50 mm (2 in) stitch welds to the top and bottom of the sleeve joint.
- Using a P-MIG welder, weld (1) 50 mm (2 in) welds to the inner and outer vertical walls of the sleeve joint.
- Inspect the frame measurements three-dimensional to ensure proper position of the service frame section.
- Using a P-MIG welder, complete the welding of the sleeve joint using the 2 minute cooling down period for every 2 minutes or 100 mm (4 in) of welding.
- Using a P-MIG welder, stitch weld (1) the tunnel braces to the structure duplicating the factory welds.
- Install the lower extension panel.
- Using a P-MIG welder, stitch weld (1) the lower floor extension panel to the structure duplicating the factory welds.
- Drill 6 mm (1/4 in) holes in the service part as necessary in the locations noted on the original panel.
- Countersink the drilled-out hole with using the structural monobolt rivet.
- Using a rivet gun, attach the lower floor extension panel to the structure duplicating the number of factory SPRs.
- Install the upper extension panel (1).
- Using a P-MIG welder, weld the upper extension panel to the structure duplicating the factory welds.
- Using a rivet gun, attach the upper floor extension panel to the structure duplicating the number of factory SPRs.
- Install the front impact bar. Refer to Front Bumper Impact Bar Replacement.
- Apply the sealers and anti-corrosion materials to the repair area, as necessary. Refer to Anti-Corrosion Treatment and Repair.
- Paint the repair area. Refer to Basecoat/Clearcoat Paint Systems.
- Install all related panels and components.
- Connect the negative battery cable. Refer to Battery Negative Cable Disconnection and Connection.
- Enable the SIR system. Refer to SIR Disabling and Enabling.

Caution: Refer to Collision Sectioning Caution in the Preface section.
Important: Use a stainless steel brush to remove the oxide layer prior to welding.

Important: Recommend 2 weld passes (root and cap).
Recommend wire alloy is 5356 and wire size is.035. The shielding gas is 100 percent Argon. A 2 minute cooling down period is recommend for every 2 minutes or 100 mm (4 in) of welding.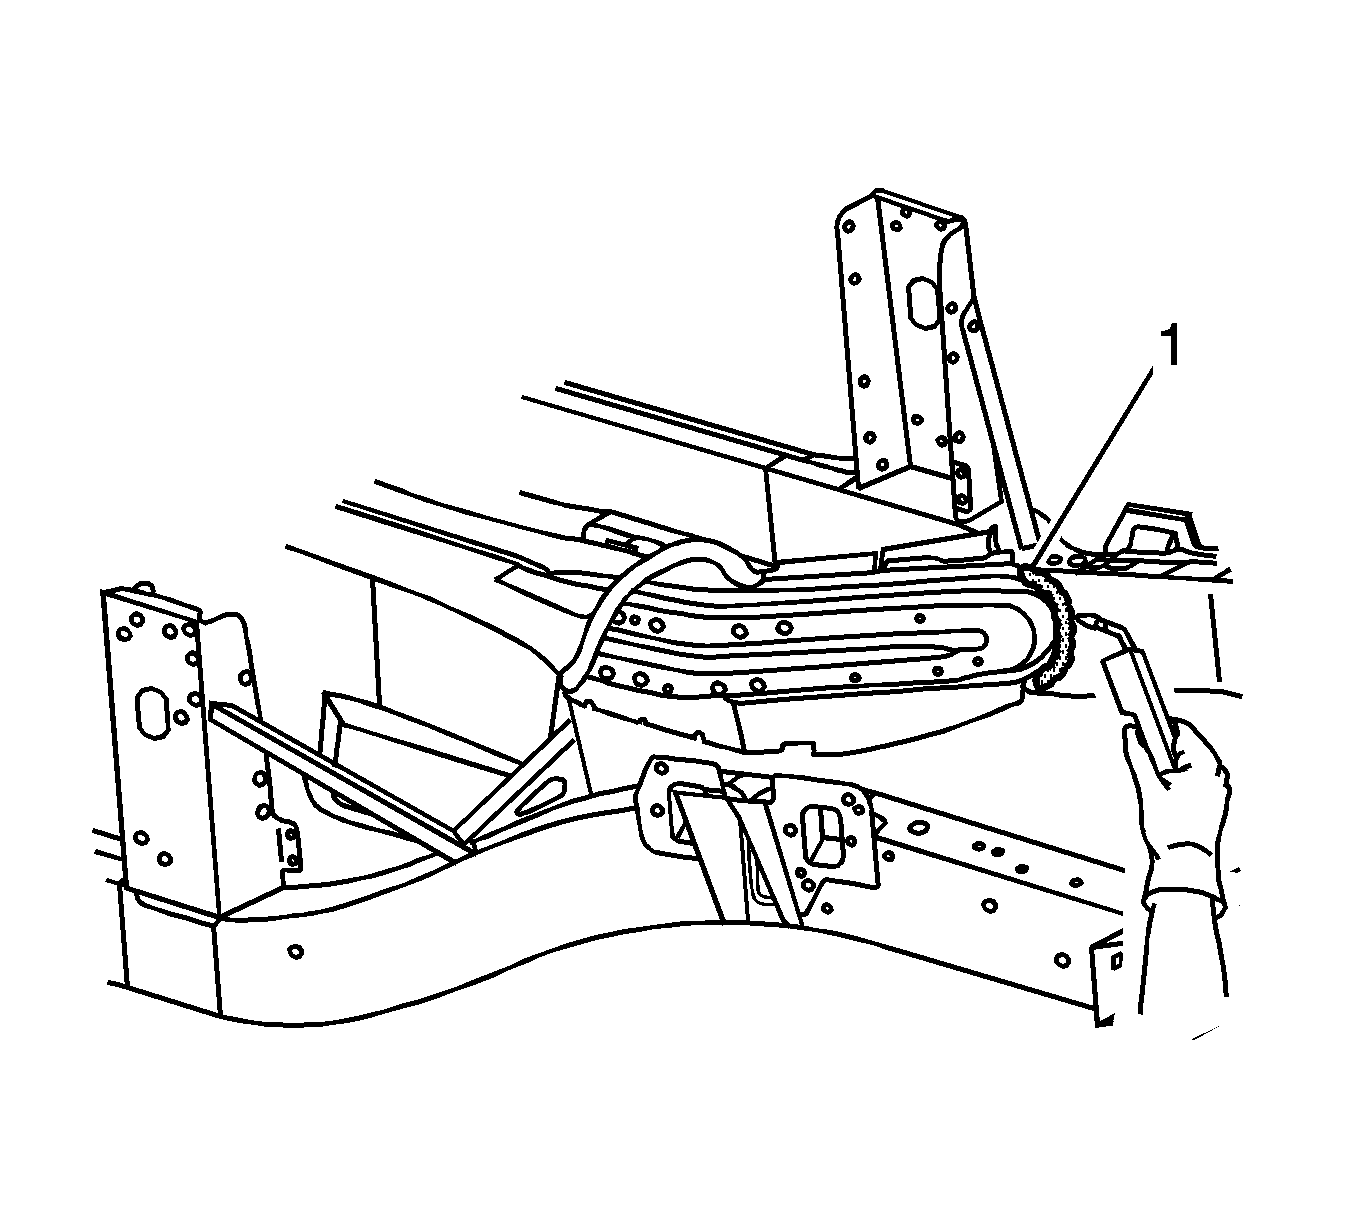
Important: A 2 minute cooling down period is recommend for every 2 minutes or 100 mm (4 in) of welding.
Important: A 2 minute cooling down period is recommend for every 2 minutes or 100 mm (4 in) of welding.
Important: Replace the SPRs with a structural monobolt rivet, GM P/N 19120691..
The structural monobolt rivet requires a special nose tip SPX P/N BO48073.
Important: Replace the SPRs with a structural monobolt rivet, GM P/N 19120691.
The structural monobolt rivet requires a special nose tip SPX P/N BO48073.