Tools Required
| • | J 34730-1A Fuel Pressure Gage |
| • | J 37088-A Tool Set, Fuel Line Quick Connect Separator |
Removal Procedure
- Disconnect the negative battery cable. Refer to Battery Negative Cable Disconnection and Connection .
- Remove the engine sight covers. Refer to Upper Intake Manifold Sight Shield Replacement .
- Relieve the fuel system pressure. Refer to Fuel Pressure Relief .
- Using compressed air, clean the fuel injector and intake manifold.
- Disconnect the fuel feed line (1) from the fuel rail (2).
- Mark the fuel injector to the electrical connector. Disconnect the electrical connectors.
- Remove the intake manifold bolts (3).
- Remove the mounting bolts for the fuel rail (4).
- Remove the fuel rail assembly (2) from the intake manifold (10).
- Remove the fuel injectors (7) from the fuel rail. Refer to Fuel Injector Replacement .
Caution: Refer to Battery Disconnect Caution in the Preface section.
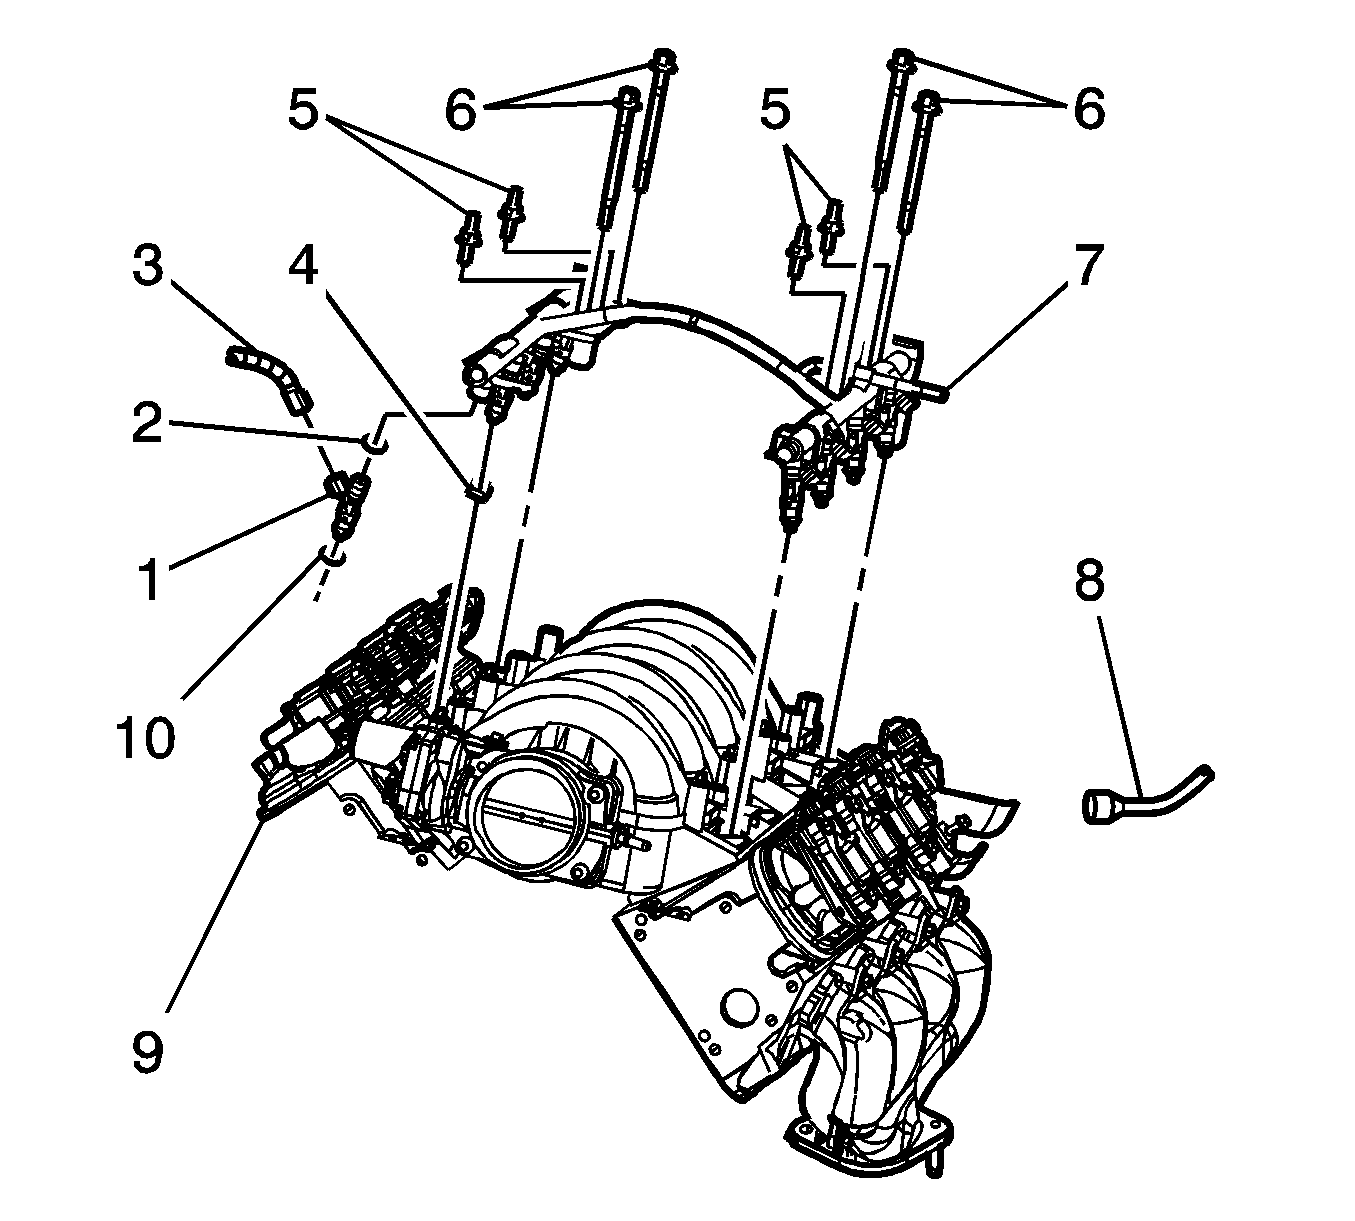
Important: Before disconnecting the electrical connectors, mark the relationship of the electrical connector to the fuel rail injector fitting. This will ensure the proper electrical connector sequence for reassembly.
Installation Procedure
- Install the fuel injectors (7) in the fuel rail (2). Refer to Fuel Injector Replacement .
- Install the fuel rail (2) to the intake manifold (10).
- Apply a 5 mm (0.020 in) band of GM P/N 12345382 (Canadian P/N 10953489) threadlock or equivalent to the threads of the fuel rail and intake manifold bolts.
- Install the intake mounting bolts (3).
- Install the fuel rail (4) mounting bolts.
- Reconnect the electrical connectors (5) for the fuel injectors (7).
- Reconnect the fuel feed hose (1) to the fuel rail (2).
- Reconnect the negative battery cable.
- Perform the following procedure in order to inspect for leaks:
- Install the engine sight covers. Refer to Upper Intake Manifold Sight Shield Replacement .
- Program the transmitters. Refer to Transmitter Programming .
Important: When installing the fuel injectors, apply a small amount of clean motor oil to the O-rings.
Notice: Refer to Fastener Notice in the Preface section.
Caution: The fuel rail stop bracket must be installed onto the engine assembly. The stop bracket serves as a protective shield for the fuel rail in the event of a vehicle frontal crash. If the fuel rail stop bracket is not installed and the vehicle is involved in a frontal crash, fuel could be sprayed possibly causing a fire and personal injury from burns.
Tighten
Tighten the intake manifold bolts to 10 N·m (89 lb in).
Tighten
Tighten the intake manifold bolts to 10 N·m (89 lb in).
Important: Ensure that the electrical connectors are attached to the proper fuel injector.
| 9.1. | Turn the ignition switch ON for 2 seconds. |
| 9.2. | Turn the ignition switch OFF for 10 seconds. |
| 9.3. | Turn the ignition switch ON. |
| 9.4. | Inspect for fuel leaks. |
