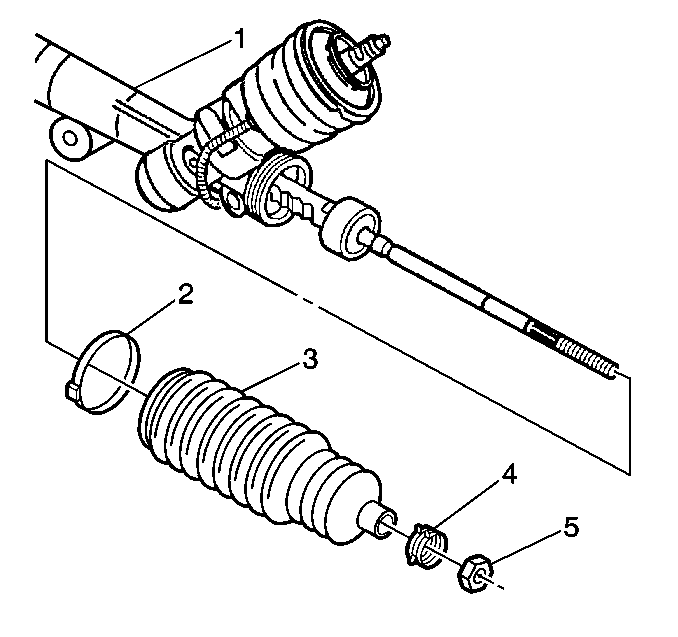
Rack and Pinion Inner Tie Rod Replacement Left
Removal Procedure
- Raise and support the
vehicle. Refer to
Lifting and Jacking the Vehicle
in General Information.
- Remove the tire and wheel assembly. Refer to
Tire and Wheel Removal and Installation
in Tires
and Wheels.
- Place a drain pan under the vehicle and drain the power steering
fluid.
- Remove the rack and pinion boot (3) from the power steering gear.
Refer to
Steering Gear Boot Replacement - Off Vehicle
.
- Remove the shock dampener
(3) from the rack inner tie rod assembly by sliding the shock dampener back
on the rack.

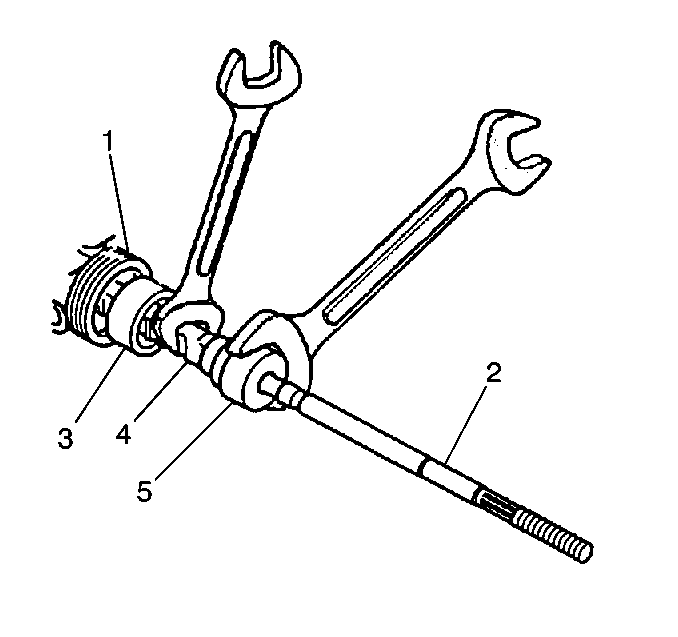
Important: The steering gear rack must be held stationary while removing and installing
the inner tie rod end to prevent steering gear damage.
- Remove the inner tie rod assembly from the rack assembly as follows:
| 6.1. | Place an appropriate size wrench on the flat of the rack assembly
(4). |
| 6.2. | Place another wrench on the flats of the inner tie rod housing
(5). |
| 6.3. | Rotate the inner tie rod housing counterclockwise until the inner
tie rod (2) separates from the rack. |
- Remove the old tread locking compound from the threads of the
rack (1) and from the inner tie rod (3).
Installation Procedure
- Install the shock dampener
(3) to the rack.
Important: Clean the threads prior to thread locking compound application. Check
the expiration date on the thread locking compound container. Do not use too
much thread locking compound; use only enough to evenly coat the threads.
- Apply thread locking compound (Loctite® 222) onto the threads
of the inner tie rod (2).
Notice: Use the correct fastener in the correct location. Replacement fasteners
must be the correct part number for that application. Fasteners requiring
replacement or fasteners requiring the use of thread locking compound or sealant
are identified in the service procedure. Do not use paints, lubricants, or
corrosion inhibitors on fasteners or fastener joint surfaces unless specified.
These coatings affect fastener torque and joint clamping force and may damage
the fastener. Use the correct tightening sequence and specifications when
installing fasteners in order to avoid damage to parts and systems.
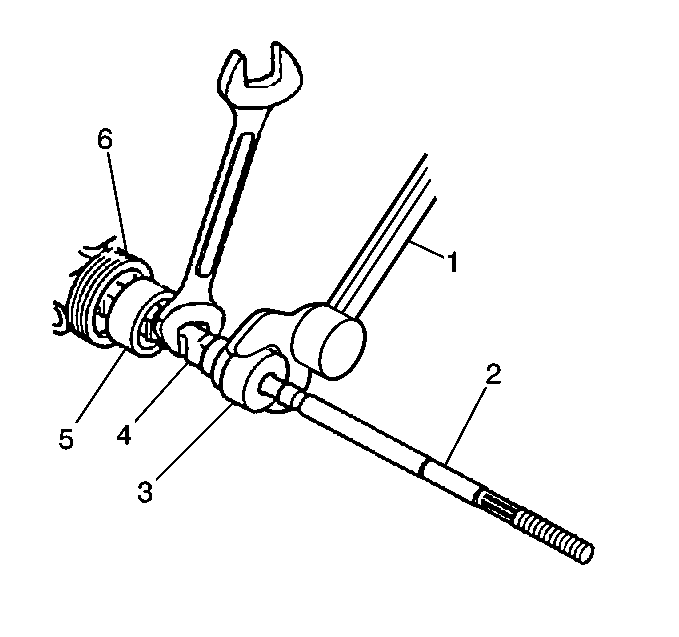
- Install the inner
tie rod (2) to the rack as follows:
| • | Place a wrench on the flats of the rack assembly (4). |
| • | Place another wrench on the flats of the inner tie rod housing
(5). |
Tighten
Tighten the inner tie rod (2) to 100 N·m (74 lb ft).
- Slide the shock dampener (3) over the inner tie rod housing until
it engages.
- Install the rack and pinion boot to the steering gear. Refer to
Steering Gear Boot Replacement - Off Vehicle
.
- Install the tire and wheel assembly. Refer to
Tire and Wheel Removal and Installation
in Tires
and Wheels.
- Perform a wheel alignment. Refer to
Wheel Alignment Measurement
in Wheel Alignment.
Rack and Pinion Inner Tie Rod Replacement Right
Removal Procedure
- Place a drain pan under
the vehicle and drain the power steering fluid.
- Raise and support the vehicle. Refer to
Lifting and Jacking the Vehicle
in General Information.
- Remove the tire and wheel assembly. Refer to
Tire and Wheel Removal and Installation
in Tires
and Wheels.
- Remove the rack and pinion boots (3) from both sides of the power
steering gear. Refer to
Steering Gear Boot Replacement - Off Vehicle
.
- Remove the shock dampener
(3) on the left side of the rack from the inner tie rod assembly by sliding
the shock dampener back into the rack.
Important: The steering gear rack must be held stationary while removing the inner
tie rod end to prevent steering gear damage.
- Remove the inner tie rod assembly from the rack assembly as follows:
| 6.1. | Place an appropriate size wrench on the teeth of the rack assembly
(4). |
| 6.2. | Place another wrench on the flats on the inner tie rod housing
(5). |
| 6.3. | Rotate the inner tie rod housing counterclockwise until the inner
tie rod (2) separates from the rack. |
- Remove the old tread locking compound from the threads of the
rack (1) and from the inner tie rod (3).
Installation Procedure
- Install the shock dampener
(3) onto the rack.
Important: Clean the threads prior to thread locking compound application. Check
the expiration date on the thread locking compound container. Do not use too
much thread locking compound; use only enough to evenly coat the threads.
- Apply thread locking compound (Loctite® 222) onto the threads
of the inner tie rod (2).
Notice: Use the correct fastener in the correct location. Replacement fasteners
must be the correct part number for that application. Fasteners requiring
replacement or fasteners requiring the use of thread locking compound or sealant
are identified in the service procedure. Do not use paints, lubricants, or
corrosion inhibitors on fasteners or fastener joint surfaces unless specified.
These coatings affect fastener torque and joint clamping force and may damage
the fastener. Use the correct tightening sequence and specifications when
installing fasteners in order to avoid damage to parts and systems.
- Install the inner
tie rod (2) to the rack as follows:
| • | Place a wrench on the teeth of the rack assembly (4). |
| • | Place another wrench on the flats of the inner tie rod housing
(5). |
Tighten
Tighten the inner tie rod (2) to 100 N·m (74 lb ft).
- Slide the shock dampener (3) over the inner tie rod housing until
it engages.
- Install the rack and pinion boots. Refer to
Steering Gear Boot Replacement - Off Vehicle
.
- Install the tire and wheel assembly. Refer to
Tire and Wheel Removal and Installation
in Tires
and Wheels.
- Perform a wheel alignment. Refer to
Wheel Alignment Measurement
in Wheel Alignment.
