Air Conditioning Compressor Replacement LSJ
Tools Required
J 39400-A Halogen Leak Detector
Removal Procedure
- Recover the refrigerant. Refer to Refrigerant Recovery and Recharging .
- Raise and support the vehicle. Refer to Lifting and Jacking the Vehicle .
- Remove the right front fender liner. Refer to Front Fender Liner Replacement .
- Remove the drive belt. Refer to Drive Belt Replacement .
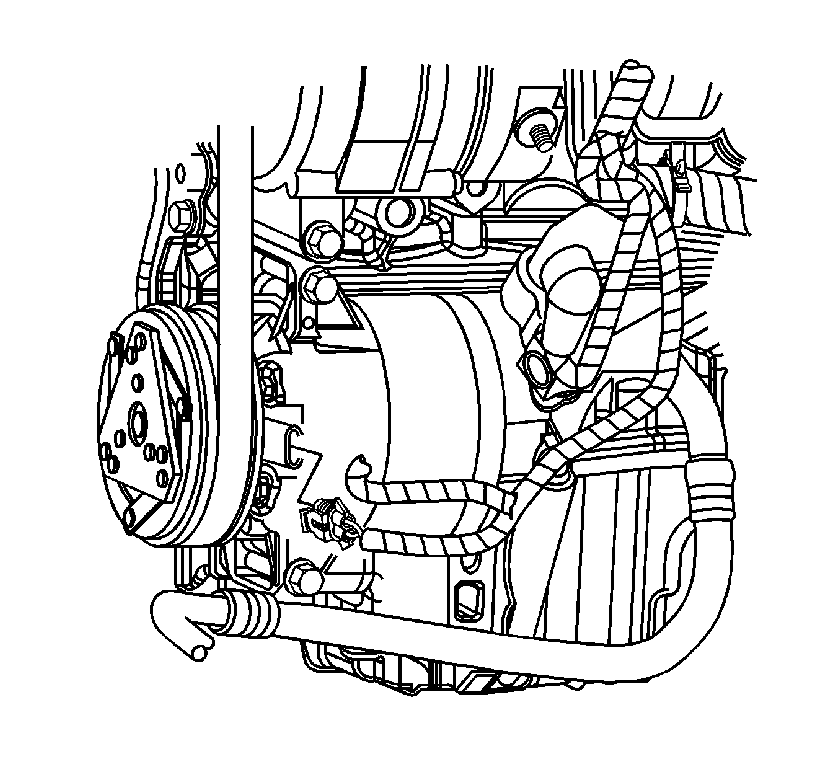
- Disconnect the electrical connector from the compressor.
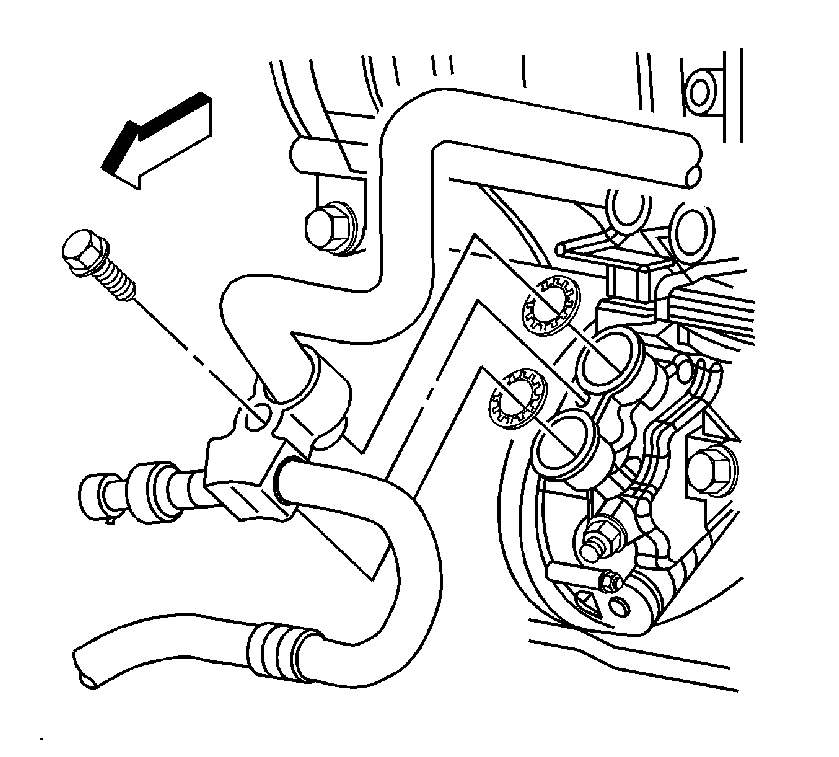
- Remove the compressor and condenser hose assembly bolt from the compressor.
- Remove the compressor and condenser hose assembly from the compressor.
- Remove and discard the sealing washers.
- Remove the auxiliary intercooler pump bolts and position the pump toward the driver side of the vehicle.
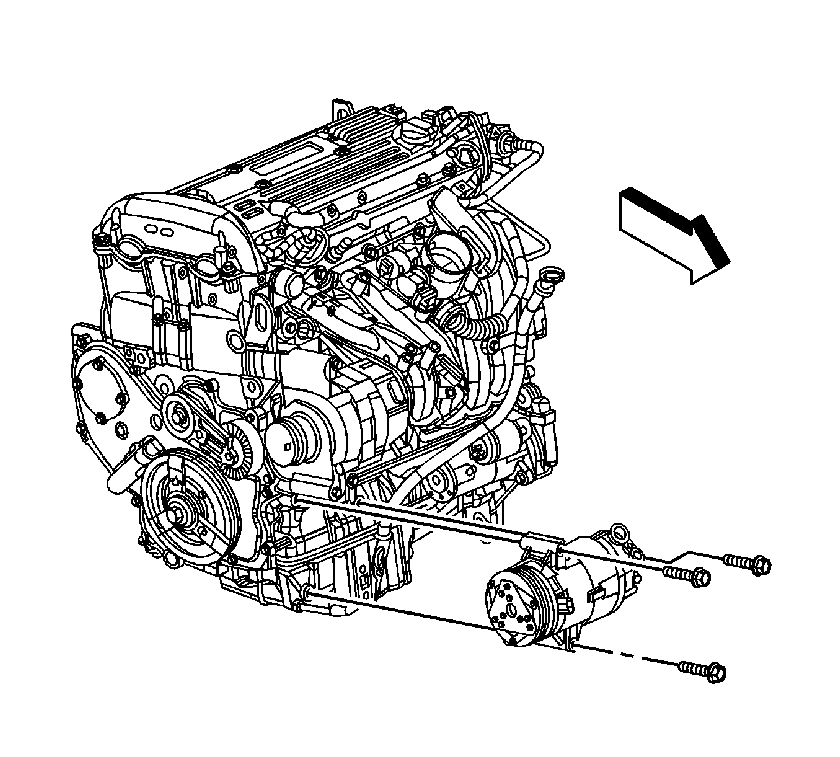
- Remove the compressor mounting bolts.
- Remove the compressor.


Installation Procedure
- If you are replacing the compressor, refer to Air Conditioning Compressor Oil Balancing .
- Install the compressor and the bolts to the engine.
- Install new sealing washers on the hose fittings. Refer to Sealing Washer Replacement .
- Install the hose assembly to the compressor.
- Install the assembly bolt.
- Connect the compressor electrical connector.
- Install the auxiliary intercooler pump.
- Install the drive belt. Refer to Drive Belt Replacement .
- Install the front fender liner. Refer to Front Fender Liner Replacement .
- Lower the vehicle.
- Evacuate and charge the refrigerant system. Refer to Refrigerant Recovery and Recharging .
- Leak test the fittings using J 39400-A .
Important: NEW CVC compressor assemblies are shipped with a partial poly-alkylene glycol (PAG) refrigerant oil charge. Use of the incorrect PAG oil can result in compressor failure.
Notice: Refer to Fastener Notice in the Preface section.
Tighten
Tighten the bolts to 25 N·m (18 lb ft).
Tighten
Tighten the bolt to 20 N·m (15 lb ft).
Tighten
Tighten the pump bolt to 10 N·m (88 lb in).
Air Conditioning Compressor Replacement L61, LE5 - First Design
Tools Required
| • | J 39400-A Halogen Leak Detector |
| • | J 44811 Accessory Belt Tensioner Unloader |
Removal Procedure
- Recover the refrigerant. Refer to Refrigerant Recovery and Recharging .
- Raise and support the vehicle. Refer to Lifting and Jacking the Vehicle .
- Remove the front fender liner. Refer to Front Fender Liner Replacement .
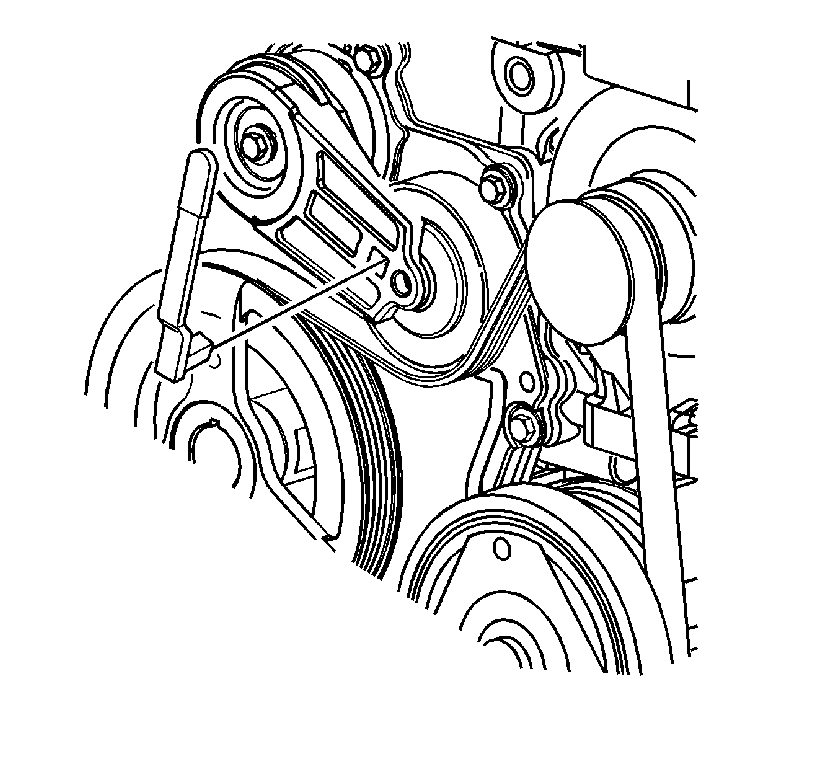
- Use J 44811 to rotate the drive belt tensioner counterclockwise to release the spring tension.
- Remove the drive belt.
- Disconnect the electrical connector from the compressor.
- Remove the compressor and condenser hose assembly bolt from the compressor.
- Remove the compressor and condenser hose assembly from the compressor.
- Remove and discard the sealing washers.
- Remove the compressor mounting bolts.
- Remove the compressor.
Installation Procedure
- If you are replacing the compressor, refer to Air Conditioning Compressor Oil Balancing .
- Install the compressor and the bolts to the engine.
- Install new sealing washers on the hose fittings. Refer to Sealing Washer Replacement .
- Install the hose assembly to the compressor.
- Install the assembly bolt.
- Connect the compressor electrical connector.
- Use J 44811 to rotate the drive belt tensioner counterclockwise to release the spring tension.
- Install the drive belt.
- Install the front fender liner. Refer to Front Fender Liner Replacement .
- Lower the vehicle.
- Evacuate and charge the refrigerant system. Refer to Refrigerant Recovery and Recharging .
- Leak test the fittings using J 39400-A .
Important: NEW CVC compressor assemblies are shipped with a partial poly-alkylene glycol (PAG) refrigerant oil charge. Use of the incorrect PAG oil can result in compressor failure.
Notice: Refer to Fastener Notice in the Preface section.
Tighten
Tighten the bolts to 25 N·m (18 lb ft).
Tighten
Tighten the bolt to 20 N·m (15 lb ft).
Air Conditioning Compressor Replacement L61, LE5 - Second Design
Special Tools
| • | J 39400-A Halogen Leak Detector |
| • | J 44811 Accessory Belt Tensioner Unloader |
Removal Procedure
- Recover the refrigerant. Refer to Refrigerant Recovery and Recharging.
- Raise and support the vehicle. Refer to Lifting and Jacking the Vehicle.
- Remove the right side engine splash shield. Refer to Engine Splash Shield Replacement - Right Side.
- Use J 44811 to rotate the drive belt tensioner counterclockwise to release the spring tension.
- Remove the drive belt.
- Disconnect the electrical connector from the compressor.
- Remove the compressor and condenser hose assembly bolt from the compressor.
- Remove the compressor and condenser hose assembly from the compressor.
- Remove and discard the sealing washers.
- Remove the compressor mounting bolts.
- Remove the compressor.
Installation Procedure
- If you are replacing the compressor, refer to Air Conditioning Compressor Oil Balancing.
- Install the compressor and the bolts to the engine.
- Install new sealing washers on the hose fittings. Refer to Sealing Washer Replacement.
- Install the hose assembly to the compressor.
- Install the assembly bolt.
- Connect the compressor electrical connector.
- Use J 44811 to rotate the drive belt tensioner counterclockwise to release the spring tension.
- Install the drive belt.
- Install the right side engine splash shield. Refer to Engine Splash Shield Replacement - Right Side.
- Lower the vehicle.
- Evacuate and charge the refrigerant system. Refer to Refrigerant Recovery and Recharging.
- Leak test the fittings using J 39400-A .
Notice: Do NOT mix refrigerant oils. Use of incorrect refrigerant oil will cause compressor failure. This compressor uses a low viscosity refrigerant oil, Saturn P/N 22695048.
Important: NEW compressor assemblies are shipped with a partial poly-alkylene glycol (PAG) refrigerant oil charge. Use of the incorrect PAG oil can result in compressor failure.
Notice: Refer to Fastener Notice in the Preface section.
Tighten
Tighten the bolts to 22 N·m (16 lb ft).
Tighten
Tighten the bolt to 20 N·m (15 lb ft).
