Your vehicle may have this feature. When on, an automatic dimming mirror automatically dims to the proper level to minimize glare from lights behind you after dark.
The mirror also includes a dual display in the upper right corner of the mirror face. The compass reading and the outside temperature will both appear in the display at the same time.
(On/Off): This is the on/off button.Temperature and Compass Display
Press the on/off button, located to the far left, briefly to turn the compass/temperature display on or off.
If the display reads CAL, you will need to calibrate the compass. For more information on calibration, see below.
To adjust between Fahrenheit and Celsius do the following:
- Press and hold the on/off button for approximately four seconds until either a flashing °F, or °C appears.
- Press the button again to change the display to the desired unit of measurement. After approximately four seconds of inactivity, the new unit will be locked in and the compass/temperature display will return.
If an abnormal temperature reading is displayed for an extended period of time, please see your dealer. Under certain circumstances, a delay in updating the temperature is normal.
Automatic Dimming Mirror Operation
The automatic dimming mirror function is turned on automatically each time the ignition is started. To operate the automatic dimming mirror, do the following:
- Make sure the green indicator light, located to the left of the on/off button, is lit. If it's not, press and hold the on/off button for approximately six seconds until the green light comes on, indicating that the mirror is in automatic dimming mode.
- Turn off the automatic dimming mirror function by pressing and holding the on/off button for approximately six seconds, until the green indicator light turns off.
Compass Variance
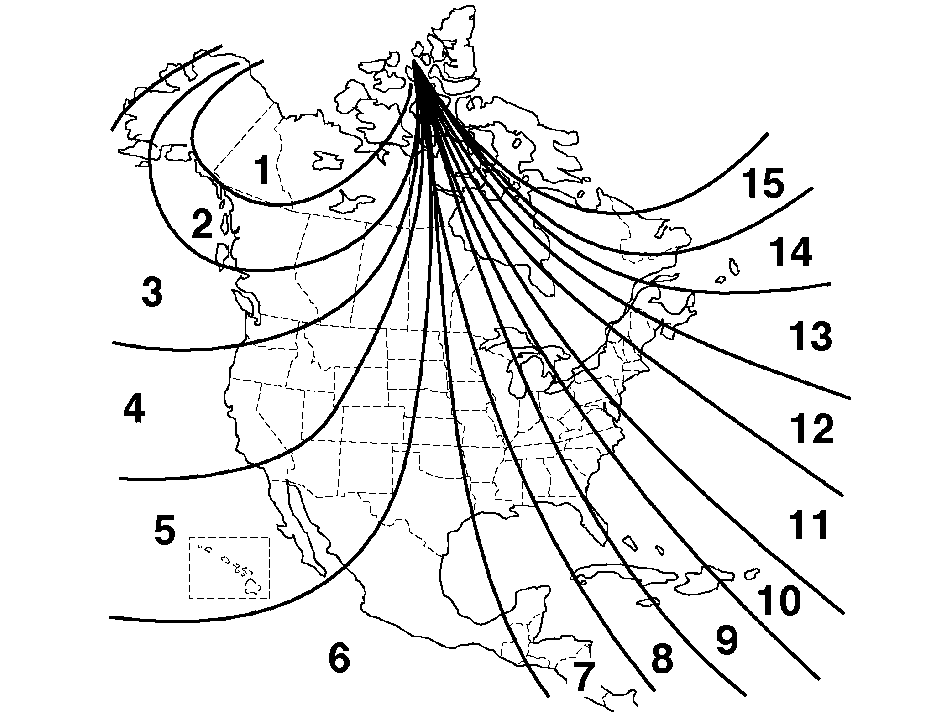
The mirror is set in zone eight upon leaving the factory. It will be necessary to adjust the compass to compensate for compass variance if you live outside of zone eight. Under certain circumstances, as during a long distance cross-country trip, it will be necessary to adjust for compass variance. Compass variance is the difference between earth's magnetic north and true geographic north. If not adjusted to account for compass variance, your compass could give false readings.
To adjust for compass variance do the following:
- Find your current location and variance zone number on the following zone map.
- Press and hold the on/off button until a Z and a zone number appears in the display. The compass is now in zone mode.
- Keep pressing the on/off button until the desired zone number appears in the display. Release the button. After approximately four seconds of inactivity, the new zone number will be locked in and the compass/temperature display will return.
- Calibrate the compass as described below.
Compass Calibration
The compass may need calibration if one of the following occurs:
| • | After approximately five seconds, the display does not show a compass heading (N for North, for example), there may be a strong magnetic field interfering with the compass. Such interference may be caused by a magnetic antenna mount, magnetic note pad holder or a similar magnetic item. |
| • | The compass does not display the correct heading and the compass zone variance is set correctly. |
In order to calibrate, CAL must be displayed in the mirror compass windows. If CAL is not displayed, push the on/off button for approximately 12 seconds or until CAL is displayed.
The compass can be calibrated by driving the vehicle in circles at 5 mph (8 km/h) or less until the display reads a direction.
Passenger Air Bag Indicator
Your vehicle may be equipped with a passenger air bag indicator, on the mirror glass, just above the buttons. For more information, see Passenger Sensing System .
Cleaning the Mirror
When cleaning the mirror, use a paper towel or similar material dampened with glass cleaner. Do not spray glass cleaner directly on the mirror as that may cause the liquid cleaner to enter the mirror housing.
