Headlamp Aiming Cadillac
Screen Method for Headlamp Aiming (Visual Aim)
The screen method requires an area set up specifically for headlamp aiming.
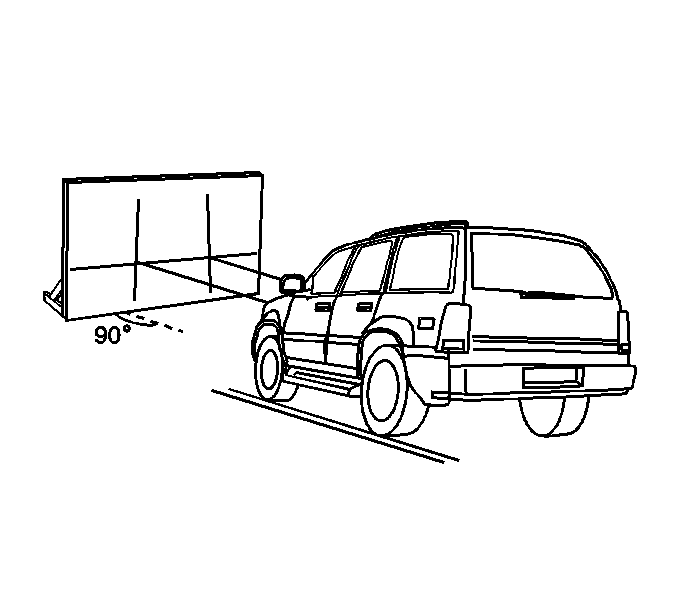
The area should consist of a level surface large enough to allow for a vehicle and an additional 7.62 m (25 ft) as measured from the face of the headlamps to the aiming screen.
The screen should be a wall or other flat surface at least 1.52 m (5 ft) high by 3.66 m (12 ft) wide with a matte white surface well shaded from extraneous light, and 90 degrees to the floor. The screen should be provided with a permanent vertical reference line 0.61 m (2 ft) from the left edge of the screen, 2 laterally adjustable vertical tapes, and one vertically adjustable horizontal tape.
After the aiming screen has been set up and located, paint or tape a reference line on the floor 15.24 m (50 ft) from the vertical reference line on the screen. This line should be perpendicular to the aiming screen and a mark placed at 7.62 m (25 ft) from the screen.
Headlamp Aiming Procedure
- Align the left tires of the vehicle with the reference line extending from the screen with the headlamps aligned with the reference line.
- Remove any snow, ice or mud from the vehicle.
- The vehicle must be fully assembled and all other work stopped while the headlamp aiming is being done.
- The vehicle must contain one person or approximately 73 kg (160 lb).
- Tires should be properly inflated.
- Rock the vehicle to stabilize the suspension.
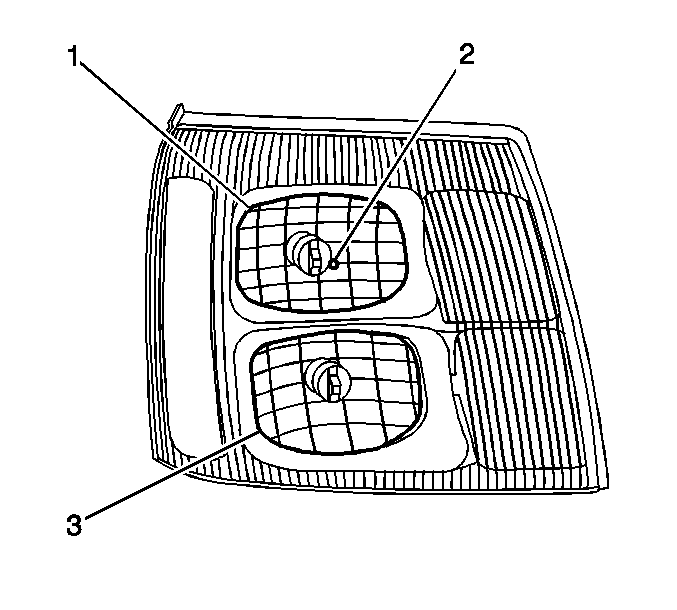
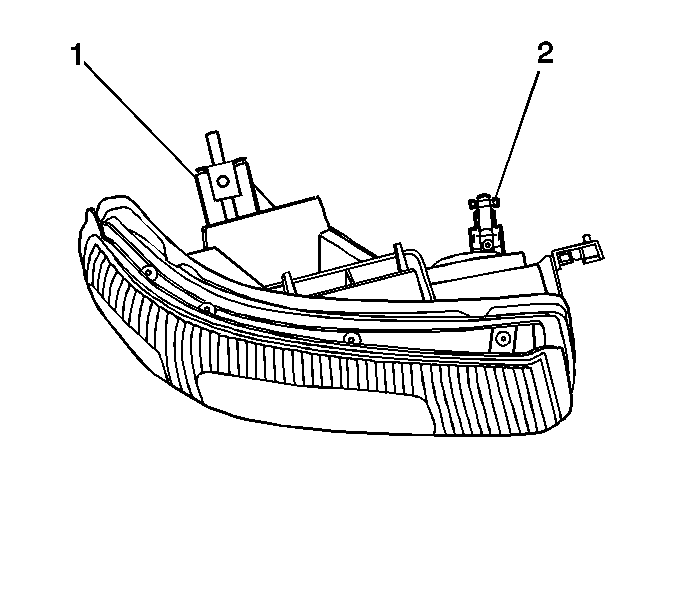
- Measure from the floor to the center of the low beam bulb (2) on the vehicle.
- At the screen, measure from the floor and place the horizontal tape at the above measured distance.
- Measure from the reference line on the floor to the left headlamp bulb centerline.
- At the screen, measure from the reference line and place the vertical tape at the above measured distance.
- Measure from the reference line on the floor to the right headlamp bulb centerline.
- At the screen, measure from the reference line and place the vertical tape at the above measured distance.
- Turn the low beam headlamps ON.
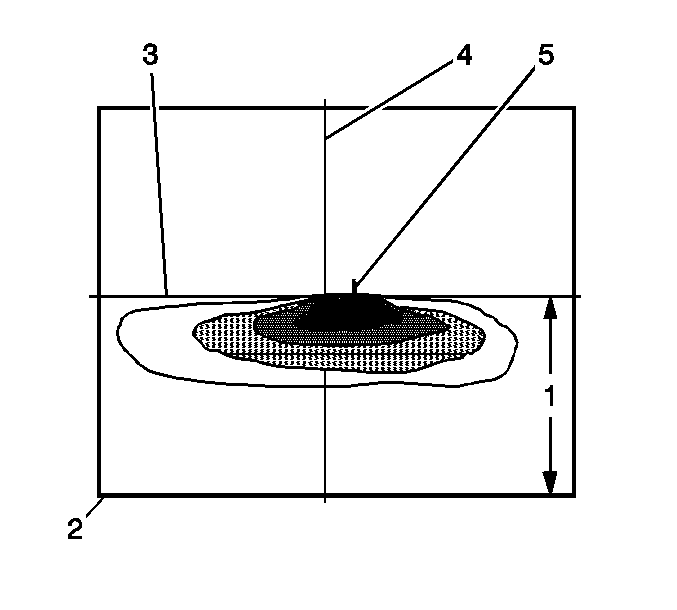
- The graphic shows the vertical (1) and horizontal (2) adjustments.
- The beam pattern must look as shown in the graphic.
- Adjust one headlamp at a time while blocking the light from the other. The cover must be away from the headlamp.

Adjust the headlamps to the specifications required by state and local authorities.
Ensure the horizontal adjustment scale is set to zero before adjusting the vertical aim.
Important: Do not place a cover directly in front of the headlamp assembly while the headlamp is ON.
The following list refers to the callouts in the graphic:
| • | Distance from ground to low beam bulb centerline (1) |
| • | The ground line (2) |
| • | Horizontal centerline of the low beam headlamp (3) |
| • | Vertical centerline of the low beam headlamp (4) |
| • | Two degrees or 26.7 cm (10.5 in) (5) to the right of the vehicle centerline (4) |
Headlamp Aiming Except Cadillac
Tools Required
J 25300-D Headlamp Aimer
The screen method is preferred for aiming headlamps. If the headlamp is equipped with aiming pads, headlamp aiming may be performed using the alternate procedure.
Headlamp aiming is done with the low beam lamps. The high beam lamps will be correctly aimed if the low beam lamps are aimed properly. If the high beam needs adjustment, follow the screen method using the high beam bulb as the reference for measurements.
Screen Method for Headlamp Aiming (Visual Aim)
The screen method requires an area set up specifically for headlamp aim.
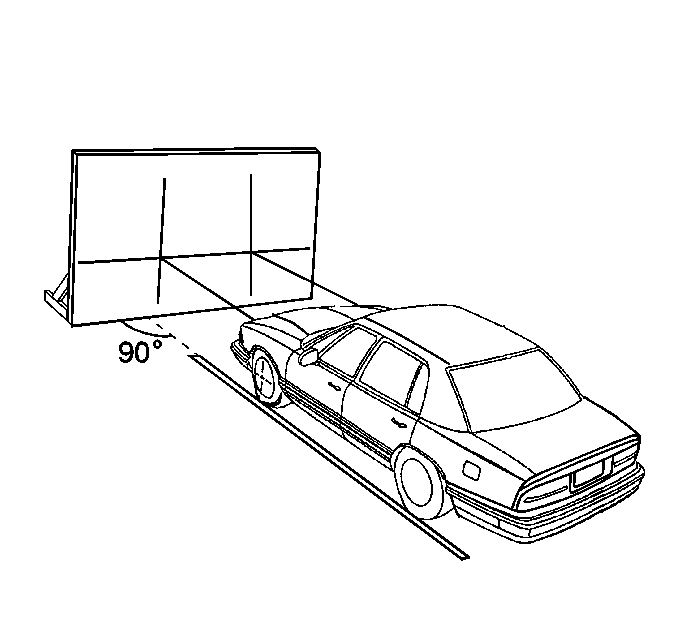
The area should consist of a level surface large enough to allow for a vehicle and an additional 7.62 m (25 ft) as measured from the face of the headlamps to the aiming screen.
The screen should be a wall or other flat surface at least 1.52 m (5 ft) high by 3.66 m (12 ft) wide with a matte white surface well shaded from extraneous light, and 90 degrees to the floor. The screen should be provided with a permanent vertical reference line 0.61 m (2 ft) from the left edge of the screen, 2 laterally adjustable vertical tapes, and one vertically adjustable horizontal tape.
After the aiming screen has been set up and located, paint or tape a reference line on the floor 15.24 m (50 ft) from the vertical reference line on the screen. This line should be perpendicular to the aiming screen and a mark placed at 7.62 m (25 ft) from the screen.
Headlamp Aiming Procedure
- Align the left tires of the vehicle with the reference line extending from the screen with the headlamps aligned with the reference line.
- Remove any snow, ice or mud from the vehicle.
- The vehicle should be fully assembled and all other work stopped while the headlamp aiming is being done.
- The vehicle should contain cargo or be loaded to represent normal vehicle use.
- Tires should be properly inflated.
- Rock the vehicle to stabilize the suspension.
- Measure from the floor to the center of the lamp bulb on the vehicle. Some lamps have an aim dot marked on the lens.
- At the screen, measure from the floor and place the horizontal tape at the measured distance.
- Measure from the reference line on the floor to the left headlamp bulb centerline.
- At the screen, measure from the reference line and place the vertical tape at the measured distance.
- Measure from the reference line on the floor to the right headlamp bulb centerline.
- At the screen, measure from the reference line and place the vertical tape at the measured distance.
- Turn the headlamps ON.
- Adjust the headlamps to the specifications required by state and local authorities.
Alternate Aiming Procedure
Instructions for use accompany the tool.
This procedure may only be used on headlamps equipped with aiming pads. Adjustment settings are embossed on the headlamp lens. They are typically located near the aiming pads. In some cases, the adjustment settings are located in other areas of the lens. They will be represented by a number followed by the letter V or the letter H.
- Remove any snow, ice or mud from the vehicle.
- The vehicle should be fully assembled and all other work stopped while the headlamp aiming is being done.
- The vehicle should contain cargo or be loaded to represent normal vehicle use.
- Tires should be properly inflated.
- Rock the vehicle to stabilize the suspension.
- Using the J 25300-D , adjust the headlamps to the specifications required by state and local authorities.
