4L80E, MT1 and 4L85E, MN8 Simplified Valve Body Reconditioning Instructions, DTC P0741, P0742, P0751, P0752, P0756, P0757, P0894, Harsh or Delayed Shifts, Slips, No Drive, No Reverse

| Subject: | 4L80E, MT1 and 4L85E, MN8 Simplified Valve Body Reconditioning Instructions, DTC P0741, P0742, P0751, P0752, P0756, P0757, P0894, Harsh or Delayed Shifts, Slips, No Drive, No Reverse |
| Models: | 1997-2000 Chevrolet Silverado |
| 1997-2002 Chevrolet Silverado Chassis Cab |
| 1997-2003 Chevrolet Express |
| 1997-2006 Chevrolet Suburban |
| 1997-2008 Chevrolet Express Panel, Cutaway Vans |
| 2001-2006 Chevrolet Silverado 2500 HD, Silverado 3500 HD |
| 2002-2006 Chevrolet Avalanche |
| 2004-2006 Chevrolet Express 2500 HD, Express 3500 HD |
| 2004-2008 Chevrolet W3500/4500 Series Medium Duty Tilt Cab Models |
| 1997-2003 GMC Savana |
| 1997-2008 GMC Savana Panel, Cutaway Vans |
| 2001-2002 GMC Classic Sierra 3500 HD Chassis Cab |
| 2001-2006 GMC Sierra 2500 HD, Sierra 3500 HD |
| 2001-2007 GMC Yukon XL |
| 2002 GMC Sierra Chassis Cab |
| 2004-2006 GMC Savana 2500 HD, Savana 3500 HD |
| 2004-2008 GMC W3500/4500 Series Medium Duty Tilt Cab Models |
| 2006 GMC Yukon Denali XL |
| 2007 GMC Savana, Savana HD, Sierra Classic HD |
| 2001-2002 Workhorse Chassis |
| with Hydra-Matic® 4L80-E or 4L85-E (RPO'S MT1, MN8) |
This bulletin is designed to provide easy to follow valve body reconditioning instructions and new illustrations to simplify reassembly of the valve body, and list other service information documents that are related to the 4L80X transmission family.
Related Service Document
PIP3427A - SES light on, DTC P0757, harsh shifts, delayed 2-3 shift, no third gear or slip in third or reverse, or a 2-3 shift flare. Debris stuck in the #11 check ball, or a sticking pintle in the 2-3 shift solenoid.
Inspection Procedure
- Using the exploded view (Illus. A), inspect each bore for freedom of valve(s) movement and evidence of debris. Pay particular attention to those valves related to the customer’s concern. IF VALVE BODY CLEANING IS NOT REQUIRED, DO NOT DISASSEMBLE BORES UNLESS IT IS NECESSARY TO VERIFY MOVEMENT OF VALVES.
- Verify movement of the valves in their normal installed position. Valves may become restricted during removal or installation. This is normal due to small tolerances between the valves and bores.
- If a valve is restricted and cannot be corrected by cleaning the valve and bore, then replace the valve body. Describe the restricted valve on the repair order.
Disassembly/Reassembly
- If a valve is restricted by a metal burr from machining that bore, remove the valve and burr, then inspect movement in the valve’s normal position. If no other debris or restrictions are found, then reassemble the valve body and install in the transmission.
- If the valve body has been contaminated with debris from another transmission component failure, then disassemble all bores for complete cleaning of all valve body components. Keeping individual bore parts separated will make reassembly easier. Use the following illustrations for positive identification and location of individual parts.
- Using GM Brake Clean, or equivalent, in a safe and clean environment (clean aluminum pan), clean the valve body and dry it with compressed air. Use appropriate eye protection.
- Clean individual valve body components with GM Brake Clean, or equivalent. Coat each valve with clean ATF and reassemble in each bore. Check each valve for free movement during assembly of each bore.
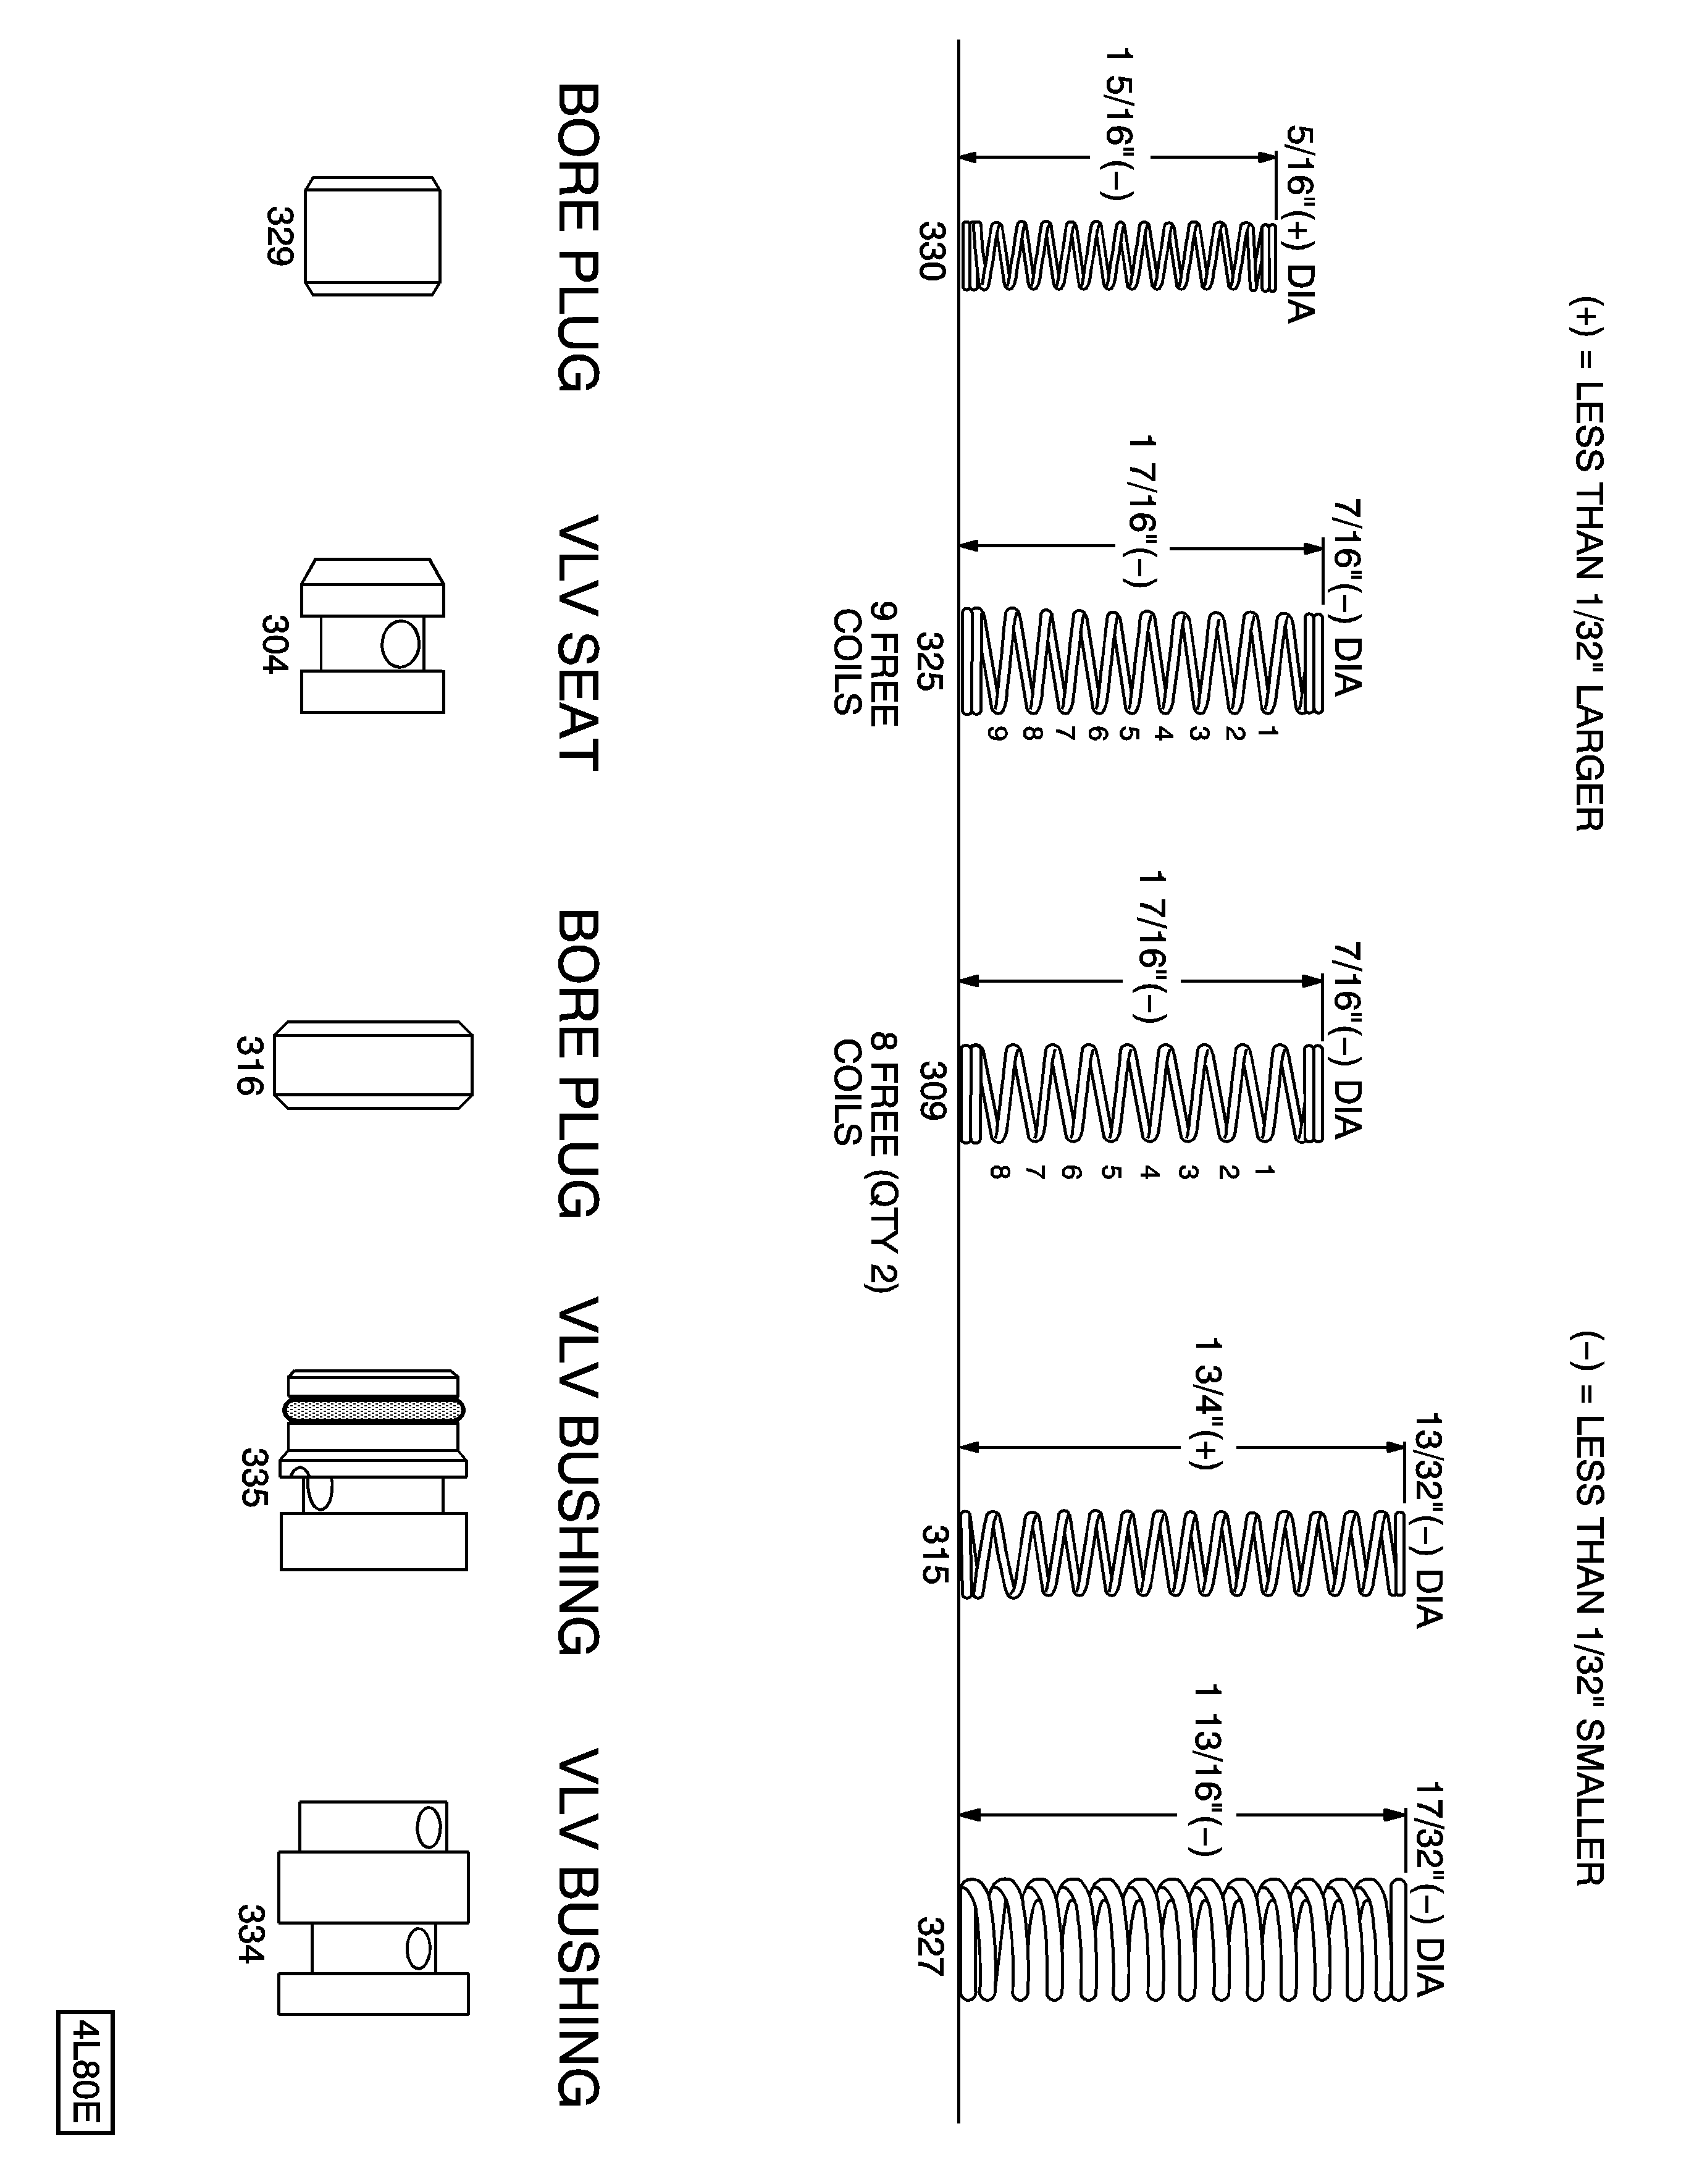
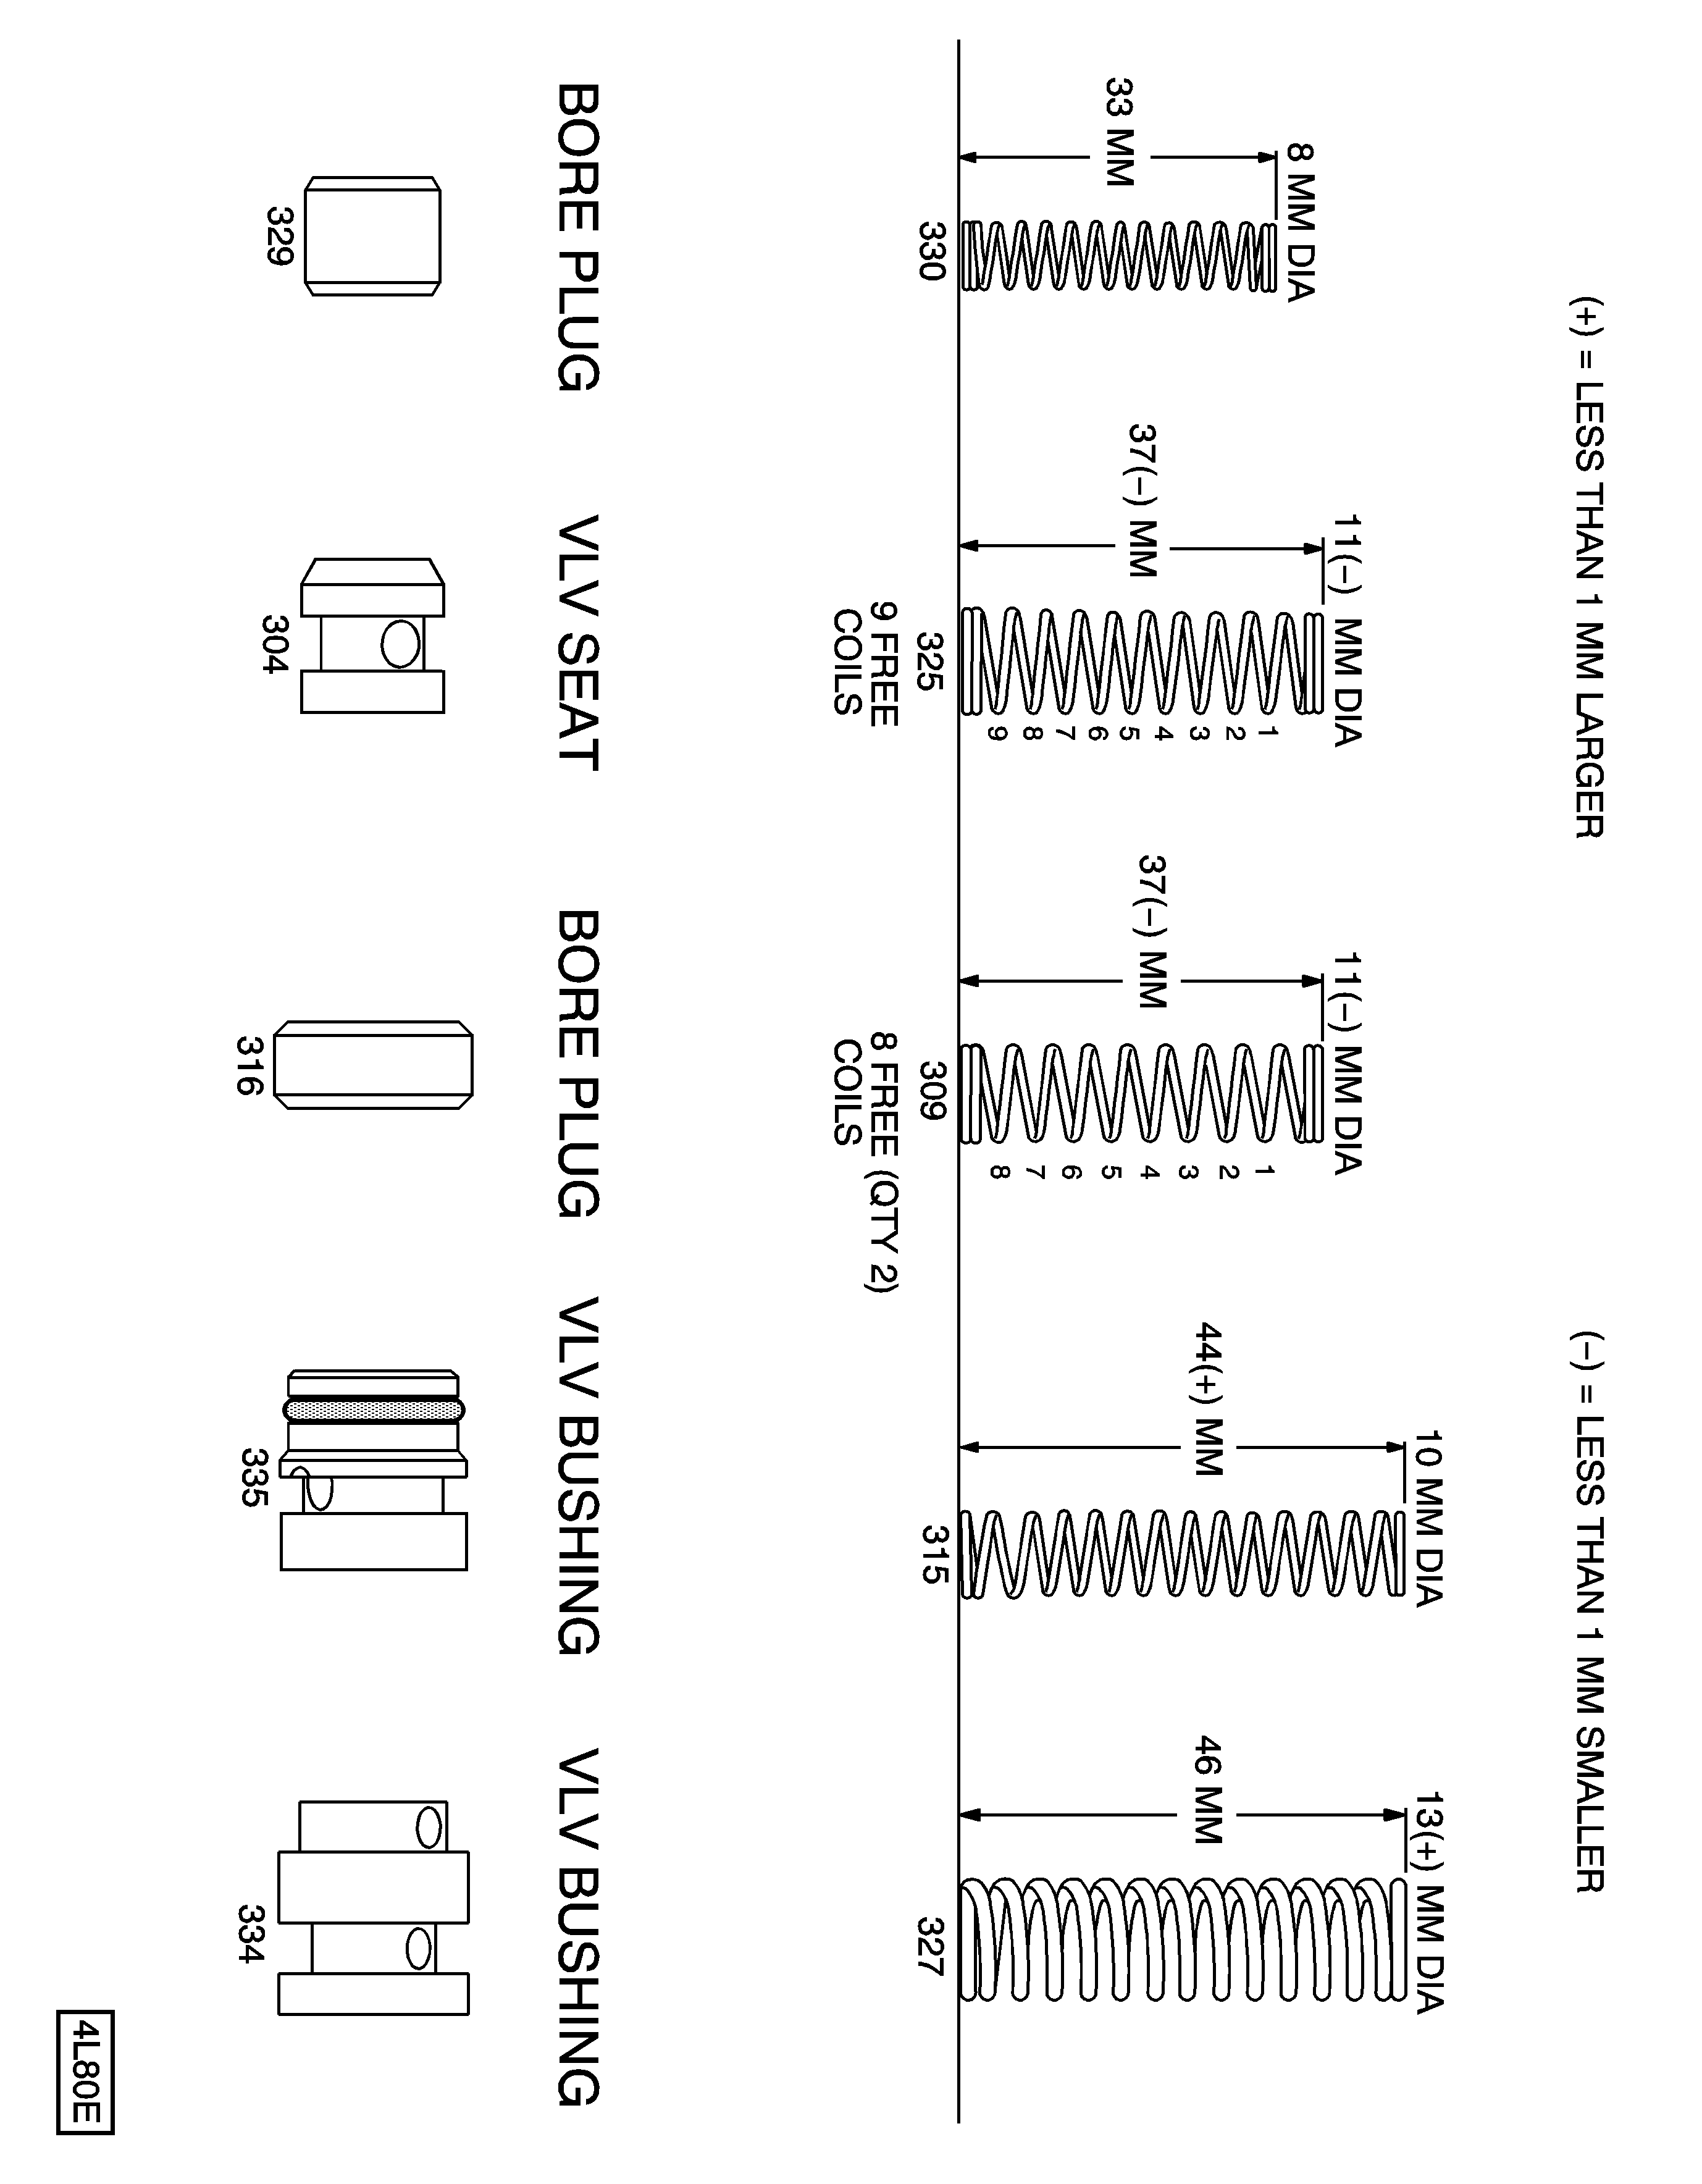
Important: Position the valve body as shown in the following illustrations for positive identification and location of individual parts.
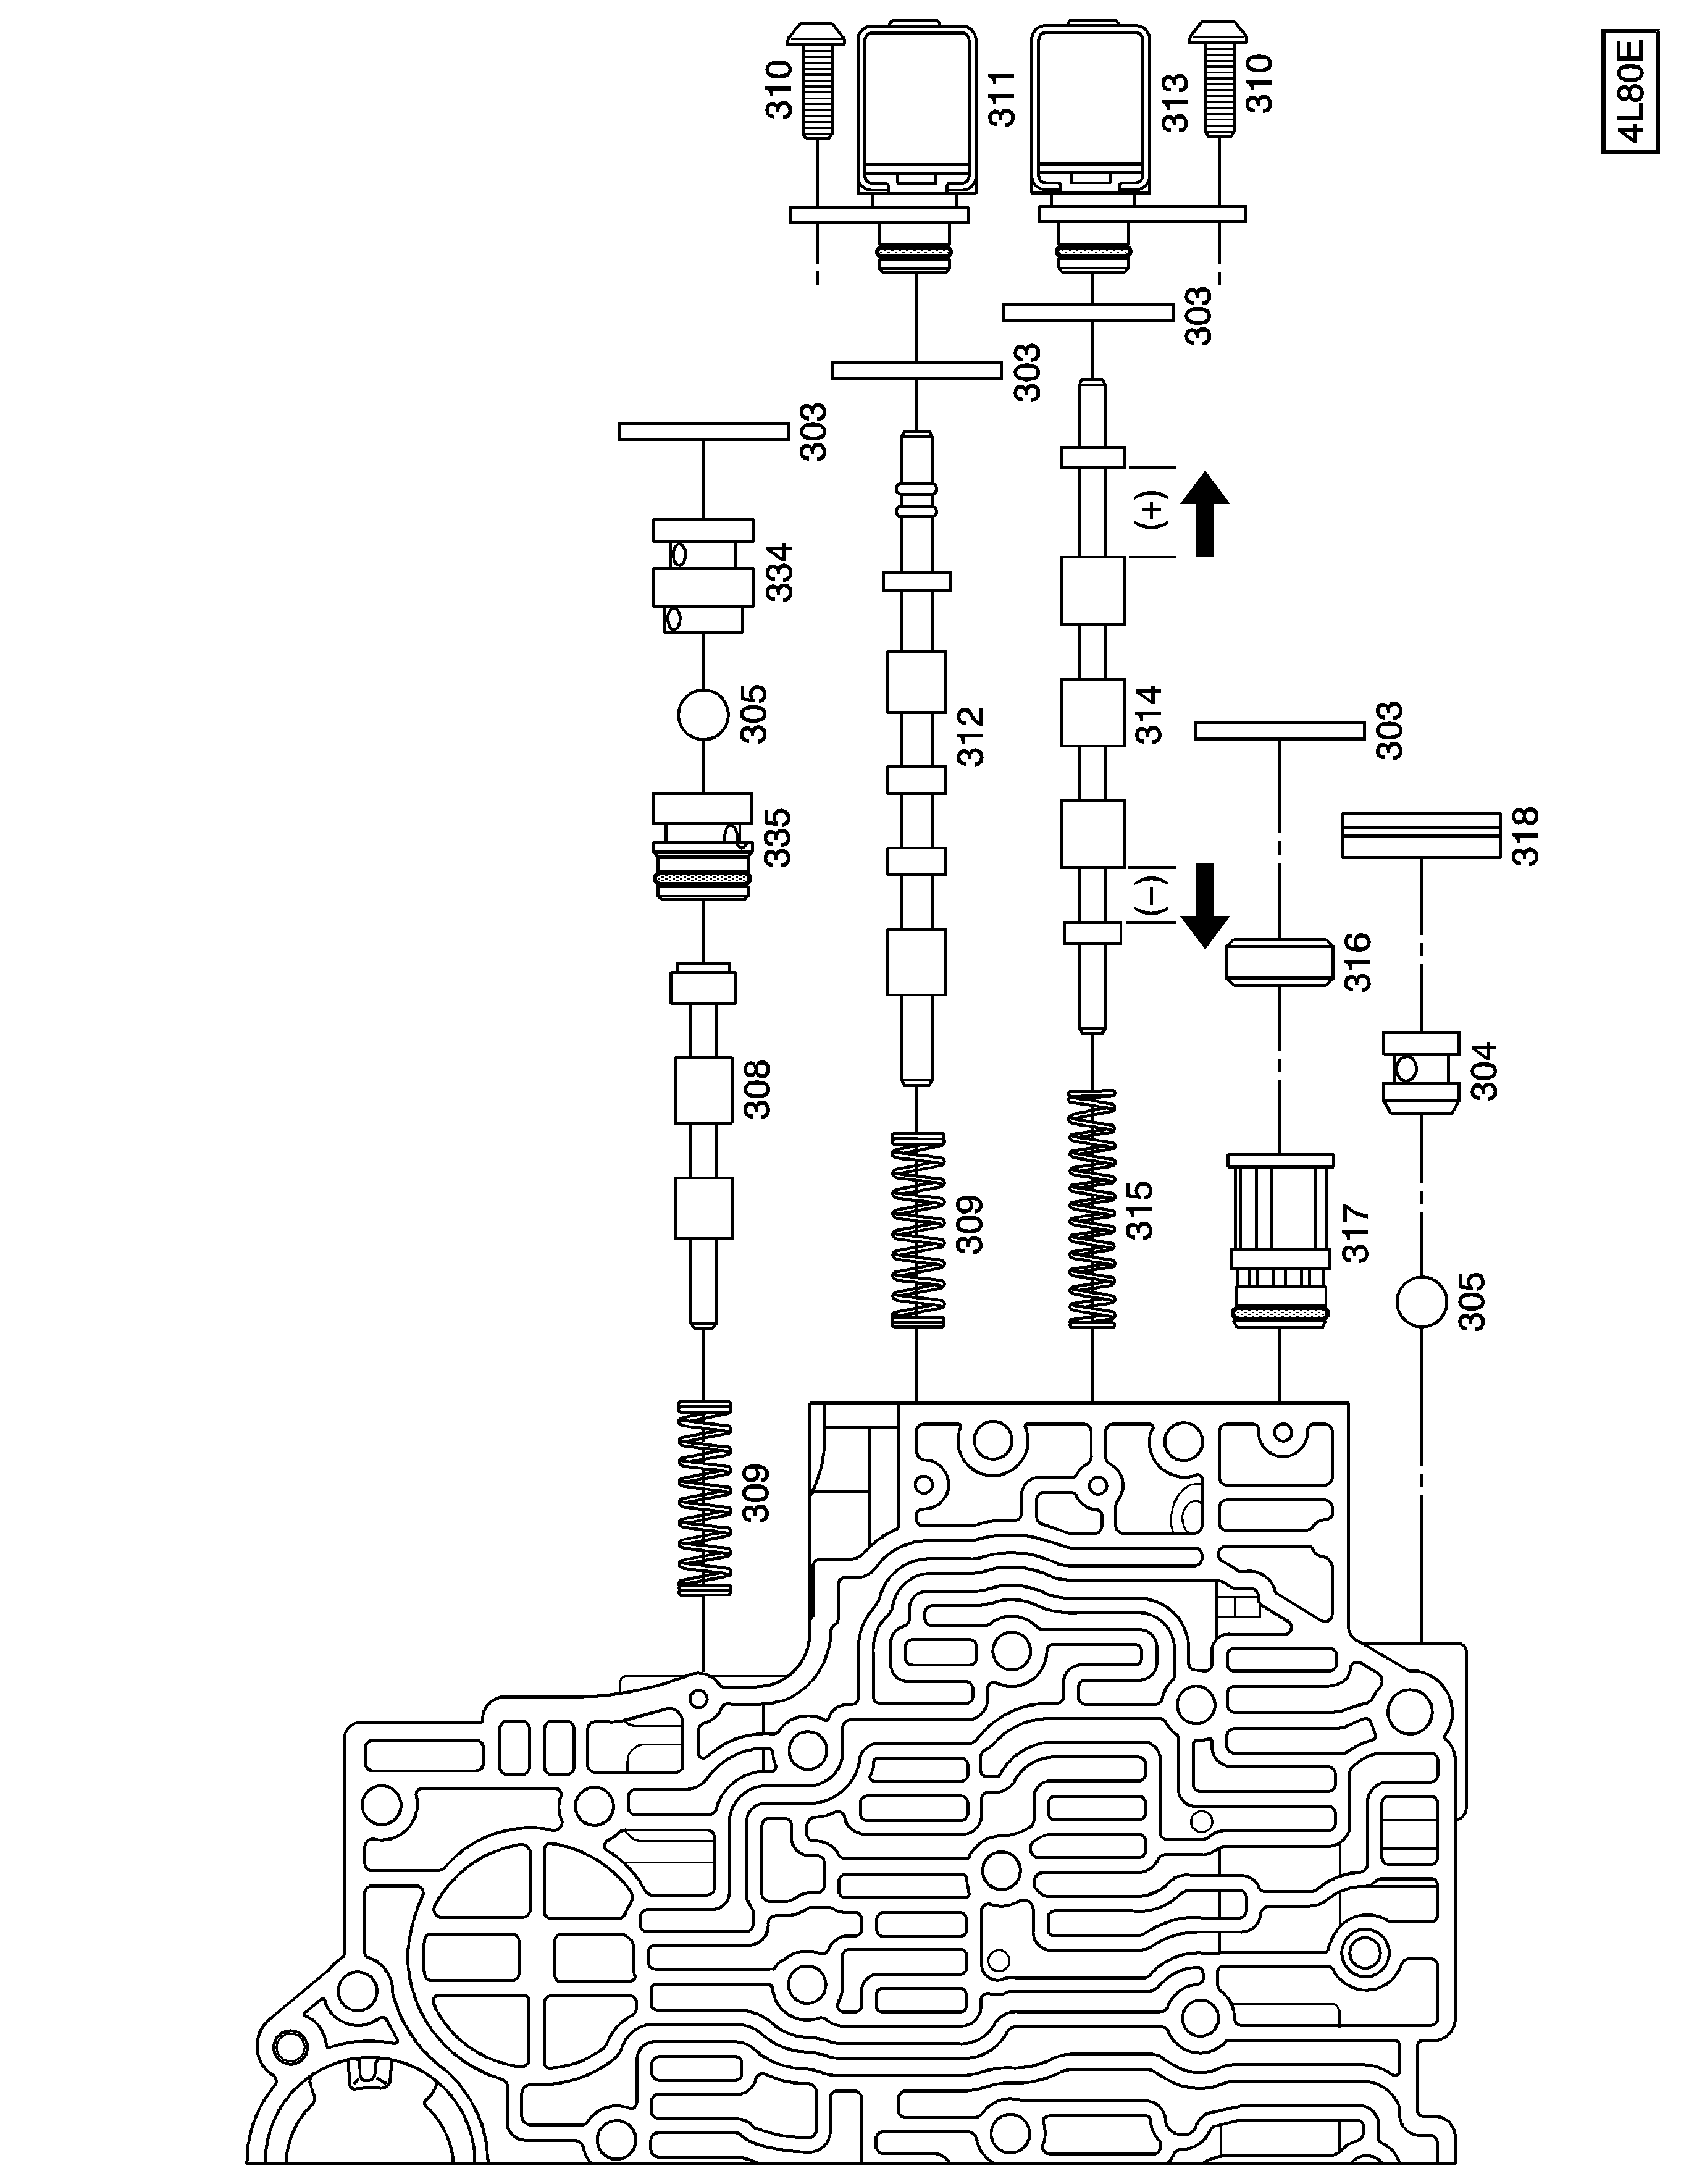
Left Side Control Valve Body Assembly
Call Out Number | Description |
|---|---|
301 | Body, Control Valve |
302 | Filter, Pressure Control Solenoid Valve Fluid |
303 | Pin, Shift Valve, Fluid Filter Bore Plug |
304 | Seat, Low-Reverse Ball Valve |
305 | Valve, Low-Reverse Ball |
307 | Seal, 3rd Ball Valve Bushing |
308 | Valve, 3-4 Shift |
309 | Spring, 3-4 Shift Valve |
310 | Bolt, Solenoid (1-2 and 2-3 Shift Valve) |
311 | Valve Assembly, 2-3 Shift Solenoid |
312 | Valve, 2-3 Shift |
313 | Valve Assembly, 1-2 Shift Solenoid |
314 | Valve, 1-2 Shift |
315 | Spring, 1-2 Shift Valve |
316 | Plug, Shift Valve Fluid Filter Bore |
317 | Filter, Shift Solenoid Valve Fluid |
318 | Pin, Low-Reverse Ball Valve Seat |
334 | Bushing, Reverse Ball Valve |
335 | Bushing, 3rd Ball Valve |
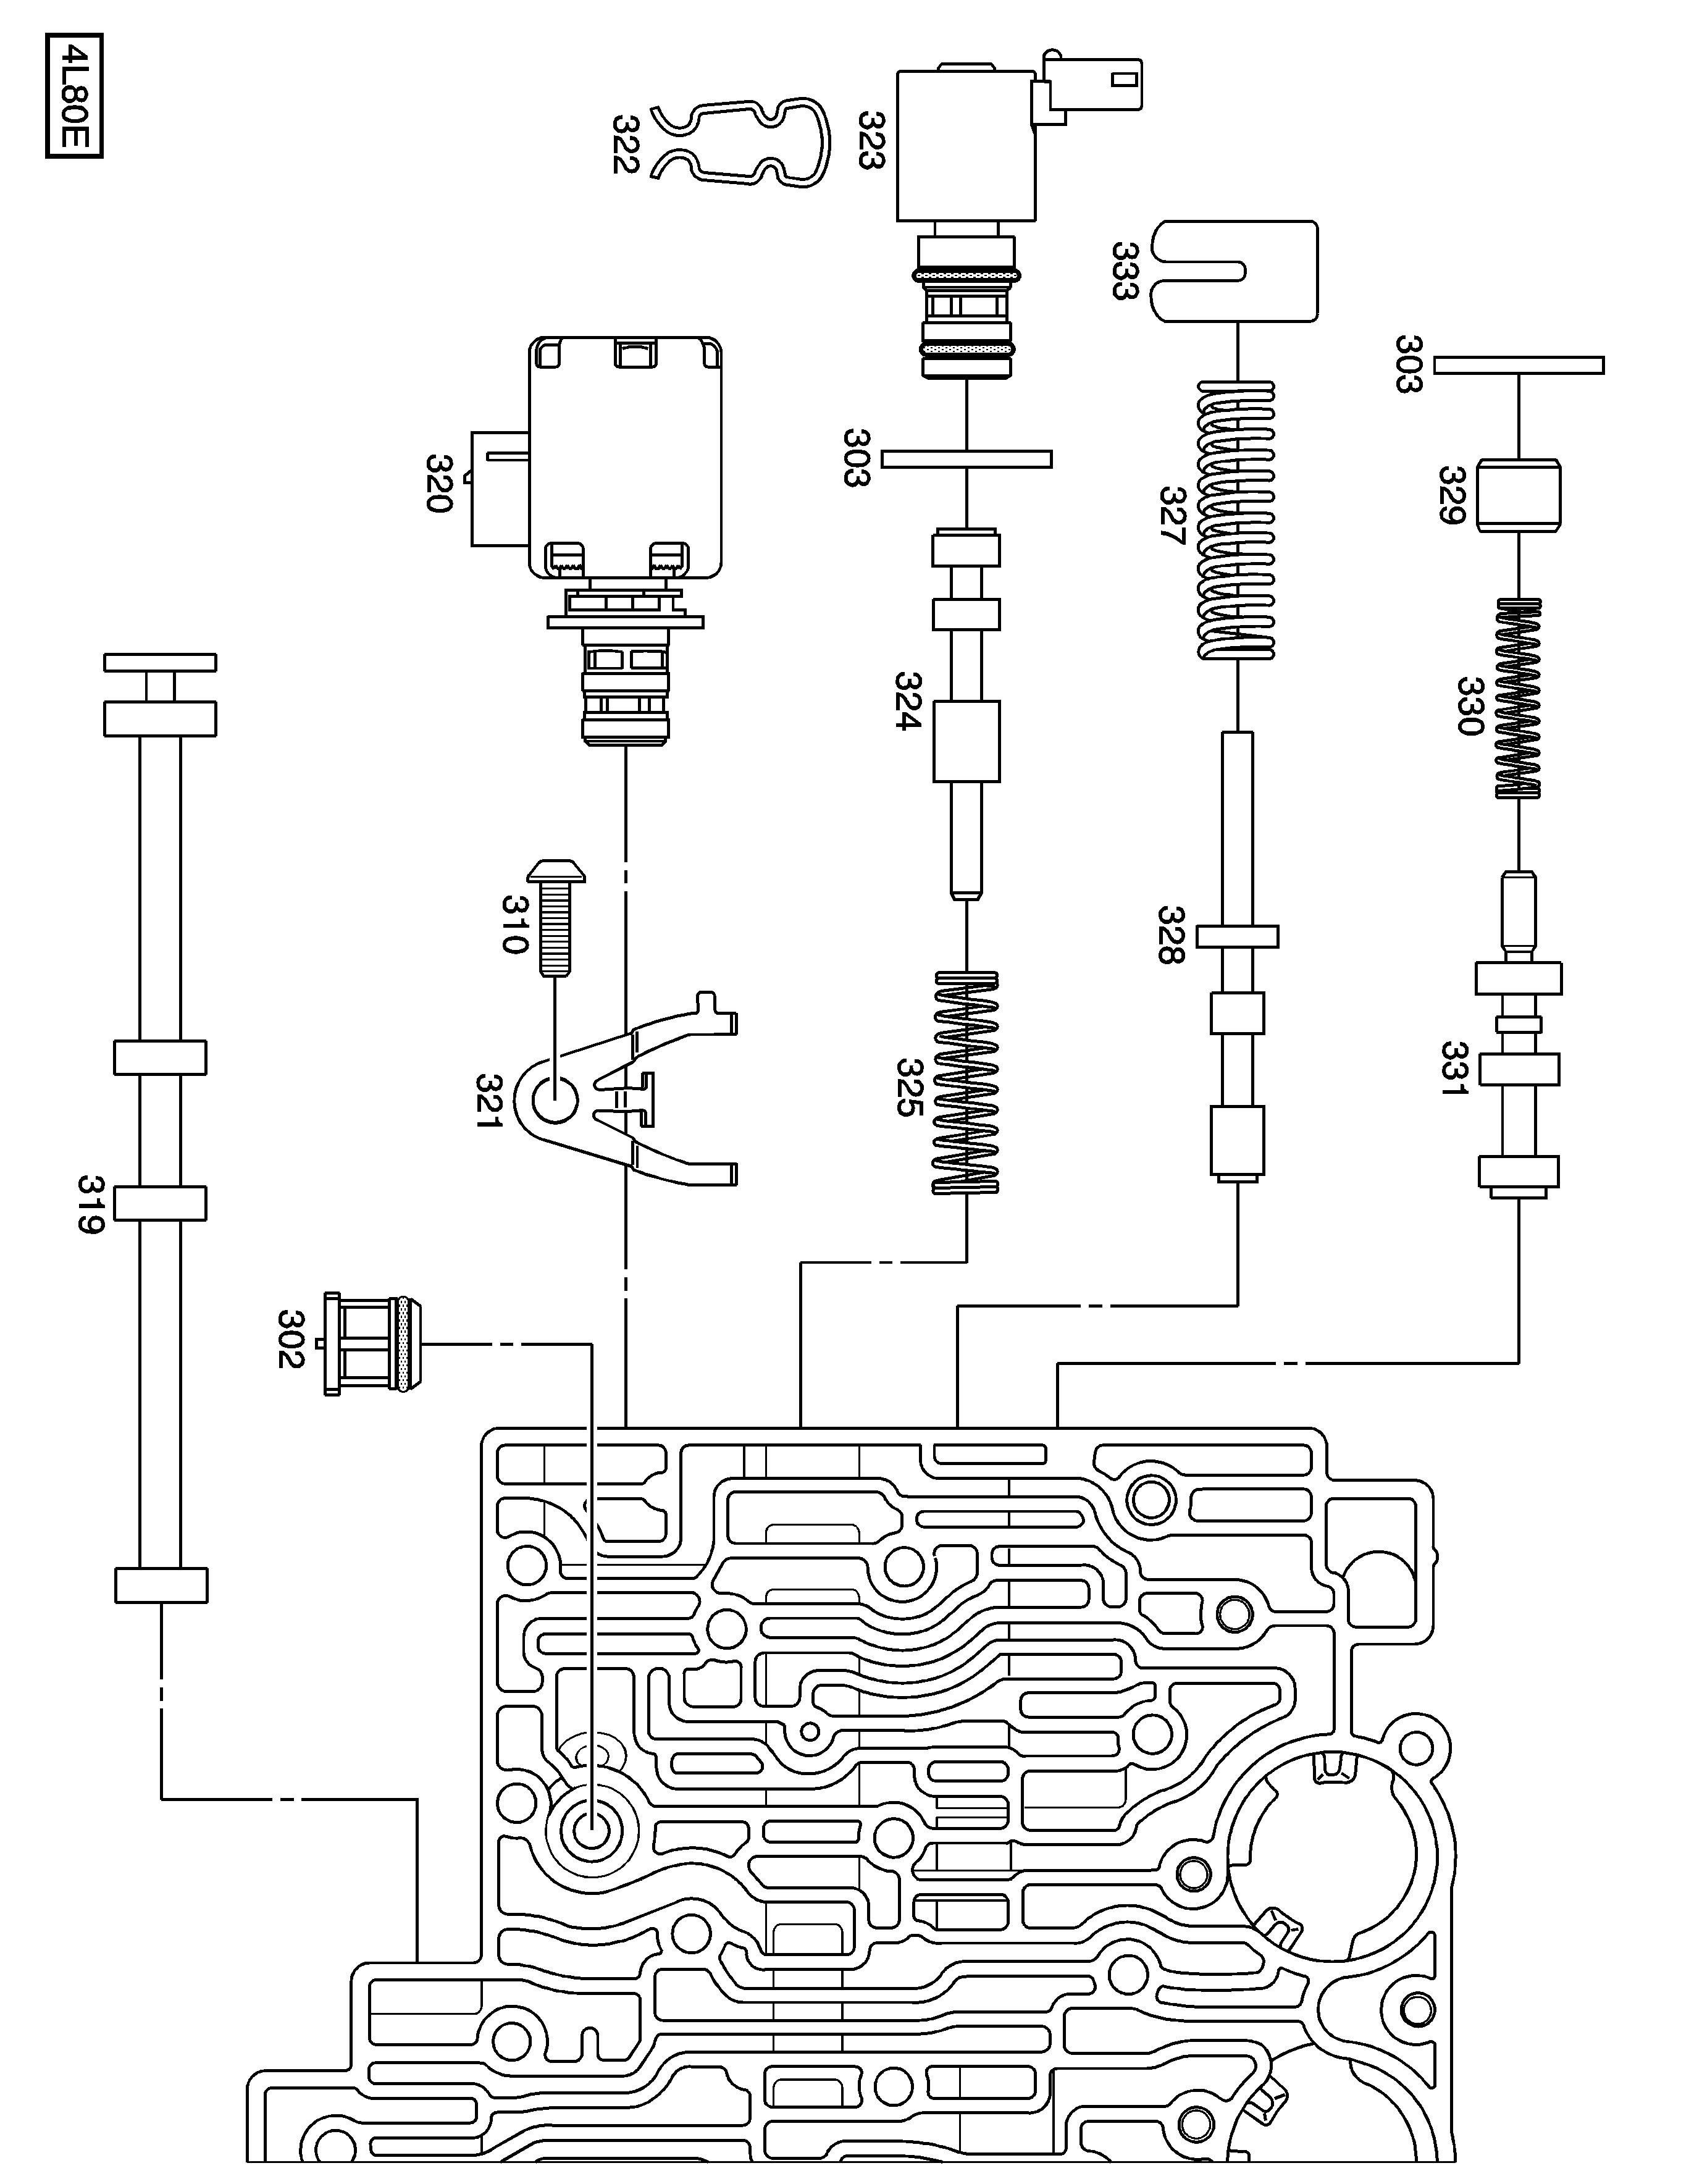
Right Side Control Valve Body Assembly
Call Out Number | Description |
|---|---|
301 | Body, Control Valve |
303 | Pin, Accumulator Valve Bore Plug, Shift Valve |
310 | Bolt, Pressure Control Solenoid Clamp |
319 | Valve, Manual |
320 | Valve Assembly, Pressure Control Solenoid |
321 | Clamp, Pressure Control Solenoid |
322 | Retainer, TCC PWM Solenoid Valve |
323 | Valve Assembly, TCC PWM Solenoid |
324 | Valve, TCC Regulator Apply |
325 | Spring, TCC Regulator Apply Valve |
327 | Spring, Actuator Feed Limit Valve |
328 | Valve, Actuator Feed Limit |
329 | Plug, Accumulator Valve Bore |
330 | Spring, Accumulator Valve |
331 | Valve, Accumulator |
333 | Retainer, Actuator Feed Limit Valve Spring |
Control Valve Body Spring and Bore Plug Chart (Metric)
Control Valve Body Spring and Bore Chart (Inch)