Circuit Description
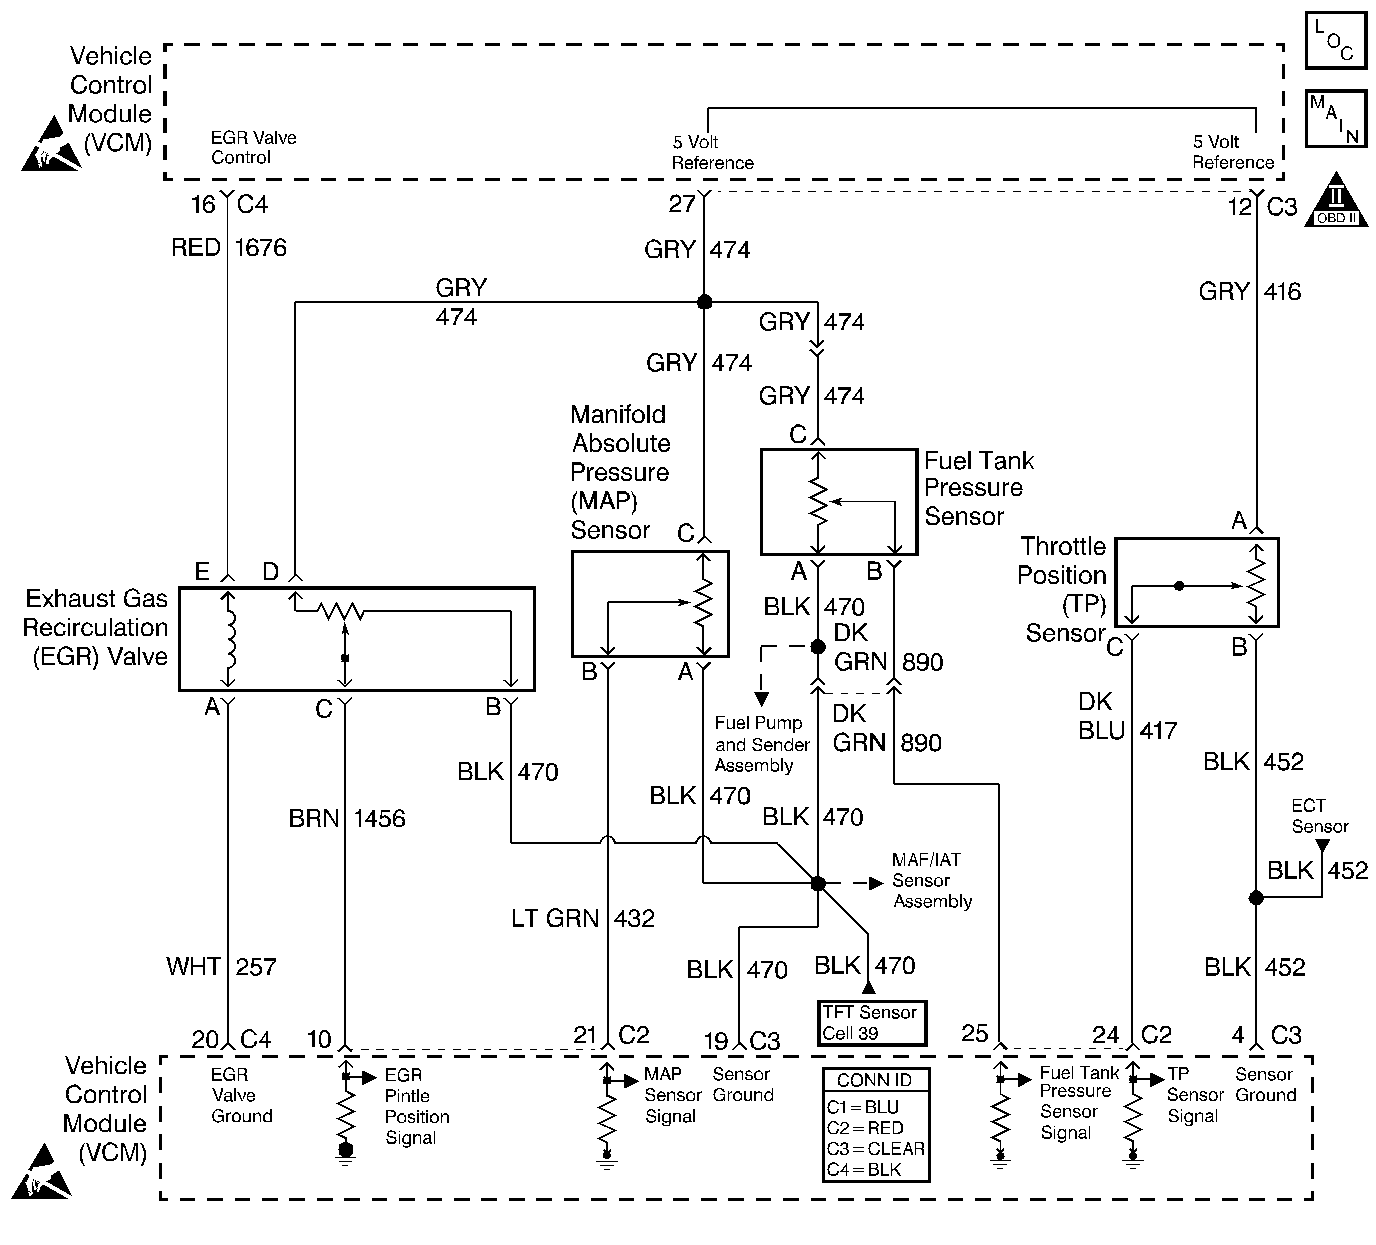
An exhaust gas recirculation (EGR) system is used in order to lower oxides of nitrogen (NOx) emission levels caused by high combustion temperatures. The EGR accomplishes this by feeding small amounts of exhaust gases back into the combustion chamber. When the air/fuel mixture is diluted with the exhaust gases, combustion temperatures are reduced.
A linear EGR valve is used on this system. The linear EGR valve is designed in order to accurately supply exhaust gases to the engine without the use of intake manifold vacuum. The valve controls exhaust flow going into the intake manifold from the exhaust manifold through an orifice with a control module controlled pintle valve. The control module commands the EGR by applying a 12 volt duty cycle to the EGR valve. This can be monitored on a scan tool as desired EGR position.
The control module can monitor the pintle position with the EGR pintle position signal. This sensor uses a variable resistor with a 5 volt reference, a signal circuit, and a ground. The signal circuit monitors changes in voltage on the variable resistor as the pintle moves.
Test Description
The numbers below refer to the step numbers in the diagnostic table.
-
At idle the EGR valve should not be open greater than 0%.
-
This step checks the ability of the pintle to be manually commanded to the desired positions.
-
This step checks the electrical circuit for a short to voltage.
-
This step checks the electrical control circuits from the VCM to the EGR valve.
Step | Action | Value(s) | Yes | No | ||||||
|---|---|---|---|---|---|---|---|---|---|---|
1 | Was the Powertrain On-Board Diagnostic (OBD) System Check performed? | -- | ||||||||
Does the scan tool indicate more than the specified value? | 0% | |||||||||
Does the actual EGR position follow the commanded EGR position? | 100 % | |||||||||
4 | Disconnect the EGR valve harness connector. Does the scan tool indicate the actual EGR position above the specified value? | 0 % | ||||||||
Is the test lamp ON? | -- | |||||||||
Is the test lamp ON? | 100 % | |||||||||
7 |
Is the test lamp ON? | -- | ||||||||
8 | Check the EGR valve feed control circuit for an open. Did you find a problem? | -- | ||||||||
9 | Check the EGR valve ground circuit for the following conditions:
Did you find a problem? | -- | ||||||||
10 |
Is the voltage above the specified value? | 5.2 V | ||||||||
11 |
Is the test lamp ON? | -- | ||||||||
12 |
Did you find a problem? | -- | ||||||||
13 |
Is the voltage near the specified value? | 5.2 V | ||||||||
14 |
Is the actual EGR position near the specified value? | 100 % | ||||||||
15 |
Did you find a problem? | -- | ||||||||
16 |
Did you find a problem? | -- | ||||||||
17 |
Does the MAP sensor reading go higher? | 30 % | ||||||||
18 | Repair the blockage in the EGR valve passages. Is the action complete? | -- | -- | |||||||
19 | Replace the EGR valve. Refer to Exhaust Gas Recirculation Valve Replacement . Is the action complete? | -- | -- | |||||||
20 | Check the EGR pintle position circuit for an open or short to ground. Did you find a problem? | -- | ||||||||
21 | Check for a poor connection at the VCM connectors. Did you find a problem? | -- | ||||||||
22 | Repair the circuit as necessary. Refer to Wiring Repairs in Wiring Systems. Is the action complete? | -- | -- | |||||||
23 |
Is the action complete? | -- | -- | |||||||
24 |
Does the actual EGR position follow the commanded EGR position? | -- | System OK |
