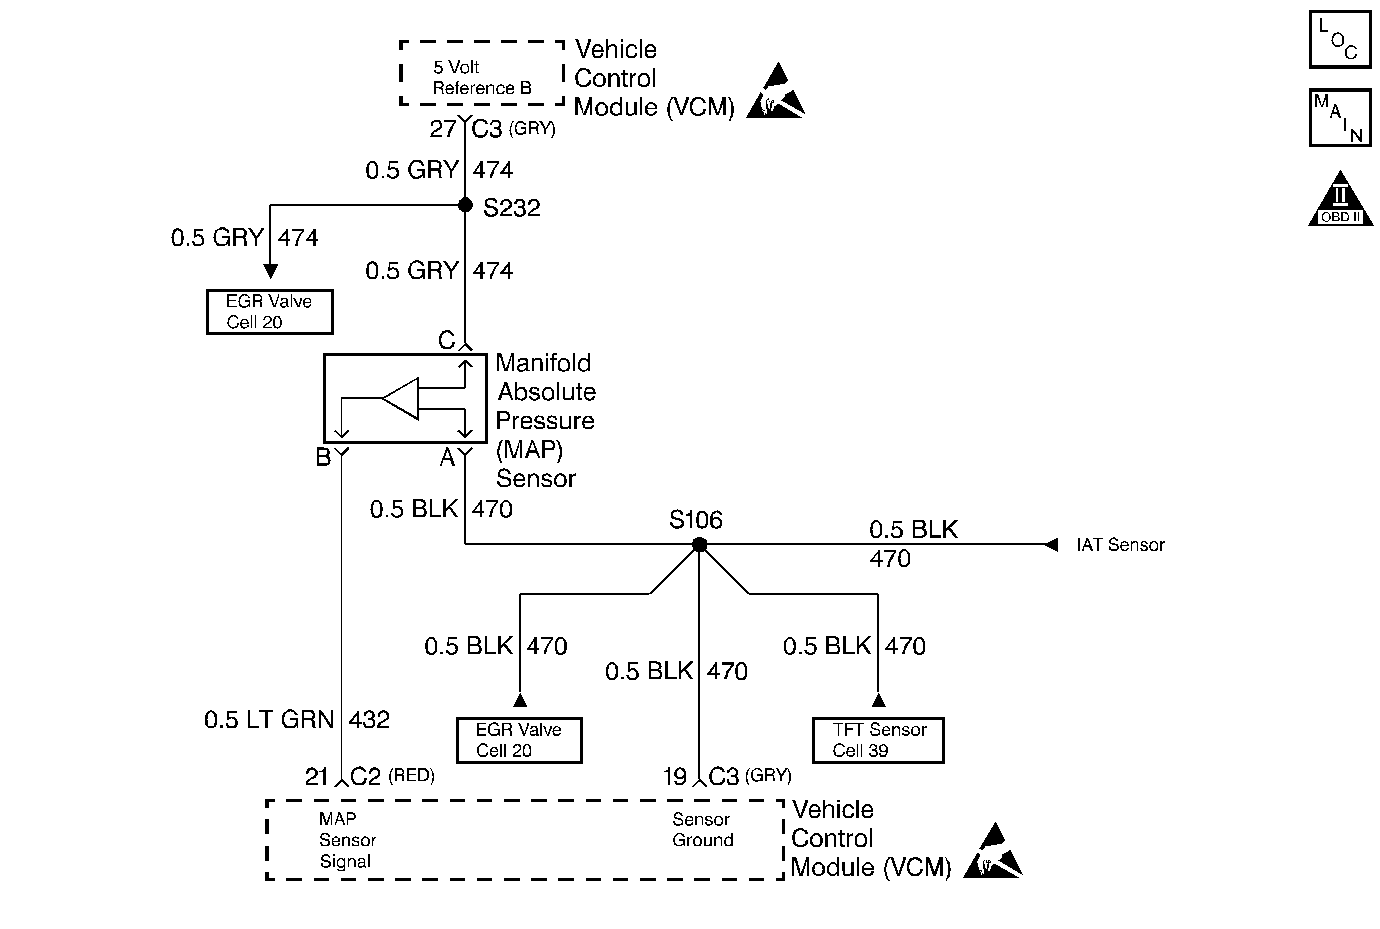
Circuit Description
The Manifold Absolute Pressure (MAP) sensor responds to changes in the intake manifold pressure (vacuum). A 5 volt reference is applied to the sensor on the 5 volt reference circuit. A variable resistor moves in relation to the manifold pressure and a voltage signal is sent back to the VCM on the MAP sensor signal circuit. This voltage signal will vary from 1.0-1.5 volts at closed throttle to 4.0-4.6 volts at wide open throttle (low vacuum). The VCM utilizes the MAP signal and the throttle position in order to determine the correct amount of fuel delivered to the engine. This DTC is a type D DTC.
Conditions for Setting the DTC
The following conditions will set the DTC:
| • | No TP sensor DTCs are set |
| • | Throttle Position is no more than 0.4% when engine speed is no more than 1200 RPM |
| • | Or the Throttle Position is no more than 19.9% when engine speed is greater than 1200 RPM |
Action Taken When the DTC Sets
The VCM turns the MIL ON when this DTC is reported and 1 failure has occurred. The VCM substitutes a calculated value for the MAP sensor value so that acceptable performance is maintained.
Conditions for Clearing the MIL/DTC
The VCM turns OFF the MIL after 3 consecutive driving trips without a fault condition present. A history DTC will clear if no fault conditions have been detected for 40 warm-up cycles (the coolant temperature has risen 22°C (40°F) from the start-up coolant temperature and the engine coolant temperature exceeds 71°C (160°F) during that same ignition cycle) or the scan tool clearing feature has been used.
Diagnostic Aids
With the ignition ON and the engine off, the manifold pressure is equal to atmospheric pressure with the signal voltage high. The VCM uses this information as an indication of the vehicle's altitude. Comparison of this reading with a known good vehicle using the same sensor is a good way to check the accuracy of a suspect sensor. Readings should be the same ±0.4 volts.
Refer to Intermittent Conditions .
Important: The electrical connector must remain securely fastened.
Important: Disconnect the sensor from the bracket and twist the sensor by hand (only) in order to check for intermittent connections. The output changes greater than 0.1 volt indicates a bad connector or connection. If OK, replace the sensor.
Important: After removing the MAP sensor from the intake manifold, replace the MAP Sensor to intake manifold seal.
Test Description
Number(s) below refer to the step number(s) on the Diagnostic Table.
-
This step checks for a short to voltage on the 5 volt reference circuit.
-
This step checks the integrity of the MAP sensor ground circuit.
-
VCM pins GR12 and GR27 are spliced together inside the VCM. This step isolates the two pins from one another.
Step | Action | Value(s) | Yes | No |
|---|---|---|---|---|
1 |
Important: Before clearing the DTC(s) use the scan tool to record the Freeze Frame and Failure Records for reference. This data will be lost when the Clear Info function is used. Was the Powertrain On-Board Diagnostic (OBD) System Check performed? | -- | ||
2 |
Does the scan tool display a voltage less than the specified value? | 15 in Hg 4.0V | ||
3 |
Does the scan tool display a voltage less than the specified value? | 1.0V | ||
4 | The DTC is intermittent. If no other DTCs are stored, go to Diagnostic Aids. Are any additional DTCs stored? | -- | Go to Applicable DTC Table | -- |
With a DVM connected to ground, probe the 5 volt reference circuit (at the MAP sensor harness connector). Is the voltage greater than the specified value? | 5.2V | |||
Probe the MAP sensor ground circuit (at the MAP sensor connector) with a test light to B+. Is the test light ON? | -- | |||
7 | Check the MAP sensor vacuum source for a restriction. Was a problem found? | -- | ||
8 | Replace the MAP sensor. Is the action complete? | -- | -- | |
9 | Check for a short to voltage in the MAP sensor signal circuit. Was a problem found? | -- | ||
Is the voltage greater than the specified value? | 5.2V | |||
11 |
Is the voltage greater than the specified value? | 5.2V | ||
12 | Repair the short to voltage on the 5 volt reference circuit Is the action complete? | -- | -- | |
13 | With a DVM to ground, measure the voltage on the VCM connector terminal GR 12. Is the voltage greater than the specified value? | 5.2V | ||
14 | Repair the sensor ground circuit. Is the action complete? | -- | -- | |
15 | Repair as necessary. Is the action complete? | -- | ||
16 | Replace the EGR valve. Refer to Exhaust Gas Recirculation Valve Replacement . Is the action complete? | -- | -- | |
17 | Repair the short to voltage on the 5 volt reference circuit (terminal GR 12). Is the action complete? | -- | -- | |
18 | Replace the VCM. Important: If the VCM is faulty, the new VCM must be programmed. Refer to VCM Replacement/Programming . Is the action complete? | -- | -- | |
19 |
Does the scan tool indicate that this diagnostic Ran and Passed? | -- | ||
20 | Using the scan tool, select Capture Info, Review Info. Are any additional DTCs displayed that have not been diagnosed? | -- | Go to Applicable DTC Table | System OK |
