GM Service Manual Online
For 1990-2009 cars only

Instrument Panel Upper Trim Panel Replacement Cadillac
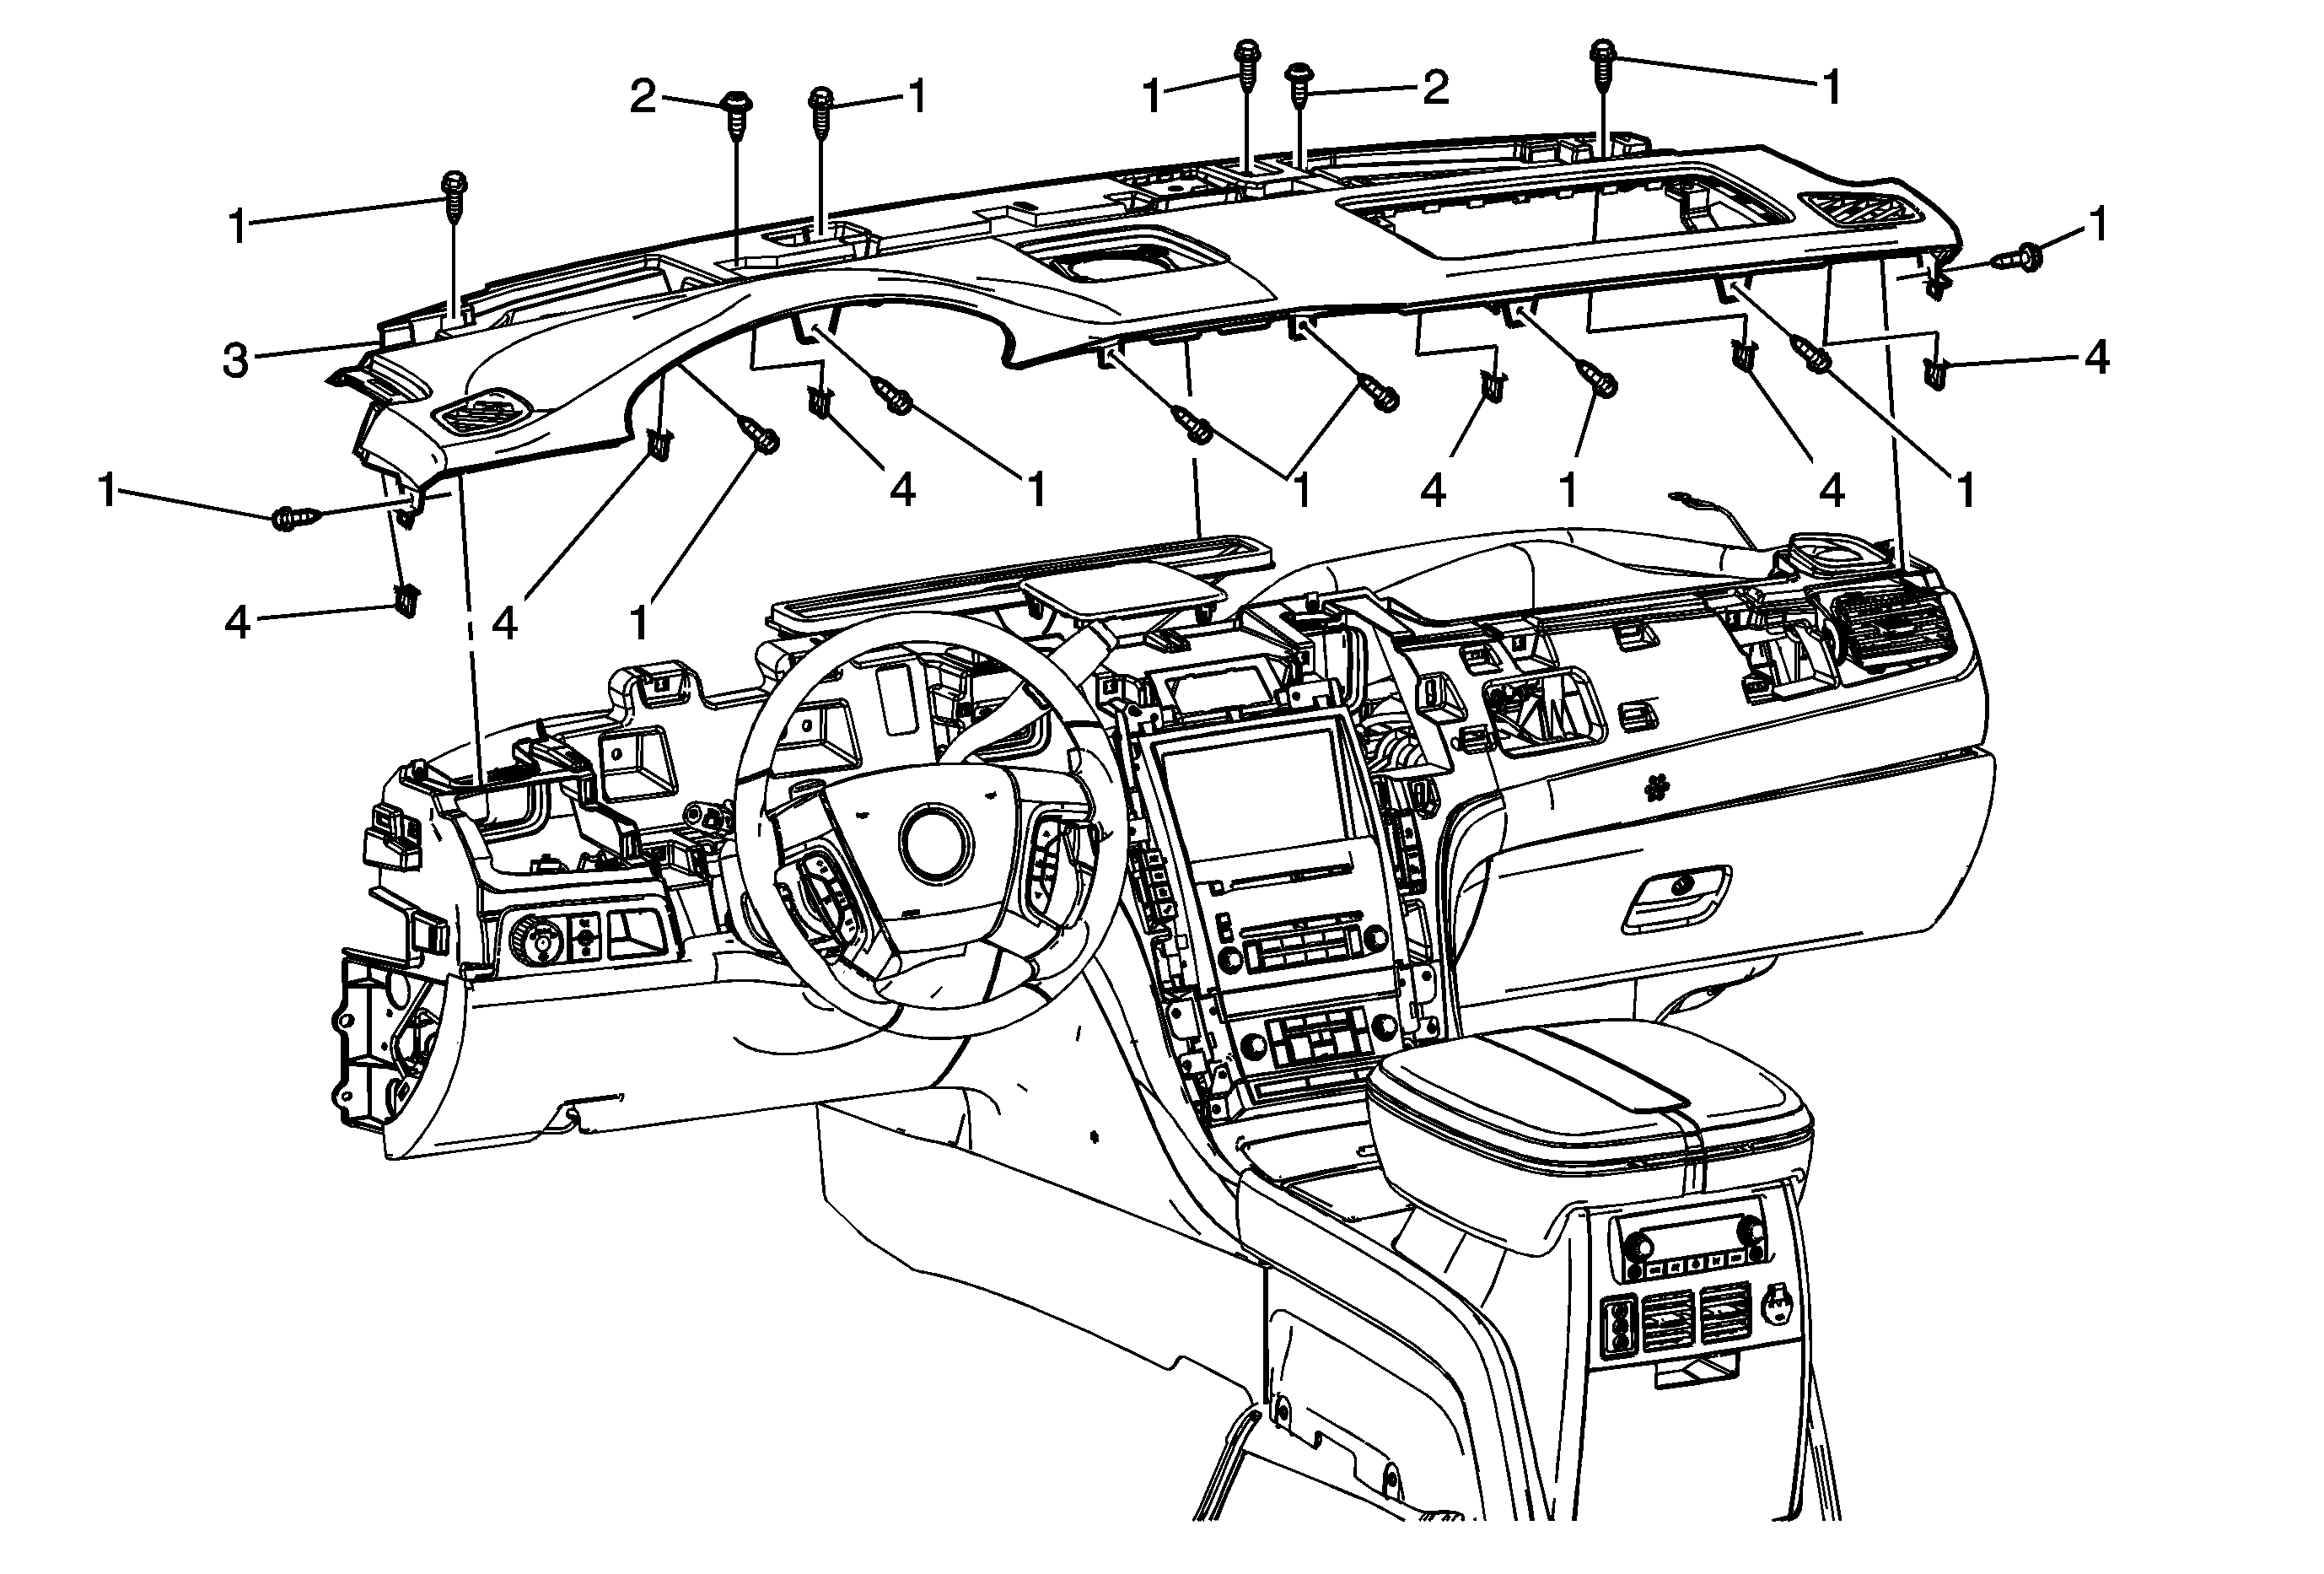

Object Number: 1703201  Size: MF

Callout

Component Name

Preliminary Procedures

  1. Disable the SIR system. Refer to SIR Disabling and Enabling .
  2. Remove the windshield pillar garnish moldings. Refer to Windshield Pillar Garnish Molding Replacement .
  3. Remove the instrument panel upper trim panel with defroster nozzle. Refer to Instrument Panel Upper Trim Panel with Windshield Defroster Nozzle Grille Replacement .
  4. Remove the instrument panel outer trim covers. Refer to Instrument Panel Outer Trim Cover Replacement .
  5. Remove the left instrument panel deflector. Refer to Instrument Panel Outer Air Outlet Deflector Replacement - Left Side .
  6. Remove the instrument panel cluster assembly. Refer to Instrument Cluster Replacement .
  7. Remove the instrument panel center trim panel. Refer to Instrument Panel Center Trim Panel Replacement .
  8. Remove the instrument panel accessory trim panel assembly. Refer to Instrument Panel Accessory Trim Plate Replacement .
  9. Remove the instrument panel inflatable restraint. Refer to Inflatable Restraint Instrument Panel Module Replacement .

1

Instrument Panel Upper Trim Panel Bolts/Screw (Qty: 8)

Notice: Refer to Fastener Notice in the Preface section.

Tighten
9 N·m (80 lb in)

2

Instrument Panel Upper Trim Panel to HVAC Duct Screw (Qty: 8)

Tighten
2 N·m (18 lb in)

3

Instrument Panel Upper Trim Panel Assembly

Procedure

  1. Disconnect electrical connections.
  2. With the aid of an assistant, remove the trim panel from the vehicle.

4

Retainer Clips (Qty: 6)

Instrument Panel Upper Trim Panel Replacement Except Cadillac
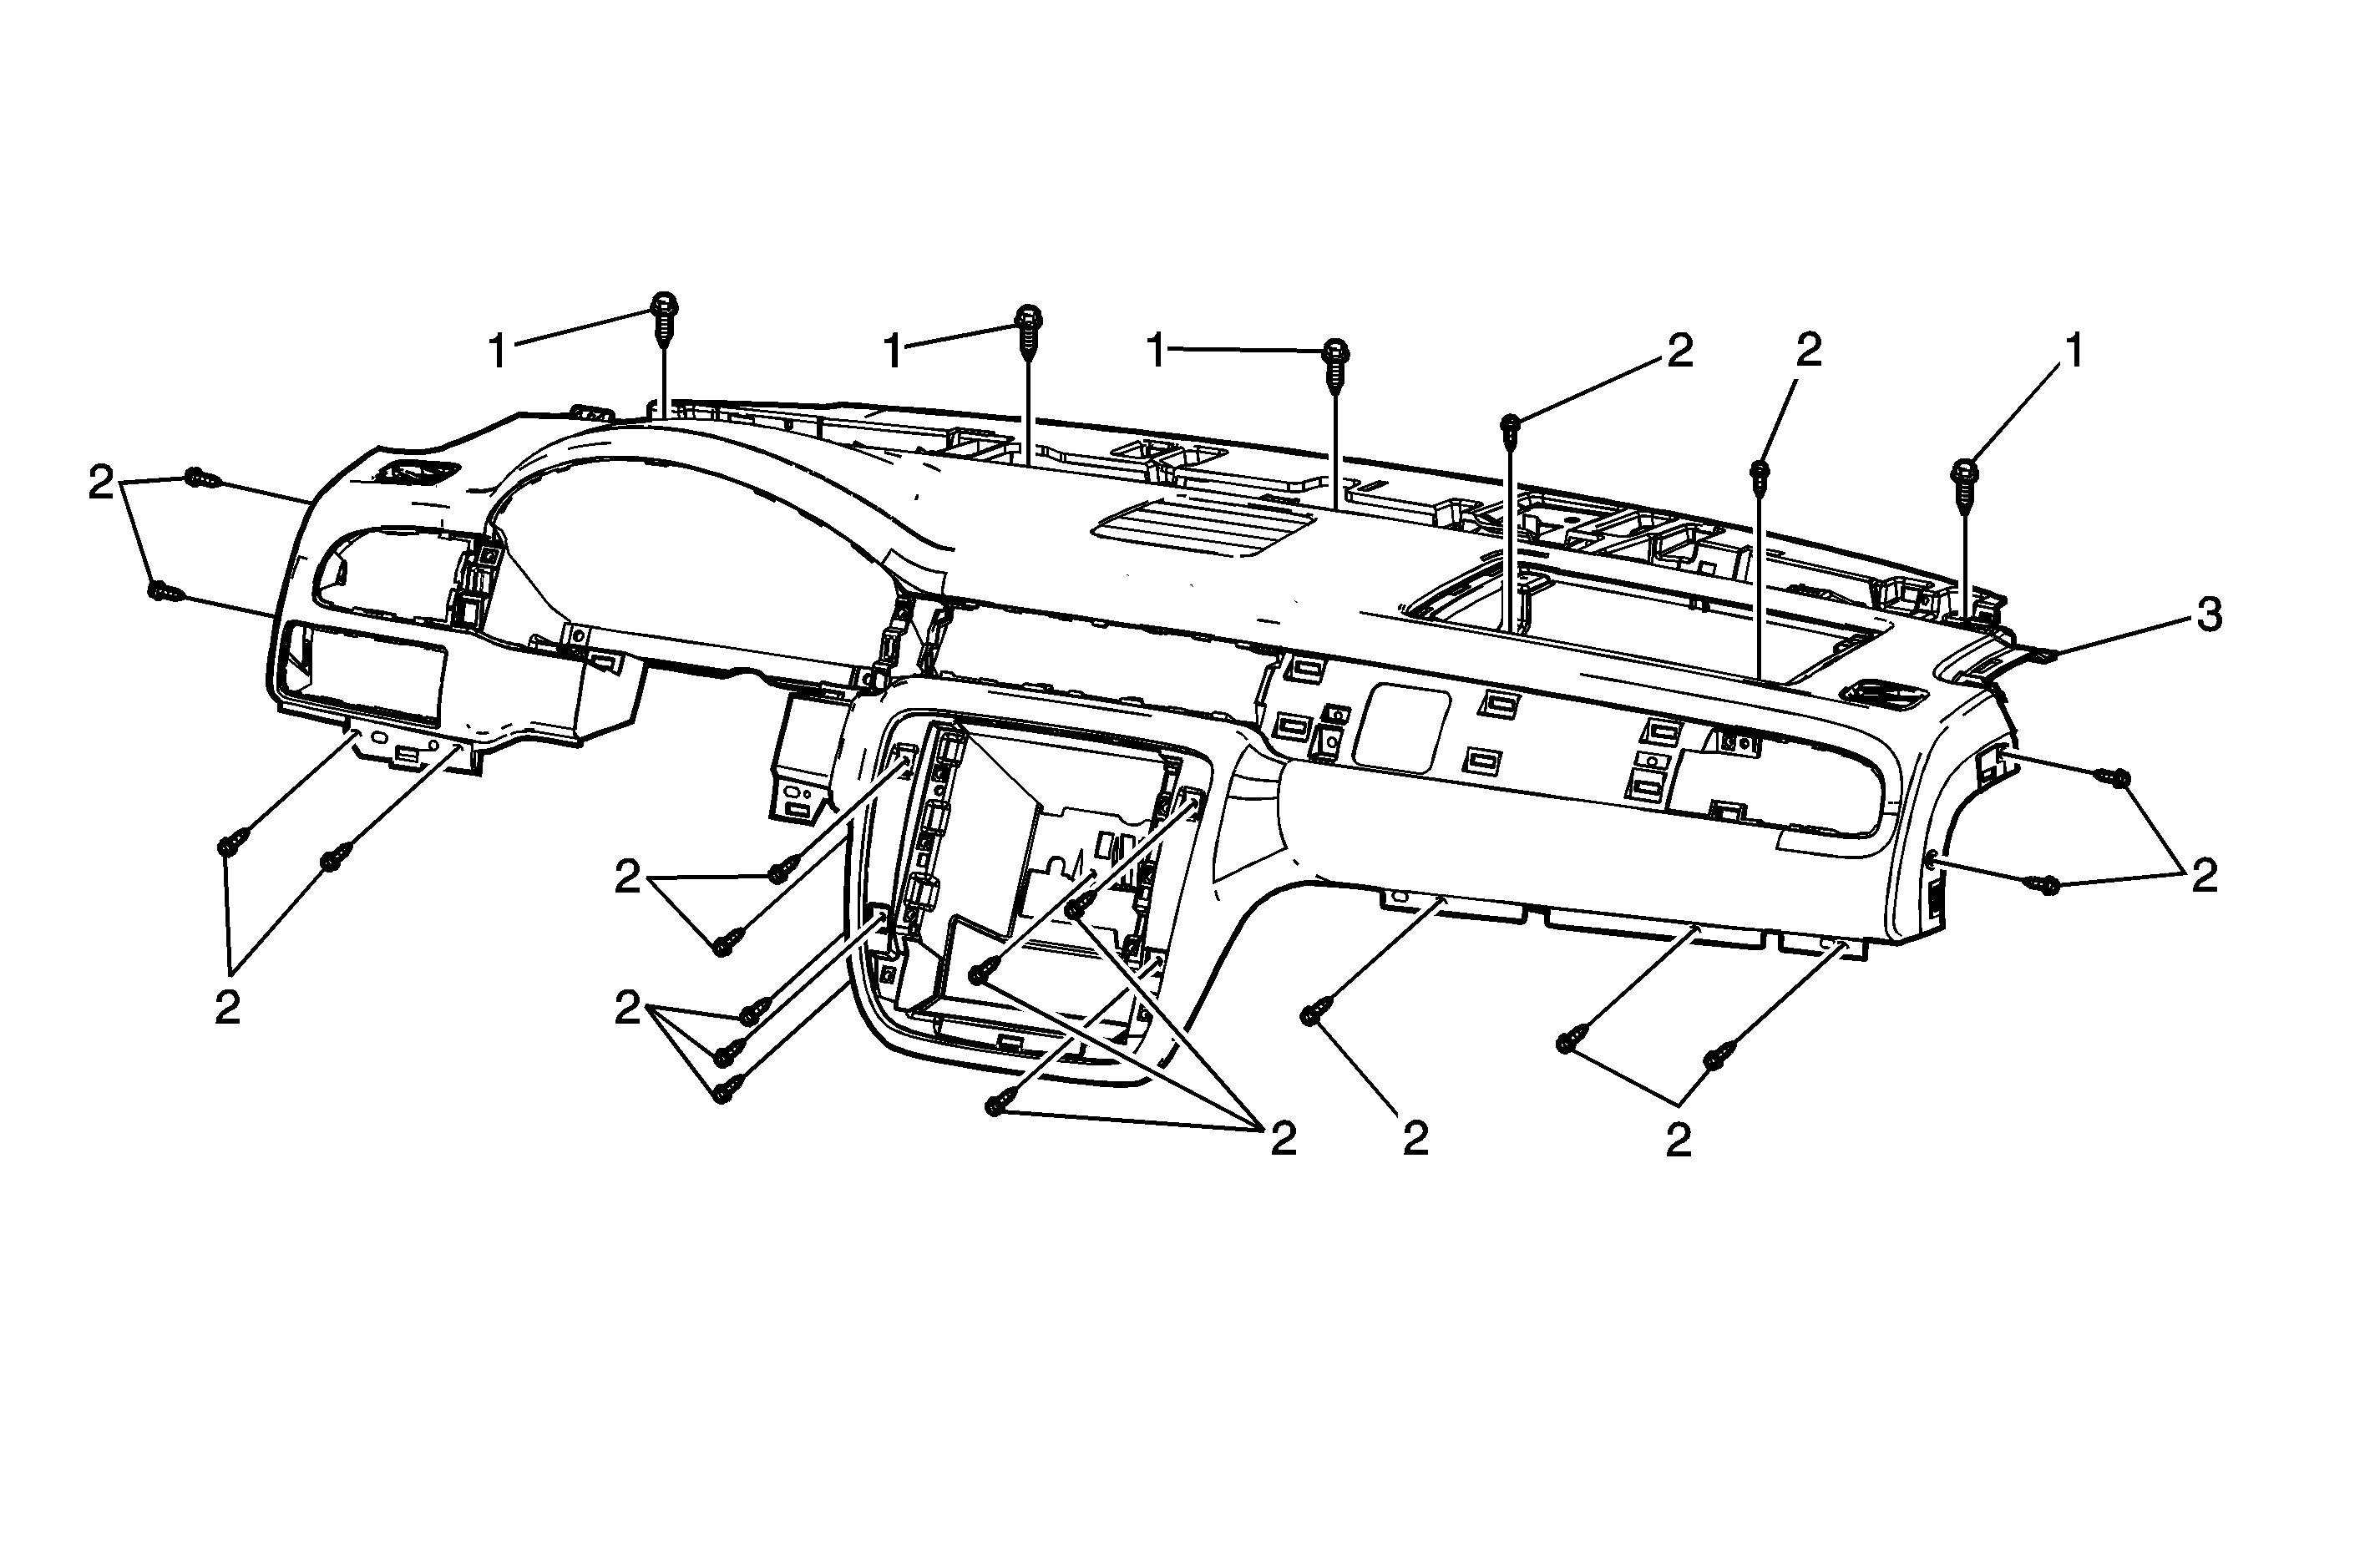

Object Number: 1689887  Size: MF

Callout

Component Name

Preliminary Procedures

  1. Disable the SIR system. Refer to SIR Disabling and Enabling .
  2. Remove the windshield pillar garnish moldings. Refer to Windshield Pillar Garnish Molding Replacement .
  3. Remove the instrument panel upper trim panel with defroster nozzle. Refer to Instrument Panel Upper Trim Panel with Windshield Defroster Nozzle Grille Replacement .
  4. Remove the Radio Front Speaker, if Equipped. Refer to Radio Front Speaker Replacement .
  5. Remove the instrument panel outer trim covers. Refer to Instrument Panel Outer Trim Cover Replacement .
  6. Remove the left instrument panel deflector. Refer to Instrument Panel Outer Air Outlet Deflector Replacement - Left Side .
  7. Remove the headlamp switch bezel assembly. Refer to Headlamp Switch Bezel Replacement .
  8. Remove the instrument panel cluster assembly. Refer to Instrument Cluster Replacement .
  9. Remove the knee bolster assembly. Refer to Knee Bolster Replacement .
  10. Remove the instrument panel center trim panel. Refer to Instrument Panel Center Trim Panel Replacement .
  11. Remove the instrument panel accessory switch assembly. Refer to Accessory Switch Replacement .
  12. Remove the HVAC control module. Refer to HVAC Control Module Replacement .
  13. Remove the radio. Refer to Radio Replacement .
  14. Remove the instrument panel inflatable restraint. Refer to Inflatable Restraint Instrument Panel Module Replacement .
  15. Remove the right instrument panel deflector. Refer to Instrument Panel Center Air Outlet Deflector Replacement .
  16. Remove the instrument panel compartment door. Refer to Instrument Panel Compartment Door Replacement .
  17. Remove the instrument panel access hole cover panel. Refer to Instrument Panel Compartment Access Hole Cover Replacement .

1

Instrument Panel Upper Trim Panel Bolts (Qty: 4)

Notice: Refer to Fastener Notice in the Preface section.

Tighten
9 N·m (80 lb in)

2

Instrument Panel Upper Trim Panel Screws (Qty: 18)

Tighten
2 N·m (18 lb in)

3

Instrument Panel Upper Trim Panel Assembly

Tip

  1. Prior to removal of the trim panel from the carrier assembly, note the routing of the wiring to aid in reassembly.
  2. Disconnect electrical connections.
  3. With the aid of an assistant, remove the trim panel from the vehicle.