For 1990-2009 cars only
Removal Procedure
- Remove the instrument panel (I/P) trim panel. Refer to Instrument Panel Upper Trim Panel Replacement .
- Remove the center console, if equipped. Refer to Console Replacement .
- Disconnect the negative battery cable. Refer to Battery Negative Cable Disconnection and Connection in Engine Electrical.
- Remove the driver side knee bolster. Refer to Knee Bolster Replacement .
- Remove the lower I/P trim panel. Refer to Instrument Panel Lower Trim Panel Replacement .
- Remove the passenger side airbag module. Refer to Inflatable Restraint Instrument Panel Module Replacement in SIR.
- Remove the radio. Refer to Radio Replacement in Entertainment.
- Remove the HVAC control. Refer to HVAC Control Module Replacement in HVAC Systems - Automatic or HVAC Control Module Replacement in HVAC Systems - Manual.
- Remove the accessory switch housing. Refer to Accessory Switch Replacement .
- Remove the left air louver housing. Refer to Instrument Panel Outer Air Outlet Deflector Replacement - Left Side in Heating, Ventilation and Air Conditioning.
- Remove the steering column. Refer to Steering Column Replacement in Steering Wheel and Column.
- Remove the communication interface module (CIM), if equipped. Refer to Communication Interface Module Replacement in Cellular Communication.
- Remove the remote control door lock receiver module, if equipped. Refer to Remote Control Door Lock Receiver Replacement in Keyless Entry.
- Remove the data link connector from the I/P. Refer to Data Link Connector Replacement in Computer/Integrating Systems.
- Remove the park brake release lever from the I/P. Refer to Parking Brake Release Handle Assembly Replacement in Park Brake.
- Remove the instrument panel cluster (IPC). Refer to Instrument Cluster Replacement .
- Remove both front window air ducts from the I/P assembly.
- Remove the harness from the I/P. Refer to Instrument Panel Electrical Center or Junction Block Replacement - Left Side and Instrument Panel Electrical Center or Junction Block Replacement - Right Side .
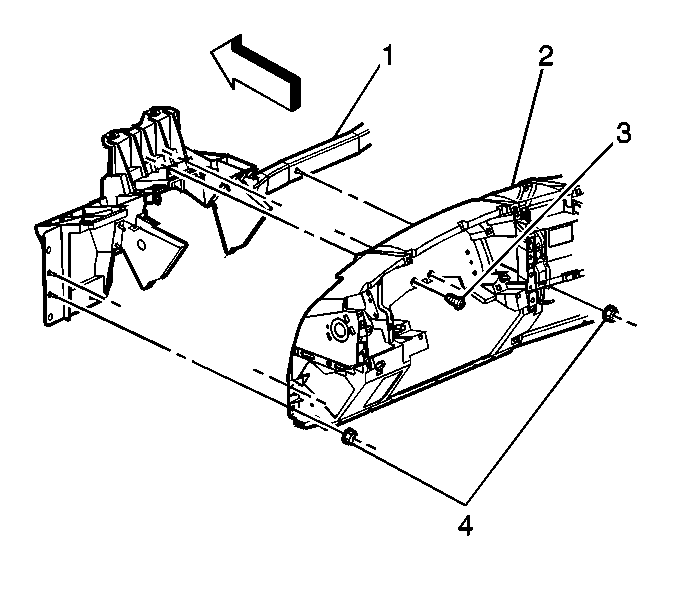
- Remove the I/P assembly retaining bolts (3) and nuts (4).
- Remove all harness hold down retainers from the I/P assembly.
- Remove the I/P assembly from the vehicle.
Caution: Refer to Battery Disconnect Caution in the Preface section.
Caution: Refer to SIR Caution in the Preface section.
Installation Procedure
- Install the I/P assembly to the vehicle.
- Install the harness hold down retainers to the I/P assembly.
- Install the I/P assembly retaining bolts (3) and nuts (4).
- Install the harness to the I/P. Refer to Instrument Panel Electrical Center or Junction Block Replacement - Left Side and Instrument Panel Electrical Center or Junction Block Replacement - Right Side .
- Install both front window air duct to the I/P assembly.
- Install the IPC assembly. Refer to Instrument Cluster Replacement .
- Install the park brake release lever to the I/P. Refer to Parking Brake Release Handle Assembly Replacement in Park Brake.
- Install the data link connector to the I/P. Refer to Data Link Connector Replacement in Computer/Integrating Systems.
- Install the remote control door lock receiver module, if equipped. Refer to Remote Control Door Lock Receiver Replacement in Keyless Entry.
- Install the CIM, if equipped. Refer to Communication Interface Module Replacement in Cellular Communication.
- Install the steering column. Refer to Steering Column Replacement in Steering Wheel and Column.
- Install the left air louver housing. Refer to Instrument Panel Outer Air Outlet Deflector Replacement - Left Side in Heating, Ventilation, and Air Conditioning.
- Install the accessory switch housing. Refer to Accessory Switch Replacement .
- Install the HVAC control. Refer to HVAC Control Module Replacement in HVAC Systems - Automatic or HVAC Control Module Replacement in HVAC Systems - Manual.
- Install the radio. Refer to Radio Replacement in Entertainment.
- Install the passenger side airbag module. Refer to Inflatable Restraint Instrument Panel Module Replacement in SIR.
- Install the lower trim panel. Refer to Instrument Panel Lower Trim Panel Replacement .
- Install the driver side knee bolster. Refer to Knee Bolster Replacement .
- Connect the negative battery cable. Refer to Battery Negative Cable Disconnection and Connection in Engine Electrical.
- Install the center console, if equipped. Refer to Console Replacement .
- Install the I/P trim panel. Refer to Instrument Panel Upper Trim Panel Replacement .
Ensure the wire harness is routed to all of the openings.
