For 1990-2009 cars only
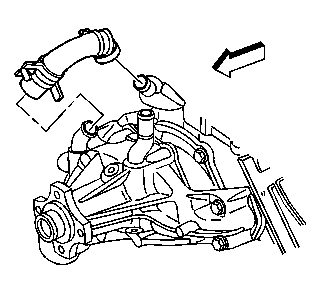
Water Pump Replacement 4.3L Engine
Removal Procedure
- Remove the air inlet duct. Refer to Air Cleaner Assembly Replacement in Engine Controls-4.3L.
- Drain the cooling system. Refer to Cooling System Draining and Filling .
- Remove the upper fan shroud. Refer to Fan Shroud Replacement .
- Remove the cooling fan and clutch assembly. Refer to Fan Clutch Replacement .
- Remove the drive belt. Refer to Drive Belt Replacement in Engine Mechanical-4.3L.
- Remove the outlet radiator hose from the water pump. Refer to Radiator Outlet Hose Replacement .
- Remove the by-pass hose.
- Remove the water pump. Refer toWater Pump Removal in Engine Mechanical.

Installation Procedure
- Install the water pump. Refer toWater Pump Installation in Engine Mechanical.
- Install the by-pass hose.
- Connect the radiator outlet hose to the water pump. Refer to Radiator Outlet Hose Replacement .
- Install the drive belt. Refer to Drive Belt Replacement in Engine Mechanical -4.3L.
- Install the cooling fan and clutch assembly. Refer to Fan Clutch Replacement
- Install the upper fan shroud. Refer to Fan Shroud Replacement .
- Install the air inlet duct. Refer to Air Cleaner Assembly Replacement in Engine Controls-4.3L.
- Fill the cooling system. Refer to Cooling System Draining and Filling .
- Check the cooling system for leaks. Refer to Cooling System Leak Testing .

Water Pump Replacement 4.8L, 5.3L, 6.0L Engines
Removal Procedure
- Remove the air inlet duct. Refer to Air Cleaner Assembly Replacement in Engine Controls-4.8L, 5.3L, 6.0L.
- Drain the coolant from the system. Refer to Cooling System Draining and Filling .
- Remove the inlet radiator hose from the water pump. Refer to Radiator Inlet Hose Replacement .
- Remove the upper fan shroud. Refer to Fan Shroud Replacement .
- Remove the cooling fan and clutch assembly. Refer to Fan Clutch Replacement .
- Remove the drive belt. Refer to Drive Belt Replacement in Engine Mechanical -4.8L, 5.3L, 6.0L.
- Remove the radiator outlet hose from the coolant pump. Refer to Radiator Outlet Hose Replacement .
- Remove the surge tank hose. Refer to Surge Tank Hose Replacement .
- Remove the heater hose.
- Remove the water pump. Refer to Water Pump Removal in Engine Mechanical.
Refer to Heater Hoses Replacement in Heating, Ventilation, and Air Conditioning.
Installation Procedure
Notice: DO NOT use cooling system seal tabs, or similar compounds, unless otherwise instructed. The use of cooling system seal tabs, or similar compounds, may restrict coolant flow through the passages of the cooling system or the engine components. Restricted coolant flow may cause engine overheating and/or damage to the cooling system or the engine components/assembly.
- Install the water pump. Refer to Water Pump Installation in Engine Mechanical.
- Install the surge tank hose. Refer to Surge Tank Hose Replacement .
- Install the heater hose. Refer to Heater Hoses Replacement in Heating, Ventilation, and Air Conditioning.
- Install the outlet radiator hose to the coolant pump. Refer to Radiator Outlet Hose Replacement .
- Install the drive belt. Refer to Drive Belt Replacement in Engine Controls-4.8L, 5.3L, 6.0L.
- Install the cooling fan and clutch assembly. Refer to Fan Clutch Replacement .
- Install the upper fan shroud. Refer to Fan Shroud Replacement .
- Install the inlet radiator hose to the water pump. Refer to Radiator Inlet Hose Replacement .
- Install the air inlet duct. Refer to Air Cleaner Assembly Replacement in Engine Controls-4.8L, 5.3L, 6.0L.
- Fill the cooling system. Refer to Cooling System Draining and Filling .
- Test the cooling system for leaks. Refer to Cooling System Leak Testing .
