COOLANT LOSS-DIESEL HEADGASKET LEAKAGE-BRASS PLUG REPLACEMENT

Model and Year 1982-83 "C/K/P" 10-30 SERIES TRUCKS AND 1983 "G" 10-30 SERIES VANS
THIS BULLETIN CANCELS AND SUPERSEDES 83-T-76 (AUGUST, 1983). ALL COPIES OF WHICH SHOULD BE DESTROYED.
External engine coolant loss on the 6.2L diesel has been from the rear lower corner of the left cylinder head and the front lower corner of the right cylinder head. This coolant loss is the result of a sealing condition around the core cleanout hole in the cylinder head. To correct this condition a brass plug kit has been released to seal the core hole. Brass plug kit, P/N 14077197, includes two (2) plugs and one (1) driver. The following procedures should be adhered to when a cylinder head is removed for service. Both heads must have the plugs installed during this service operation.
CYLINDER HEAD GASKET REPLACEMENT AND BRASS PLUG KIT INSTRUCTIONS
1. Removal
A. Disconnect battery.
B. Remove injection lines and intake manifold.
C. Remove rocker arm cover.
D. Drain coolant into a clean container and save for refilling.
E. Remove dipstick tube (left side).
F. Disconnect ground strap.
G. Raise vehicle.
H. Disconnect exhaust pipe from manifold.
I. Lower vehicle.
J. If equipped with A/C move out of the way without disconnecting the fluid hoses.
K. Remove generator.
L. Disconnect glow plug wires.
M. Remove rocker arm assemblies.
N. Remove push rods. Mark push rods for reinstallation. Place rocker arm shafts and push rods in a rack so they may be reinstalled in the same location, and orientation.
0. Disconnect radiator, bypass, and heater hoses.
P. Remove thermostat housing/crossover at cylinder head.
Q. Remove cylinder head bolts (17 each side). Rear left cylinder head bolt may have to remain in the head upon loosening.
R. Remove cylinder head.
2. Inspection and Repair
A. Inspect the cylinder head for cracks in the exhaust ports, combustion chambers, or external cracks to the coolant chambers.
B. Clean the cylinder head mating surface.
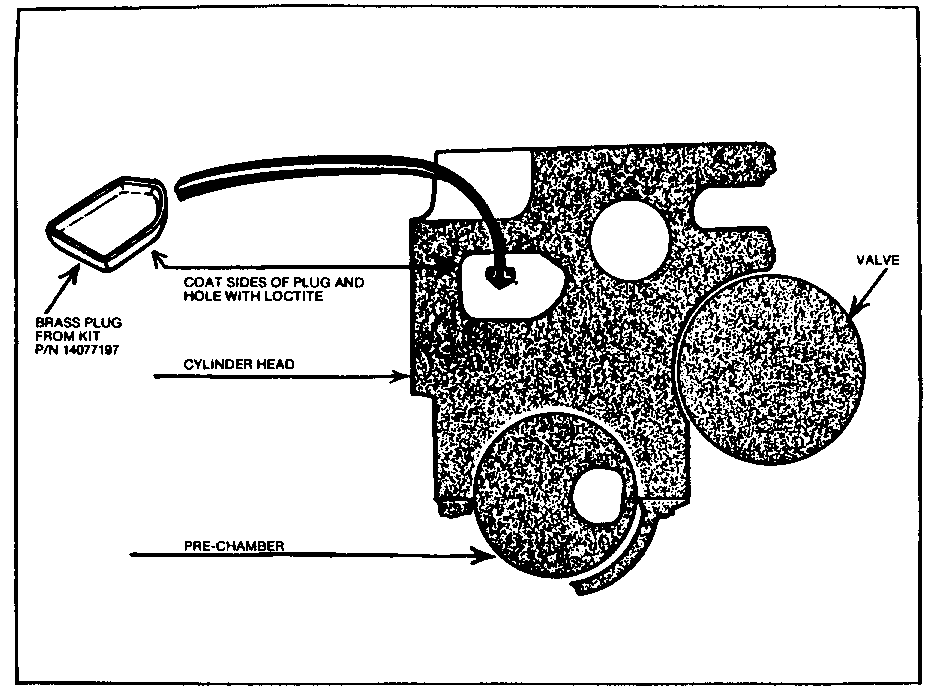
C. Prepare the cored hole (see attached illustration) to accept a brass plug by eliminating cast irregularities. Clean the inside edge of the hole with a wire brush and wash with solvent to prepare surface for sealant.
D. Coat the sides of the brass plug and the hole with Loctite 271 or equivalent.
E. Insert the brass plug slowly and squarely using an arbor press, and the plastic plug driver. Press the plug in until it is flush with the head surface. If the plug deforms or pulls away from the side of the hole, gently tap the sides of the plug to move them back in contact with the side of the cast hole while the Loctite is still wet. Allow the Loctite to cure with the head resting with the fire deck down while completing the following items.
F. Clean out the cylinder head bolt holes in the block with an M12 x 1.75 tap to remove all old sealer.
G. Clean the block mating surfaces.
H. Remove any sheared brass and excessive Loctite that may be on the cylinder head surface.
I. Check engine injection pump static timing. Timing marks should line up according to Chevrolet Bulletin 82-T-126.
3. Assembly
A. All gasket surfaces must be free of dirt and foreign material.
B. Head gaskets are a special composition gasket that must be used without a sealer.
C. Install a new head gasket over the dowel pins on the cylinder block.
D. Use gasket, P/N 14066246. This part number is for a head gasket only.
E. Carefully reinstall head assembly and replace all head bolts with P/N 14077193. Coat the threads and underside of the bolt head with a teflon type sealant, such as P/N 1052080 or equivalent, and install bolts finger tight.
NOTICE: Due to clearances on "C/K" vehicles, the left rear cylinder head bolt must be coated with sealing compound and installed into the head prior to installation. Care should be used to prevent the bolt from damaging the gasket during installation.
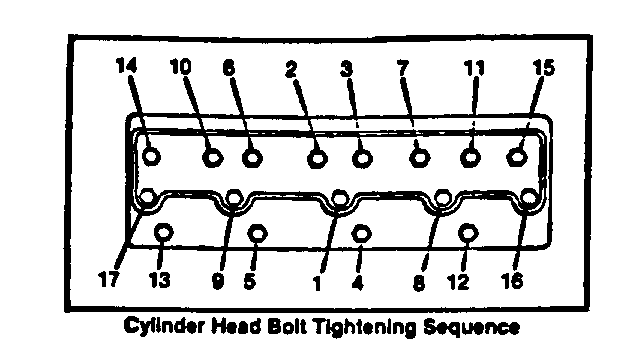
F. NOTICE: It is mandatory that the following items must be done in the order and sequence shown to insure a uniform bolt tension.
1. In sequence, torque all bolts to 25 N.m (20 ft. lb.).
2. In sequence, retorque all bolts to 65 N.m (50 ft. lb.).
3. In sequence, mark one (1) flat on each bolt, with a yellow marker, when you are ready to turn it, so that you can tell how far the bolt has been turned. TURN EACH BOLT AN ADDITIONAL 900 (1/4 TURN). Marking the bolts will help insure that none of the bolts are missed.
G. For remainder of installation, reverse the removal procedure.
WARRANTY DESCRIPTION
Dealers should submit an accurately filled out warranty repair order on each vehicle completed in accordance with this bulletin.
Time Allowance Labor -------------- Operation "C/K" "G/P" Number Description Models Models ------ ----------- ------ ------ J0507 R&R both cylinder head gas- kets, inspect and install brass plugs per procedure outlined in bulletin. 8.1 hr. 8.7 hr.*
With A/C add .3 hr. 1.9 hr.
With automatic transmission add -- .3 hr.
With electronic speed con- trol (RPO K34) add .2 hr.
*P models equipped with Union City bodies built prior to August, 1982 may require additional time. Contact your Area Service Manager.
PARTS INFORMATION
Parts required to complete this fix are to be ordered from WDDGM and will be available on a limited basis after August 15, 1983. To insure this part will be obtained as soon as possible, it should be ordered from WDDGM on a C.I.O. order with no special instruction code, but order on Advice Code 2.


General Motors bulletins are intended for use by professional technicians, not a "do-it-yourselfer". They are written to inform those technicians of conditions that may occur on some vehicles, or to provide information that could assist in the proper service of a vehicle. Properly trained technicians have the equipment, tools, safety instructions and know-how to do a job properly and safely. If a condition is described, do not assume that the bulletin applies to your vehicle, or that your vehicle will have that condition. See a General Motors dealer servicing your brand of General Motors vehicle for information on whether your vehicle may benefit from the information.
