Description
The EVAP LARGE LEAK TEST is based on applying vacuum to the EVAP system and monitoring the rate of vacuum decay. The Powertrain Control Module (PCM) uses the input from the fuel tank pressure (FTP) sensor in order to determine the rate of vacuum decay. At an appropriate time, the PCM turns the EVAP canister purge valve ON (open) and the EVAP canister vent valve ON (closed). This allows the engine to draw a vacuum on the system. At a calibrated time or vacuum level, the PCM turns the purge valve OFF (closed), and tests the system vacuum. If the system is unable to achieve the calibrated vacuum level, the PCM will set DTC P0440.
Conditions for Running the DTC
- DTC P0107. P0108, P0110, P0112, P0113, P0115, P0117, P0118, P0121, P0122, P0123, P0125, P0443, P0449, P0452, P0453, P1106. P1107, P1111, P1112, P1114, P1115, P1121 and P1122 not active.
- The system voltage is between 10-18 volts.
- The startup (ECT) engine coolant temperature is between than 4-30°C (39-86°F), but the start up ECT is not more than 8°C (14°F) more than the startup IAT temperature.
- The startup (IAT) intake air temperature is between than 4-30°C (39-86°F), but the start up IAT is not more than 3°C (7°F) more than the startup ECT temperature.
- The fuel tank level is between 15-85 percent.
- The barometric pressure (BARO) is more than 75 kPa.
- The vehicle speed sensor (VSS) is less than 75 mph.
Conditions For Setting the DTC
The EVAP system is not able to achieve or maintain vacuum during the diagnostic test.
Action Taken When the DTC Sets
| • | The control module illuminates the malfunction indicator lamp (MIL) when the diagnostic runs and fails. |
| • | The control module records the operating conditions at the time the diagnostic fails. The control module stores this information in the Freeze Frame/Failure Records. |
Conditions for Clearing the MIL/DTC
| • | The control module turns OFF the malfunction indicator lamp (MIL) after 3 consecutive ignition cycles that the diagnostic runs and does not fail. |
| • | A current DTC, Last Test Failed, clears when the diagnostic runs and passes. |
| • | A history DTC clears after 40 consecutive warm-up cycles, if no failures are reported by this or any other emission related diagnostic. |
| • | Clear the MIL and the DTC with a scan tool. |
Diagnostic Aids
| • | Use the EVAP pressure/purge diagnostic station in order to pressurize the EVAP system to aid in locating intermittent leaks. |
| • | Move all EVAP components while testing with the Ultrasonic Leak Detector. |
| • | A temporary blockage in the EVAP canister purge valve, purge pipe or EVAP canister could cause an intermittent condition. To repair a blockage in the EVAP system refer to Evaporative Emission System Cleaning . |
Test Description
The numbers below refer to the step numbers on the diagnostic table.
-
This step verifies that a failure condition is active.
-
This step is used to verify if a leak is present.
-
This step verifies proper operation of the fuel tank pressure (FTP) sensor.
-
This step tests the EVAP canister purge valve for a restriction or blockage.
-
This step verifies that repairs are complete and that no other condition is present.
Step | Action | Values | Yes | No | ||||||||||||||||||||
|---|---|---|---|---|---|---|---|---|---|---|---|---|---|---|---|---|---|---|---|---|---|---|---|---|
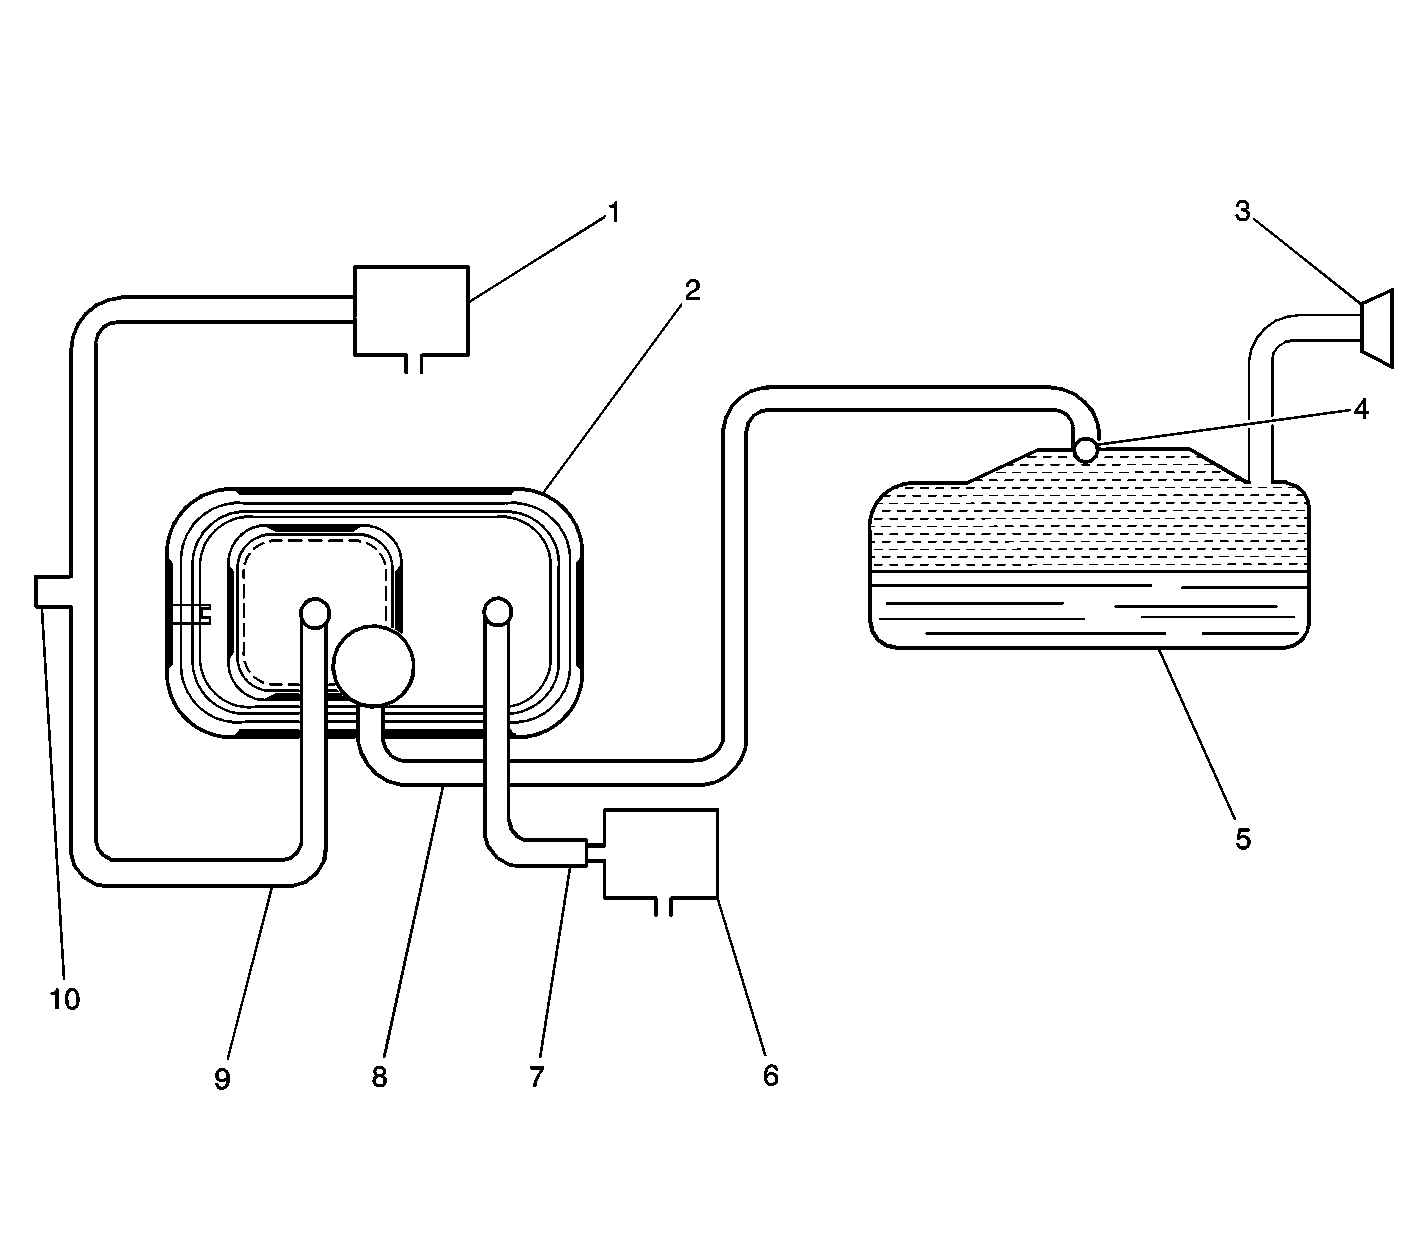
Schematic Reference:
| ||||||||||||||||||||||||
1 | Did you perform the Diagnostic System Check-Engine Controls? | -- | Go to Step 2 | |||||||||||||||||||||
2 | Does the scan tool indicate DTC P0443 or DTC P0449 are also set? | -- | Go to Step 3 | |||||||||||||||||||||
3 |
Did you find and correct the condition? | -- | Go to Step 19 | Go to Step 4 | ||||||||||||||||||||
Does the scan tool indicate that the service bay test passed? | -- | Go to Diagnostic Aids | Go to Step 5 | |||||||||||||||||||||
|
Important: The following steps require the EVAP Pressure/Purge Diagnostic Station J 41413 and the Fuel Fill Cap Adaptor J 41415 . Always zero the EVAP Pressure and vacuum (in. H2O) gauges on the EVAP Pressure Diagnostic Station before proceeding with diagnosis.
Did you obtain the specified value? | 5 in H2O | Go to Step 6 | Go to Step 8 | |||||||||||||||||||||
Compare the EVAP pressure/purge diagnostic station value to the scan tool (FTP) fuel tank pressure sensor value. Does EVAP pressure/purge diagnostic station value measure near the scan tool value? | -- | Go to Step 7 | Go to Step 14 | |||||||||||||||||||||
7 |
Does the EVAP system pressure decrease? | 5 in H2O | Go to Step 10 | Go to Step 11 | ||||||||||||||||||||
8 |
Important: It may be necessary to partially lower the fuel tank to inspect components located in the upper portion of the tank.
Did you locate a leak? | -- | Go to Step 9 | Go to Diagnostic Aids | ||||||||||||||||||||
9 | Repair the system as necessary. Did you complete the repair? | -- | Go to Step 19 | -- | ||||||||||||||||||||
Does the EVAP pressure/purge diagnostic station vacuum gauge measure above the specified value? | 12 in Hg | Go to Diagnostic Aids | Go to Step 16 | |||||||||||||||||||||
11 |
Does the EVAP system pressure decrease? | -- | Go to Step 17 | Go to Step 12 | ||||||||||||||||||||
12 |
Does the EVAP system pressure decrease? | -- | Go to Step 13 | |||||||||||||||||||||
13 |
Does the EVAP system pressure decrease? | -- | Go to Step 18 | Go to Step 15 | ||||||||||||||||||||
14 | Replace the (FTP) fuel tank pressure sensor. Refer to Fuel Tank Pressure Sensor Replacement Did you complete the replacement? | -- | Go to Step 19 | -- | ||||||||||||||||||||
15 | Repair for a pinched or obstructed EVAP vapor pipe between the front and rear tanks. Did you complete the repair? | -- | Go to Step 19 | -- | ||||||||||||||||||||
16 | Repair for a plugged vacuum supply. Did you find and correct the condition? | -- | Go to Step 19 | Go to Step 17 | ||||||||||||||||||||
17 | Replace the EVAP canister purge valve. Refer to Evaporative Emission Canister Purge Solenoid Valve Replacement . Did you complete the replacement? | -- | Go to Step 19 | -- | ||||||||||||||||||||
18 | Replace the EVAP canister. Refer to Evaporative Emission Canister Replacement | -- | Go to Step 19 | -- | ||||||||||||||||||||
Perform the Service Bay Test. Refer to Service Bay Test . Does the scan tool indicate that the service bay test passed? | -- | Go to Step 20 | Go to Step 2 | |||||||||||||||||||||
20 | With a scan tool, observe the stored information, Capture Info. Does the scan tool display any DTCs that you have not diagnosed? | -- | System OK | |||||||||||||||||||||
