Caution: Always use the J 42435-B Compressed Natural Gas (CNG) Fuel Tank Venting Kit in conjunction with the General Motors approved Fuel Tank Venting service procedure to vent CNG fuel tanks. Failure
to use the J 42435-B and follow the approved Fuel Tank Venting procedure could result in death, serious injury or vehicle and component damage.
The J 42435-B is required for the following reasons:
| • | Natural gas fuel vapor can also contain water vapor. |
| • | The pressure drop associated with venting high pressure gaseous fuel can cause fuel vapor, tank and line temperatures to reach -73°C (-100°F) or colder. |
| • | The below freezing temperature can cause the water vapor to freeze |
| • | The J 42435-B vent hose contains an orifice which is intended to freeze before the CNG high pressure lock-off (HPL) tank valve freezes. |
| • | The J 42435-B pressure gauge can indicate a restricted orifice if fuel flow ceases. |
| • | Internal
fuel tank ice build-up may result when venting the CNG fuel tank without the J 42435-B. |
| - | Internal
fuel tank ice build-up can completely restrict the venting of fuel. |
| - | Venting may cease indefinitely depending upon ambient temperature conditions. |
| - | The ceasing of fuel tank venting may falsely indicate that the fuel tank pressure has been completely vented. |
| - | CNG fuel tanks with exceptionally high water content are suceptible to internal fuel tank ice build-up even with the use of the J 42435-B. |
The CNG fuel tank is completely vented when all of the following conditions have been met:
- Venting natural gas is no longer audible from the vent stack.
- Close the J 42435-B ¼-turn valve and stabilize the fuel tank and line assembly at a temperature greater than 7°C (45°F) for at least 4 hours.
| | If the ambient temperature is less than 7°C (45°F), warm the fuel
tank and vent line assembly manually, either with warm water or by placing the tank and line assembly into a warm environment. |
- The J 42435-B pressure gauge indicates 0 kPa (0 psi).
Tools Required
J 42435-B
CNG Tank Venting Kit
- If possible, operate the vehicle on CNG until most of the fuel tank pressure has been depleted.
Important:
| • | Venting of natural gas to the atmosphere may be prohibited in some areas. Before venting the compressed natural gas (CNG) fuel tank, contact the authority having jurisdiction to ensure that all local, state and federal regulations are observed. |
| • | Transportation of a pressurized CNG fuel tank is prohibited by law. The CNG fuel tank must be vented prior to consignment. |
| • | Storing a pressurized CNG fuel tank outside of the vehicle may be prohibited. Contact the authority having jurisdiction prior to removing and storing a pressurized CNG fuel tank. |
| • | A pressurized CNG fuel tank must be properly restrained and protected from unauthorized access when outside of the vehicle. Restrain the fuel tank to a shipping pallet or with the CNG fuel tank brackets from the vehicle and move to a secure area. |
| • | Protect the tank from ultra-violet (UV) radiation and physical damage while removed from the vehicle. Inspect for damage any CNG fuel tank that has been removed from the vehicle prior to installation. Refer to
Fuel Tank Inspection
. |
| • | Venting cannot be stopped once the high pressure lock-off (HPL) has been opened with the manual vent tool. |
| • | Venting the CNG fuel tank with the manual vent tool will damage the HPL. Venting the internal tank pressure is only necessary for the following: |
| - | When required by the authority having jurisdiction |
| - | Type 4 tank Pressure Relief Device (PRD) removal |
| - | Tank storage outside of the vehicle (varies by local ordinance) |
| • | Vent the CNG fuel tank only while it is properly restrained within the vehicle tank brackets. |
- Remove the CNG fuel tank cover. Refer to
Fuel Tank Cover Replacement
. Remove the truck body or side panel as required on ZW9 equipped vehicles in order to gain access to the HPL side of the CNG fuel tank.
- Relieve the CNG fuel system line pressure. Refer to
Fuel Pressure Relief
.
- Disconnect the negative battery cable. Refer to
Battery Negative Cable Disconnection and Connection
in Engine Electrical in the C/K Pickup service manual.
- Close the HPL manual lock-down screw.
Caution: The compressed natural gas (CNG) fuel tank internal pressure must be completely vented before attempting to remove the external pressure relief device (PRD). Refer to
Fuel Tank Venting Procedure. Failure to perform the venting procedure could result in CNG fuel tank damage and personal injury.
- DO NOT remove the PRD (6) on a Type 4 fuel tank. The PRD must remain undisturbed until the venting procedure has been completed and you are certain that all pressure has been vented from the fuel tank.
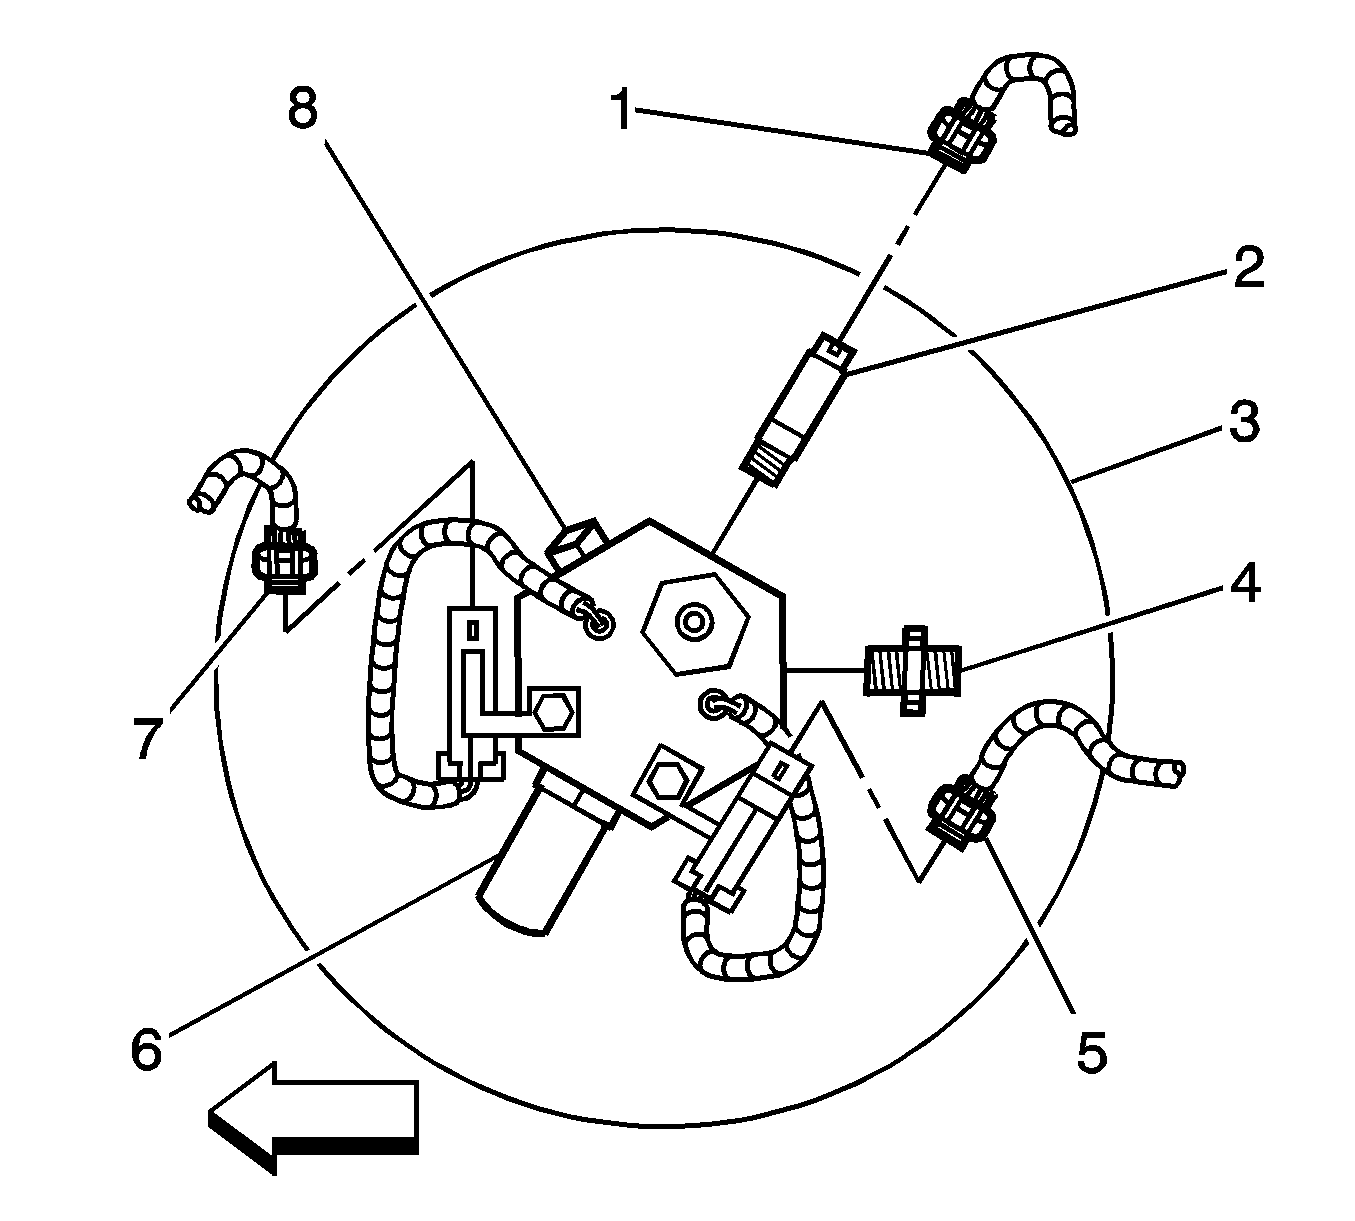
- Disconnect the fuel lines from the HPL fittings (4,8) as necessary.
- Remove the fuel tank pressure (FTP) sensor (2).
- Install fittings (4) supplied from the
J 42435-B
into all of the HPL fuel ports as necessary with the exception of the PRD port (6).
Tighten
Tighten the fittings to 48 N·m (35 lb ft).
- Install caps supplied from the
J 42435-B
onto the FTP port fitting (2) and the fuel outlet fitting (8) as necessary.
Tighten
Tighten the caps to 37 N·m (27 lb ft).
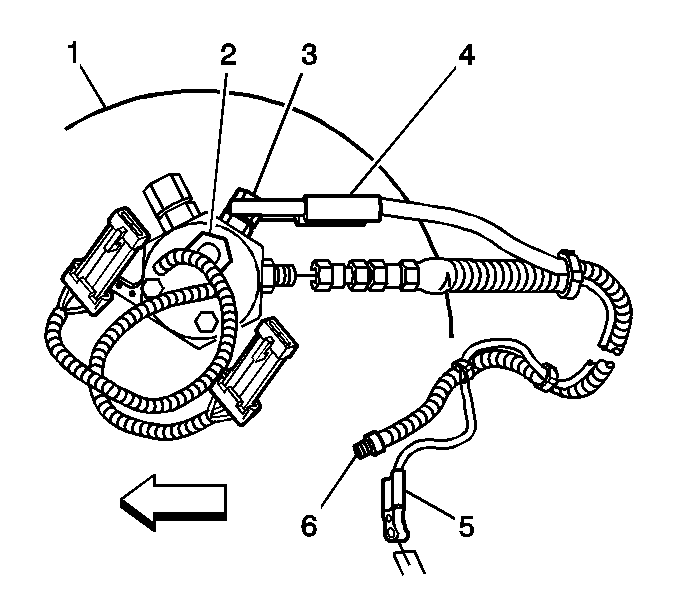
- Connect the female end of the vent hose to the fuel line fitting.
- Connect the male end of the vent hose (6) to a vent stack. Refer to the
J 42435-B
container for instructions on how to properly construct a vent stack.
Caution: When venting the Compressed Natural Gas (CNG) fuel tank take the following precautions
in order to prevent fire and personal injury:
| • | Use the proper grounding procedure to an earth ground in order to prevent a build-up of static electricity which can lead to an electrical discharge. |
| • | Use the J 42435-B CNG Tank Vent Kit with a vent stack. |
| • | Vent the CNG fuel tank in a well ventilated work area. |
| • | Keep sparks, flames, and smoking material away from the area. |
| • | Wear the appropriate hearing protection during the venting procedure. A sudden pressure loss from an uncontrolled gas leak can cause hearing damage. |
- Connect the ground strap (4) to the FTP port fitting (3) and to the vent stack earth ground (5).
- Open the
J 42435-B
¼ turn in-line valve.
Important: If you were required to close the HPL manual lock-down screw during the
Fuel Pressure Relief
the tank may begin to vent when the lock-down screw is opened.
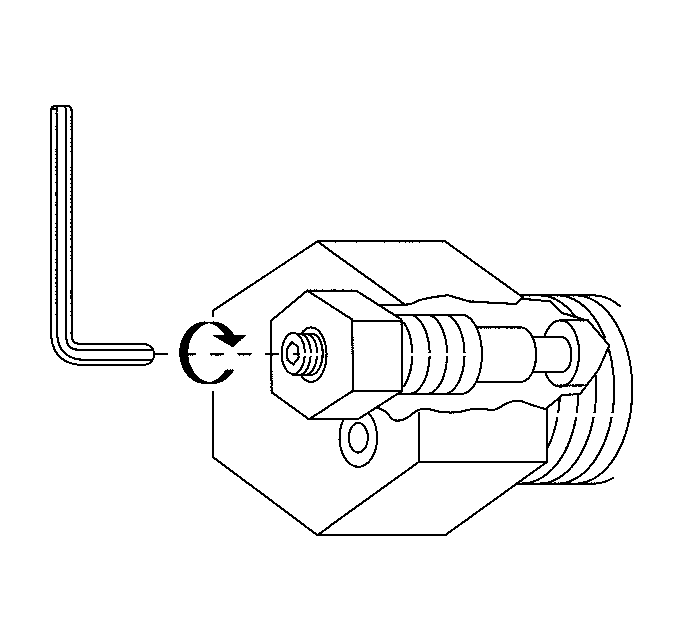
- Ensure that the manual lock-down screw of the manual shut-off fitting (2) is open by rotating the allen screw counter-clockwise until fully seated.
- If the tank begins venting when the manual lock-down screw is opened do not proceed to the next step until the tank stops venting.
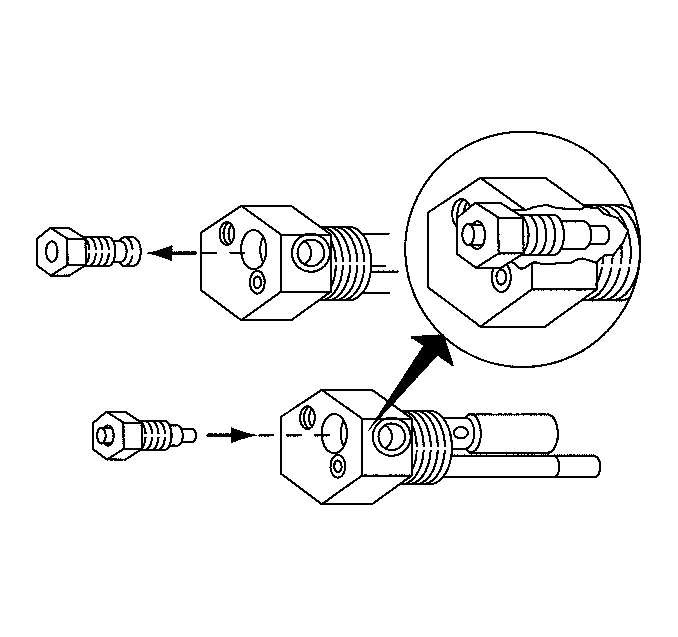
- Remove the manual shut-off fitting from the HPL.
- Obtain the manual vent tool supplied from the
J 42435-B
.
- Rotate the screw on the manual vent tool counter-clockwise in order to fully retract the plunger prior to installation.
- Install the manual vent tool into the HPL port ensuring that the plunger is fully retracted.
Tighten
Tighten the manual vent tool to 12 N·m (108 lb in).
- Slowly turn the manual vent tool screw clockwise until the plunger is fully extended. Do not leave the tank
unattended during venting.
- The tank should always contain some pressure and begin to vent.
- The CNG fuel tank is completely vented when all of the following conditions have been met:
| 23.1. | Venting natural gas is no longer audible from the vent stack. |
| 23.2. | Close the
J 42435-B
¼-turn valve and stabilize the fuel tank and line assembly at a temperature greater than 7°C (45°F) for at least 4 hours. |
If the ambient temperature
is less than 7°C (45°F), warm the fuel tank and vent line assembly manually, either with warm water or by placing the tank and
J 42435-B
line assembly into a warm environment.
| 23.3. | The
J 42435-B
pressure gauge indicates 0 kPa (0 psi). |
- When the tank is completely vented remove the vent line (6) from the fuel fitting.
- Remove all the fittings and caps as necessary.
- Remove the manual vent tool (2).
- Remove the PRD on a vehicle equipped with a Type 4 tank.
- If the tank is to be re-used, you must replace the high pressure lock-off. Refer to
High Pressure Lock-Off Solenoid Replacement
.
- If the tank is to be discarded, perform the Removing From Service procedure. Refer to
Fuel Tank Inspection
.
