Product Safety - Parking Brake Shoe and Drum Contact

| Subject: | 05042B -- PARKING BRAKE SHOE AND DRUM CONTACT |
| Models: | 1999-2002 CHEVROLET 1500 SILVERADO |
| 2001-2005 CHEVROLET 2500/3500 SILVERADO, GVWR >= 9200# |
| 1999-2002 GMC 1500 SIERRA |
| 2001-2005 GMC 2500/3500 SIERRA, GVWR >= 9200# |
| EQUIPPED WITH A MANUAL TRANSMISSION |
STEP 11.2 IN THE SERVICE PROCEDURE FOR THE 2500/3500 SERIES VEHICLES HAS BEEN REVISED. DISCARD ALL COPIES OF BULLETIN 05042A ISSUED JANUARY 2006.
Condition
General Motors has decided that a defect which relates to motor vehicle safety exists in certain 1999-2002 Chevrolet Silverado and GMC Sierra 1500 Series, and 2001-2005 Chevrolet Silverado and GMC Sierra 2500/3500 Series vehicles equipped with a manual transmission. Some of these vehicles may have a contact condition between the parking brake shoes and parking brake drums when the parking brake is not applied. If this were to occur, the driver may or may not hear an intermittent scraping noise from the rear of the vehicle while driving. This condition could cause parking brake lining wear. If this lining wear is undetected, the parking brake may become ineffective in immobilizing a parked vehicle on a grade. An ineffective parking brake may result in a vehicle crash.
Correction
1500 Series - Dealers are to inspect the parking brake lining thickness on both rear brakes, and depending on the amount of lining remaining, install either a reduced-force parking brake retainer spring clip on both rear brakes or parking brake shoe kits, which includes the reduced-force clips.
2500-3500 Series - Dealers are to inspect the parking brake lining thickness on both rear brakes and install a new rear right-hand parking brake cable assembly. Also, depending on the amount of lining remaining, install new parking brake shoes (both rear brakes).
Vehicles Involved
Involved are certain 1999-2002 Chevrolet Silverado and GMC Sierra 1500 Series, and 2001-2005 Chevrolet Silverado and GMC Sierra 2500/3500 Series vehicles equipped with a manual transmission and built within these VIN breakpoints:
Year | Division | Model | From | Through |
|---|---|---|---|---|
1999 | Chevrolet | Silverado | X1100016 | X1298896 |
XE100007 | XE256723 | |||
XZ100003 | XZ214621 | |||
2000 | Chevrolet | Silverado | Y1100305 | Y1312411 |
YE100002 | YE433885 | |||
YZ100001 | YZ371941 | |||
2001 | Chevrolet | Silverado | 1E100006 | 1E346528 |
1F100007 | 1F213631 | |||
1M104945 | 1M119149 | |||
1Z100001 | 1Z335174 | |||
2002 | Chevrolet | Silverado | 2E100004 | 2E306363 |
2F100003 | 2F249007 | |||
2M100005 | 2M116596 | |||
2Z100001 | 2Z348508 | |||
2003 | Chevrolet | Silverado | 3E100006 | 3E378698 |
3F100004 | 3F258842 | |||
3M100001 | 3M112290 | |||
3Z00941 | 3Z261498 | |||
2004 | Chevrolet | Silverado | 4E10001 | 4E403759 |
4F100011 | 4F268956 | |||
4M100006 | 4M112271 | |||
2005 | Chevrolet | Silverado | 5F800008 | 5F809980 |
5M100001 | 5M100990 | |||
1999 | GMC | Sierra | X1513081 | X1571372 |
XE500004 | XE555386 | |||
XZ500001 | XZ540973 | |||
2000 | GMC | Sierra | Y1100130 | Y1312412 |
YE100357 | YE433935 | |||
YZ100003 | YZ371614 | |||
2001 | GMC | Sierra | 1E100007 | 1E345072 |
1F100002 | 1F213791 | |||
1Z100009 | 1Z335197 | |||
2002 | GMC | Sierra | 2E100034 | 2E305823 |
2F100192 | 2F250408 | |||
2Z100116 | 2Z348464 | |||
2003 | GMC | Sierra | 3E100015 | 3E380985 |
3F102273 | 3F258975 | |||
3Z110687 | 3Z251793 | |||
2004 | GMC | Sierra | 4E100010 | 4E403754 |
4F101095 | 4F268255 | |||
2005 | GMC | Sierra | 5F801146 | 5F809737 |
Important: Dealers should confirm vehicle eligibility through GMVIS (GM Vehicle Inquiry System) prior to beginning recall repairs. [Not all vehicles within the above breakpoints may be involved.]
For US and Canada
For dealers with involved vehicles, a Campaign Initiation Detail Report containing the complete Vehicle Identification Number, customer name and address data has been prepared and will be loaded to the GM DealerWorld (US) Recall Information, GMinfoNet (Canada) Recall Reports. Dealers will not have a report available if they have no involved vehicles currently assigned.
For Export
For dealers with involved vehicles, a Campaign Initiation Detail Report containing the complete Vehicle Identification Number, customer name and address data has been prepared, and is being furnished to involved dealers. Dealers will not receive a report with the recall bulletin if they have no involved vehicles currently assigned.
The Campaign Initiation Detail Report may contain customer names and addresses obtained from Motor Vehicle Registration Records. The use of such motor vehicle registration data for any purpose other than follow-up necessary to complete this recall is a violation of law in several states/provinces/countries. Accordingly, you are urged to limit the use of this report to the follow-up necessary to complete this recall.
Parts Information
Parts required to complete this recall are to be obtained from General Motors Service Parts Operations (GMSPO). Please refer to your "involved vehicles listing" before ordering parts. Normal orders should be placed on a DRO = Daily Replenishment Order. In an emergency situation, parts should be ordered on a CSO = Customer Special Order.
Part Number | Description | Qty |
|---|---|---|
88982879 | Spring Kit, RR Park Brk Shoe Holdn (1500 Series) (inc. clips for both rear wheels) | 1 (If Req'd) |
88982875 | Lining Kit, Park Brk Shoe (1500 Series) | 2 (If Req'd) |
10362946 | Cable, Park Brk RR (2500/3500 Series) | 1 |
15130816 | Cable, Park Brk RR (2500/3500 Chassis Cab w/GTY) | 1 |
15130818 | Cable, Park Brk RR (2500/3500 Chassis Cab w/o GTY) | 1 |
12473088 | Lining Kit, Park Brk Shoe w/Shoes (2500/3500 Series) | 2 (If Req'd) |
15007008 | Seal, R/Axl Shf (2500/3500 Series) | 2 |
Service Procedure
1500 Series Vehicles
| • | J 46277 Rotor Removal Tool |
| • | J 6125-B Slide Hammer |
- Raise and suitably support the vehicle.
- Remove the rear tire and wheel assemblies.
- Remove the rear caliper bolts on one side.
- Remove the caliper from the rotor (drum-in-hat) and support.
- Remove the rear rotor.
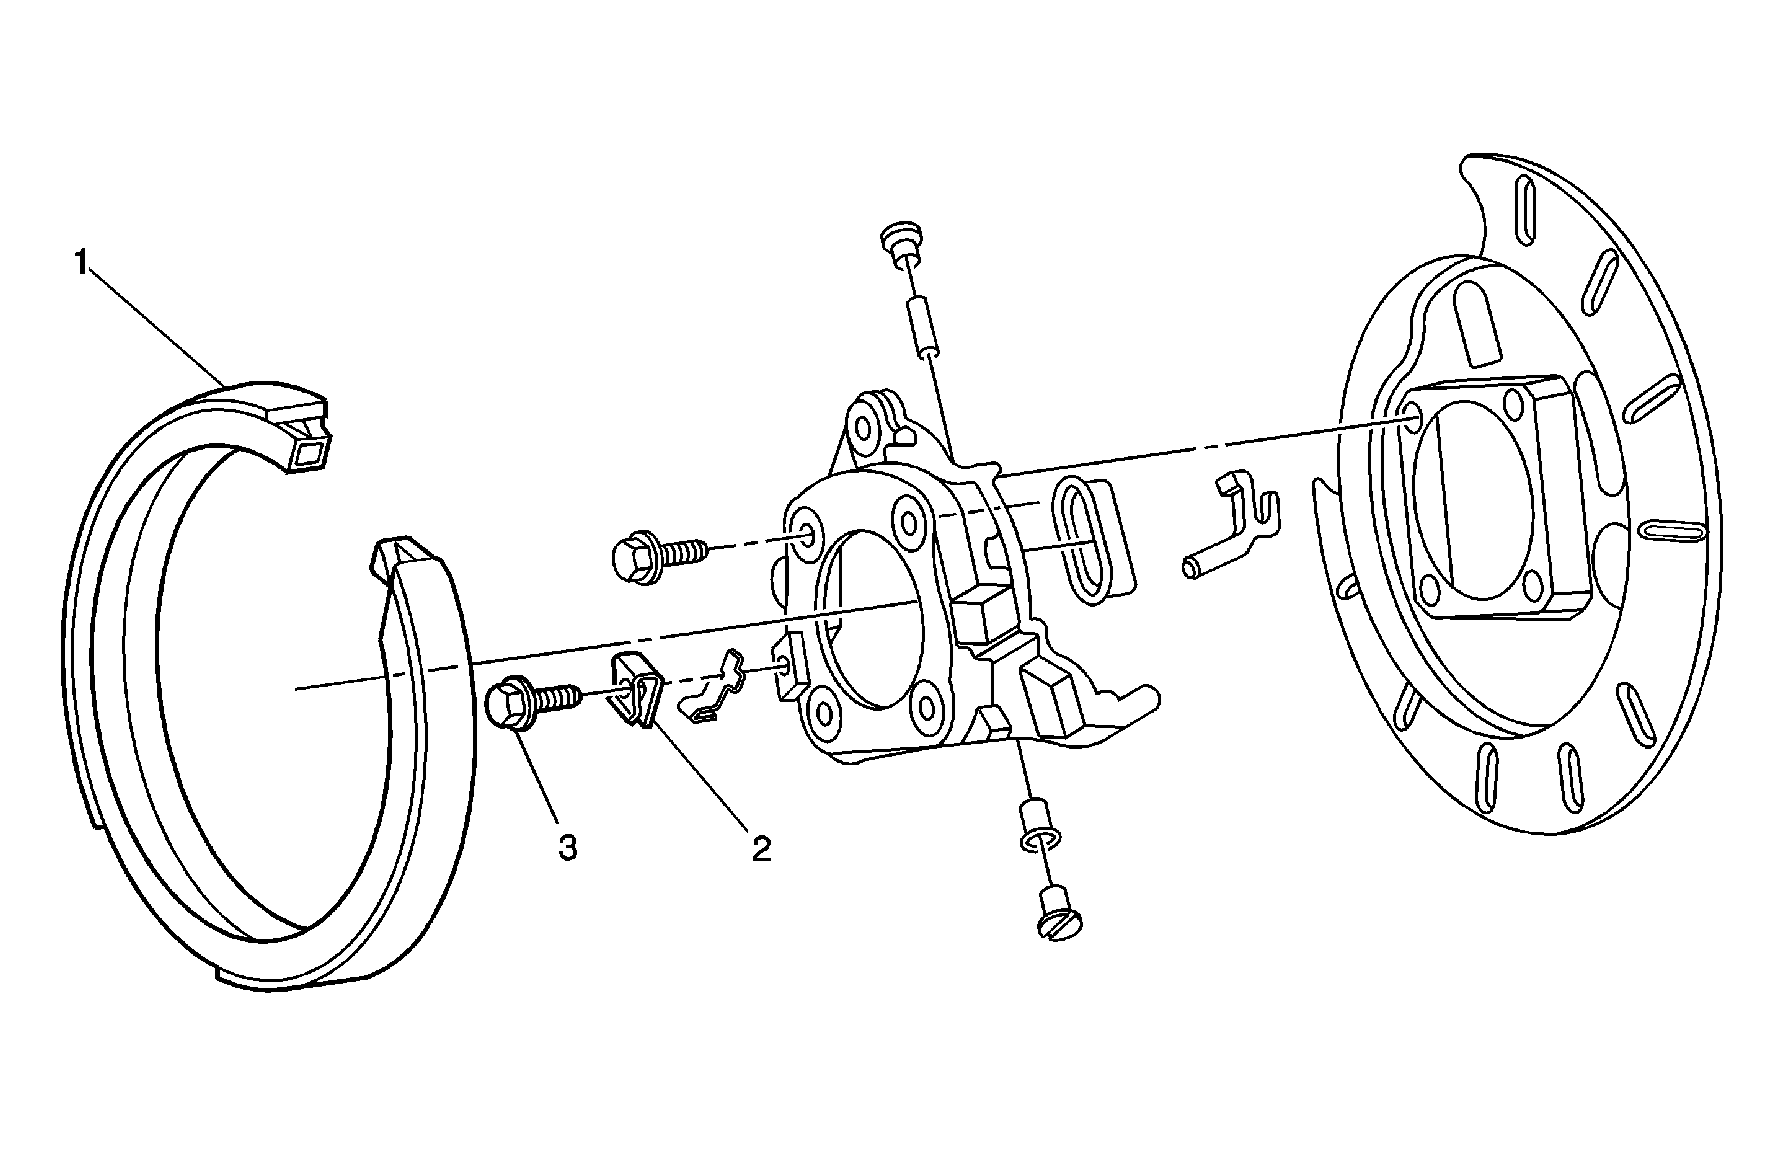
- Remove the park brake shoe retaining clip (2).
- Repeat Steps 3 through 6 for the other side.
- Inspect the parking brake shoe lining (1) thickness in at least 6 places on each side of the vehicle. If the lining thickness is less than 1.5 mm (0.06 in) at any spot, install a new parking brake shoe on both sides.
- Install a new park brake shoe retaining clip. If the parking brake shoe was replaced in the previous step, the new retaining clip was included in the kit.
- Grind out the ridge in the drum section of the rotor, if necessary.
- Adjust the lining-to-drum clearance at the rear wheel to 0.6604 mm (0.026 in).
- Install the rotor.
- Install the caliper to the rotor.
- Perform the following procedure before installing the caliper guide pin bolts.
- Install the caliper bolts.
- Repeat Steps 9 through 13 for the other rear caliper.
- Install the tire and wheel assemblies.
- Install the wheel nuts.
- Lower the vehicle.
Notice: Use J 46277, Rotor Removal Tool, with J 6125-B, Slide Hammer, to remove the rotor from the vehicle. Place J 46277 between the rotor surfaces in the vent section of the rotor. DO NOT place J 46277 on the back side of the rotor surface; it may damage the rotor surface.
Tighten
Tighten the bolt to 3 N·m (25 lb in).
| 14.1. | Remove all traces of the original adhesive patch. |
| 14.2. | Clean the threads of the bolt with brake parts cleaner or the equivalent and allow to dry. |
| 14.3. | Apply Threadlocker, GM P/N 12345493 (Canadian P/N 10953488) to the threads of the bolt. |
Tighten
Tighten the caliper guide pin bolts to 42N·m (31 lb ft).
Notice: A torque wrench or J 39544 must be used to ensure that wheel nuts are tightened to specification. Never use lubricants or penetrating fluids on wheel studs, nuts, or mounting surface, as this can raise the actual torque on the nut without a corresponding torque reading on the torque wrench. Wheel nuts, studs, and mounting surfaces must be clean and dry. Failure to follow these instructions could result in a wheel, nut, and/or stud damage.
Important: Tighten the nuts evenly and alternately in order to avoid excessive run out.
Tighten
Tighten the wheel nuts as shown to 190 N·m(140 lb ft).
2500/3500 Series Vehicles
| • | J 46277 Rotor Removal Tool |
| • | J 6125-B Slide Hammer |
| • | J 2222-C Wheel Bearing Nut Wrench, or equivalent |
| • | J 8092 Universal Driver Handle - 3/4 inch - 10 |
| • | J 44420 Differential Bearing and Hub Seal Installer |
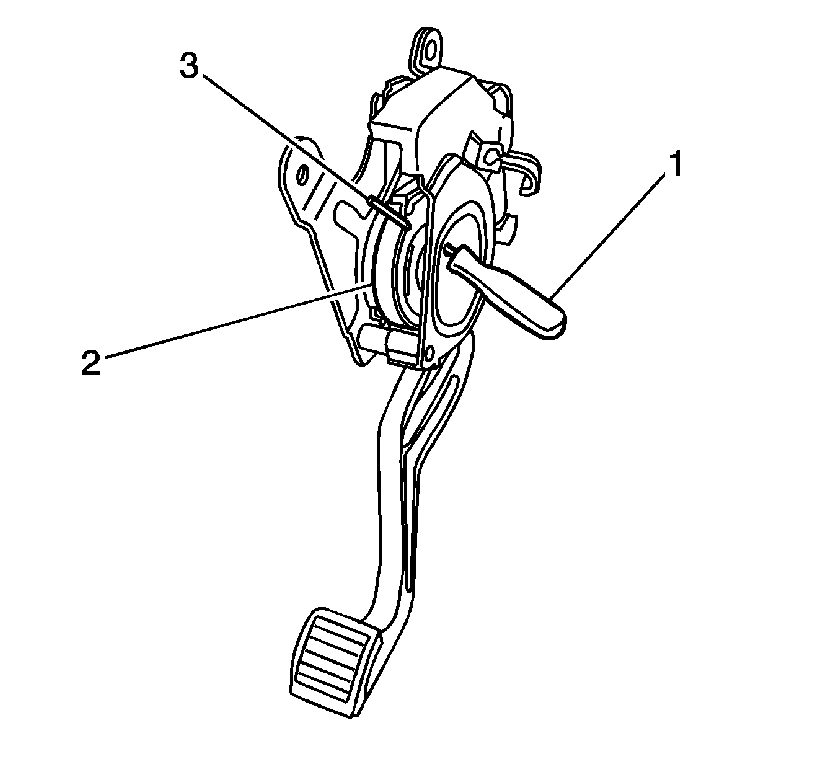
- Hold the park brake activation pedal in the FULL upward position.
- Pull rearward on the front park brake cable until the pedal drum (2) reaches its full reset position.
- Insert a scribe or the shaft of a thin screwdriver (1) on an upward angle through the hole in the front of the pedal assembly, past the retracted pedal drum, and into the hole in the back of the pedal assembly (3).
- Slowly release the cable.
- Raise and suitably support the vehicle.
- Remove the rear tire and wheels assemblies.
- Remove the rear caliper bolts on one side.
- Remove the caliper from the rotor (drum-in-hat) and support. Do not leave the caliper hanging from the hydraulic lines.
- For non dual rear wheels: Remove the rear rotor.
- Repeat Steps 7 through 9 for the other side of the vehicle.
- Inspect the parking brake shoe lining thickness in at least 6 places on each side of the vehicle.
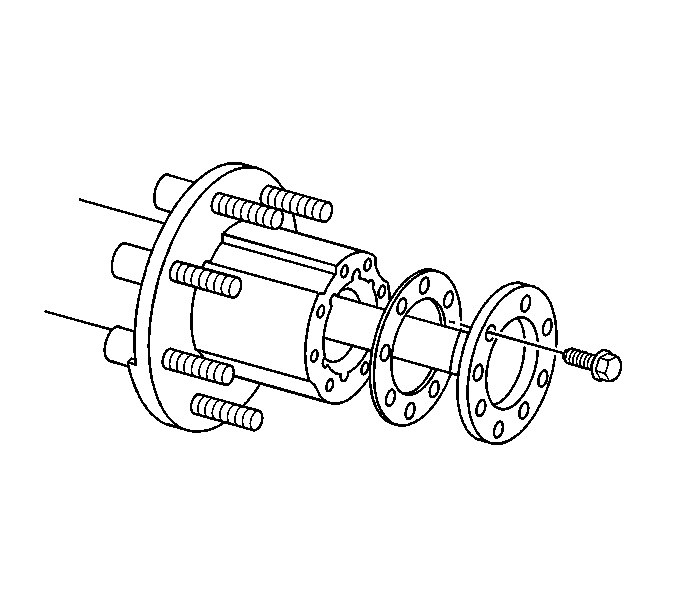
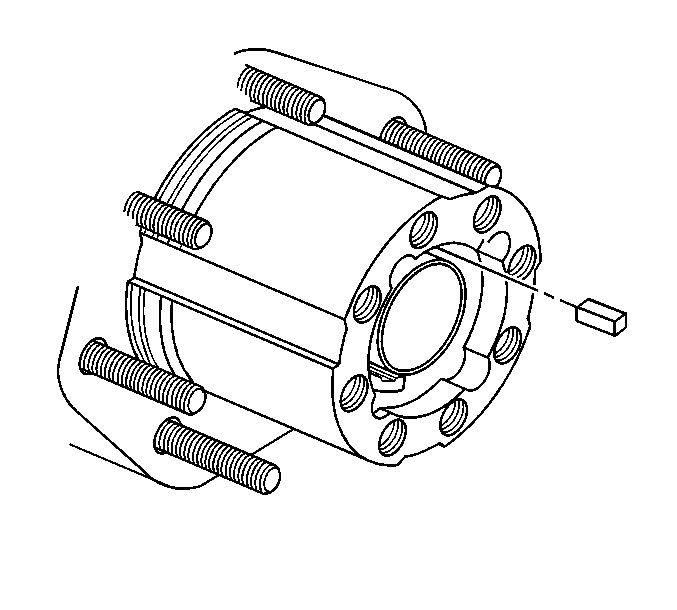
- Remove the axle shaft bolts and axle shaft.
- Remove the axle nut retaining ring.
- Remove the key.
- Remove the adjusting nut using the J 2222-C.
- Remove the hub from the axle housing.
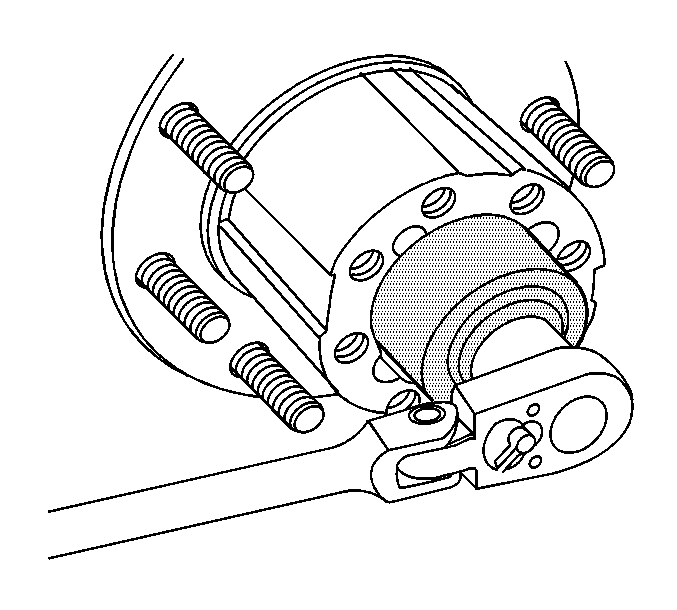
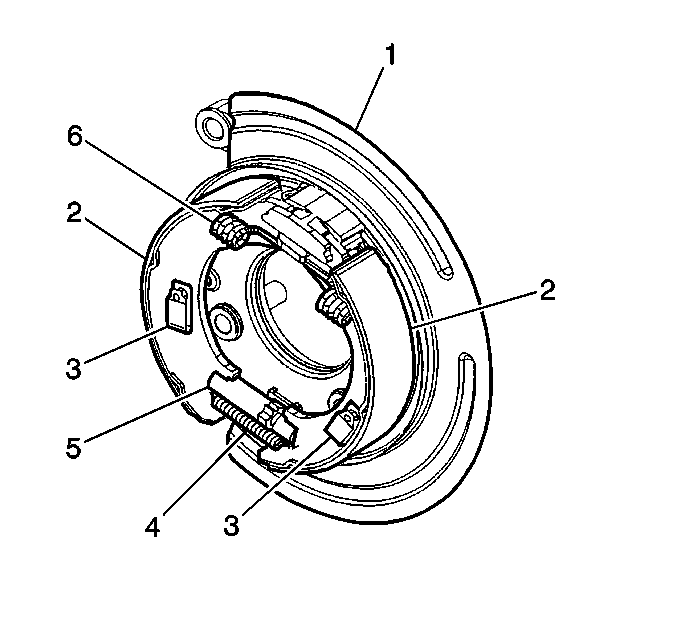
- Remove the park brake shoe return spring (6).
- Remove the park brake shoe anchor springs and pins (3).
- Separate the tips of the shoes from the park brake actuator and remove the park brake shoes (2) and adjuster assembly (5) from the vehicle.
- Clean the debris and the dust from the park brake components using a clean shop cloth.
- Install the adjuster assembly to the park brake shoes.
- Separate the tips of the shoes and install the park brake shoes to the park brake actuator.
- Install the park brake shoe anchor springs and pins.
- Install the park brake shoe return spring (6).
- Grind out the ridge in drum section of rotor if necessary.
- Adjust the lining-to-drum clearance at the rear wheel to 0.6604 mm (.026 in).
- Replace the hub seal using the J 44420, differential bearing and hub seal installer (2) and the J 8092, universal driver handle (1).
- Install the hub to the axle housing.
- Install and tighten the wheel bearing adjusting nut using the J 2222-C. Rotate the hub in the opposite direction to the way the adjuster nut is turning. Ensure that the inner bearing and the seal seats against the spindle shoulder.
- Turn the adjusting nut counterclockwise until the nut is loose using the J 2222-C.
- Turn the adjusting nut clockwise until the nut contacts the bearing cone. The torque on the nut must be zero to finger tight.
- Insert the adjusting nut lock key into the keyway using one of the following procedures.
- Install the retaining ring.
- Install the gasket and the axle shaft into the axle tube.
- Ensure that the shaft splines mesh into the differential side gear.
- Align the holes in the axle flange and the gasket with the holes in the hub.
- Install the axle flange bolts.
- Install the rotor.
- Perform the following procedure before installing the brake caliper mounting bracket bolts:
- Install the brake caliper assembly and bolts.
- Repeat this procedure for other side starting with Step 11.
- Disconnect the cable for the right rear from the equalizer.
- Remove the bolt from the rear axle clip.
- Remove the cable from the differential clip.
- Perform the following procedure to remove the cable (2) from the backing plate (4):
- Remove the park brake cable (2) from the lever (1).
- Remove the cable from the vehicle.
- Install the new cable to the vehicle.
- Install the park brake cable (2) to the lever (1).
- Perform the following procedure to install the cable (2) to the backing plate (4):
- Bolt the cable to the differential clips.
- Install the cable to the differential clip.
- Connect the cable at the equalizer.
- Install the wheels and tires.
- Hold the park brake pedal in the FULL upward position.
- Pull rearward on the front park brake cable until the tension is released from the scribe or nail (1) installed through the holes in the pedal assembly.
- Remove the scribe or screwdriver (1).
- Slowly release the park brake cable until it returns to its original position.
- Release the park brake pedal.
- Install the tire and wheel.
- Install the wheel nuts.
- Install the wheel center cap.
- Lower the vehicle.
- Apply and release the park brake pedal to ensure that there is no binding or sticking.
Notice: Use J 46277 Rotor Removal Tool with J 6125-B Slide Hammer to remove the rotor from the vehicle. Place J 46277 between the rotor surfaces in the vent section of the rotor. DO NOT place J 46277 on the back side of the rotor surface; it may damage the rotor surface.
For dual rear wheels: Perform Steps 12 through 16 before Step 10.
| 11.1. | If the lining thickness is less than 1.5 mm (0.06 in) at any spot, install new parking brake shoes on both sides of the vehicle. |
| • | Non dual rear wheels: Continue to Step 12. |
| • | Dual rear wheels: Continue to Step 17. |
| 11.2. | If the lining thickness is more that 1.5 mm (0.06 in) in all spots, new parking brake shoes are not necessary. |
| • | Non dual rear wheels: Perform Steps 25 and 26, and then go to Step 38. |
| • | Dual rear wheels: Continue to Step 25. |
| 12.1. | Remove the flange bolts. |
| 12.2. | Lightly tap the axle shaft with a soft-faced hammer in order to loosen the shaft. |
| 12.3. | Grip the rib on the axle shaft flange with a pair of locking pliers. Twist the axle shaft flange in order to start the axle shaft removal |
| 12.4. | Remove the axle shaft from the tube. |
| 12.5. | Remove the gasket |
| 12.6. | Clean the axle shaft flange and the outside face of the hub assembly |

Tighten
Tighten the adjusting nut to 70 N·m (52 lb ft).
| 32.1. | If the adjusting nut slot is in alignment with the keyway in the axle spindle, insert the adjusting nut lock key into the keyway in the axle spindle. |
| Important: Do not turn the adjusting nut more than one slot counterclockwise in order to align the adjusting nut slot with the keyway in the axle spindle. |
| 32.2. | If the adjusting nut slot is not aligned with the keyway in the axle spindle, turn the adjusting nut counterclockwise until the adjusting nut slot is in alignment with the keyway in the axle spindle and insert the adjusting nut lock key. |
Notice: Use the correct fastener in the correct location. Replacement fasteners must be the correct part number for that application. Fasteners requiring replacement or fasteners requiring the use of thread locking compound or sealant are identified in the service procedure. Do not use paints, lubricants, or corrosion inhibitors on fasteners or fastener joint surfaces unless specified. These coatings affect fastener torque and joint clamping force and may damage the fastener. Use the correct tightening sequence and specifications when installing fasteners in order to avoid damage to parts and systems.
Tighten
| • | For the 10.5 inch axle, tighten the rear axle flange bolts to 156 N·m (115 lb ft). |
| • | For the 11.5 inch axle, tighten the rear axle flange bolts to 200 N·m (148 lb ft). |
| 39.1. | Remove all traces of the original adhesive patch. |
| 39.2. | Clean the threads of the bolt with brake parts cleaner or the equivalent and allow to dry. |
| 39.3. | Apply Threadlocker GM P/N 12345493 (Canadian P/N 10953488) to the threads of the bolt. |
Tighten the brake caliper mounting bracket bolts to
| • | RPO JC5/JH5 to 200 N·m (148 lb ft) |
| • | RPO JH6 to 165 N·m (122 lb ft) |
| • | RPO JH7 to 300 N·m (221 lb ft) |
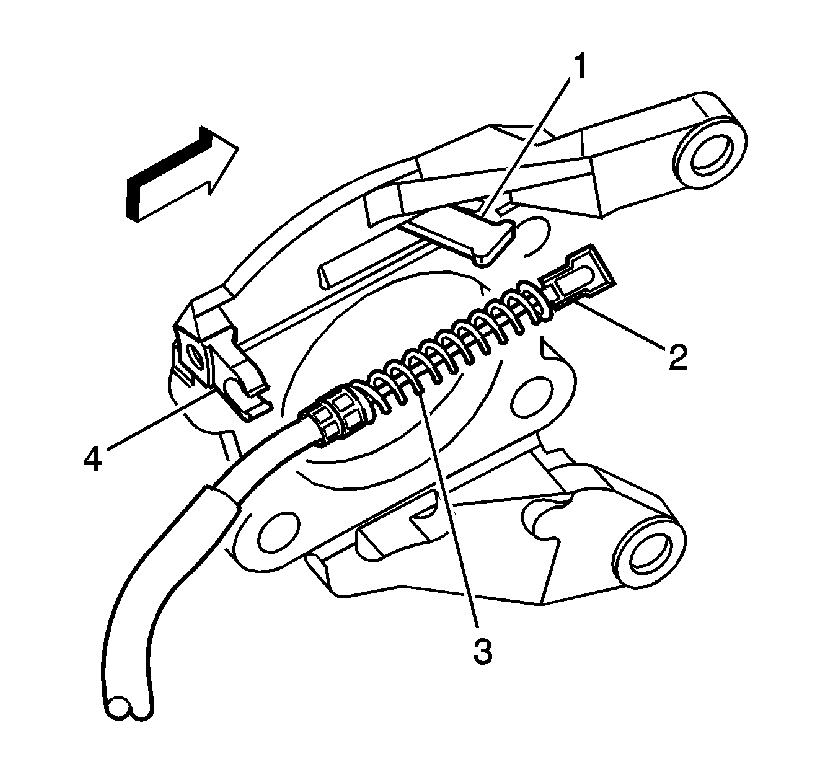
| 45.1. | Compress the spring (3) by pushing towards the lever (1). |
| 45.2. | Depress the locking tabs. |
| 45.3. | Pull the cable housing out of the backing plate (4). |
| 45.4. | Remove the cable (2) through the slot in the backing plate. |
| 50.1. | Compress the spring (3) by pushing towards the lever (1). |
| 50.2. | Route the cable (2) through the slot in the backing plate. |
| 50.3. | Push the cable housing into the backing plate (4) until the locking tabs snap into place. |
Tighten
Tighten the bolt to 25 N·m(18 lb ft).
Important: After installing the cable to the rear axle holding clip, verify that the clip is securely retaining the cable. If not, crimp the clip by hand, taking care not to pinch or kink the cable.
Notice: A torque wrench or J 39544 must be used to ensure that wheel nuts are tightened to specification. Never use lubricants or penetrating fluids on wheel studs, nuts, or mounting surfaces, as this can raise the actual torque on the nut without a corresponding torque reading on the torque wrench. Wheel nuts, studs, and mounting surfaces must be clean and dry. Failure to follow these instructions could result in wheel, nut, and/or stud damage.
Tighten
Tighten the wheel nuts as shown to 190 N·m(140 lb ft).
Customer Reimbursement - For US
All customer requests for reimbursement for previous repairs for the recall condition will be handled by the Customer Assistance Center, not by dealers.
A General Motors Product Recall Customer Reimbursement Procedure Form is included with the customer letter.
Important: Refer to the GM Service Policies and Procedures Manual, section 6.1.12, for specific procedures regarding customer reimbursement and the form.
Customer Reimbursement - For Canada & Export
Customer requests for reimbursement of previously paid repairs to correct the condition covered in this bulletin are to be submitted by August 31, 2006.
All reasonable customer paid receipts should be considered for reimbursement. The amount to be reimbursed will be limited to the amount the repair would have cost if completed by an authorized General Motors dealer.
When a customer requests reimbursement, they must provide the following:
| • | Proof of ownership at time of repair. |
| • | Original paid receipt confirming the amount of repair expense(s) that were not reimbursed, a description of the repair, and the person or entity performing the repair. |
Claims for customer reimbursement on previously paid repairs are to be submitted as required by WINS.
Important: Refer to the GM Service Policies and Procedures Manual, section 1.6.2, for specific procedures regarding customer reimbursement verification.
Courtesy Transportation
The General Motors Courtesy Transportation Program is intended to minimize customer inconvenience when a vehicle requires a repair that is covered by the New Vehicle Limited Warranty. The availability of courtesy transportation to customers whose vehicles are within the warranty coverage period and involved in a product recall is very important in maintaining customer satisfaction. Dealers are to ensure that these customers understand that shuttle service or some other form of courtesy transportation is available and will be provided at no charge. Dealers should refer to the General Motors Service Policies and Procedures Manual for courtesy transportation guidelines.
Claim Information
Submit a Product Recall Claim with the information indicated below:
Repair Performed | Part Count | Part No. | Parts Allow | CC-FC | Labor Op | Labor Hours | Net Item |
|---|---|---|---|---|---|---|---|
Inspect Park Brake Lining - 1500 Series Only | 0 | -- | * | MA-96 | V1371 | 0.6 | NA |
Add: Replace Both Linings | 2 |
|
|
|
| 0.1 |
|
Add: Grind One Rotor |
|
|
|
|
| 0.2 |
|
Add: Grind Both Rotors |
|
|
|
|
| 0.3 |
|
Inspect Park Brake Linings & Replace Right Cable - 2500/3500 Series Non-Dual Wheels | 3 | -- | * | MA-96 | V1372 | 0.8 | NA |
Add: Replace Both Linings | 2 |
|
|
|
| 0.7 |
|
Add: Grind One Rotor |
|
|
|
|
| 0.2 |
|
Add: Grind Both Rotors |
|
|
|
|
| 0.3 |
|
Inspect Park Brake Lining & Replace Right Cable - 2500/3500 Series Dual Rear Wheels | 3 | -- | * | MA-96 | V1373 | 1.2 | N/A |
Add: Replace Both Linings | 2 |
|
|
|
| 0.3 | N/A |
Add: Grind One Rotor |
|
|
|
|
| 0.2 |
|
Add: Grind Both Rotors |
|
|
|
|
| 0.3 |
|
Courtesy Transportation for Vehicles Within the New Vehicle Limited Warranty (US & Canadian Dealers) | N/A | N/A | N/A | MA-96 | ** | N/A | *** |
Customer Reimbursement (Canadian & Export Dealers/ US CAC) | N/A | N/A | N/A | MA-96 | V1374 | 0.2 | **** |
* The "Parts Allowance" should be the sum total of the current GMSPO Dealer net price plus applicable Mark-Up or Landed Cost Mark-Up (for Export) for the spring kit or lining kit (1500 Series), or the cable, and if required, the lining kit (2500/3500 Series), to complete the repair. ** Submit courtesy transportation using normal labor operations for courtesy transportation as indicated in the GM Service Policies and Procedures Manual for vehicles within the New Vehicle Limited Warranty. *** The amount identified in the "Net Item" column should represent the actual dollar amount for courtesy transportation. **** The amount identified in the "Net Item" column should represent the dollar amount reimbursed to the customer. | |||||||
Refer to the General Motors WINS Claims Processing Manual for details on Product Recall Claim Submission.
Customer Notification -- For US and Canada
General Motors will notify customers of this recall on their vehicle (see copy of customer letter included with this bulletin).
Customer Notification -- For Export
Letters will be sent to known owners of record located within areas covered by the US National Traffic and Motor Vehicle Safety Act. For owners outside these areas, dealers should notify customers using the attached sample letter.
Dealer Recall Responsibility -- For US and Export (US States, Territories, and Possessions)
The US National Traffic and Motor Vehicle Safety Act provides that each vehicle which is subject to a recall of this type must be adequately repaired within a reasonable time after the customer has tendered it for repair. A failure to repair within sixty days after tender of a vehicle is prima facie evidence of failure to repair within a reasonable time. If the condition is not adequately repaired within a reasonable time, the customer may be entitled to an identical or reasonably equivalent vehicle at no charge or to a refund of the purchase price less a reasonable allowance for depreciation. To avoid having to provide these burdensome remedies, every effort must be made to promptly schedule an appointment with each customer and to repair their vehicle as soon as possible. In the recall notification letters, customers are told how to contact the US National Highway Traffic Safety Administration if the recall is not completed within a reasonable time.
Dealer Recall Responsibility -- All
All unsold new vehicles in dealers' possession and subject to this recall MUST be held and inspected/repaired per the service procedure of this recall bulletin BEFORE customers take possession of these vehicles.
Dealers are to service all vehicles subject to this recall at no charge to customers, regardless of mileage, age of vehicle, or ownership, from this time forward.
Customers who have recently purchased vehicles sold from your vehicle inventory, and for which there is no customer information indicated on the dealer listing, are to be contacted by the dealer. Arrangements are to be made to make the required correction according to the instructions contained in this bulletin. A copy of the customer letter is provided in this bulletin for your use in contacting customers. Recall follow-up cards should not be used for this purpose, since the customer may not as yet have received the notification letter.
In summary, whenever a vehicle subject to this recall enters your vehicle inventory, or is in your dealership for service in the future, please take the steps necessary to be sure the recall correction has been made before selling or releasing the vehicle.
July 2005Dear General Motors Customer:
This notice is sent to you in accordance with the requirements of the National Traffic and Motor Vehicle Safety Act.
Reason For This Recall
General Motors has decided that a defect, which relates to motor vehicle safety, exists in certain 1999-2002 Chevrolet Silverado and GMC Sierra 1500 Series, and 2001-2005 Chevrolet Silverado and GMC Sierra 2500/3500 Series vehicles equipped with a manual transmission. Some of these vehicles may have a contact condition between the parking brake shoes and parking brake drums when the parking brake is not applied. If this were to occur, the driver may or may not hear an intermittent scraping noise from the rear of the vehicle while driving. This condition could cause parking brake lining wear. If this lining wear is undetected, the parking brake may become ineffective in immobilizing a parked vehicle on a grade. An ineffective parking brake may result in a vehicle crash.
What Will Be Done
If your vehicle is a 1500 Series, your GM dealer will inspect the parking brake lining thickness on both rear brakes, and depending on the amount of lining remaining, install either a reduced-force parking brake retainer clip on both rear brakes or parking brake shoe kits, which includes the reduced-force clips. This service will be performed for you at no charge .
If your vehicle is a 2500 or 3500 Series, your GM dealer will inspect the parking brake lining thickness on both rear brakes and install a new rear right-hand parking brake cable assembly. Also, depending on the amount of lining remaining, your dealer may also install new parking brake shoes. This service will be performed for you at no charge .
How Long Will The Repair Take?
This inspection and service correction can take anywhere from 40 minutes to 1 hour and 50 minutes, depending on the vehicle and the results of the inspection. However, due to service scheduling requirements, your dealer may need your vehicle for a longer period of time.
Contacting Your Dealer
To limit any possible inconvenience, we recommend that you contact your GM dealer as soon as possible to schedule an appointment for this repair. By scheduling an appointment, your dealer can ensure that the necessary parts will be available on your scheduled appointment date. Should your dealer be unable to schedule a service date within a reasonable time, you should contact the appropriate Customer Assistance Center at the listed number below. The Customer Assistance Center’s hours of operation are from 8:00 AM to 11:00 PM, EST, Monday through Friday.
Division | Number | Text Telephones |
|---|---|---|
Chevrolet | 1-800-630-2438 | 1-800-833-2438 |
GMC | 1-866-996-9463 | 1-800-462-8583 |
Puerto Rico - English | 1-800-496-9992 |
|
Puerto Rico - Español | 1-800-496-9993 |
|
Virgin Islands | 1-800-496-9994 |
|
Guam | 1-671-648-8650 |
|
If, after contacting the appropriate customer assistance center, you are still not satisfied that we have done our best to remedy this condition without charge and within a reasonable time, you may wish to write the Administrator, National Highway Traffic Safety Administration, 400 Seventh Street SW, Washington, DC 20590 or call 1-888-327-4236.
Customer Reply Form
The enclosed customer reply form identifies your vehicle. Presentation of this form to your dealer will assist in making the necessary correction in the shortest possible time. If you no longer own this vehicle, please let us know by completing the form and mailing it back to us.
Customer Reimbursement
The enclosed form explains what reimbursement is available and how to request reimbursement if you have paid for repairs for the recall condition.
Courtesy Transportation
If your vehicle is within the New Vehicle Limited Warranty your dealer may provide you with shuttle service or some other form of courtesy transportation while your vehicle is at the dealership for this repair. Please refer to your Owner’s Manual and your dealer for details on Courtesy Transportation.
Owner Center Online
This free online service offers vehicle and ownership related information and tools tailored to your specific vehicle. To get the most personalized information for your vehicle, visit www.mygmlink.com , and enter your vehicle's 17-character vehicle identification number (VIN) shown on the enclosed customer reply form.
Federal regulation requires that any vehicle lessor receiving this recall notice must forward a copy of this notice to the lessee within ten days.
We are sorry to cause you this inconvenience; however, we have taken this action in the interest of your safety and continued satisfaction with our products.
General Motors Corporation
Enclosure
05042
