Pickup Box Sheet Metal Fracture/Damage with Aftermarket Accessories Installed (Repair Pickup Box Damage and Install Pickup Box Reinforcements)

| Subject: | Pickup Box Sheet Metal Fracture/Damage with Aftermarket Accessories Installed (Repair Pickup Box Fracture/Damage and Install Pickup Box Reinforcements) |
| Models: | 1999-2003 Chevrolet Silverado (New Body Style) |
| 1999-2003 GMC Sierra (New Body Style) |
| with Steel Fleetside Pickup Box (RPO E63) |
| 2004-2005 Chevrolet Silverado 1500 Series Crew Cab with 5'8" Pickup Box |
| 2004-2005 GMC Sierra 1500 Series Crew Cab with 5'8" Pickup Box |
| Except Dual Rear Wheel (RPO R05), Stepside (RPO E62) and Inner Composite (RPO E37) Pickup Boxes |
This bulletin is being revised to add the 2004-2005 1500 Series Crew Cab with 5'8" pickup box and change equipment weight capacity information. Please discard Corporate Bulletin Number 01-08-66-014A (Section 08 -- Body and Accessories).
Built Prior to the following VIN Breakpoints:
Plant | VIN Breakpoint |
|---|---|
Fort Wayne, IN | 3Z115302 |
Flint, MI | 3F102974 |
Pontiac, MI | 3E115871 |
Oshawa, ONT | 31108937 |
Important: Implementation of this Service Bulletin by "GM of Canada" dealers requires prior District Service Manager approval.
Condition
Some customers may comment about pickup box sheet metal fractures/damage when using aftermarket accessories such as tool boxes, window barrier and ladder racks.
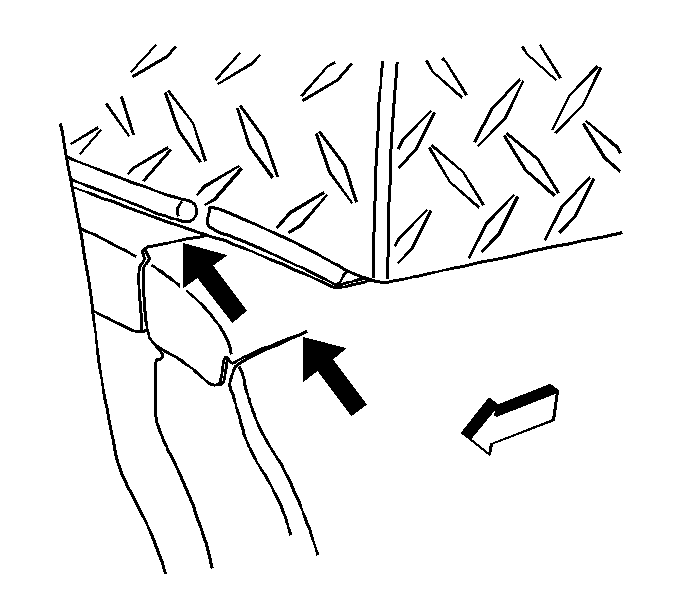
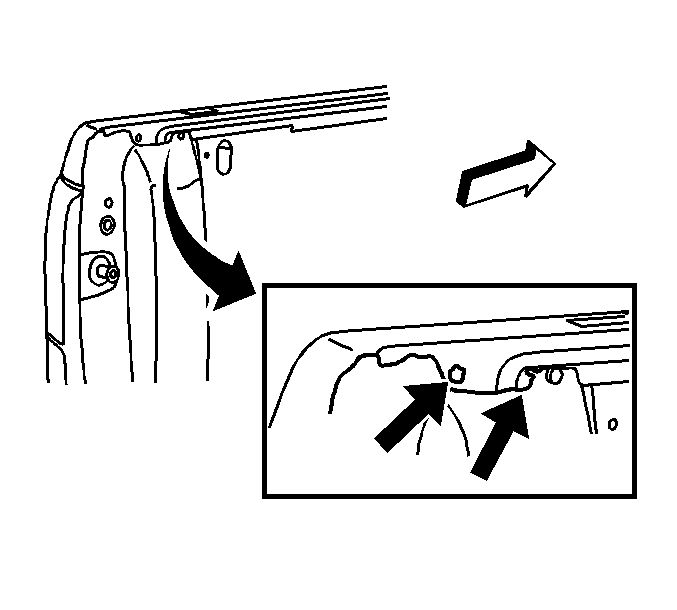
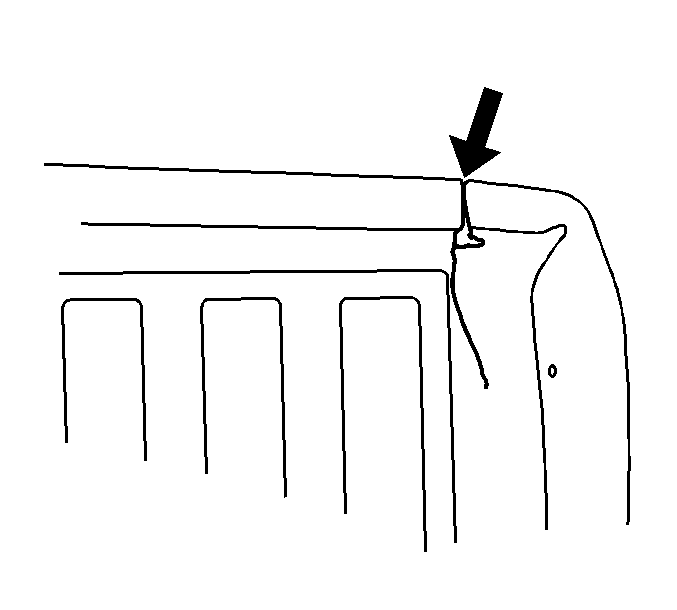
The following illustrations are typical examples of the types of fractures/damage that may occur.
Pickup Box Perforation (Left Front of Box)
Pickup Box Perforation (Inner Side - Rear)
Pickup Box Perforation (Outer Front of Box with Pickup Box Removed)
Correction
- Repair the damaged pickup box using the following procedure. When repairing any damage to the front of the pickup box, it may be necessary to remove the pickup box from the frame.
- Go to www.gmgoodwrench.com.
- Click on GM Collision Parts.
- Click on GM Technical Repair Information.
- Click on Paint Shop.
- After completion of any repairs due to the use of aftermarket accessories, install new pickup box reinforcements using the following procedure and the applicable part numbers listed below.
| 1.1. | Drill a 6 mm (0.23 in) hole in the extreme end of the crack. |
| 1.2. | Prepare inner crack for welding. |
| Important: Do not use oxyacetylene welding equipment. MIG WELD ONLY. |
| 1.3. | Weld the crack using the appropriate welding technique. |
| 1.4. | Clean and prepare all of the welding surfaces. |
| 1.5. | Return surface contour to its original contour. |
| Important: Prior to refinishing, refer to the GM4901M-D-2005 (English) or GM4901M-D-F2005 (French) GM Approved Refinish Materials booklet for recommended products. The information for the 2005 GM Approved Refinish
Materials booklet will now be online at the GMGOODWRENCH WEB SITE ONLY. Printed books have been discontinued. Steps to the site are as follows:
|
| 1.6. | Refinish as necessary. |
| 1.7. | Apply an approved anti-corrosion material to all of the bare metal surfaces. |
Pickup Box Reinforcement Installation
Important: The reinforcements must be installed before adding a toolbox or ladder rack system. After the reinforcements have been installed, follow the instructions supplied with the toolbox/ladder rack system for installation onto the pickup box.
Use the following service procedure to install the reinforcements. Use the applicable reinforcement kit part number listed below.
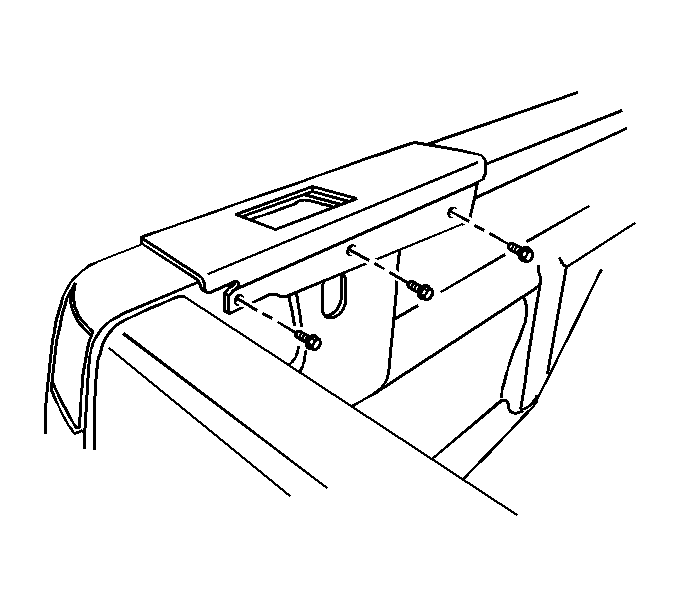
Cross Toolbox and Rear Window Barrier Applications - Front Reinforcement Installation
- Place the front L-shaped reinforcements into position on the front top of the pickup box. For vehicles equipped with an over the rail bedliner, the bedliner should be removed with the aid of an assistant prior to installing these reinforcements.
- Mark the holes necessary for drilling.
- Remove the front reinforcements.
- Drill two 13.5 mm (0.54 in) holes per side into the box section of the front panel.
- Drill 7.5 mm (0.30 in) holes into the weld flange of the side outer panel.
- Apply anti-corrosion material to the drilled holes as necessary per the GM4901M-D-2005 (English) or GM4901M-D-F2005 (French) GM Approved Refinish Materials booklet. The information for the 2005 GM Approved Refinish Materials booklet will now be online at the GMGOODWRENCH WEB SITE ONLY. Printed books have been discontinued. Steps to the site are as follows:
- Place the front reinforcements back onto the box, lining up the drilled holes.
- Install the large shoulder (M8) bolts into the reinforcement and front panel (total of 4) and the small (M6) bolts into the reinforcement and side outer panel (total of 6) with the nuts.
- Remove all metal shavings from the pickup box after installation.
- Install the bedliner if equipped with the aid of an assistant. The bedliner may need to be trimmed in order to obtain the necessary clearance for the reinforcements.
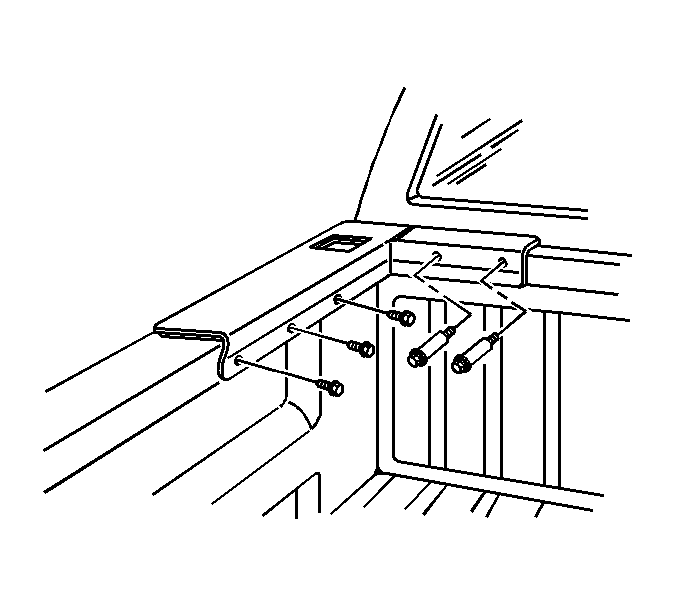
Important: The horizontal surfaces of the reinforcements must be flush to the horizontal surface of the pickup box top rail. Use a clamping tool when positioning the reinforcements onto the top rail to ensure flushness to the outer panel.
Important: Use a block of wood and/or a drill stop in order to protect the back of the cab while drilling.
| 6.1. | Go to www.gmgoodwrench.com. |
| 6.2. | Click on GM Collision Parts. |
| 6.3. | Click on GM Technical Repair Information. |
| 6.4. | Click on Paint Shop. |
Tighten
| • | Tighten the M8 bolts to 25 N·m (18 lb ft). |
| • | Tighten the M6 bolts to 9 N·m (79 lb in). |
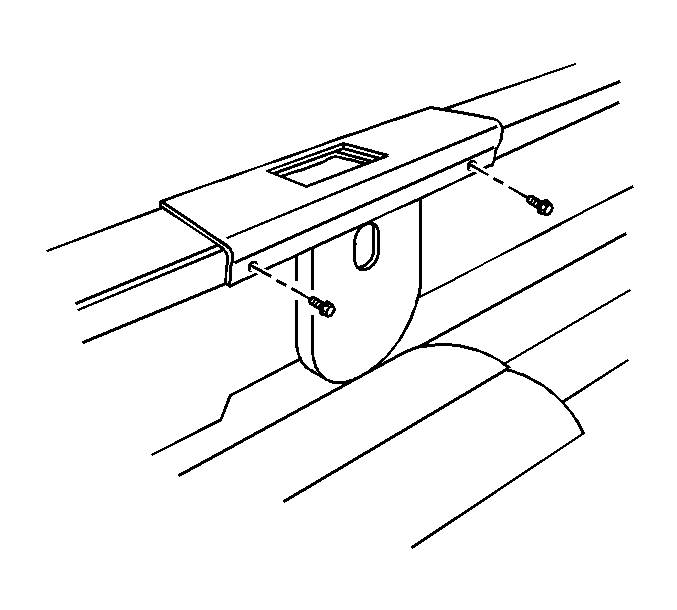
Ladder Rack and/or Side Tool Box Applications - Reinforcement Kit Installation
- Install the LH and RH front L-shaped reinforcements using the procedure above.
- Remove the LH and RH rear taillamp assemblies. This is necessary to gain access to install the rearmost bolt of the rear reinforcement.
- Place the LH and RH rear reinforcements into position on the pickup box.
- Mark the holes necessary for drilling and remove the reinforcements.
- Drill 7.5 mm (0.30 in) holes into the weld flange of the side outer panel.
- Apply anti-corrosion material to the drilled holes as necessary. Refer to step 6 under Front Reinforcement Installation procedure.
- Place the rear reinforcements back onto the pickup box.
- Install the M6 bolts through the reinforcement and side panel with the nuts.
- Install the LH and RH rear taillamp assemblies.
- Place the LH and RH center reinforcement into position on the pickup box.
- Mark the holes necessary for drilling and remove the brackets.
- Drill 7.5 mm (0.30 in) holes into the weld flange of the side outer panel.
- Touch-up the drilled holes as necessary. Refer to step 6 under the Front Reinforcement Installation procedure.
- Place the center reinforcements back onto the pickup box.
- Install the M6 bolts through the reinforcement and side panel with the nuts.
- Remove any metal shavings from the pickup box after installation.
Tighten
Tighten the bolts to 9 N·m (79 lb in).
| • | On the 2.4 m (8 ft) long pickup box models, this center reinforcement fits over the existing center stake hole. |
| • | On the 1.7 m (5 ft, 8 in) and 2 m (6.5 ft) short box models, these center reinforcements are recommended to be installed. The reinforcements should be centered between the front and rear reinforcements on the pickup box. |
Tighten
Tighten the bolts to 9 N·m (79 lb in).
*Maximum Equipment Weight Capacities (Equipment and Cargo)
| • | Ladder Rack and Cargo - 340 kg (750 lb) |
| • | Cross Toolbox and Cargo - 181 kg (400 lb) |
| • | Side Tool boxes and Cargo - 113 kg (250 lb) (per side) |
*The combined weight for all rail-mounted equipment should not exceed454 kg (1, 000 lb). Excluded is the 1500 Series Crew Cab models with 5’8" pickup box length. A reinforcement kit for rail-mounted add-on equipment is recommended as described in this bulletin. .
Ladder racks are not recommended for 1500 Series Crew Cab models with 5’8" pickup box. Maximum recommended cross-mounted tool box and cargo weight is 136 kg (300 lb) for the 1500 Series Crew Cab with 5’8" pickup box.
Parts Information
| • | P/N 15068208 contains the reinforcements necessary to install ladder rack systems and/or side-mounted toolboxes. |
| • | P/N 15068209 contains the reinforcements for cross toolbox and/or rear window barrier applications only. |
Part Number | Description |
|---|---|
15068208 | Reinforcement Kit - Pickup Box Otr S/PNL Includes Frt, Ctr, and Rr S/PNL Reinforcements (LH and RH) w/Bolts and Nuts |
15068209 | Reinforcement Kit - Pickup Box Otr S/PNL Includes Frt S/PNL Reinforcements (LH and RH) w/Bolts and Nuts |
Parts are currently available from GMSPO.
Warranty Information
For vehicles repaired under warranty, use:
Labor Operation | Description | Labor Time |
|---|---|---|
*A9971 (Front) | Repair and Repaint (Spot Paint) Panels (as required) | **Use Straight Time |
*A9972 (Rear) | ||
B4811 | Pickup Box Reinforcements (Front) - Install | 0.9 hr |
Add | Install rear reinforcements for 5 ft 8 in , 6 or 8 ft box | 0.4 hr |
Add | Install side reinforcements for 5 ft 8 in , 6 or 8 ft box | 0.3 hr |
Add | With bedliner and cut for clearance | 0.2 hr |
*These are unique labor operation numbers for use only with this bulletin. These labor operation numbers will not be published in the Labor Time Guide.
**This time should be submitted as Regular hours, not as Other hours.
