If your vehicle's battery (or batteries) has run down, you may want to use another vehicle and some jumper cables to start your vehicle. Be sure to use the following steps to do it safely.
Caution: Batteries can hurt you. They can be dangerous because:
• They contain acid that can burn you. • They contain gas that can explode or ignite. • They contain enough electricity to burn you.
Notice: Ignoring these steps could result in costly damage to the vehicle that would not be covered by the warranty.
Trying to start the vehicle by pushing or pulling it will not work, and it could damage the vehicle.- Check the other vehicle. It must have a 12-volt battery with a negative ground system.
- If you have a vehicle with a diesel engine with two batteries (or more), you should know before you begin that, especially in cold weather, you may not be able to get enough power from a single battery in another vehicle to start your diesel engine.
- Get the vehicles close enough so the jumper cables can reach, but be sure the vehicles are not touching each other. If they are, it could cause a ground connection you do not want. You would not be able to start your vehicle, and the bad grounding could damage the electrical systems.
- Turn off the ignition on both vehicles. Unplug unnecessary accessories plugged into the cigarette lighter or accessory power outlets. Turn off the radio and all lamps that are not needed. This will avoid sparks and help save both batteries. And it could save the radio!
- Open the hoods and locate the positive (+) and negative (-) terminal locations of the other vehicle.
- Check that the jumper cables do not have loose or missing insulation. If they do, you could get a shock. The vehicles could be damaged too.
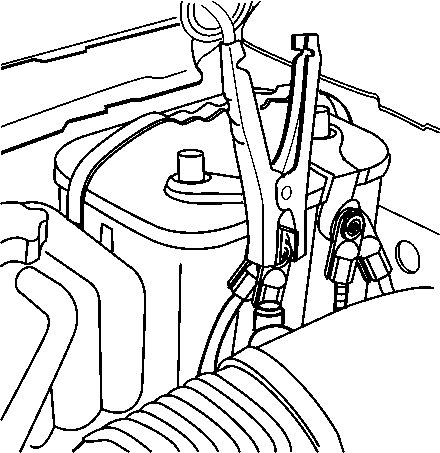
- Connect the red positive (+) cable to the positive (+) terminal of the vehicle with the dead battery. Use a remote positive (+) terminal if the vehicle has one.
- Do not let the other end touch metal. Connect it to the positive (+) terminal of the good battery. Use a remote positive (+) terminal if the vehicle has one.
- Now connect the black negative (-) cable to the negative (-) terminal of the good battery. Use a remote negative (-) terminal if the vehicle has one. The vehicle's remote negative (-) terminal is marked GND.
- Do not let the other end touch anything until the next step. The other end of the negative (-) cable does not go to the dead battery. It goes to a heavy unpainted metal engine part of the vehicle with the dead battery, or to a remote negative (-) terminal if the vehicle has one.
- See Engine Compartment Overview for the location of your vehicle's remote negative (-) terminal.
- Now start the vehicle with the good battery and run the engine for a while.
- Try to start the vehicle that had the dead battery. If it will not start after a few tries, it probably needs service.
Notice: If the other vehicle's system is not a 12-volt system with a negative ground, both vehicles can be damaged. Only use vehicles with 12-volt systems with negative grounds to jump start your vehicle.
If your vehicle has more than one battery, use the battery that is closer to the starter -- this will reduce electrical resistance.
To avoid the possibility of the vehicles rolling, set the parking brake firmly on both vehicles involved in the jump start procedure. Put an automatic transmission in PARK (P) or a manual transmission in NEUTRAL before setting the parking brake. If you have a four-wheel-drive vehicle, be sure the transfer case is in a drive gear, not in NEUTRAL.
Notice: If you leave the radio or other accessories on during the jump starting procedure, they could be damaged. The repairs would not be covered by the warranty. Always turn off the radio and other accessories when jump starting the vehicle.
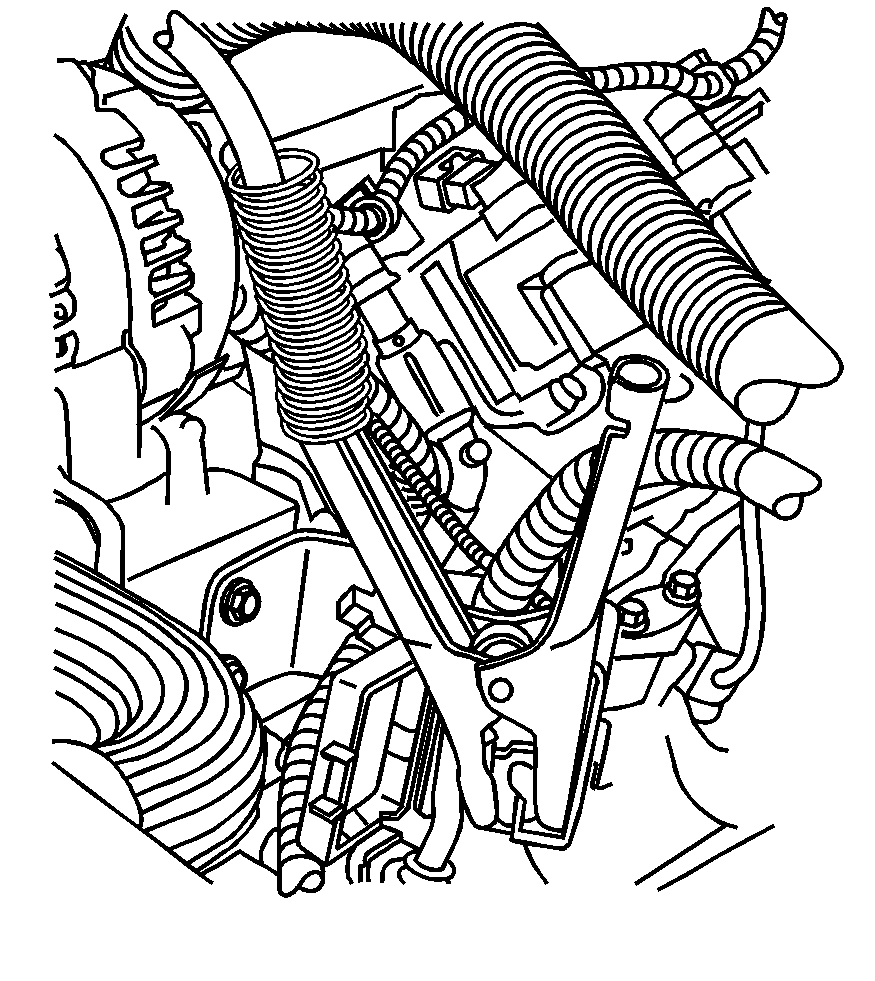
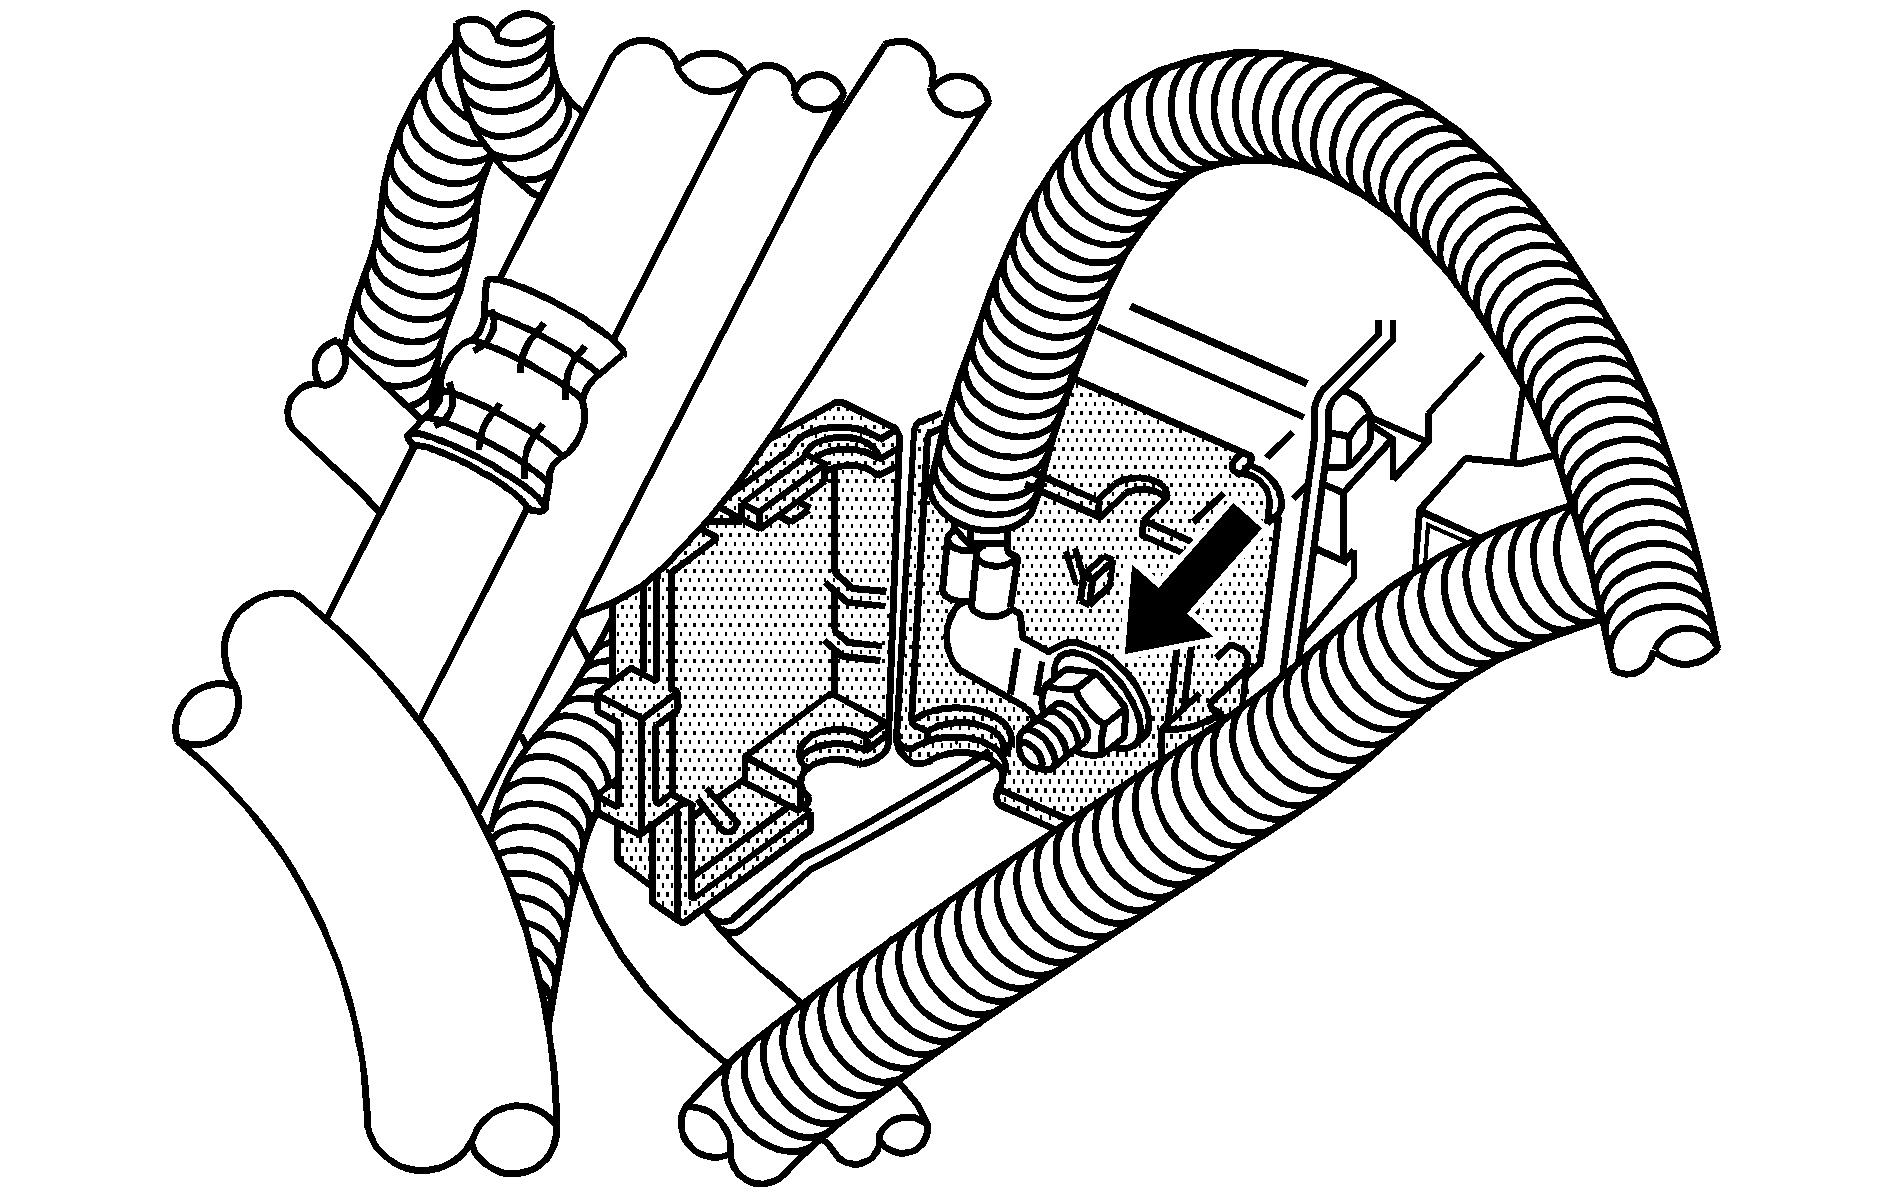
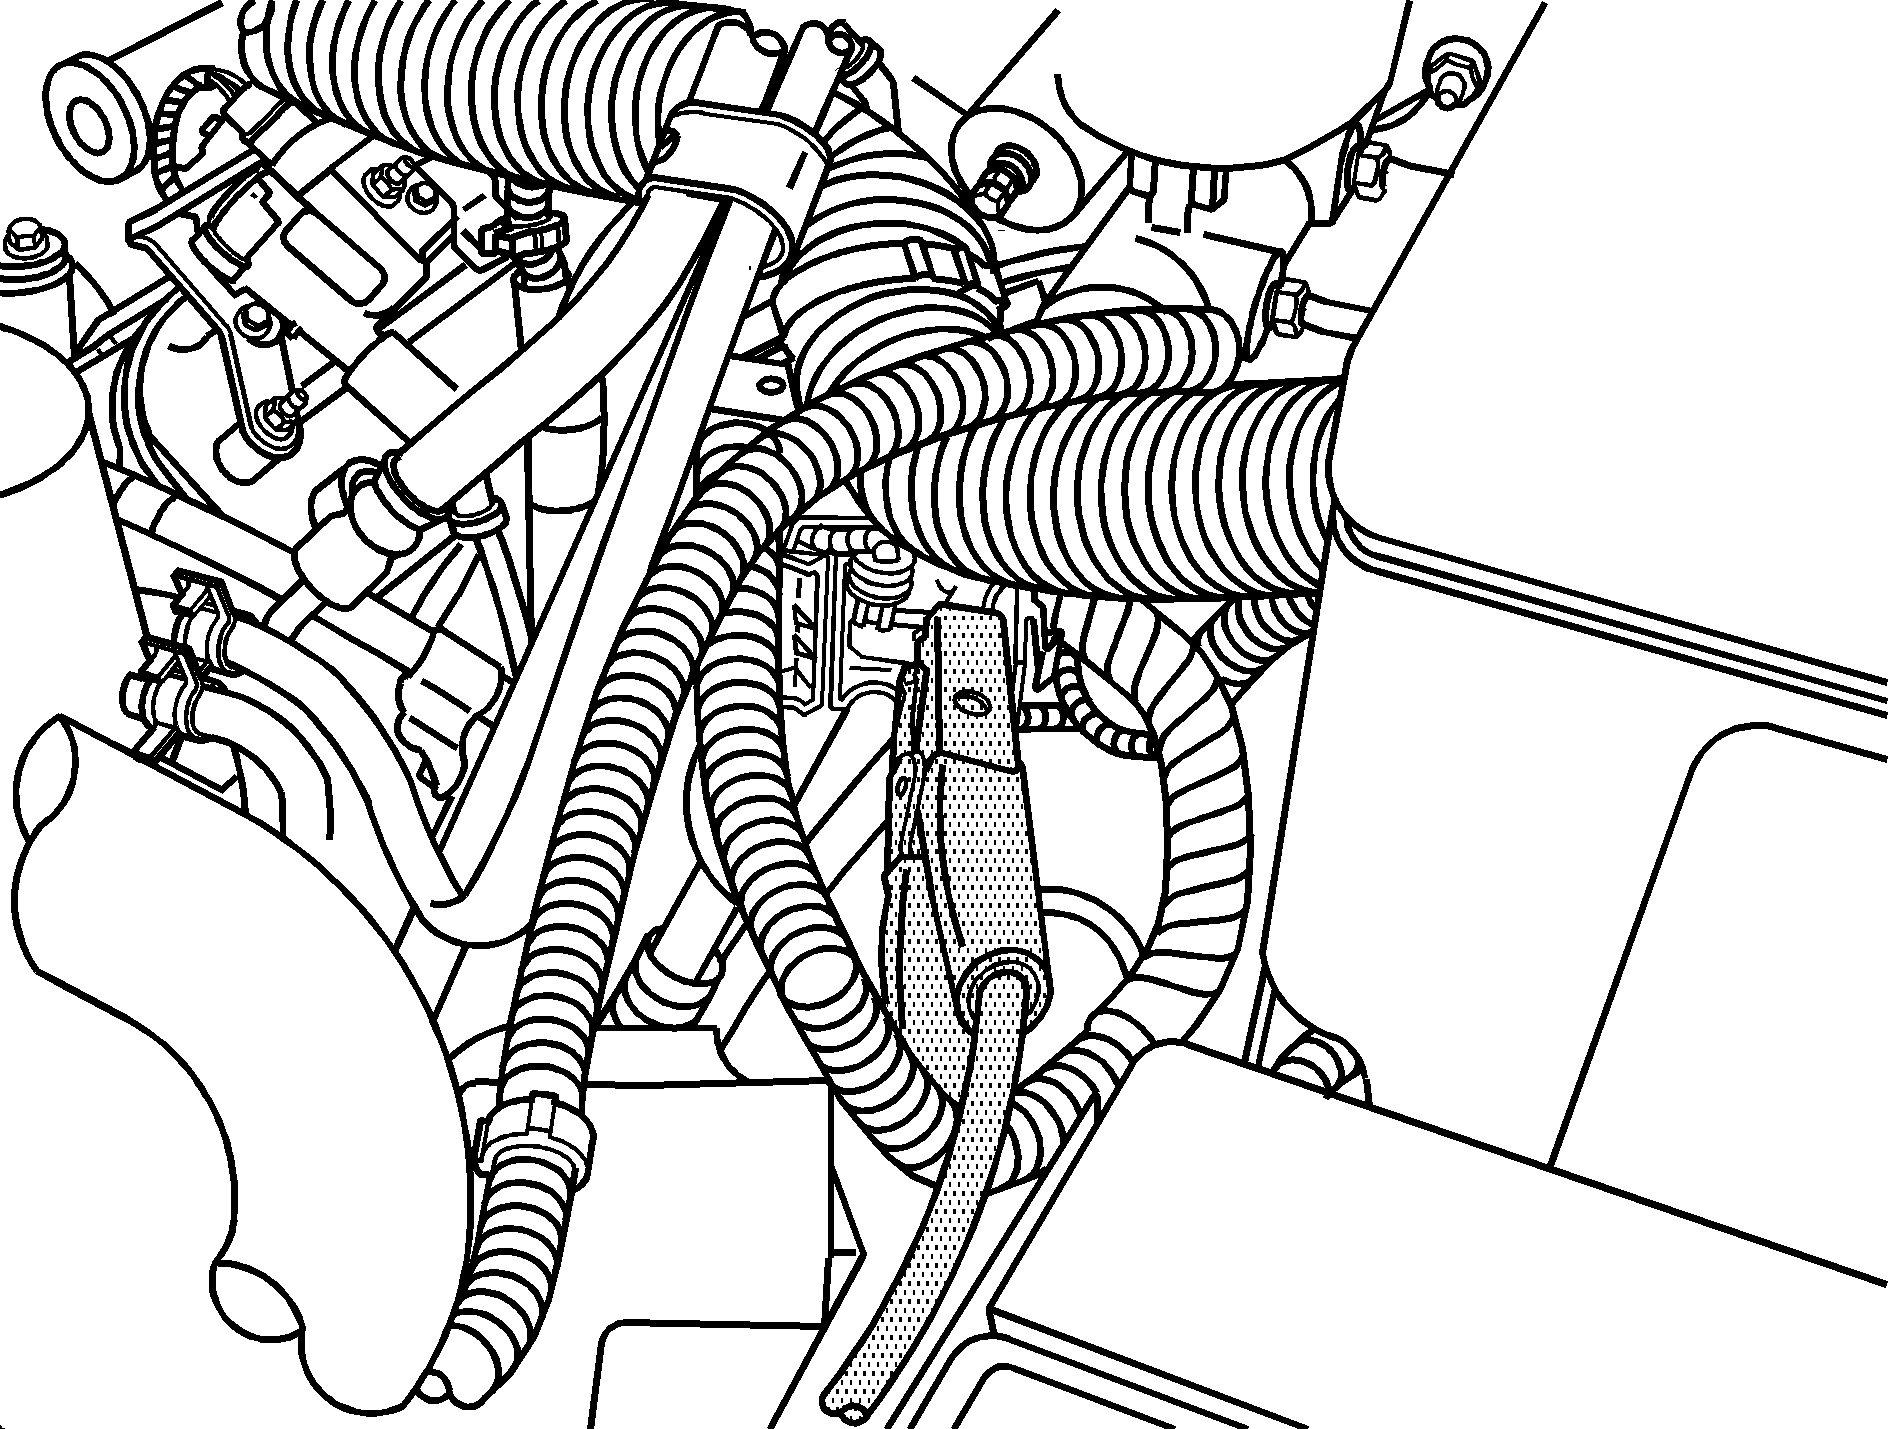
Your vehicle has a remote positive (+) jump starting terminal and a remote negative (-) jump starting terminal. You should always use these remote terminals instead of the terminals on the battery.
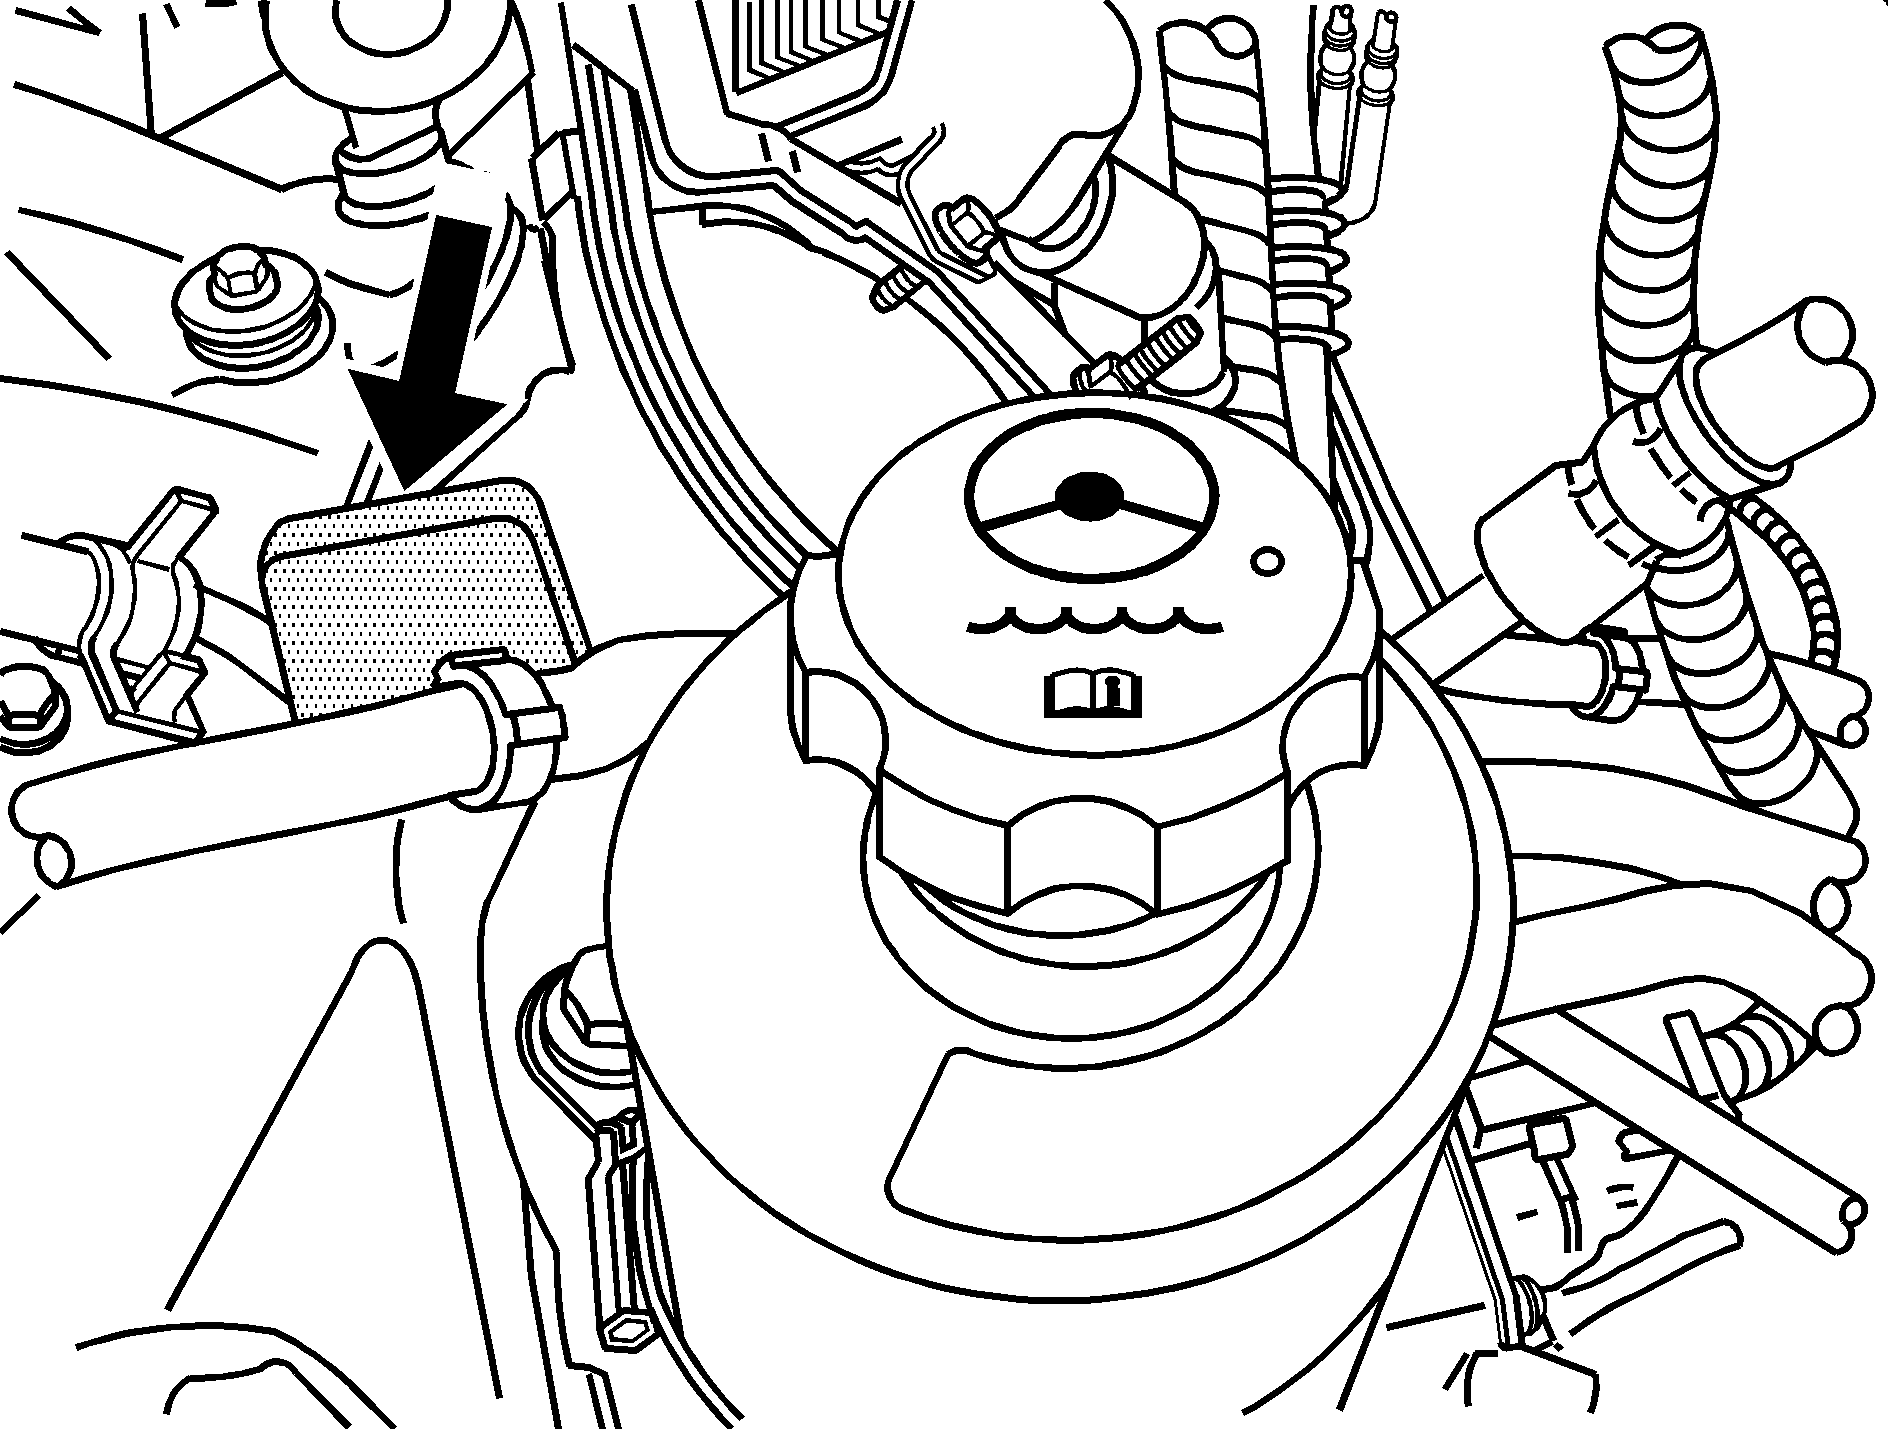
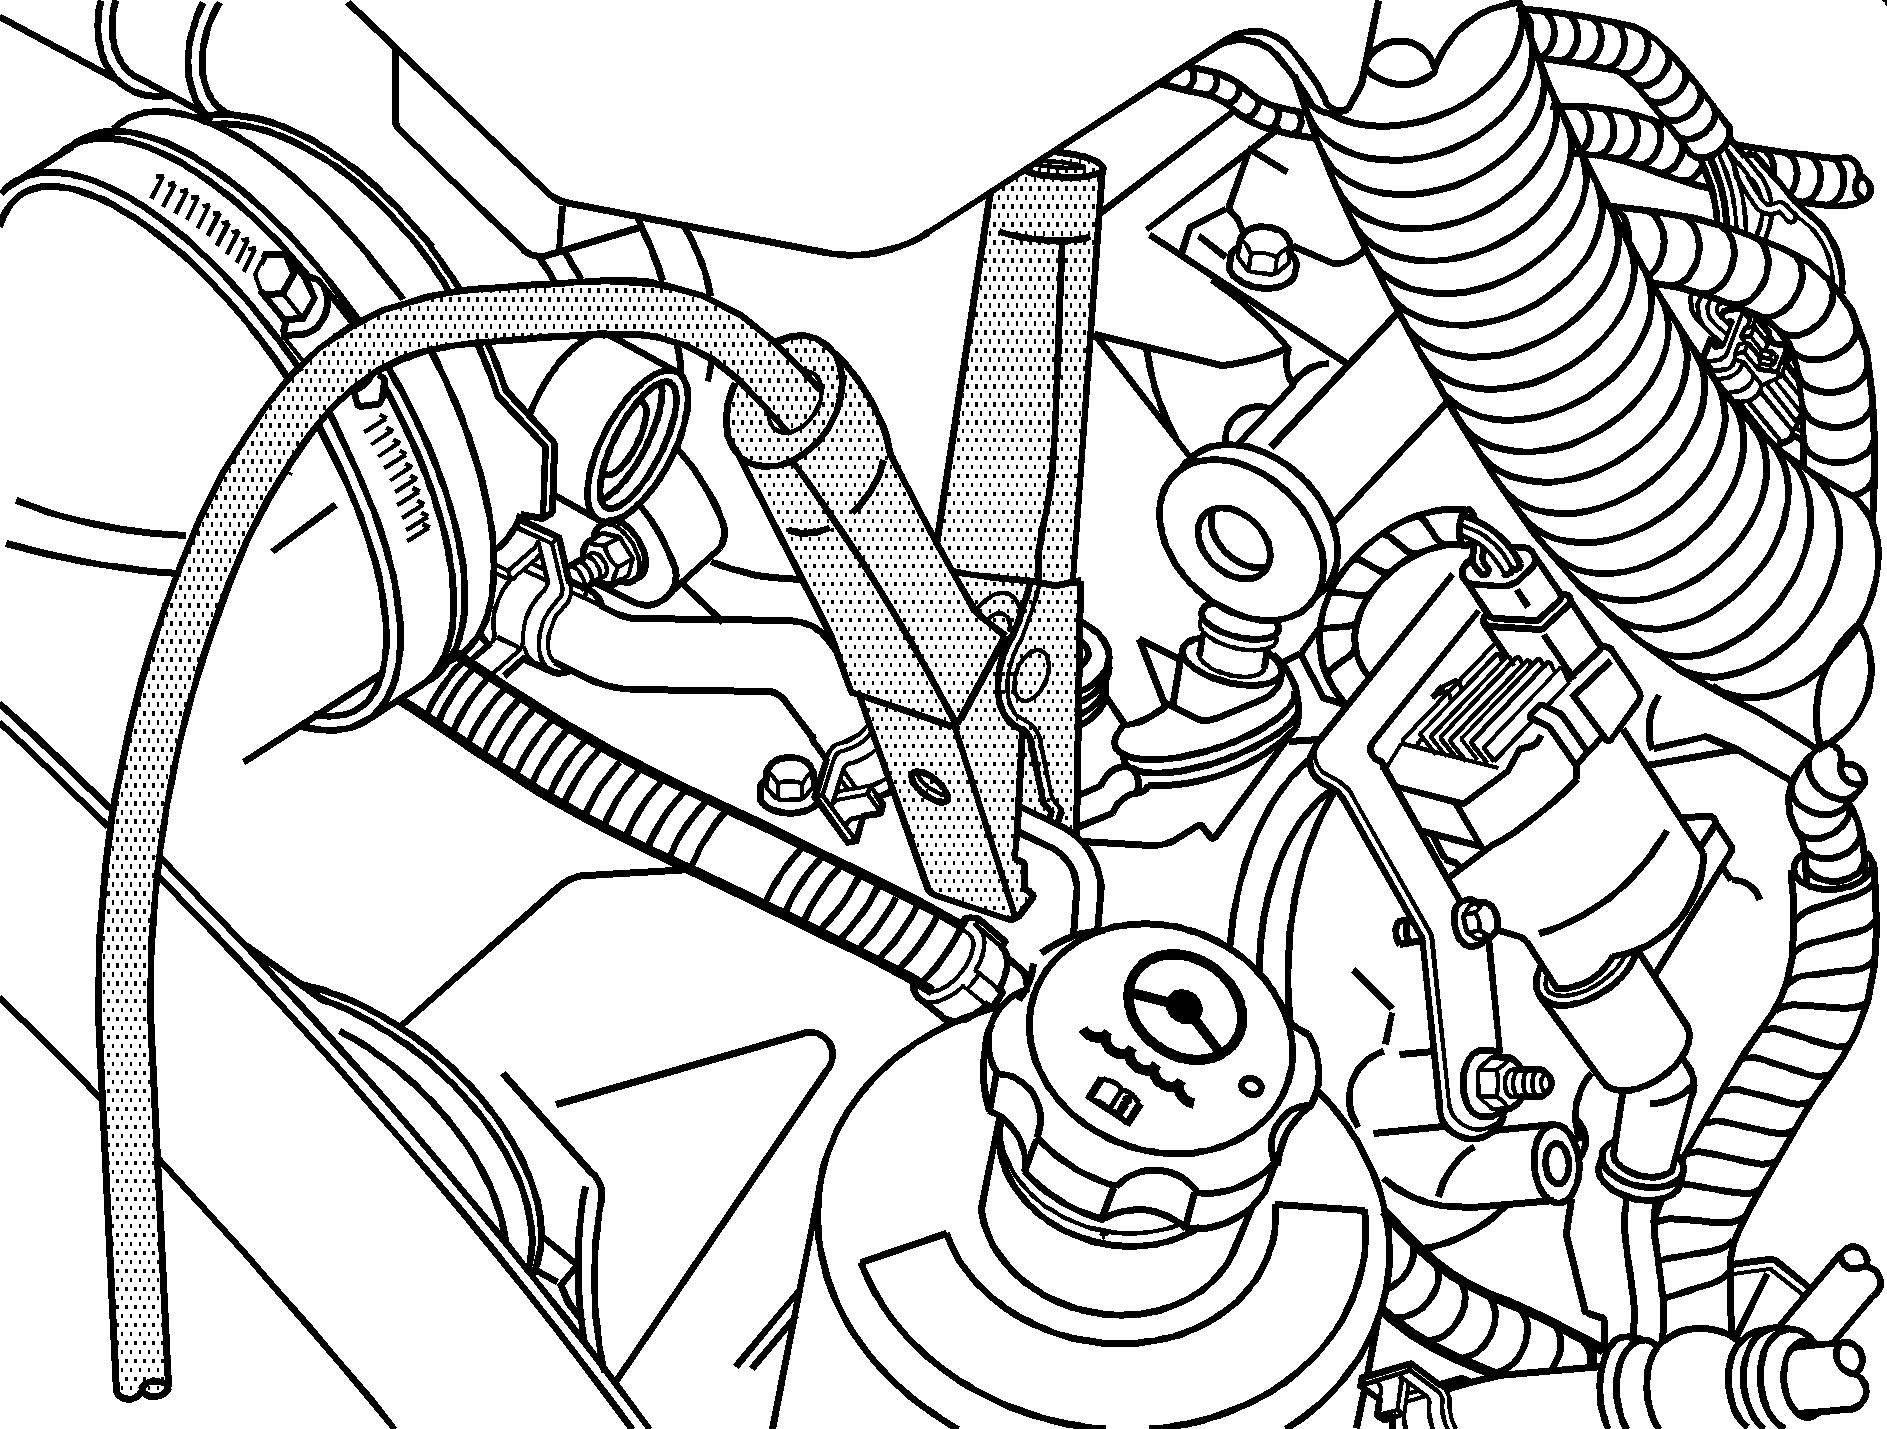
The remote positive (+) terminal is located behind a red plastic cover, near the engine accessory drive bracket, if your vehicle has one. To uncover the remote positive (+) terminal, open the red plastic cover.
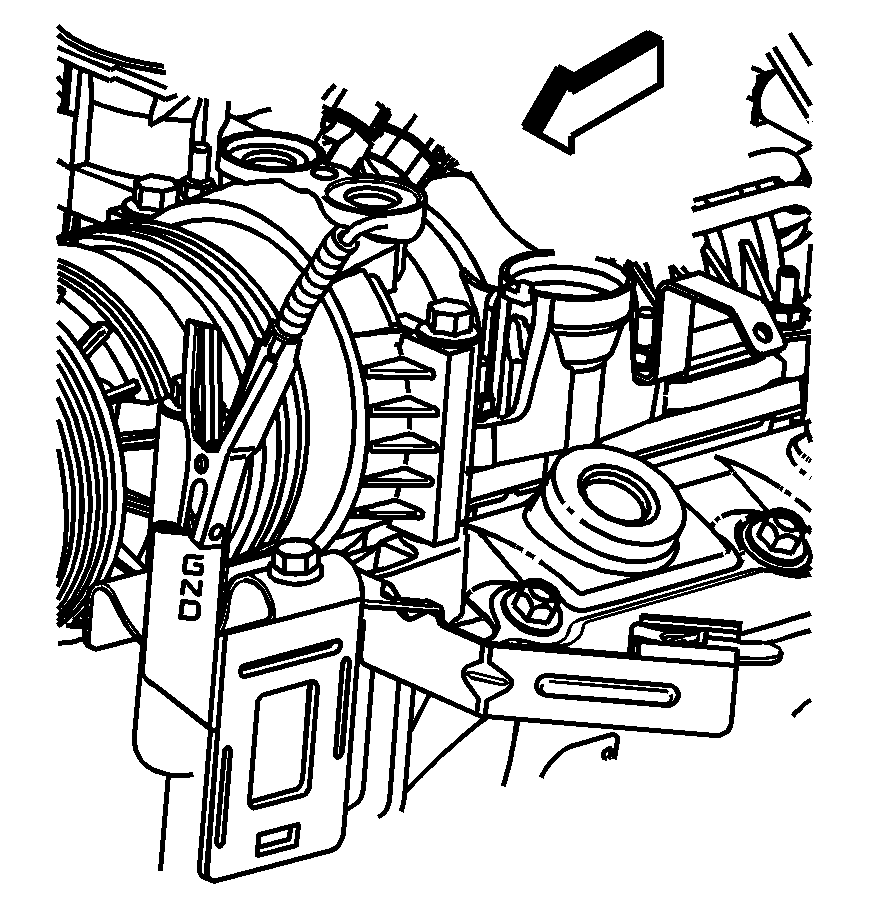
The remote negative (-) terminal is located on the engine drive bracket on all V8 and diesel engines, and on the thermostat housing on the 8.1L engine. On V8 engines it is marked GND (Ground).
On V6 engines the remote negative (-) terminal is located on a tab attached to the engine accessory drive bracket where it is marked GND (Ground).
See Engine Compartment Overview for more information on the location of the remote positive (+) and remote negative (-) terminals.
Caution: Using a match near a battery can cause battery gas to explode. People have been hurt doing this, and some have been blinded. Use a flashlight if you need more light.
Be sure the battery has enough water. You do not need to add water to the battery installed in your new vehicle. But if a battery has filler caps, be sure the right amount of fluid is there. If it is low, add water to take care of that first. If you do not, explosive gas could be present. Battery fluid contains acid that can burn you. Do not get it on you. If you accidentally get it in your eyes or on your skin, flush the place with water and get medical help immediately.Caution: Fans or other moving engine parts can injure you badly. Keep your hands away from moving parts once the engine is running.
Before you connect the cables, here are some basic things you should know. Positive (+) will go to positive (+) or a remote positive terminal (+) if the vehicle has one. Negative (-) will go to a heavy, unpainted metal engine part or a remote negative (-) terminal if the vehicle has one.
Do not connect positive (+) to negative (-) or you will get a short that would damage the battery and maybe other parts too. And do not connect the negative (-) cable to the negative (-) terminal on the dead battery because this can cause sparks.
On vehicles that have dual batteries, make all battery connections to the remote positive (+) and remote negative (-) terminals.
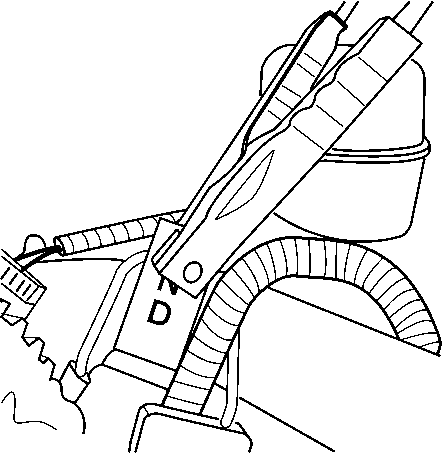
V8 engine shown, other engines similar
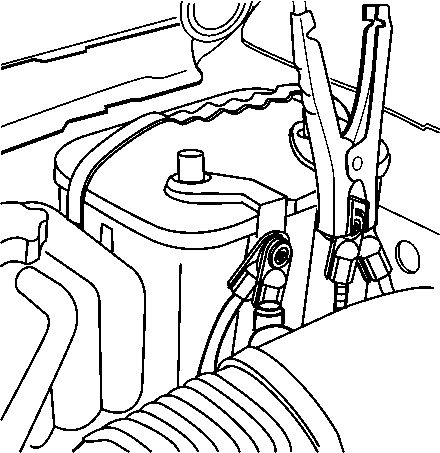
Connect the other end of the negative (-) cable to the remote negative (-) terminal, marked GND, on the vehicle with the dead battery.
Notice: If the jumper cables are connected or removed in the wrong order, electrical shorting may occur and damage the vehicle. The repairs would not be covered by the vehicle warranty. Always connect and remove the jumper cables in the correct order, making sure that the cables do not touch each other or other metal.
-
Jumper Cable Removal
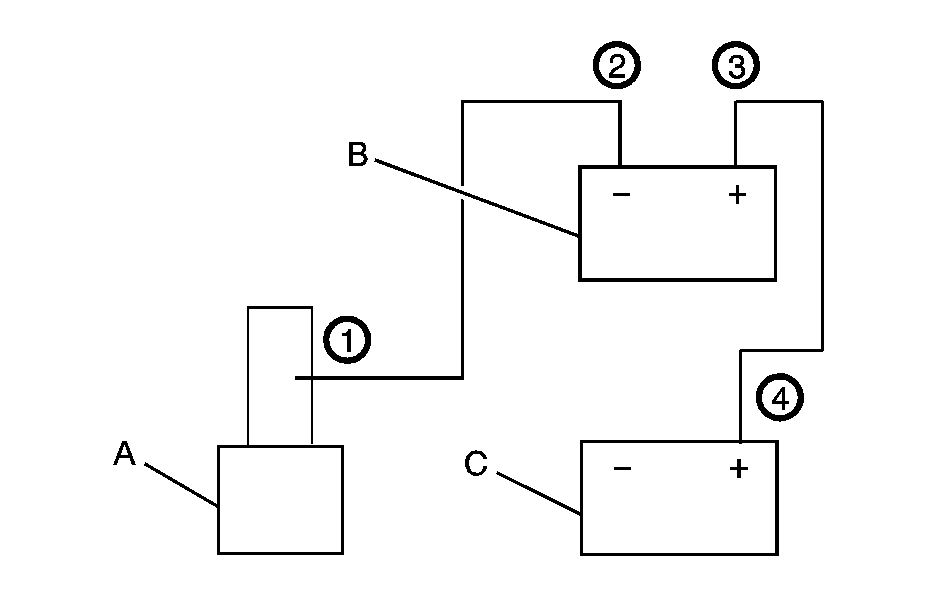
Heavy, Unpainted Metal Engine Part or Remote Negative (-) Terminal
Good Battery or Remote Positive (+) and Remote Negative (-) Terminals
Dead Battery or Remote Positive (+) Terminal
To disconnect the jumper cables from both vehicles do the following:
- Disconnect the black negative (-) cable from the vehicle that had the bad battery.
- Disconnect the black negative (-) cable from the vehicle with the good battery.
- Disconnect the red positive (+) cable from the vehicle with the good battery.
- Disconnect the red positive (+) cable from the other vehicle.
- Return the remote positive (+) terminal cover, if your vehicle has one, to its original position.
If your 42-volt battery has run down, you may want to use another vehicle's 12-volt battery and jumper cables to start your vehicle. Jump starting your hybrid vehicle may take considerably longer than a regular vehicle. You may have to wait 10 to 20 minutes total for your vehicle to charge from the other vehicle's good 12-volt battery in order to start your vehicle. Use the following steps to do it safely:
Caution: Batteries can hurt you. They can be dangerous because:
• They contain acid that can burn you. • They contain gas that can explode or ignite. • They contain enough electricity to burn you.
Notice: Ignoring these steps could result in costly damage to the vehicle that would not be covered by the warranty.
Trying to start the vehicle by pushing or pulling it will not work, and it could damage the vehicle.- Check to see that the battery disconnect switch on your hybrid vehicle is in the power position. If it is not, turn it clockwise until it stops and then try to start your vehicle. See Battery Disconnect Switch for more information. If your vehicle still won't start, continue to Step 2.
- Check the other vehicle. It must have a 12-volt battery with a negative ground system.
- Get the vehicles close enough so the jumper cables can reach, but be sure the vehicles are not touching each other. If they are, it could cause a ground connection you do not want. You would not be able to start your vehicle, and the bad grounding could damage the electrical systems.
- Turn off the ignition on both vehicles. Unplug unnecessary accessories plugged into the cigarette lighter and accessory power outlets. Turn off the radio and all lamps that are not needed. This will avoid sparks and help save both batteries. And it could save your radio!
- Open the hoods and locate the positive (+) and negative (-) terminal locations of the other vehicle.
- The remote positive (+) terminal is located under a red plastic cover near the center of the engine compartment. See Engine Compartment Overview . To access the remote positive (+) terminal, open the red plastic cover.
- The remote negative (-) terminal is located on the engine accessory drive bracket behind the power steering pump and is marked GND. Do not connect the jumper cables to any part of the power steering pump or hoses.
- Check that the jumper cables do not have loose or missing insulation. If they do, you could get a shock. The vehicles could be damaged too.
- Connect the red positive (+) cable to the remote positive (+) terminal of your hybrid vehicle.
- Do not let the other end touch metal. Connect it to the positive (+) terminal of the good battery. Use a remote positive (+) terminal if the other vehicle has one.
- Now connect the black negative (-) cable to the negative (-) terminal of the good battery. Use a remote negative (-) terminal if the vehicle has one.
- Do not let the other end touch anything until the next step. The other end of the negative (-) cable doesn't go to the dead battery. It goes to your vehicle's remote negative (-) terminal, marked GND. The electrical connection is just as good there, and the chance of sparks getting back to the battery is much less.
- Now start the vehicle with the good battery.
- Try to start the hybrid vehicle. Hold the key in the start position for at least three seconds. If the hybrid vehicle still does not start, turn the key to LOCK and wait 5 minutes.
- After 5 minutes try to start the hybrid vehicle again.
- Repeat steps 11 and 12 several more times as necessary. If the hybrid vehicle still will not start, your vehicle needs service.
Notice: If the other vehicle's system is not a 12-volt system with a negative ground, both vehicles can be damaged. Only use vehicles with 12-volt systems with negative grounds to jump start your vehicle.
To avoid the possibility of the vehicles rolling, set the parking brake firmly on both vehicles involved in the jump start procedure. Put an automatic transmission in PARK (P) or a manual transmission in NEUTRAL before setting the parking brake.
Notice: If you leave the radio or other accessories on during the jump starting procedure, they could be damaged. The repairs would not be covered by the warranty. Always turn off the radio and other accessories when jump starting the vehicle.
Your vehicle has a remote positive (+) 12-volt jump starting terminal and a remote negative (-) jump starting terminal. You should always use these remote terminals instead of the terminals on the battery.
See Engine Compartment Overview for more information on location of the positive (+) and negative (-) terminals.
Caution: Using a match near a battery can cause battery gas to explode. People have been hurt doing this, and some have been blinded. Use a flashlight if you need more light.
Be sure the battery has enough water. You do not need to add water to the battery installed in your new vehicle. But if a battery has filler caps, be sure the right amount of fluid is there. If it is low, add water to take care of that first. If you do not, explosive gas could be present. Battery fluid contains acid that can burn you. Do not get it on you. If you accidentally get it in your eyes or on your skin, flush the place with water and get medical help immediately.Caution: An electric fan can start up even when the engine is not running and can injure you. Keep hands, clothing and tools away from any underhood electric fan.
Caution: Fans or other moving engine parts can injure you badly. Keep your hands away from moving parts once the engine is running.
Before you connect the cables to the other vehicle, here are some basic things you should know. Positive (+) will go to positive (+) or to a remote positive terminal (+) if the vehicle has one. Negative (-) will go to a heavy, unpainted metal engine part or to a remote negative (-) terminal, if the vehicle has one.
Do not connect positive (+) to negative (-) or you will get a short that would damage the battery and maybe other parts too.
Notice: If the jumper cables are connected or removed in the wrong order, electrical shorting may occur and damage the vehicle. The repairs would not be covered by the vehicle warranty. Always connect and remove the jumper cables in the correct order, making sure that the cables do not touch each other or other metal.
-
Jumper Cable Removal
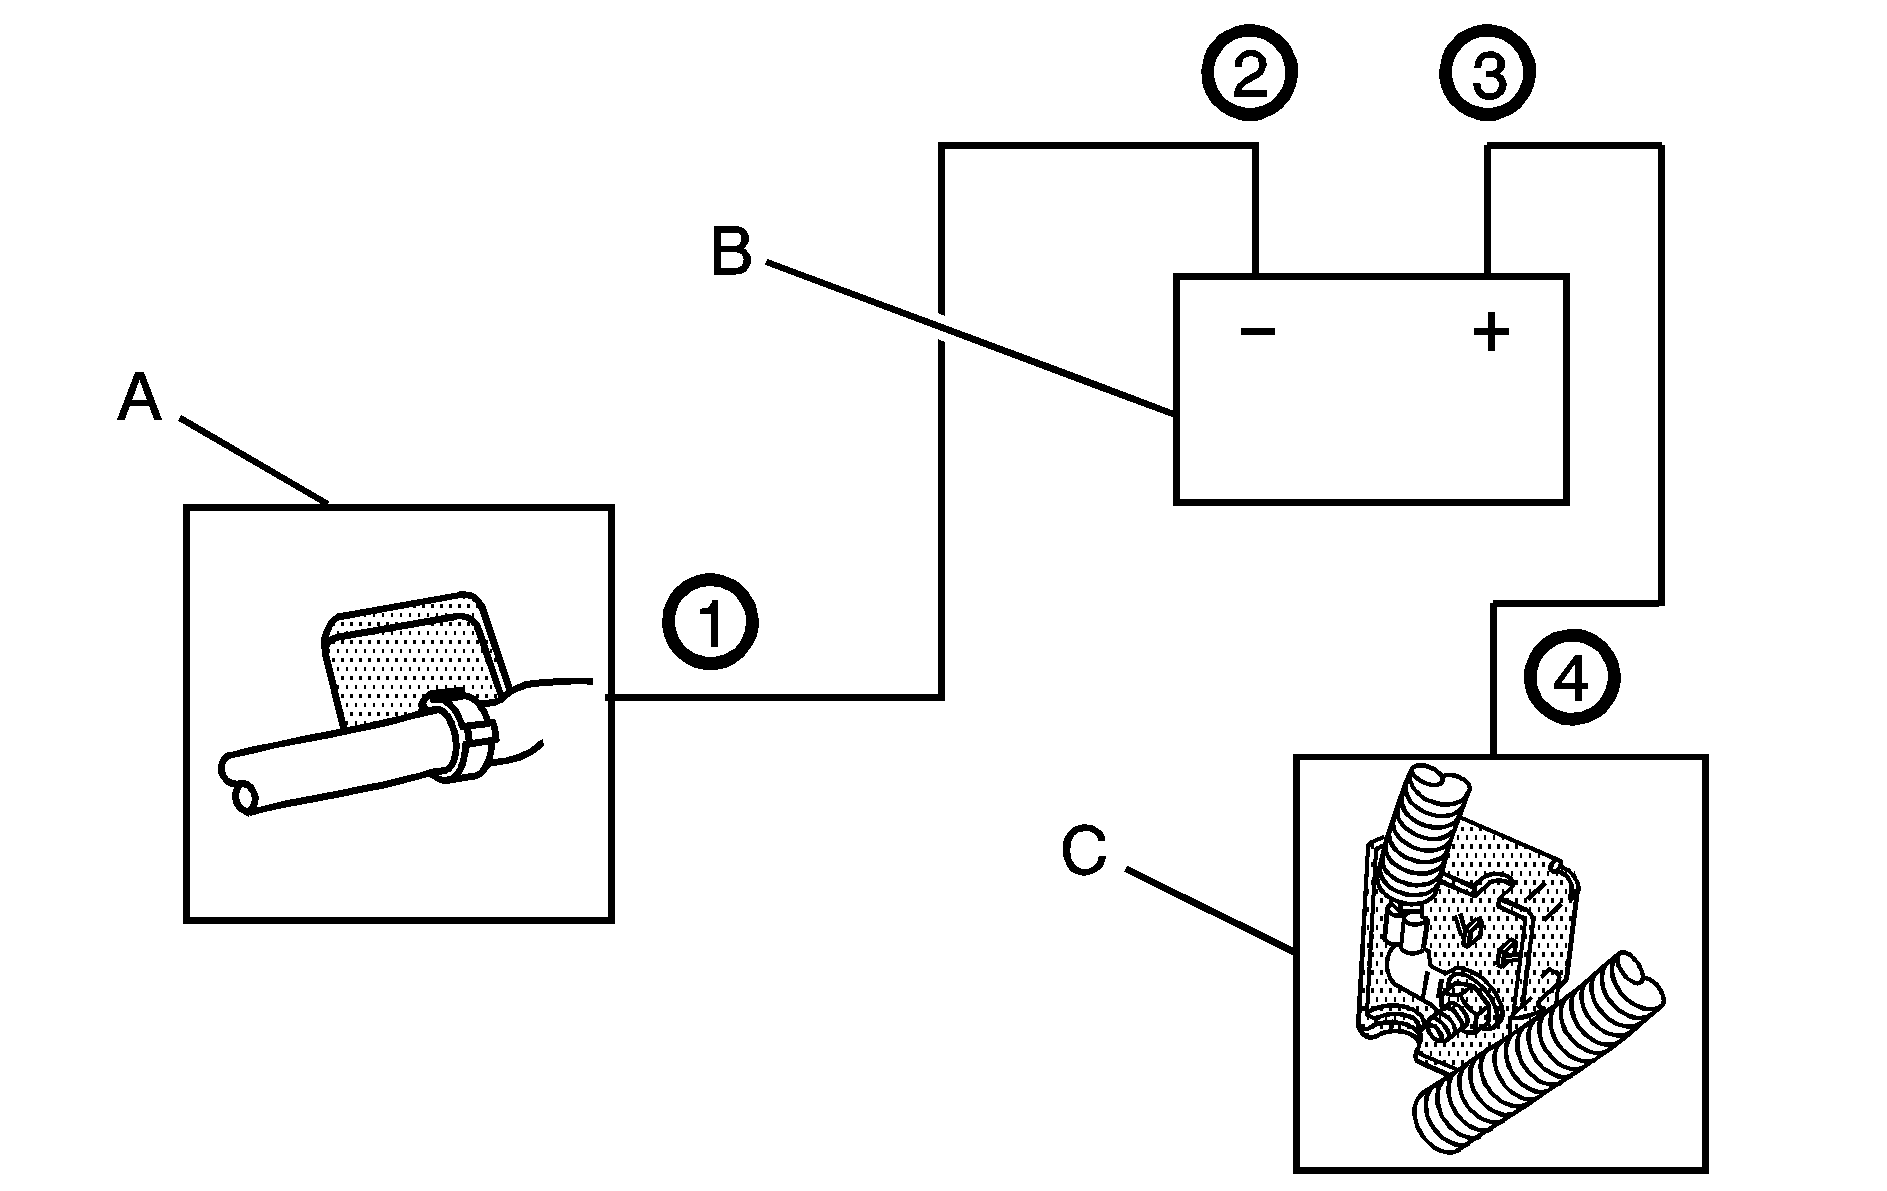
Remote Negative (-) Terminal on hybrid vehicle.
Good Battery or Remote Positive (+) and Negative (-) Terminals on other vehicle.
Remote Positive (+) Terminal on hybrid vehicle.
To disconnect the jumper cables from both vehicles do the following:
- Disconnect the black negative (-) cable from the hybrid vehicle.
- Disconnect the black negative (-) cable from the vehicle with the good battery.
- Disconnect the red positive (+) cable from the vehicle with the good battery.
- Disconnect the red positive (+) cable from the hybrid vehicle.
- Return the positive (+) remote terminal cover on your hybrid vehicle to its original position.
Jump Starting 12V System
If the battery (or batteries) on the vehicle have run down and the vehicle will not start, you may want to use another vehicle to provide power to start the vehicle.
Heavy duty jumper cables can be used to jump start the 12-volt system.
Caution: Getting between vehicles that are being jump started is dangerous. If the vehicles were to move you could be seriously injured or killed. Do not stand in front of the vehicle being jump started.
Never jump start frozen batteries they can explode. You or others can be could be seriously injured. Allow the battery to thaw at room temperature before jump starting.Caution: Batteries can hurt you. They can be dangerous because:
• They contain acid that can burn you. • They contain gas that can explode or ignite. • They contain enough electricity to burn you.
Notice: Ignoring these steps could result in costly damage to the vehicle that would not be covered by the warranty.
Trying to start the vehicle by pushing or pulling it will not work, and it could damage the vehicle.This procedure applies only to the underhood battery located on the passenger’s side of the vehicle.
- Check the other vehicle. It must have a 12-volt battery with a negative ground.
- Get the vehicles close enough so that jumper cables can reach, but be sure the vehicles are not touching each other. If they are, it could cause a ground causing the vehicle not to start. The bad grounding could damage the electrical systems.
- Turn off the ignition on both vehicles. Unplug unnecessary accessories plugged into the cigarette lighter or accessory power outlets. Turn off all lamps that are not required as well as radios. This will avoid sparks and help save both batteries. In addition, it could save the radio!
- Ensure the jumper cables do not have loose or missing insulation. If they do, you could get shocked and the vehicle could be damaged.
- Open the hood and locate the battery. Find the positive (+) and negative (-) terminals on each battery.
- Connect the positive (+) cable to the positive (+) terminal of the 12-volt battery (12-volt side) of the vehicle with the dead battery.
- Connect the positive (+) cable to the positive (+) terminal of the 12-volt battery of the vehicle with the good battery.
- Connect the negative (-) cable to the negative (-) terminal of the 12-volt system of the vehicle with the good battery.
- Connect the other end of the negative (-) cable to the remote negative (-) terminal, marked GND, on the vehicle with the dead battery. The electrical connection is just as good there, but the chance of sparks getting back to the battery is much less.
- Start the vehicle with the good battery. Allow the vehicle’s battery to charge for 10 minutes before attempting to start the vehicle.
- Start the vehicle with the dead battery.
- Remove the cables in reverse order to prevent electrical shorting. Take care that they do not touch each other or any other metal.
To avoid the possibility of the vehicles rolling, set the parking brake firmly on both vehicles involved in the jump start procedure. Put the automatic transmission in PARK (P). Be sure the transfer case is in a drive gear and is NOT in NEUTRAL (N).
Notice: If you leave the communications/navigation equipment or other accessories on during jump starting procedure, they could be damaged. The repairs wouldn’t be covered by the warranty. Always turn off your communications/navigation equipment or other accessories when jump starting your vehicle.
Before you connect the cables, here are some basic things you should know. Positive (+) will go to positive (+). Negative (-) will go to a heavy, unpainted metal engine part or a remote negative (-) terminal. The remote negative is located on the engine drive bracket and is marked GND (Ground).
Caution: Using an open flame near a battery can cause battery gas to explode. People have been hurt doing this, and some have been blinded. Use a flashlight if you need more light. Be sure the batteries have enough water. You don’t need to add water to the Optima battery (or batteries) installed in every new Military vehicle. But if a battery has filler caps, be sure the right amount of fluid is there. If it is low, add water to take care of that first. If you do not, explosive gas could be present. Battery fluid contains acid that can burn you. Do not get it on you. If you accidentally get it in the eyes or on the skin, flush the place with water and get medical help immediately.
Caution: Fans or other moving engine parts can injure you badly. Keep your hands away from moving parts once the engine is running.

Do not let the other end touch anything until the next step. The other end of the negative (-) cable does not go to the dead battery. It goes to a heavy unpainted metal part of the engine in the vehicle with the dead battery, or to a remove negative (-) terminal if the vehicle has one.
Note: It may take up to 30 minutes to charge the battery enough to start the vehicle, depending on the battery’s state of charge.
Notice: If the jumper cables are connected or removed in the wrong order, electrical shorting may occur and damage the vehicle. The repairs would not be covered by the vehicle warranty. Always connect and remove the jumper cables in the correct order, making sure that the cables do not touch each other or other metal.
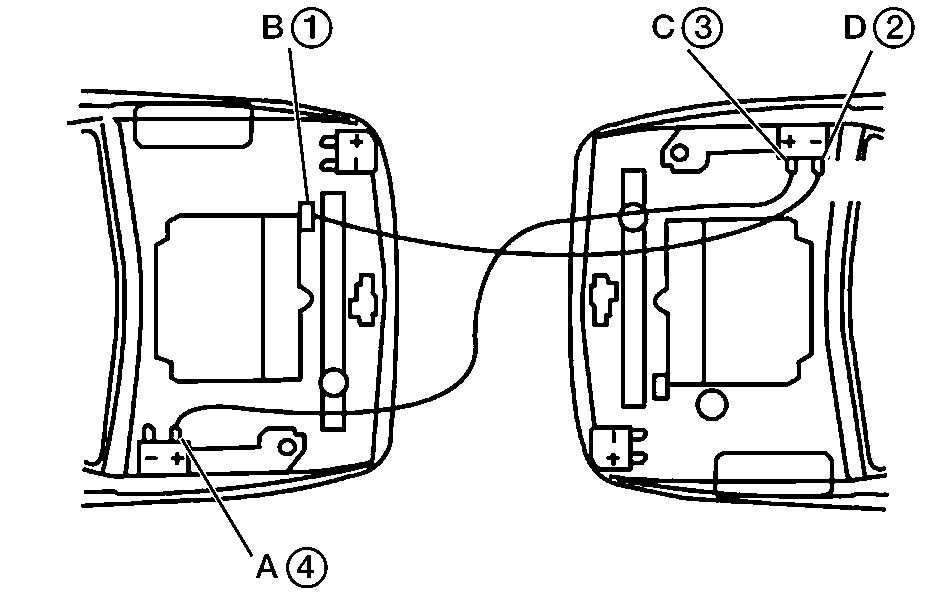
Dead Battery Positive (+) Terminal
Remote Negative (-) Terminal, marked GND
Good Battery Positive (+) Terminal
Good Battery Negative (-) Terminal
Jumper Cable Removal
To disconnect the jumper cables from both vehicles do the following:
- Disconnect the black negative (-) cable from the vehicle that had the bad battery, or remove the negative terminal.
- Disconnect the black negative (-) cable from the vehicle with the good battery.
- Disconnect the red positive (+) cable from the vehicle with the good battery.
- Disconnect the red positive (+) cable from the other vehicle.
- Return the remote positive (+) terminal cover, if equipped, to its original position.
If this procedure does not work, you will need to disconnect the left front underhood battery and charge it alone for 10 minutes. Reconnect the battery and repeat the jump starting procedures as outlined.
Note: This procedure should only be performed by authorized personnel.
