Rear Disc Brake Mounting and Hardware Inspection 1500 Series Pickup
Caution: Refer to Brake Dust Caution in the Preface section.
- Inspect the fluid level in the brake master cylinder reservoir.
- If the brake fluid level is midway between the maximum--full point
and the minimum allowable level, no brake fluid needs to be removed from the reservoir
before proceeding.
- If the brake fluid level is higher than midway between the maximum-full
point and the minimum allowable level, remove brake fluid to the midway point
before proceeding.
- Raise and support the vehicle. Refer to
Lifting and Jacking the Vehicle
in General Information.
- Remove the tire and wheel assembly. Refer to
Tire and Wheel Removal and Installation
in Tires and Wheels.
- Grasp the brake caliper housing and try to move the brake caliper housing
up/down and forward/reverse in relation to the brake caliper mounting bracket. If
excessive looseness is observed the brake caliper bracket bushings and/or the brake
caliper mounting bracket slide pins may need to be replaced.
- Compress the rear caliper piston.
| • | Install a large C-clamp over the top of the caliper housing and against
the back of the outboard pad. |
| • | Slowly tighten the C-clamp until the piston is pushed completely into
the caliper bore. |
| • | Remove the C-clamp from the caliper. |
- With the piston compressed into the caliper bore, grasp the caliper housing
and slide it back and forth along the brake caliper mounting bracket slide pins.
Check for smooth operation. If the brake caliper slide force is high or the brake
caliper housing does not slide smoothly, inspect the brake caliper mounting bracket
slide pins and/or the brake caliper mounting bracket bushings for wear or damage.
If wear or damage conditions are found, replacement of the brake caliper mounting
bracket slide pins and/or the brake caliper mounting bracket bushings is necessary.
- Remove the brake caliper mounting bolts and support the brake caliper
using heavy mechanics wire. Do Not remove the hydraulic brake hose from the caliper.
Refer to
Rear Brake Caliper Replacement
.

- Remove
the disc brake pads from the brake caliper mounting bracket.
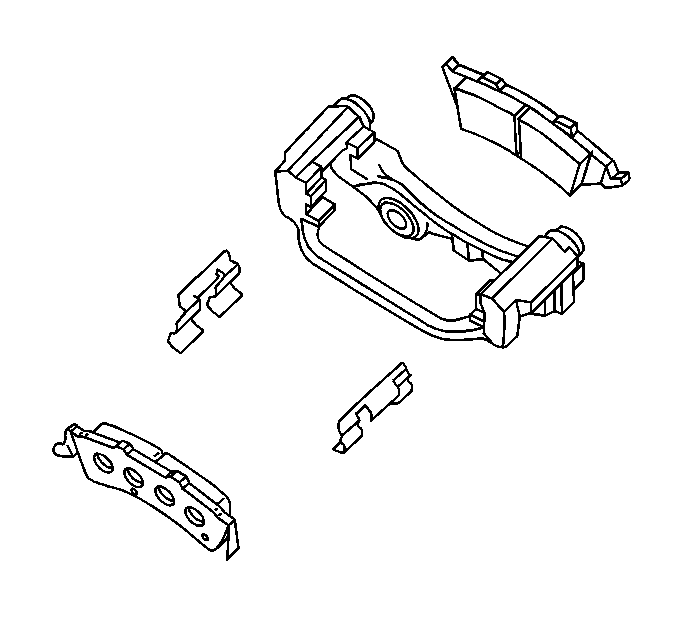
- Inspect the disc brake pad mounting hardware for the following:
| • | Missing mounting hardware |
| • | Looseness at the brake caliper mounting bracket |
| • | Looseness at the disc brake pads |
| • | Excessive contaminants in the brake caliper mounting bracket surface
and threads. |
- If any of the conditions listed are found, the disc brake pad mounting
hardware requires replacement.
- Ensure the disc brake pads are held firmly in place on the brake caliper
mounting bracket, yet slide easily on the mounting hardware without binding.

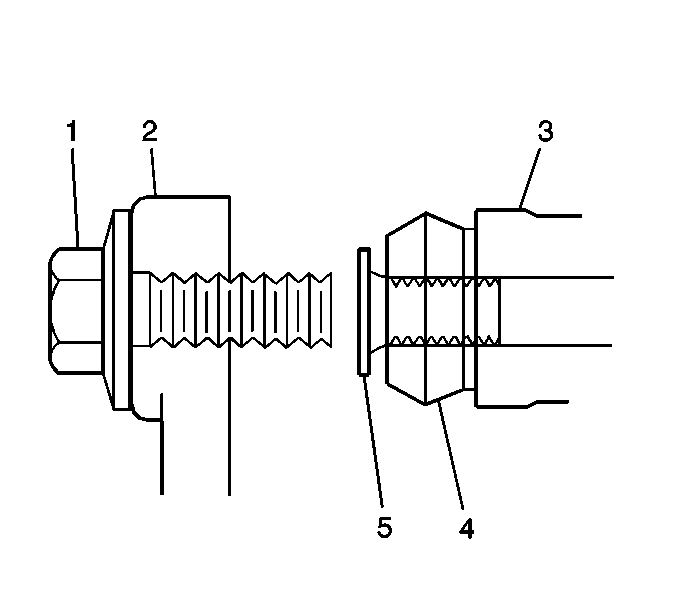
- Inspect the brake caliper mounting bracket
slide pins (5) for the following:
| • | Looseness in the caliper mounting bracket (3) |
| • | Bent or damaged brake caliper mounting bolts (1). |
| • | Cracked or torn boots (4) |
| • | Bent or damaged brake caliper mounting bracket (3) |
- Replace any parts found to have the one of the above conditions.
- Install the disc brake pads to the brake caliper mounting bracket.
- Install the disc brake caliper to the brake caliper mounting bracket.
Refer to
Rear Brake Caliper Replacement
.
Rear Disc Brake Mounting and Hardware Inspection All Except 1500 Series Pickup
Caution: Refer to Brake Dust Caution in the Preface section.
- Inspect the fluid level in the brake master cylinder reservoir.
- If the brake fluid level is midway between the maximum-full point
and the minimum allowable level then no brake fluid needs to be removed from the
reservoir before proceeding.
- If the brake fluid level is higher than midway between the maximum-full
point and the minimum allowable level then remove brake fluid to the midway point
before proceeding.
- Raise and support the vehicle. Refer
Lifting and Jacking the Vehicle
to in General Information.
- Remove the tire and wheel assembly. Refer to
Tire and Wheel Removal and Installation
in Tires and Wheels.

- Grasp
the brake caliper housing and try to move the brake caliper housing up/down and forward/reverse
in relation to the brake caliper mounting bracket. If excessive looseness is
observed the brake caliper bracket bushings and/or the brake caliper mounting bolts
may need to be replaced.
- Compress the rear brake caliper pistons.
| • | Install a large C-clamp over the top of the caliper housing and against
the back of the outboard pad. |
| • | Slowly tighten the C-clamp until the pistons are pushed completely into
the caliper bores. |
| • | Remove the C-clamp from the caliper. |
- With the pistons compressed into the caliper bores, grasp the brake caliper
housing and slide it back and forth on the brake caliper mounting bolts. Check
for smooth operation. If the brake caliper housing slide force is high or the brake
caliper housing does not slide smoothly, inspect the brake caliper mounting bolts
and/or the brake caliper mounting bracket bushings for wear or damage. If wear
or damage conditions are found, replacement of the brake caliper mounting bolts
and/or the brake caliper mounting bracket bushings is necessary.
- Remove the brake caliper mounting bolts from the brake caliper mounting
bracket and support the brake caliper using heavy mechanics wire. Do Not remove
the hydraulic brake hose from the caliper. Refer to
Rear Brake Caliper Replacement
in Disc Brakes.
- Remove the disc brake pads from the brake caliper mounting bracket.
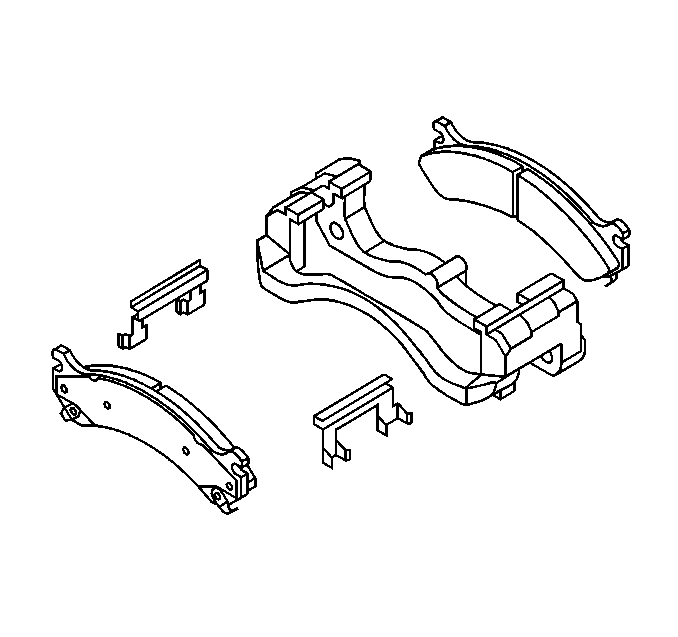
- Inspect the disc brake pad mounting hardware for the following:
| • | Missing mounting hardware |
| • | Looseness at the brake caliper mounting bracket |
| • | Looseness at the disc brake pads |
| • | Excessive contaminants in the brake caliper mounting bracket surface
and threads. |
- If any of the conditions listed are found, the disc brake pad mounting
hardware requires replacement.
- Ensure the disc brake pads are held firmly in place on the brake caliper
mounting bracket, yet slide easily on the mounting hardware without binding.

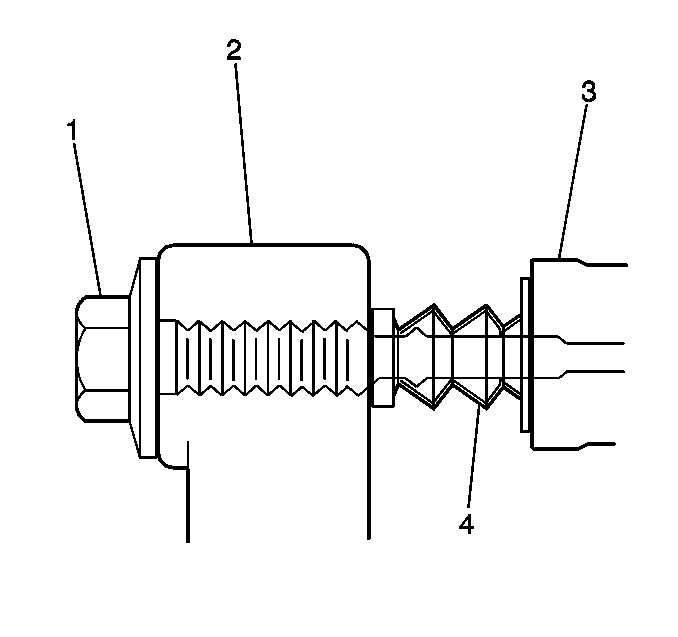
- Inspect the caliper bolts (1) for the following:
| • | Looseness in the brake caliper mounting bracket (3) |
| • | Bent or damaged brake caliper mounting bolts |
| • | Cracked or torn boots (4) |
| • | Bent or damaged brake caliper mounting bracket (3) |
- If any of the conditions listed are found then the brake caliper mounting
hardware requires replacement.
- Install the disc brake pads to the brake caliper mounting bracket.
- Install the disc brake caliper to the brake caliper mounting bracket.
Refer to
Rear Brake Caliper Replacement
in Disc Brakes.


