Front Drive Axle Inner Shaft and Inner Shaft Housing Replacement 8.25 S4WD and 9.25 Axles
Removal Procedure
- Raise the vehicle. Refer to
Lifting and Jacking the Vehicle
in General Information.
- Drain the differential carrier assembly. Refer to
Lubricant Change
.
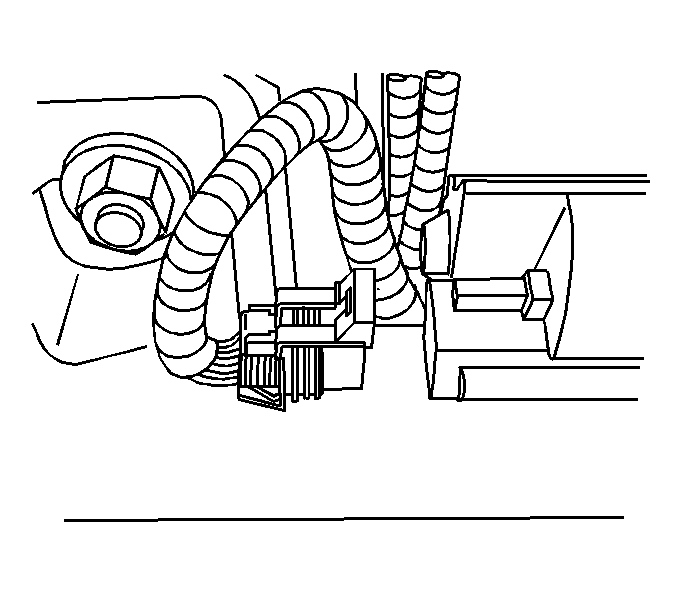
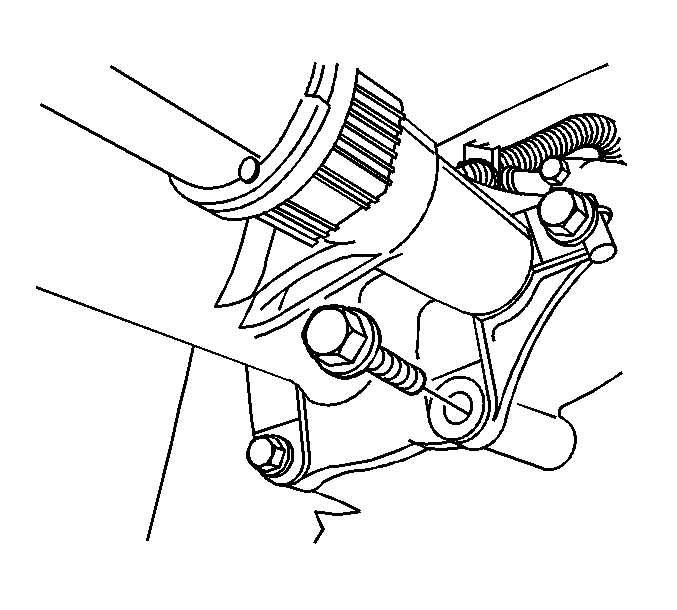
- Disconnect the electrical connector from the electric motor actuator.
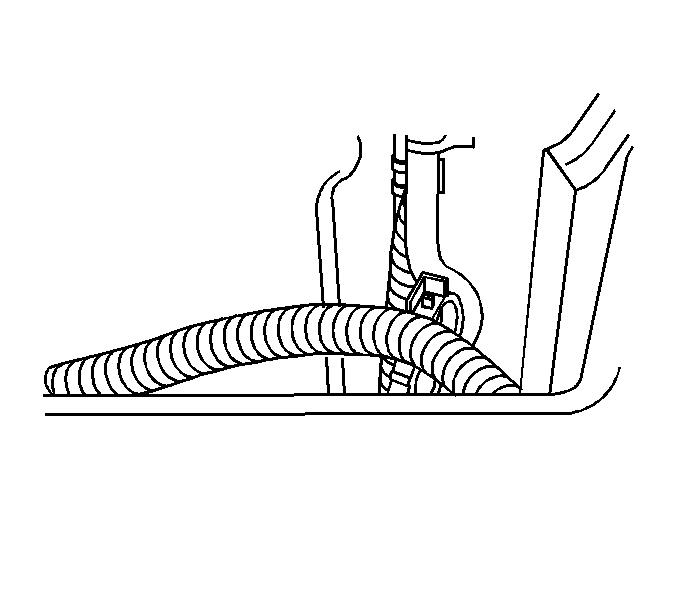
- Disconnect the wire harness from the inner
axle shaft housing.
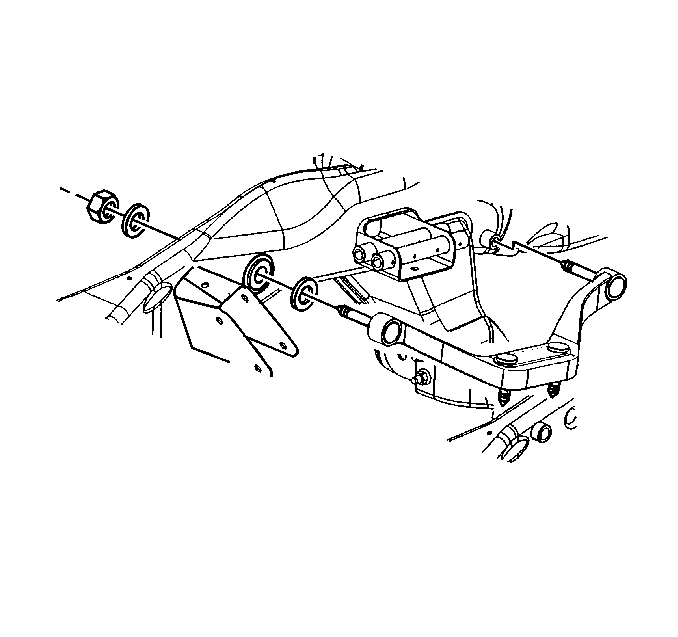
- Remove the stabilizer shaft link assembly. Refer to
Stabilizer Shaft Link Replacement
in Front Suspension.
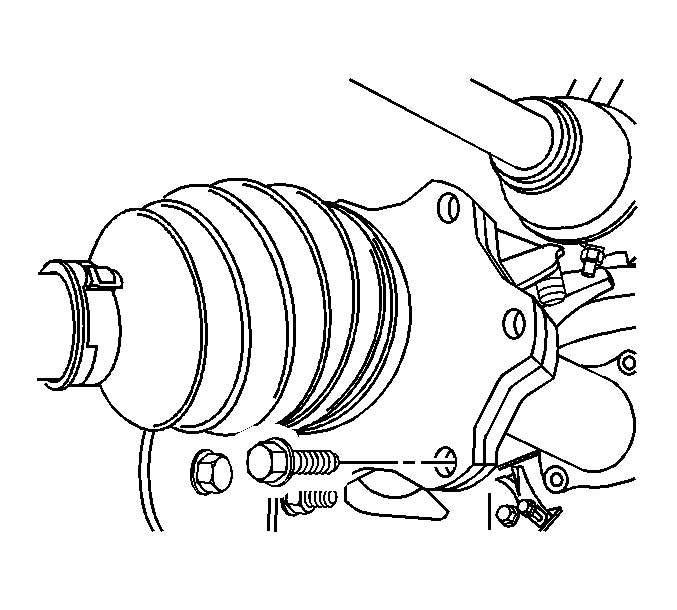
- Remove the wheel drive shaft inboard flange
bolts from the inner axle shaft.
Disconnect the wheel drive shaft from the inner axle shaft.
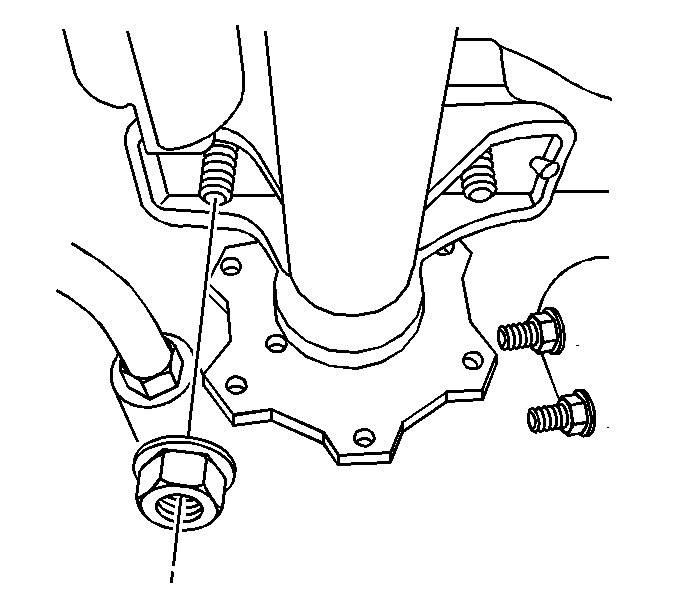
- Remove the inner axle shaft housing nuts
and washers from the bracket.
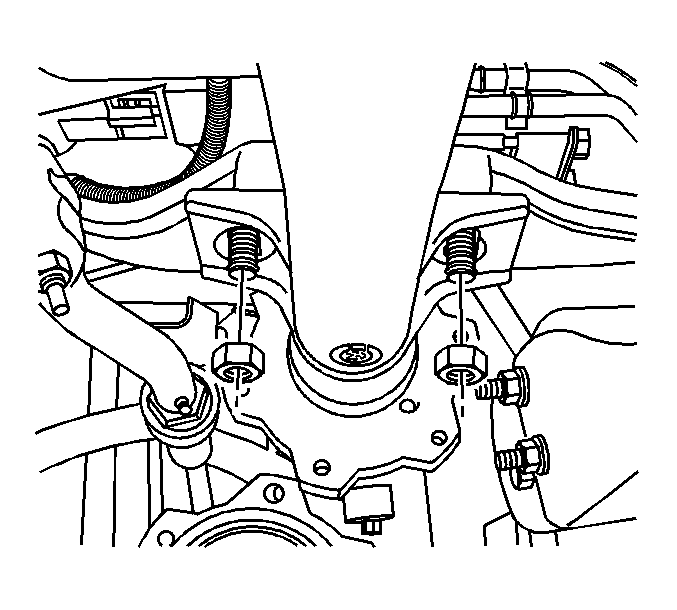
- For 25 series vehicles, perform the following
steps in order to provide additional clearance so the inner axle housing can be removed
from the vehicle:
| 8.1. | Remove the front axle mounting bracket to frame nuts. |
| 8.2. | Slide the front axle mounting bracket towards the engine. It may be necessary
to pull down on the inner axle housing and/or push up on the mounting bracket in order
to gain clearance. |
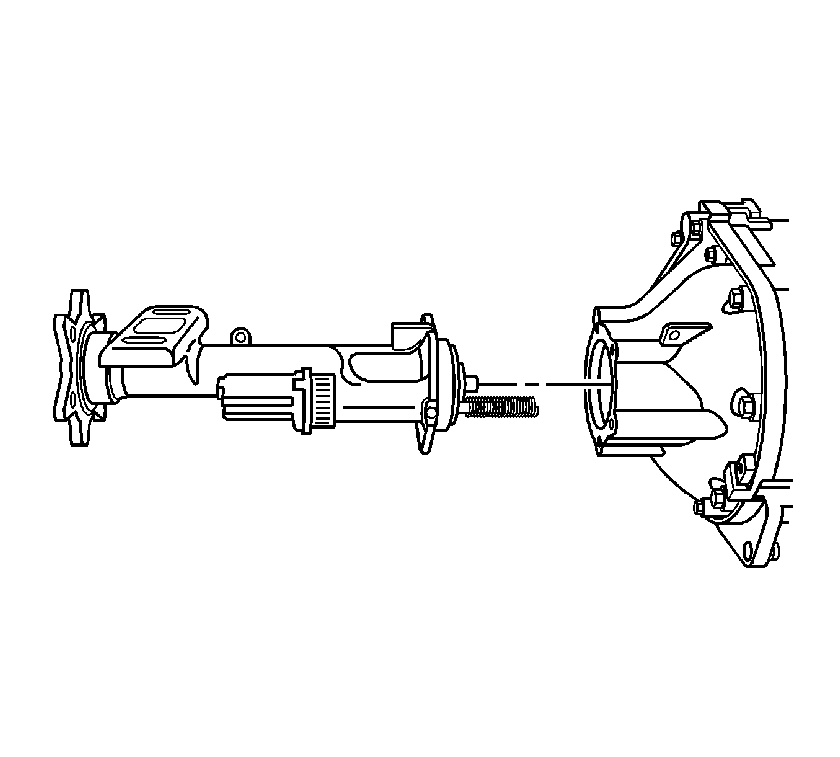
- Remove the inner axle shaft housing bolts from the differential carrier case.
Important: Keep the open end of the inner axle shaft housing up.
- Carefully remove the inner axle shaft housing assembly from the differential
carrier assembly.
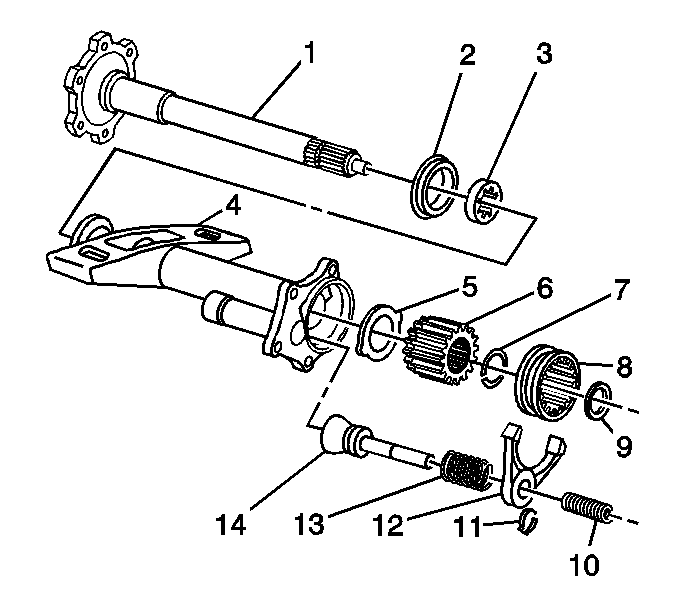
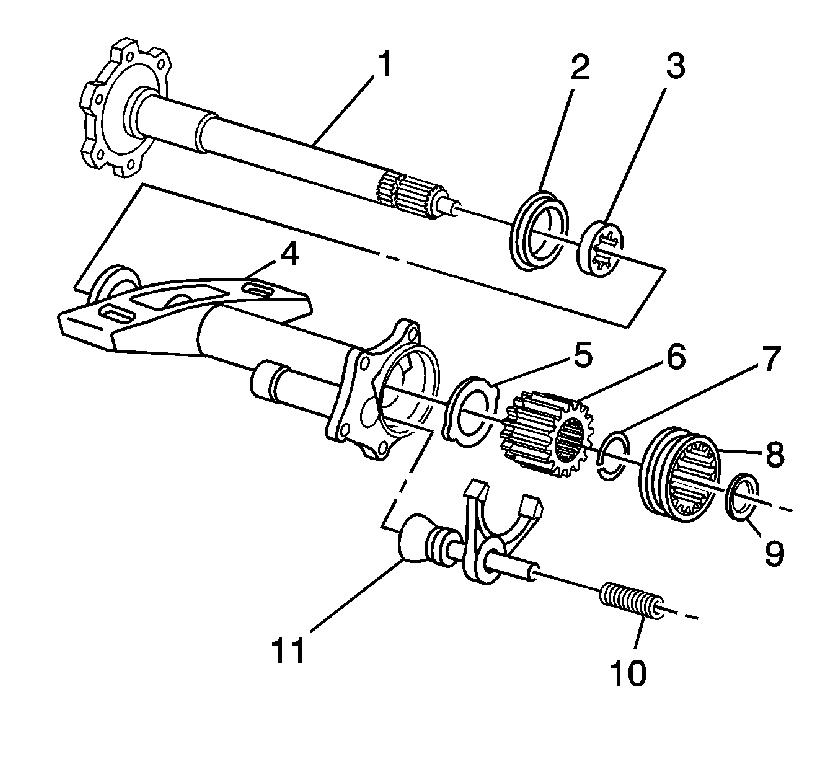
- For the 8.25 inch axle - 1st
design, remove the following components from the inner axle shaft housing:
| 11.1. | The clutch fork inner spring (10) |
| 11.2. | The clutch fork shaft assembly components (14, 13, 12, 11) |
| 11.3. | The clutch shaft shim (9) |
| 11.4. | Remove the clutch sleeve (8) |
| 11.5. | Remove the clutch gear (6) by doing the following: |
| 11.5.1. | Clamp the inner axle shaft housing (4) in a vise. |
Clamp only on the mounting flange.
| 11.5.2. | Strike the inside surface of the shaft (1) flange with a hammer
and a brass drift in order to dislodge the front drive axle clutch gear 6)
from the inner axle shaft (1). |
| 11.6. | Remove the thrust washer (5) |
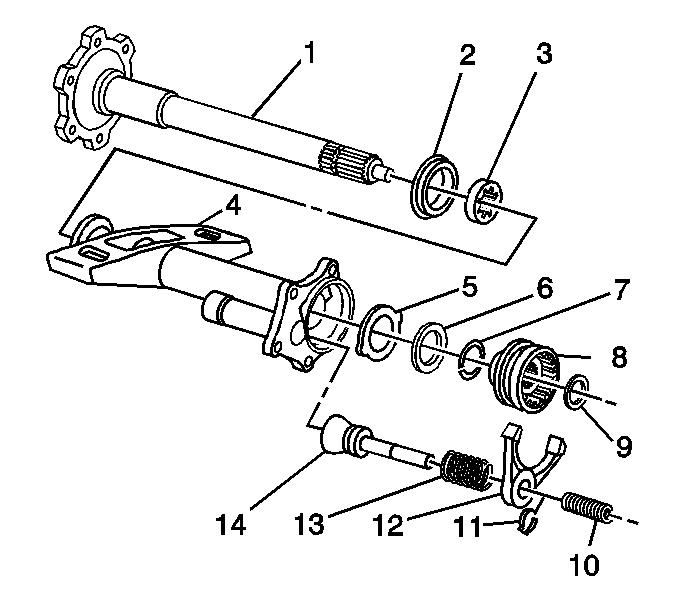
- For the 8.25 inch axle - 2nd design, remove the following components
from the inner axle shaft housing:
| 12.1. | The clutch fork inner spring (10) |
| 12.2. | The clutch fork assembly (11) |
| 12.3. | The clutch shaft shim (9) |
| 12.4. | The clutch sleeve (8) |
| 12.5. | The clutch gear (6) by doing the following: |
| 12.5.1. | Clamp the inner axle shaft housing (4) in a vise. |
Clamp only on the mounting flange.
| 12.5.2. | Strike the inside surface of the shaft (1) flange with a hammer
and a brass drift in order to dislodge the front drive axle clutch gear (6)
from the inner axle shaft (1). |
| 12.6. | The thrust washer (5) |
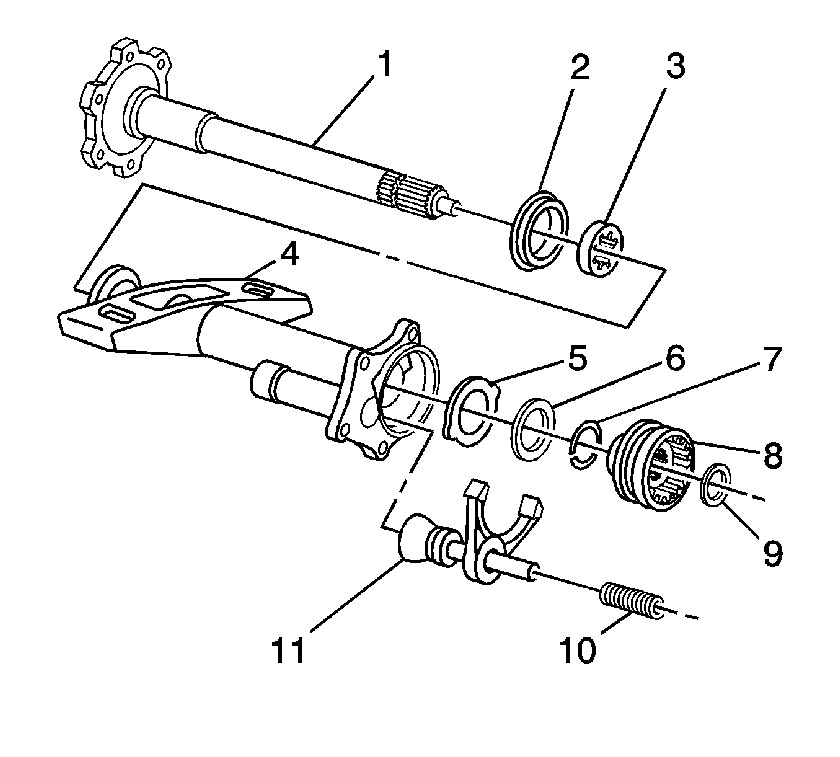
- For the 9.25 inch axle - 1st
design, remove the following components from the inner axle shaft housing:
| 13.1. | The clutch fork inner spring (10) |
| 13.2. | The clutch fork assembly components (14, 13, 12, 11) |
| 13.3. | The clutch shaft shim (9) |
| 13.4. | The clutch sleeve (8) |
| 13.5. | The retainer ring (7) |
| 13.6. | The thrust washers (5, 6) |
- For the 9.25 inch axle - 2nd design, remove the following components
from the inner axle shaft housing:
| 14.1. | The clutch fork inner spring (10) |
| 14.2. | The clutch fork assembly (11) |
| 14.3. | The clutch shaft shim (9) |
| 14.4. | The clutch sleeve (8) |
| 14.5. | The retainer ring (7) |
| 14.6. | The thrust washers (5, 6) |
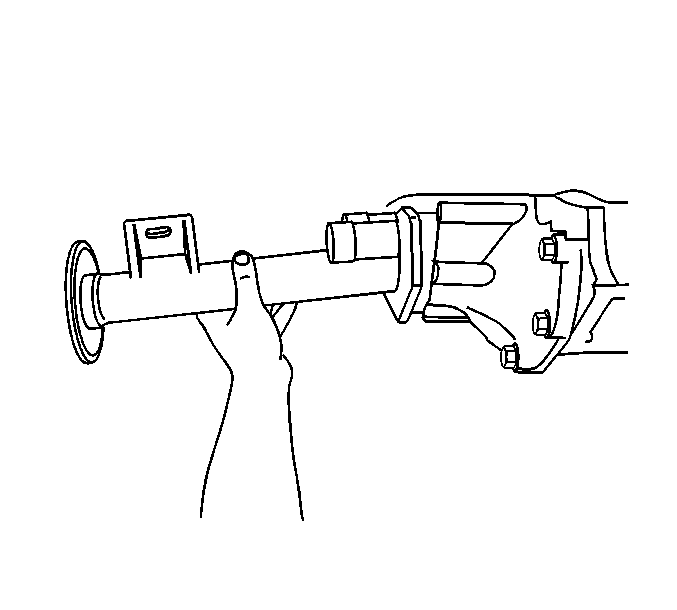
- Remove the inner axle shaft (2).
Tap out the inner axle shaft with a soft-faced mallet.
- Remove the inner axle seal and the bearing from the axle housing. Refer
to
Front Drive Axle Inner Shaft Seal and Inner Shaft Bearing Replacement
.
Installation Procedure
- Install the new inner axle shaft bearing and the seal to the axle housing.
Refer to
Front Drive Axle Inner Shaft Seal and Inner Shaft Bearing Replacement
.
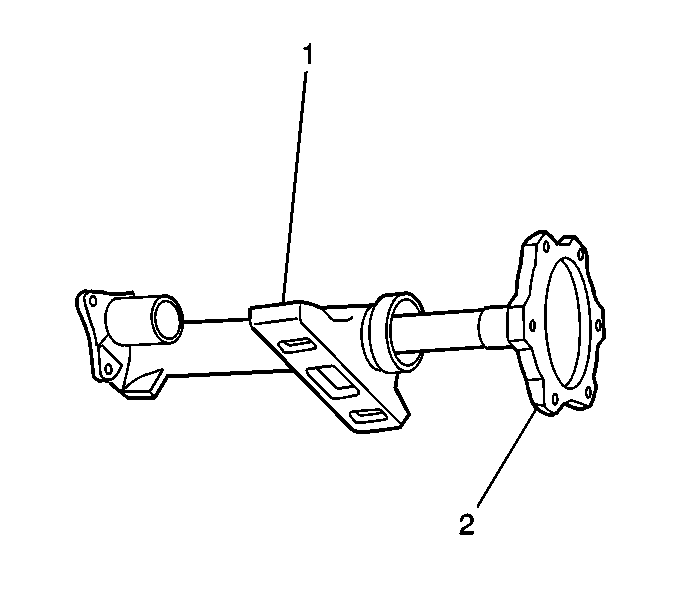
- Install the inner axle shaft (2)
into the inner axle shaft housing (1).
Carefully tap the inner axle shaft into place with a soft-faced mallet.
- Place the inner axle shaft housing on end so that the splines of the inner
axle shaft is facing up.
- For the 8.25 inch axle - 1st
design, install the following components into the inner axle shaft housing:
| | Important: Use chassis grease in order to hold the thrust washer in place.
|
| 4.1. | The thrust washer (5) |
Ensure the tabs on the thrust washer are aligned with the slots in the inner
axle shaft housing (4).
| 4.2. | The retainer ring (7) into the clutch gear (6). |
| 4.3. | The clutch gear (6) onto the inner axle shaft (1). |
Drive the clutch gear into place with a plastic hammer.
| 4.5. | The clutch gear shim (9) |
| 4.6. | The clutch sleeve (8) |
| 4.7. | The clutch fork assembly (14, 13, 12, 11) |
| 4.8. | The clutch fork inner spring (10) into the differential carrier
case. |
- For the 8.25 inch axle - 2nd design, install the following components
into the inner axle shaft housing:
| | Important: Use chassis grease in order to hold the thrust washer in place.
|
| 5.1. | The thrust washer (5) |
Ensure the tabs on the thrust washer are aligned with the slots in the inner
axle shaft housing (4).
| 5.2. | The retainer ring (7) into the clutch gear (6). |
| 5.3. | The clutch gear (6) onto the inner axle shaft (1). |
Drive the clutch gear into place with a plastic hammer.
| 5.5. | The clutch gear shim (9) |
| 5.6. | The clutch sleeve (8) |
| 5.7. | The clutch fork assembly (11) |
| 5.8. | The clutch fork inner spring (10) into the differential carrier
case. |
- For the 9.25 inch axle - 1st
design, install the following components into the inner axle shaft housing:
| | Important: Use chassis grease in order to hold the thrust washer in place.
|
| 6.1. | The thrust washer (5) |
Ensure the tabs on the thrust washer are aligned with the slots in the inner
axle shaft housing (4).
| 6.2. | The second thrust washer (6) |
| 6.3. | The retainer ring (7) onto the inner axle shaft (1). |
| 6.5. | The clutch gear shim (9) |
| 6.6. | The clutch sleeve (8) |
| 6.7. | The clutch fork assembly (14, 13, 12, 11) |
| 6.8. | The clutch fork inner spring (10) into the differential carrier
case. |
- For the 9.25 inch axle - 2nd design, install the following components
into the inner axle shaft housing:
| | Important: Use chassis grease in order to hold the thrust washer in place.
|
| 7.1. | The thrust washer (5) |
Ensure the tabs on the thrust washer are aligned with the slots in the inner
axle shaft housing (4).
| 7.2. | The second thrust washer (6) |
| 7.3. | The retainer ring (7) onto the inner axle shaft (1). |
| 7.5. | The clutch gear shim (9) |
| 7.6. | The clutch sleeve (8) |
| 7.7. | The clutch fork assembly (11) |
| 7.8. | The clutch fork inner spring (10) into the differential carrier
case. |
- Apply sealant to the inner axle housing to differential carrier sealing
surface. Use the correct sealant. Refer to
Sealers, Adhesives, and Lubricants
.
- Install the inner axle shaft housing assembly
to the differential carrier assembly.
Notice: Refer to Fastener Notice in the Preface section.
- Install the inner axle shaft housing bolts.
Tighten
Tighten the inner axle shaft housing bolts to 40 N·m (30 lb ft).
- For 25 series vehicles, perform the following
steps in order to install the front axle mounting bracket to the inner axle housing:
| 11.1. | Slide the front axle mounting bracket towards the frame. |
| 11.2. | Install the front axle mounting bracket studs into the inner shaft housing
mounting flange. |
It may be necessary to push up on the front axle mounting bracket and/or pull
down on the inner axle housing in order to gain enough clearance to install the mounting
brackets studs into the inner shaft housing.
| 11.3. | Install the front axle mounting bracket to frame nuts. |
Tighten
Tighten the front axle mounting bracket to frame nuts to 90 N·m
(67 lb ft).
- Install the inner axle shaft housing washers
and nuts to the bracket.
Tighten
Tighten the inner axle shaft housing nuts to 100 N·m (75 lb ft).
- Connect the wheel drive shaft inboard flange to the inner axle shaft.
- Install the wheel drive shaft inboard flange
to the inner axle shaft bolts.
Tighten
Tighten the wheel drive shaft inboard flange to inner axle shaft bolts to 79 N·m
(58 lb ft).
- Install the stabilizer shaft link assembly. Refer to
Stabilizer Shaft Link Replacement
in Front Suspension.
- Connect the wire harness to the inner axle
shaft housing.
- Connect the electrical connector to the
front axle actuator.
- Fill the differential carrier assembly with axle lubricant. Use the proper
fluid. Refer to
Lubricant Change
.
- Lower the vehicle.
Front Drive Axle Inner Shaft and Inner Shaft Housing Replacement 8.25 F4WD Axle
Removal Procedure
- Raise the vehicle. Refer to
Lifting and Jacking the Vehicle
in General Information.
- Drain the differential carrier assembly. Refer to
Lubricant Change
.
- Remove the stabilizer shaft link assembly. Refer to
Stabilizer Shaft Link Replacement
in Front Suspension.
- Remove the wheel drive shaft inboard flange
bolts from the inner axle shaft.
- Disconnect the wheel drive shaft from the inner axle shaft.
- Disconnect the inner axle shaft from the differential case side gear using a
hammer and brass drift.
- Remove the inner axle shaft housing nuts
and washers from the bracket.
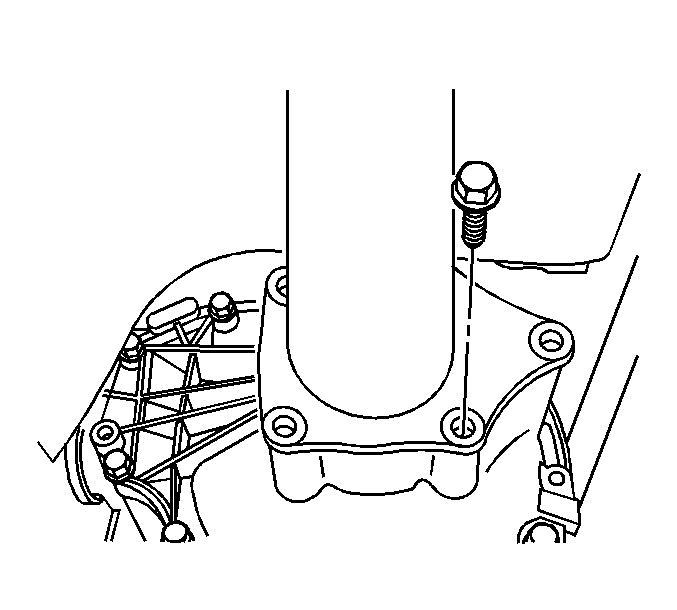
- Remove the inner axle shaft housing bolts from the differential carrier assembly.
- Remove the inner axle shaft and inner axle shaft housing from the vehicle.
- Remove the inner axle shaft from the inner axle shaft housing.
- Remove the inner axle shaft seal and the bearing from the inner axle shaft
housing. Refer to
Front Drive Axle Inner Shaft Seal and Inner Shaft Bearing Replacement
.
Installation Procedure
- Install the new inner axle shaft bearing and the new seal to the inner
axle shaft housing. Refer to
Front Drive Axle Inner Shaft Seal and Inner Shaft Bearing Replacement
.
- Install the inner axle shaft into the inner axle shaft housing.
Do not install the inner axle shaft completely into the inner axle shaft housing
at this time.
- Apply sealant to the inner axle housing to differential carrier sealing
surface. Use the correct sealant. Refer to
Sealers, Adhesives, and Lubricants
.
- Install the inner axle shaft and the inner axle shaft housing to the differential
carrier assembly.
Notice: Refer to Fastener Notice in the Preface section.
- Install the inner axle shaft housing bolts.
Tighten
Tighten the inner axle shaft housing bolts to 40 N·m (30 lb ft).
- Install the inner axle shaft housing nuts
and washers to the bracket.
Tighten
Tighten the inner axle shaft housing nuts to 100 N·m (75 lb ft).
- Install the inner axle shaft into the differential case side gear by doing
the following:
| 7.1. | Turn the inner axle shaft and align the splines of the inner axle shaft
with the splines on the differential side gear. |
| 7.2. | Install the inner axle shaft into the differential case side gear using
a soft-faced mallet until the retaining ring on the inner axle shaft is fully seated
within the groove in the differential case side gear. |
| 7.3. | Pull back on the inner axle shaft to ensure that the inner axle shaft
is properly retained in the differential case side gear. |
- Install the wheel drive shaft inboard flange to the inner axle shaft.
- Install the wheel drive shaft inboard flange
to inner axle shaft bolts.
Tighten
Tighten the wheel drive shaft inboard flange to inner axle shaft bolts to 79 N·m
(58 lb ft).
- Install the stabilizer shaft link assembly. Refer to
Stabilizer Shaft Link Replacement
in Front Suspension.
- Fill the differential carrier assembly with axle lubricant. Use the proper
fluid. Refer to
Lubricant Change
.
- Lower the vehicle.
