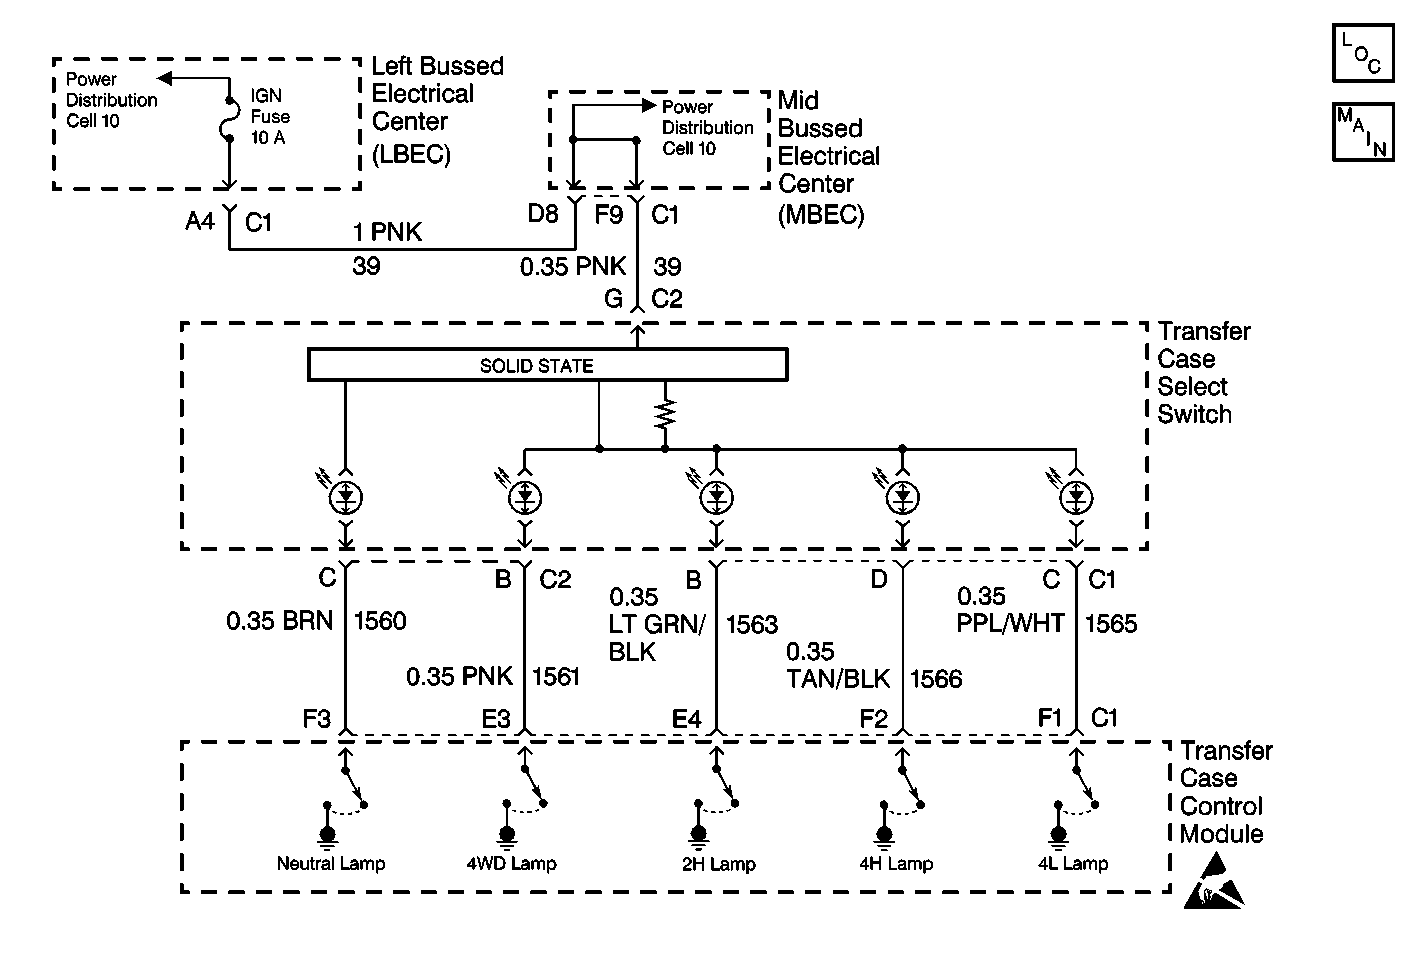
Circuit Description
The indicator lamps circuit consist of five individual lamps contained inside the mode/range switch assembly. They are AUTO, 4WD, 2HI, 4HI, 4LO and Neutral. The AUTO, 4WD, 2HI, 4HI, and 4LO lamps are contain inside their respective range button. When the ignition in ON, the automatic transfer case control module illuminates the indicator lamp that corresponds to the current ATC gear position by providing a ground through a current limiting driver.
The automatic transfer case control module flashes each indicator lamp after a shift has been requested and will continue to flash until the automatic transfer case control module can complete the shift. After a shift to AUTO, 4WD, 4HI, or 4LO is made, the automatic transfer case control module will flash that indicator lamp until the automatic transfer case control module receives a high voltage signal on circuit 1695 from the front axle switch.
A solid state circuit located inside the switch supplies ignition voltage to the lamps. The solid state circuit also receives voltage whenever the headlamp switch is in park or headlamp position. When the solid state circuit receives voltage from the headlamp switch it will reduce the voltage that it supplies to the indicator lamps, dimming the lamps when the headlamps are ON.
Test Description
The number(s) below refer to the step number(s) on the diagnostic table.
-
This step determines if the transfer case shift control module has electronic control of the switch indicator lamps.
-
This step provides a ground to the indicator lamp circuits in order to eliminate the transfer case shift control module.
-
This step checks for B+ in the indicator lamp circuits.
Step | Action | Value(s) | Yes | No |
|---|---|---|---|---|
1 | Was the Transfer Case Diagnostic System Check performed? | -- | Go to Step 2 | |
Do the switch indicator lamps turn On? | -- | Go to Step 7 | Go to Step 3 | |
3 |
Do each of the switch indicator lamp states change from OFF to ON as Indicator Lamps are commanded ON? | -- | Go to Step 7 | Go to Step 4 |
Do each of the lamps illuminate when its circuit is grounded? | -- | Go to Step 7 | Go to Step 5 | |
Connect a J 39200 Digital Multimeter DMM between the suspect circuit and ground in order to measure voltage. Is the voltage within the specified value? | 9-14 V | Go to Step 8 | Go to Step 6 | |
6 | Inspect the suspect circuit(s) for open. Refer to Wiring Repairs in Wiring Systems. Were the suspected circuit(s) open? | -- | Go to Step 9 | Go to Step 8 |
7 | Replace the transfer case shift control module. Refer to Transfer Case Shift Control Module Replacement . Is the action complete? | -- | Go to Step 10 | -- |
8 | Replace the range/mode switch. Refer to Transfer Case Shift Control Switch Replacement . Is the action complete? | -- | Go to Step 10 | -- |
9 | Repair an open in the suspect circuit(s). Refer to Wiring Repairs in Wiring Systems. Is the repair complete? | -- | Go to Step 10 | -- |
10 |
Have all the ATC components been reconnected and properly mounted? | -- | Go to Step 11 | -- |
11 | Clear all ATC DTCs. Have all the ATC DTCs been cleared? | -- | -- |
