GM Service Manual Online
For 1990-2009 cars only

Circuit Description

The instrument panel cluster (IPC) diagnostic system check is a test to identify an electronic system malfunction. The IPC diagnostic system check is the starting point for any IPC complaints. Understanding and using the IPC diagnostic system check table will reduce diagnostic time and prevent the unnecessary replacement of parts.

Test Description

The step number(s) below refer to the same step number(s) in the IPC diagnostic system check table.

  1. This step determines if the scan tool can be powered up by the data link connector

  2. Since most of the diagnostic procedures require a scan tool, serial data must be available. This step determines if communications can be established with the IPC.

  3. This step determines if the Class 2 line is operational and can communicate to other module on the line.

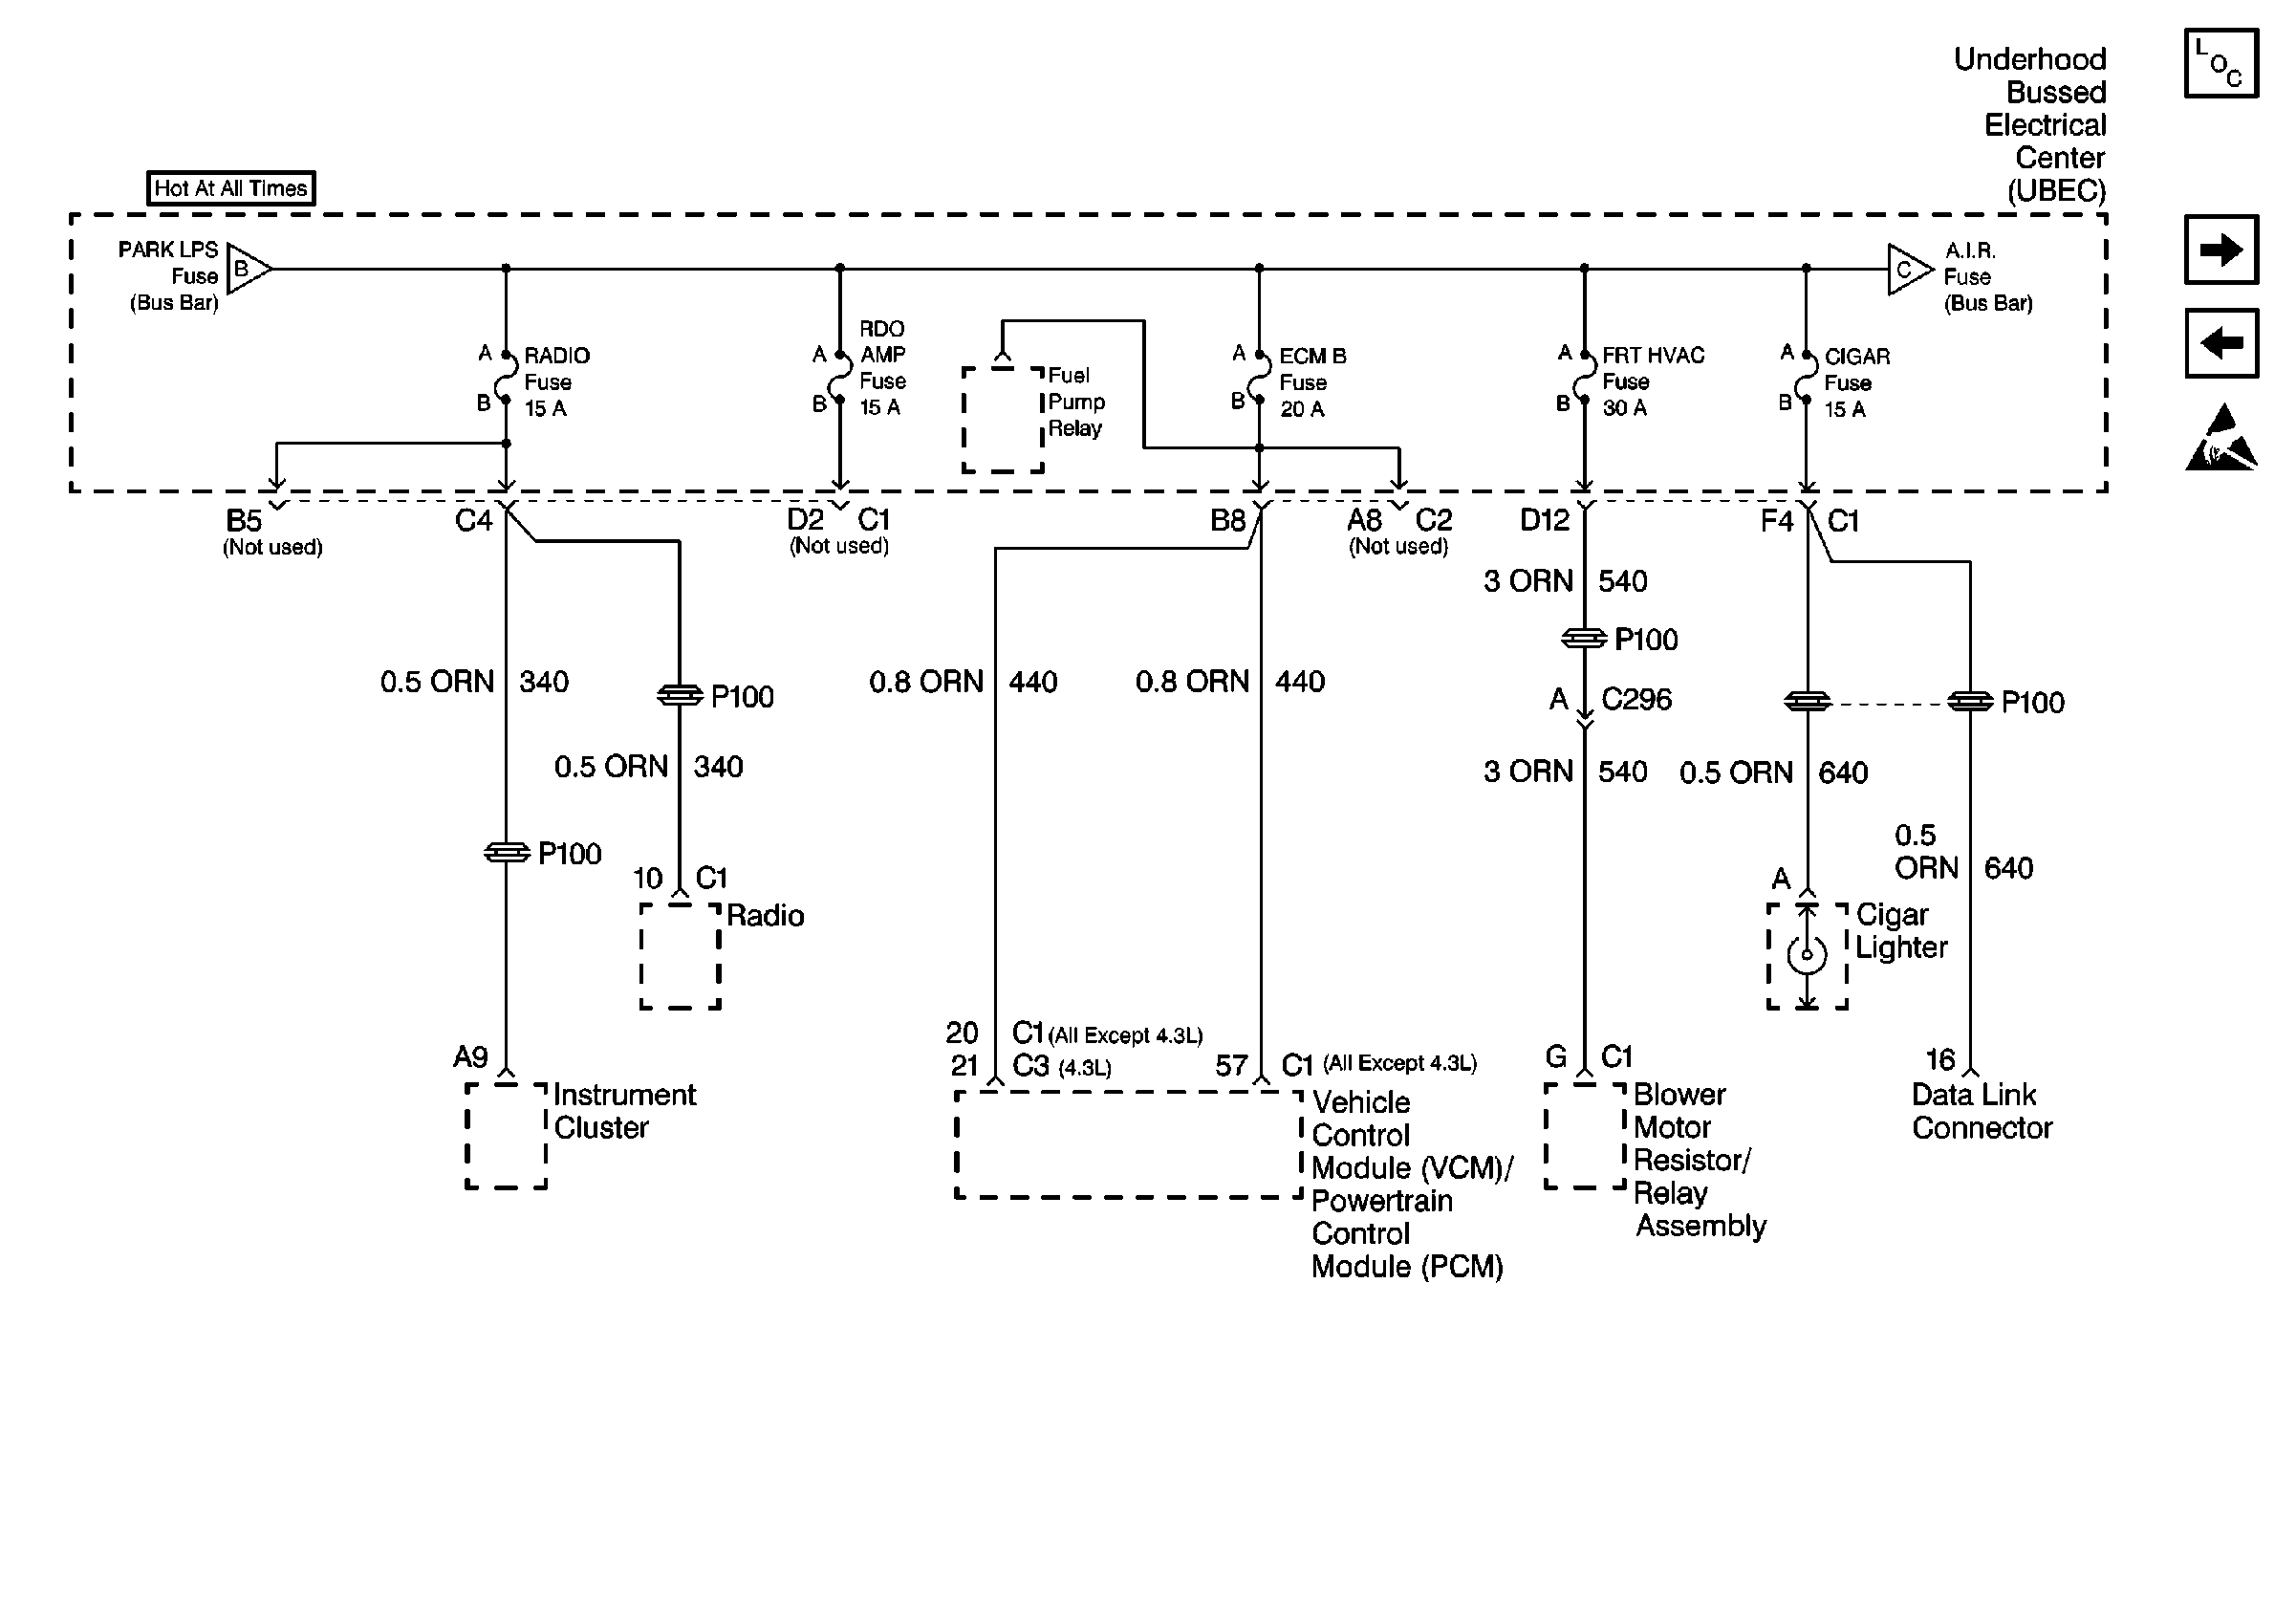
  4. This step determines if CKT 340 is shorted to ground and opens the RADIO fuse.

  5. This step determines if CKT 340 is still shorted to ground or if CKT 340 was an intermittent problem.

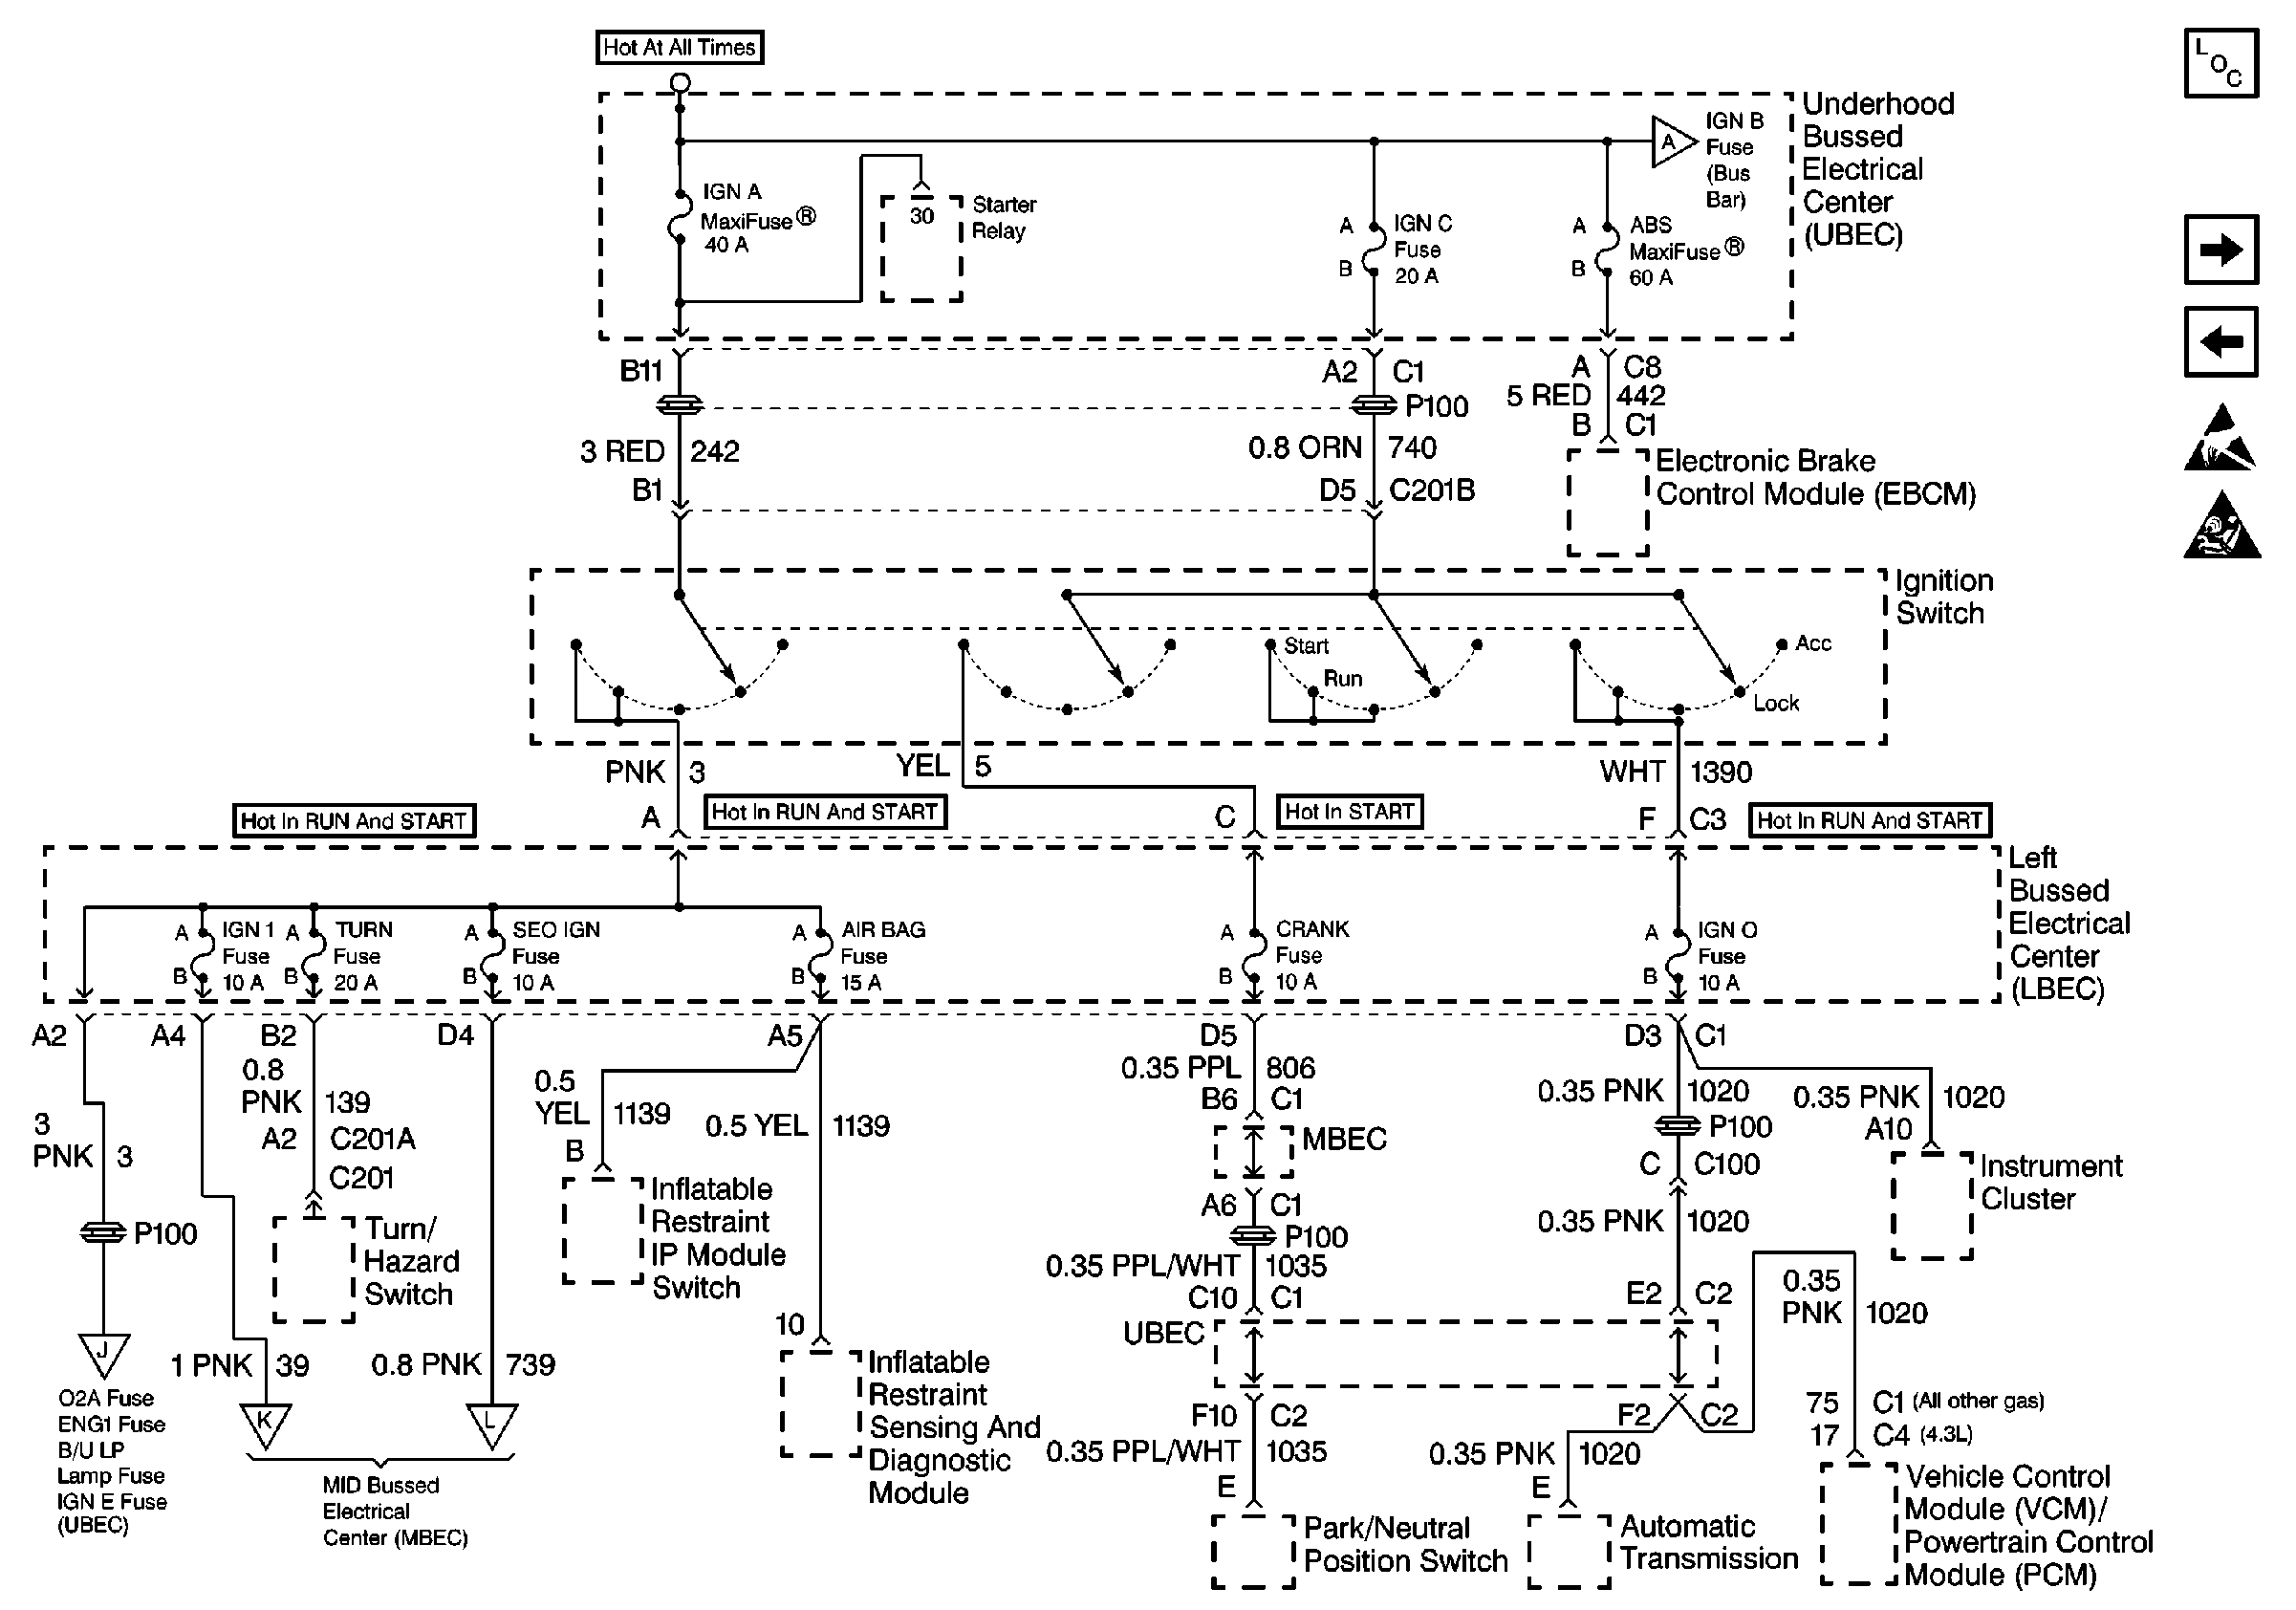
  6. This step determines if CKT 1020 is shorted to ground and opens the IGN 0 fuse.

  7. This step determines if CKT 1020 is still shorted to ground or if CKT 1020 was an intermittent problem.

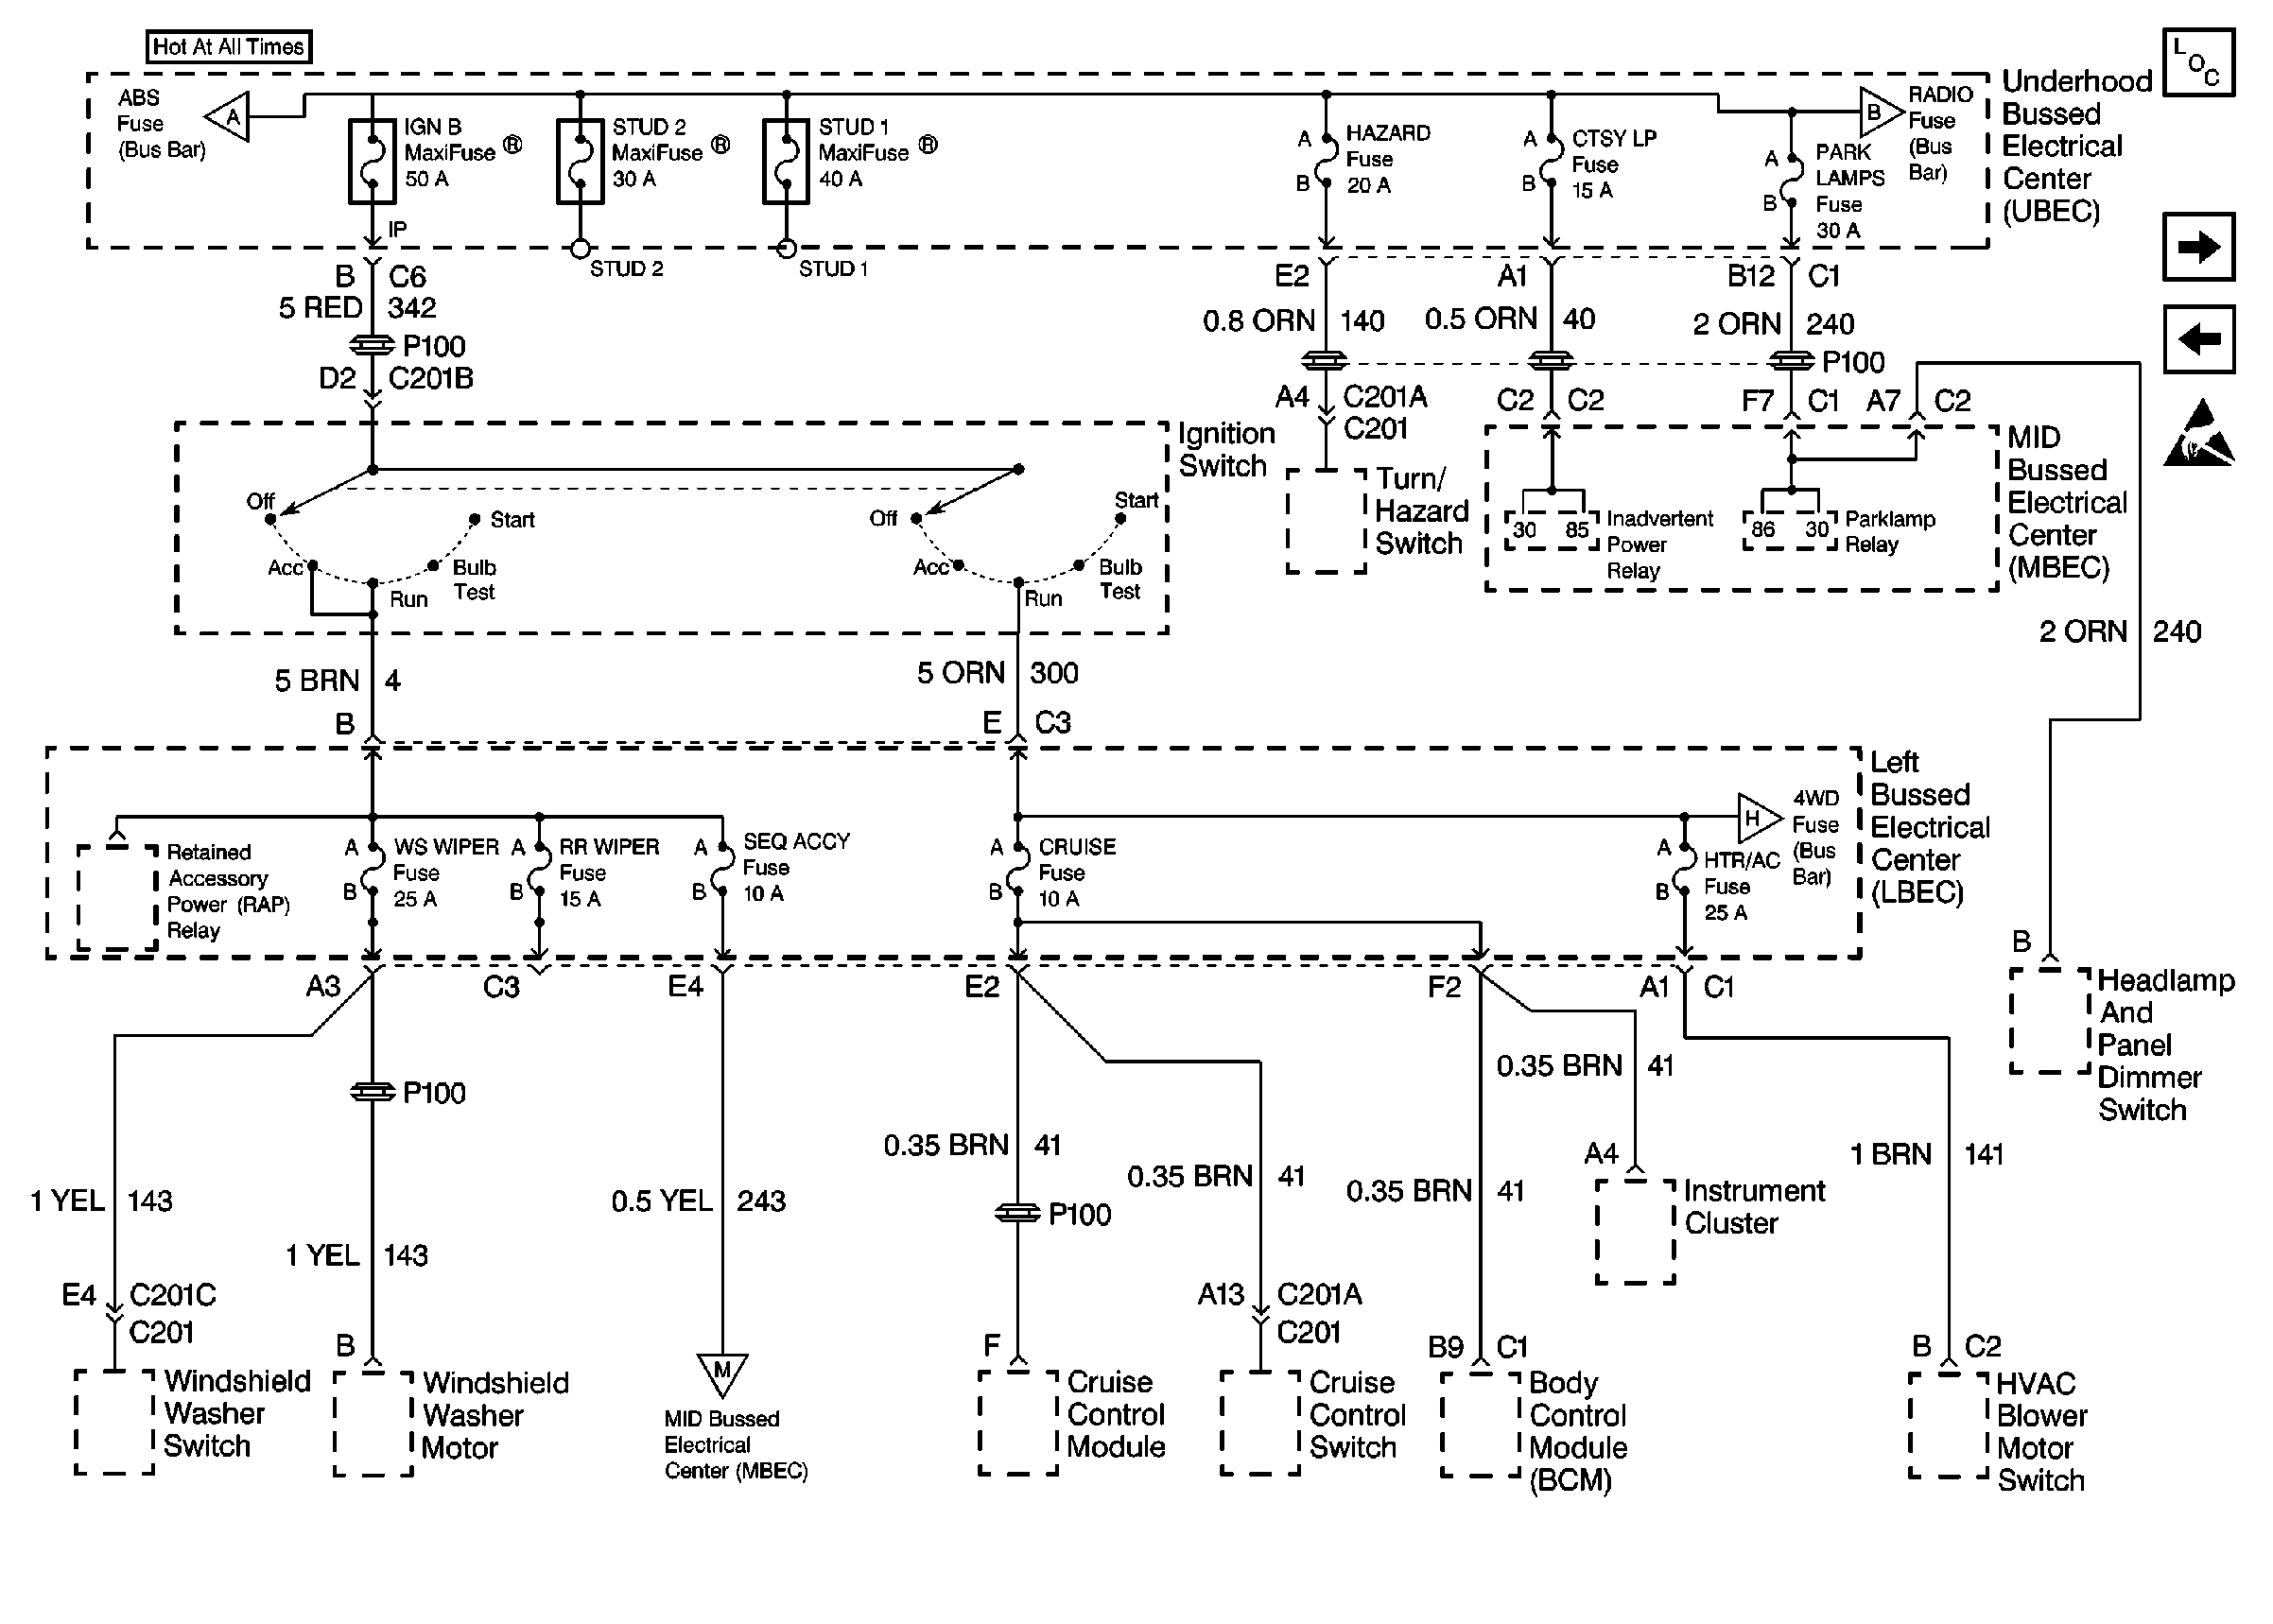
  8. This step determines if CKT 41 is shorted to ground and opens the CRUISE fuse.

  9. This step determines if CKT 41 is still shorted to ground or if it was an intermittent problem.

  10. This step determines if CKT 39 is shorted to ground and opens the IGN 1 fuse.

  11. This step determines if CKT 39 is still shorted to ground or if it was an intermittent problem.

  12. This step determines if the IPC CKT 1020 is open between the IPC and the IGN 0 fuse.

  13. This step determines if the IPC CKT 1020 is shorted to battery between the IPC and the IGN 0 fuse.

  14. This step determines if the IPC CKT 340 is open between the IPC and the RADIO fuse.

  15. This step determines if the IPC ground CKT 451 is open

  16. This step determines if the IPC CKT 41 is open between the IPC and the CRUISE fuse.

  17. This step determines if the IPC CKT 39 is open between the IPC and the IGN 1 fuse.

  18. This step determines if the IPC class 2 CKT 1036/1132 is open between the IPC and the data line connector.

Step

Action

Value(s)

Yes

No

1

  1. Turn the ignition switch to the RUN position.
  2. Plug the scan tool in to the data link connector.
  3. Power up the scan tool.

Does the scan tool power up?

--

Go to Step 2

Go to Scan Tool Does Not Communicate with Class 2 Data Line

2

With the scan tool, attempt to establish communications with the IPC.

Does the scan tool communicate with the IPC?

--

Go to Instrument Cluster System Check

Go to Step 3

3

Attempt to establish communications with other class 2 systems (i.e. vehicle control module, (VCM), powertrain control module (PCM), body control module (BCM).

Does the scan tool communicate with other class 2 systems?

--

Go to Step 4

Go to Scan Tool Does Not Communicate with Class 2 Data Line in wiring systems.

4

Inspect the RADIO fuse located in the underhood bussed electrical center (UBEC).

Is the RADIO fuse open?

--

Go to Step 5

Go to Step 7

5

  1. Turn the ignition switch to the OFF position.
  2. Replace the open fuse.
  3. Inspect the RADIO fuse.

Is the RADIO fuse open.

--

Go to Step 6

Go to Intermittents and Poor Connections Diagnosis

6

  1. CKT 340 (ORN) is shorted to ground. Refer to

    Cell 10: Underhood Bussed Electrical Center, Data Link Connector


    Object Number: 295485  Size: FS
    Power and Grounding Components
    Cell 10: Underhood Bussed Electrical Center, Electronic Brake Control ModuLe
    Cell 10: Underhood Bussed Electrical Center, Bussed Fuses
    Handling ESD Sensitive Parts Notice
    in wiring system to determine what other components are on the CKT 340 (ORN).
  2. Disconnect each component one at a time to determine which one is shorted to ground. If all the components are OK, locate and repair the short to ground in the CKT 340 (ORN).

Is the repair complete?

--

Go to Step 31

--

7

Check the IGN 0 fuse located in the left bussed electrical center (LBEC).

Is the IGN 0 fuse open?

--

Go to Step 8

Go to Step 10

8

  1. Turn the ignition switch to the OFF position.
  2. Replace the open fuse.
  3. Start the engine and then turn the engine off.
  4. Recheck the IGN 0 fuse.

Is the IGN 0 fuse open?

--

Go to Step 9

Go to Intermittents and Poor Connections Diagnosis

9

  1. CKT 1020 (PNK) is shorted to ground. Refer to

    Cell 10: Underhood Bussed Electrical Center, Electronic Brake Control Module


    Object Number: 293713  Size: FS
    Power and Grounding Components
    Cell 10: Underhood Bussed Electrical Center, Headlamp Dimmer Switch
    Cell 10: Underhood Bussed Electrical Center, Data Link Connector
    Handling ESD Sensitive Parts Notice
    SIR Caution
    Cell 10: Underhood Bussed Electrical Center, HVAC Blower Switch
    Cell 10: Underhood Bussed Electrical Center, Bussed Fuses
    Cell 10: A/C Compressor Relay, Auxiliary Power Outlet
    Cell 10: Underhood Bussed Electrical Center, Automatic Transfer Case
    in wiring system to determine what other components are on the CKT 1020 (PNK) circuit.
  2. Disconnect each component one at a time to determine which one is shorted to ground. If all the components are OK, locate and repair the short to ground in the CKT 1020 (PNK).

Is the repair complete?

--

Go to Step 31

--

10

Check the CRUISE fuse located in the left bussed electrical center (LBEC).

Is the CRUISE fuse open?

--

Go to Step 11

Go to Step 13

11

  1. Turn the ignition switch to the OFF position.
  2. Replace the open fuse.
  3. Turn the ignition switch to the RUN position.
  4. Recheck the CRUISE fuse.

Is the CRUISE fuse open?

--

Go to Step 12

Go to Intermittents and Poor Connections Diagnosis

12

  1. CKT 41 (BRN) is shorted to ground. Refer to

    Cell 10: Underhood Bussed Electrical Center, HVAC Blower Switch


    Object Number: 293754  Size: FS
    Power and Grounding Components
    Cell 10: A/C Compressor Relay, Auxiliary Power Outlet
    Cell 10: Left Bussed Electrical Center, Electronic Brake Control Module
    Handling ESD Sensitive Parts Notice
    Cell 10: Underhood Bussed Electrical Center, Electronic Brake Control ModuLe
    Cell 10: Underhood Bussed Electrical Center, Data Link Connector
    Cell 10: Left Bussed Electrical Center, Electronic Brake Control Module
    Cell 10: Underhood Bussed Electrical Center, Automatic Transfer Case
    in wiring system to determine what other components are on the CKT 41 (BRN).
  2. Disconnect each component one at a time to determine which one is shorted to ground. If all the components are OK, locate and repair the short to ground in the CKT 41 (BRN).

Is the repair complete?

--

Go to Step 31

--

13

Check the IGN 1 fuse located in the left bussed electrical center (LBEC).

Is the IGN 1 fuse open?

--

Go to Step 14

Go to Step 16

14

  1. Turn the ignition switch to the OFF position.
  2. Replace the open fuse.
  3. Start the engine and then turn the engine off.
  4. Recheck the IGN 1 fuse.

Is the IGN 1 fuse open?

--

Go to Step 15

Go to Intermittents and Poor Connections Diagnosis

15

  1. CKT 39 (PNK) is shorted to ground. Refer to

    Cell 10: Underhood Bussed Electrical Center, Electronic Brake Control Module


    Object Number: 293713  Size: FS
    Power and Grounding Components
    Cell 10: Underhood Bussed Electrical Center, Headlamp Dimmer Switch
    Cell 10: Underhood Bussed Electrical Center, Data Link Connector
    Handling ESD Sensitive Parts Notice
    SIR Caution
    Cell 10: Underhood Bussed Electrical Center, HVAC Blower Switch
    Cell 10: Underhood Bussed Electrical Center, Bussed Fuses
    Cell 10: A/C Compressor Relay, Auxiliary Power Outlet
    Cell 10: Underhood Bussed Electrical Center, Automatic Transfer Case
    in wiring system to determine what other components are on the CKT 39 (PNK).
  2. Disconnect each component one at a time to determine which one is shorted to ground. If all the components are OK locate and repair the short to ground in the CKT 39 (PNK).

Is the repair complete?

--

Go to Step 31

--

16

  1. Turn the ignition switch to the OFF position.
  2. Disconnect the IPC connector and remove the connector combs.
  3. Turn the ignition switch to the RUN position.
  4. Backprobe (to prevent damage to the terminal) with a DMM J 39200 and measure the voltage between the CKT 1020 (PNK) cavity A10 and ground.

Does the DMM display battery voltage?

9-16 volts

Go to Step 17

Go to Step 23

17

  1. The DMM still connected between the PNK (1020) wire cavity A10 and ground.
  2. Turn the ignition switch to the OFF position.

Does the DMM display battery voltage?

9-16 volts

Go to Step 27

Go to Step 18

18

  1. Turn the ignition switch to the RUN position.
  2. Backprobe (to prevent damage to the terminal) with a DMM J 39200 and measure the voltage between the CKT 340 (ORN) cavity A9 and ground.

Does the DMM display battery voltage?

9-16 volts

Go to Step 19

Go to Step 24

19

Back probe (to prevent damage to the terminal) with a DMM J 39200 and measure the voltage between the IPC connector CKT 340 (ORN) cavity A9 to CKT 451 (BLK/WHT) cavity A8.

Does the DMM display battery voltage?

9-16 volts

Go to Step 20

Go to Step 25

20

Backprobe (to prevent damage to the terminal) with a DMM J 39200 and measure the voltage between the CKT BRN (41) wire cavity A4 and ground.

Does the DMM display battery voltage?

9-16 volts

Go to Step 21

Go to Step 29

21

Backprobe (to prevent damage to the terminal) with a DMM J 39200 and measure the voltage between the CKT 39 (PNK) cavity B6 and ground.

Does the DMM display battery voltage?

9-16 volts

Go to Step 22

Go to Step 28

22

With a DMM J 39200 measure the resistance between the CKT 1036/1132 (GRY) cavity A5 of the IPC connector and cavity 2 of the data line connector.

Is the resistance within a specified range?

0-5 ohms

Go to Step 30

Go to Step 26

23

Locate and repair the open CKT 1020 (PNK) between the IPC and the IGN 0 fuse.

Is the repair complete?

--

Go to Step 31

--

24

Locate and repair open CKT 340 (ORN) between the IPC and the RADIO fuse (located in the underhood bussed electrical center (UBEC).

Is the repair complete?

--

Go to Step 31

--

25

Locate and repair open CKT 451 (BLK/WHT) between the IPC and G103.

Is the repair complete?

--

Go to Step 31

--

26

Locate and repair open CKT 1036 (GRY) / CKT 1132 (PPL) between the IPC and the data link connector.

Is the repair complete?

--

Go to Step 31

--

27

Locate and repair the short to battery in CKT 1020 (PNK) between the IPC and IGN 0 fuse.

Is the repair complete?

--

Go to Step 31

--

28

Locate and repair the open in CKT 39 (PNK) between the IPC and IGN 1 fuse.

Is the repair complete?

--

Go to Step 31

--

29

Locate and repair the open in CKT 41 (BRN) between the IPC and CRUISE fuse.

Is the repair complete?

--

Go to Step 31

--

30

Replace the IPC Instrument Cluster Replacement

Is the repair complete?

--

Go to Step 31

--

31

  1. Turn the ignition switch to the OFF position.
  2. Reconnect all disconnected components.
  3. With the scan tool clear all DTCs.

Are all DTCs cleared?

--

Go to Instrument Cluster System Check

--