CAMPAIGN: AUTO TRANS REAR INTERNAL GEAR (REPLACE GEAR)

Subject: 4L80-E OR 4L80-EHD AUTOMATIC TRANSMISSION REAR INTERNAL GEAR
Models: 1992 Chevrolet and GMC C/K Trucks, P30 Trucks and G Vans
TO: ALL GENERAL MOTORS DEALERS:
General Motors of Canada Limited has detennined that certain 1992 Chevrolet and GMC C/K Trucks, P30 Trucks and G Vans equipped with 4L80-E or 4L80-EHD automatic transmissions may have a transmission rear intemal gear with an improper heat treat process. With extended use this may cause noisy operation, sluggish forward gear operation, no motion in reverse, and/or no motion in drive.
To coffect this condition, dealers are to replace the rear intemal gear.
VEHICLES INVOLVED:
Involved are CERTAIN 1992 Chevrolet and GMC C/K Trucks, P30 Trucks and G Vans equipped with 4L80-E or 4L80-EHD automatic transmissions and built within the following VIN breakpoints:
PLEASE CHECK DCS BEFORE PERFORMING CAMPAIGN TO ENSURE THAT THE VEHICLE IS AFFECTED. ONLY AFFECTED VIN'S WILL BE PAID.
Year Model Plant Plant Code From Through ---- ----- ----- ---------- ---- -------
1992 C/K - Pickup Oshawa "1" N1169360 N1232903 1992 C/K - Pickup Pontiac "E" NE120478 NE193625 1992 C/K - Pickup Fort Wayne "Z" NZ166138 NZ197510 1992 C/K - Blazer/ Janesville "J" NJ103310 NJ332337 Suburban/Crew Cab 1992 P30 Detroit "3" N3306269 N3312818 1992 G-Van Scarborough "4" N4119655 N4147403 1992 G-Van Lordstown "7" N7121335 N7132498
All affected vehicles have been identified by the VIN listing provided to involved dealers with this bulletin. Any dealer not receiving a listing was not shipped any of the affected vehicles.
DEALER CAMPAIGN RESPONSIBILITY:
Dealers are to perforrn this campaign on all involved vehicles at no charge to owners, regardless of kilometres traveled, age of vehicle, or ownership, from this time forward.
Whenever a vehicle subject to this campaign is taken into your new or used vehicle inventory, or it is in your dealership for service, you are to ensure the campaign coffection has been made before selling or releasing the vehicle.
Owners of vehicles recently sold from your new vehicle inventory are to be contacted by the dealer, and arrangements made to make the required modification according to instructions contained in this bulletin.
CAMPAIGN PROCEDURE:
Refer to Section 4 of the Service Policies and Procedures Manual for the detailed procedure on handling Product Campaigns. Dealers are requested to complete the campaign on all transfers as soon as possible.
OWNER NOTIFICATION:
All owners of record at the time of campaign release are shown on the attached computer listing and have been notified by first class mail from General Motors. The listings provided are for campaign activity only and should not be used for any other purpose.
PARTS INFORMATION:
Parts required to complete this campaign should be ordered through regular channels, as follows:
Quantity/ Part Number Description Vehicle ----------- ----------- ---------
8687940 Rear Intemal Gear Repair Package 1 (For Trans. Models: BMP, BNP, DNP, DPP, DRP, LLP, BYP, BZP)
8687939 Rear Intemal Gear Repair Package 1 (For Trans. Models: ABP, ACP, AFP, AJP, BAP BJP, MBP, MKP, MPP, BSP, BUP, MAP, MJP, MLP, MHP, DCP, DLP, HTP, TWP, TSP, LAP, LFP)
8683922 Greased Output Shaft Sleeve & Seal Assembly 1 (For C Trucks and G Vans with Trans. Models AJP, AFP, MJP, MKP, MLP, MPP, HTP and TSP)
10952315 Dexron II-E Automatic Transmission Fluid 6.6 Litres
Rear Internal Gear Repair Packages (P/N's 8687940 & 8687939) consist of two layers containing the following (order only one of these packages per vehicle depending on transmission model type (see following illustration for location of transmission model code):
1st Layer: Centre Support, Centre Support Bolt, Rear Intemal Gear, Pump Assembly Bolts, Filter Assembly, Converter Seal Assembly, Fourth Clutch Bolt, Small Package with Oil Fill Tube Multi-Lip Seal, Manual Shift Shaft Seal Assembly and Force Motor Feed Filter Assembly.
2nd Layer: (Under Cardboard Insert) Centre Support Seal Rings, Pump Gasket, Pump Sep-1, Rear Servo Cover Gasket, and Valve-Body-To-Case Gasket.
Notice: The previous centre support and rear internal gear must be discarded after the normal warranty retention period. Do not reuse these parts. Also, some parts in kits 8687939 and 8687940 will not be installed as part of the procedures in this bulletin.
PARTS AND LABOUR CLAIM INFORMATION:
Credit for the campaign work perforrned will be paid upon receipt of a properly completed campaign claim card or DCS transn-tission in accordance with the following:
Time Repair Code Description Allowance
2A Install New Rear Internal Gear - C Truck - 4.5 Sleeve & Seal Assembly Not Required
3A Install New Rear Internal Gear - C Truck - 4.7 Sleeve & Seal Assembly ReQuired
4A Install New Rear Intemal Gear - C Truck Heavy Duty 4.7
5A Install New Rear Internal Gear - K Truck - 5.9 Without Skid Plate
9A Install New Rear Internal Gear - K Truck 6.2 With Skid Plate
AA Install New Rear Intemal Gear - G Van - 4.2 Sleeve & Seal Assembly Not Required
BA Install New Rear Intemal Gear - G Van - 4.4 Sleeve & Seal Assembly Reguired CA Install New Rear Intemal Gear - P Truck 4.7
Repair Codes 2A, 3A, 4A, 5A, 9A, AA, BA and CA include 0.3 hrs. for test driving vehicle after campaign repair is performed and $19.84 for 6.6 litres of transmission fluid.
Time allowance includes 0.1 hour for dealer administrative detail associated with this campaign. Parts credit will be based on dealer net plus 30% to cover parts handling.
SERVICE PROCEDURE:
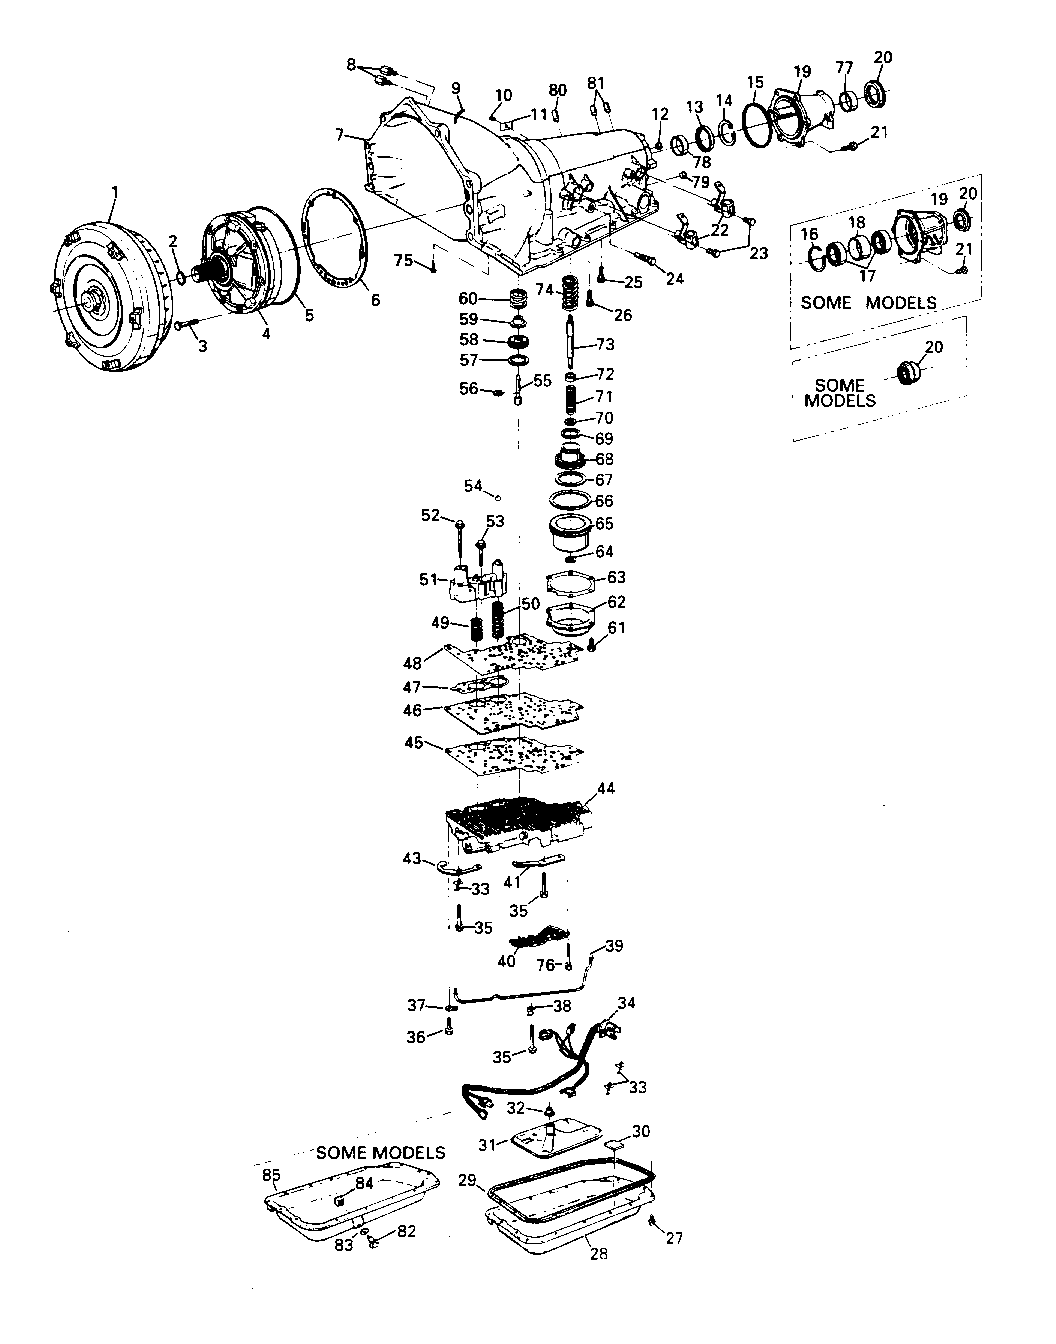
Numbers in parenthesis refer to figures on pg 6 - 12
Tools Required: J-21366 Converter Holding Strap J-3289-20 Transmission Holding Fixture Base J-8763-02 Transmission Holding Fixture J-38655 Transmission Holding Fixture Adapter J-37789 Pump Removal Tool J-38868 Gear Unit Assembly Installer/Remover J-23093 Centre Support Tool J-24396 Intermediate Clutch Pack Alignment Tool J-38358-A Forward Clutch Assembly Remover & Installer J-23327 Forward Clutch Spring Compressor J-38733 Direct Clutch Assembly Remover/Installer J-38734 Intermediate Clutch Piston Compressor Adapter J-38735 Centre Support Seal Installer/Sizer/Pusher
1. Remove transmission from vehicle and install torque converter holding strap J-21366. When removing transn-tission, follow procedures in appropriate truck service manual.
NOTICE:
FOR STEPS 2.40, REFER TO THE SECTION OF THE 1992 LIGHT DUTY TRUCK UNIT REPAIR MANUAL REGARDING 4L80-E OR 4L80-EHD TRANSMISSIONS FOR DETAILED PROCEDURES AND ILLUSTRATIONS.
ALSO, BE CERTAIN TO INSPECT COMPONENTS FOR CRACKS AND OTHER DAMAGE DURING DISASSEMBLY AND REASSEMBLY OF TRANSMISSION.
2. Drain fluid from transmission and dispose of properly. 3. Remove two speed sensors (22) and bolts (23) with 8mm socket. 4. Mount transmission on bench fixture using J-3289-20 base, J-8763-02 holding fixture, and J-38655 adapter. 5. Remove converter assembly (1) after renioving torque converter holding strap J-21366.
Notice: Torque converter is extremely heavy (approx. 29 kilograms/65 lbs.), personal injury may result.
6. Remove turbine shaft 0-ring (2). 7. For C Trucks or G Vans equipped with transmission models AJP, AFP, MJP, MKP, MLP, MPP, HT?, and TSP remove six 15mm case extension bolts (21), extension assembly (19), extension-to-case seal (15), sleeve output shaft yoke seal (682) and seal output shaft (683). 8. Remove 10mm pan assembly bolts (27), remove pan (28 or 85 depending on model) and seal assembly (29).
Notice: Seal assembly (29) will be reused.
9. Remove filter assembly (3 1) and filter neck seal assembly (32). 10. Disconnect wire hamess assembly (34) at pass dirough connector in the case.
Notice: Use precautions to protect electrical pins fi-om damage.
To prevent electrical connector distress, do not pry off connectors from electrical components.
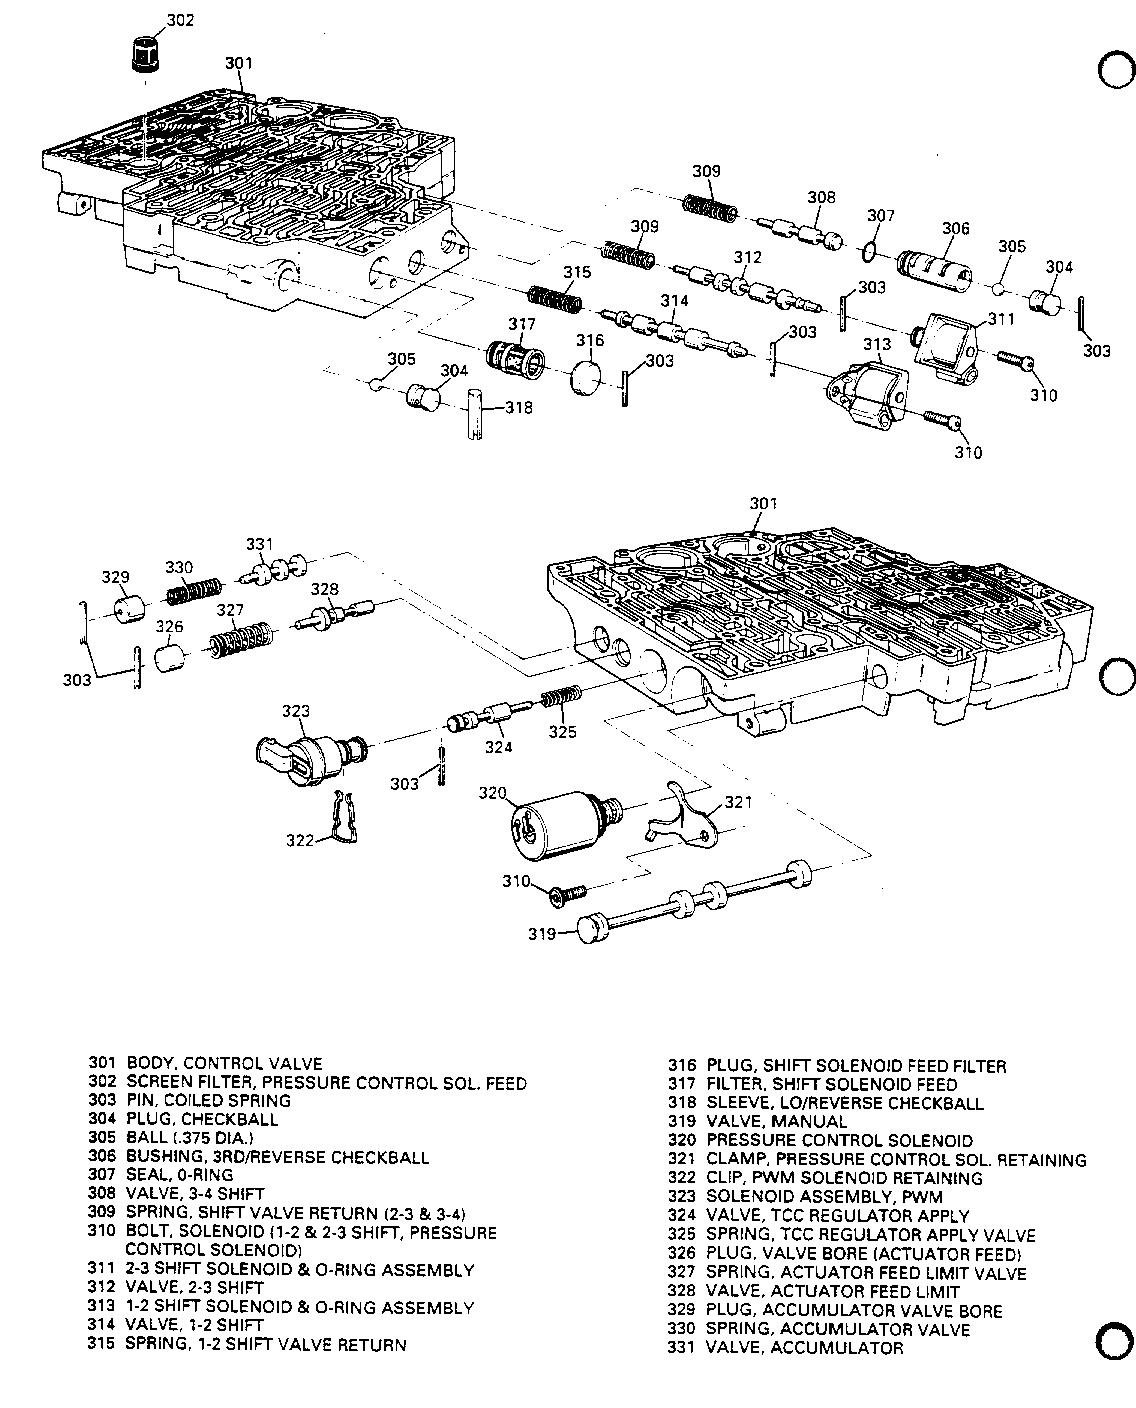
11. Remove hamess assembly with valve assembly complete. 12. Remove 21 valve body assembly bolts (35), manual detent spring and roller assembly (41), lube pipe (39), short lube pipe bolt (36), retainer (37), clamp (38), three wiring clips (33), indicator stop (43) control valve assembly (including accumulator housing) (44), six pressure switch bolts (76), pressure switch assembly (40) and check balls (54).
Notice: Do not use a magnet to remove check balls. Magnet could cause a check ball to become magnetized causing metal particles to stick to check ball.
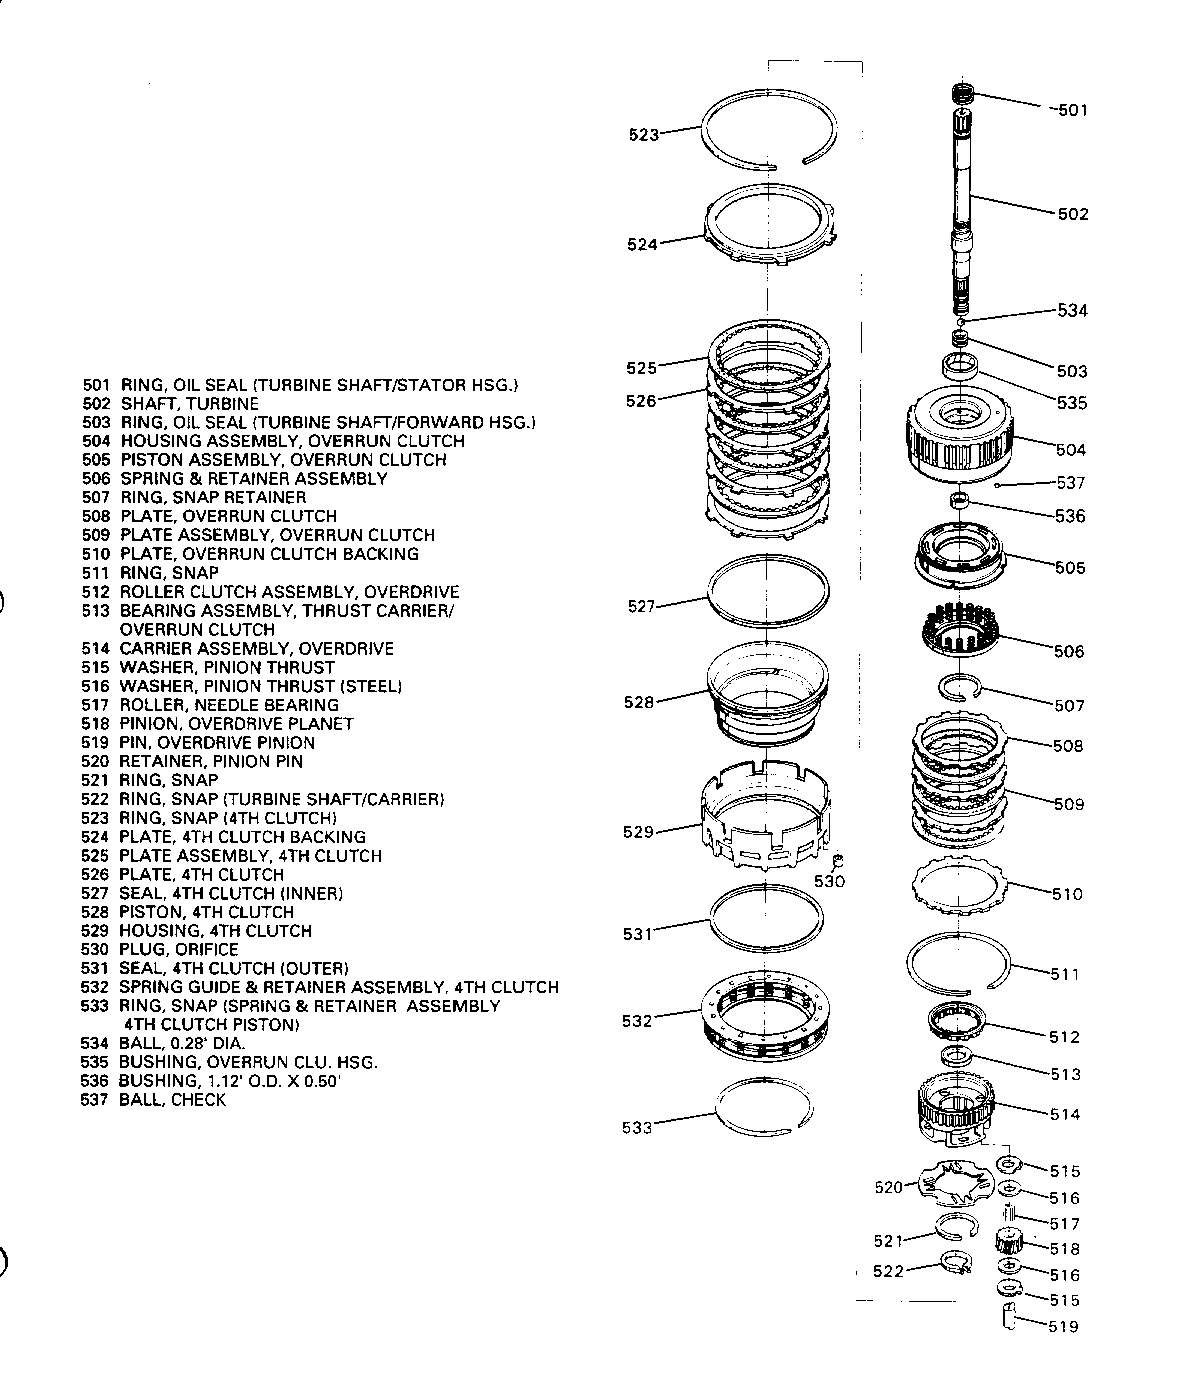
13. Remove valve-body-to-case gasket (48). 14. Remove manual valve (319) from control valve assembly to prevent damage to manual valve. 15. Remove front servo assembly (55-60). 16. Remove six 10mm rear servo accumulator cover bolts (61), rear servo accumulator cover (62), rear servo accumulator gasket (63) and rear servo accumulator assembly (64-74). 17. Remove 13nim pump assembly bolts (3), pump assembly (4), pump-to-case seal (5) and pump-cover-to-case gasket (6). Use J-37789 when removing pump assembly. 18. Remove complete overdrive unit (501-522). 19. Remove 4th clutch bolt (26) using 40t torx head socket. Bolt wfll not be reused. 20. Remove housing assembly (529). 21. Remove forward clutch assembly(602) using J-38358-A. 22. Remove thrust washer (612). 23. Remove direct clutch assembly (623) using J-38733. 24. Remove front band (628). 25. Remove snap ring (629), intermediate clutch backing plate (630) and clutch plates (631 & 632). 26. Remove centre support bolt (25). Bolt will not be reused. 27. Remove snap ring centre support (633) and gear unit assembly (634-671) using J-38868. 28. Disassemble gear unit and output assembly (634-67 1). 29. Install new seal rings (639) to new centre support (640) using J-38735. Reuse piston (636), seals (637 & 638), spring and retainer assembly (635), and snap ring (634) using J-23327 and J-38734 and install to centre support. 30. Install new rear internal gear (666) to main shaft (662) with snap ring (670). 31. Assemble gear unit and output assembly (634-67 1). 32. Install gear unit and output assembly (634-671) into case using J-38868 and also installing snap ring (633). 33. Align centre support (640) using J-23093. a. Locate J-23093 into centre support direct clutch passage through case. b. Apply pressure on J-23093, seating centre support splines counterclockwise against case splines (push tool toward rear servo bore). C. Install new centre support bolt (25) and torque to 43 N.m (32 lb. ft.). DO NOT OVER TORQUE. 34. Install interinediate clutch plates (632 & 631), backing plate (630) and snap ring (629). Backing plate is to be installed flat side down. Align clutch plates using J-24396.
Notice: Dip all clutch plates in Dexron II-E transmission fluid.
35. Install front band (628) and direct clutch assembly (623) using J-38733. 36. Install thrust washer. 37. Install forward clutch assembly (602) into case using J-38358-A. 38. Install 4th clutch assembly (529) into case and install new 4th clutch bolt (26). 39. Disassemble 4th clutch plates (525 & 526), backing plate (524) and snap ring (523) to ease installation of overdrive unit (Step 42). 40. Rotate transmission to horizontal position and torque 4th clutch bolt (26) to 15-17 N.m (I 1- 13 lb. ft.). DO NOT OVER TORQUE. 41. Install complete overdrive unit (501-522) into case. 42. Install 4th clutch plate (525 & 526), backing plate (524) and snap ring (523). Notice: Install steel plates with narrow tang at "one o'clock" position. 43. Install new pump gasket (6), new pump seal (5) and pump assembly (4) to case (7) with new bolts (3). Torque bolts to 24 N.m (18 lb. ft.) with 13mm socket. 44. Install turbine shaft 0-ring (2) to turbine shaft (502). 45. Install front servo assembly (55-60). 46. Install rear servo accumulator spring (74), servo parts (64-73), new rear servo accumulator gasket (63), rear servo accumulator cover (62) and 6 10mm rear servo accumulator bolts (61) into case (7). Torque rear servo accumulator bolts to 24 N.m (I 8 lb. ft.). 47. Install check balls (54) in proper location.
Notice: Do not use a magnet to install check balls. Magnet could cause a check ball to become magnetized and causing metal particles to stick to the ball.
48. Install new valve-body-to-case gasket (48). 49. Install manual valve (319) into valve body assembly. 50. Install valve body assembly/accumulator (44) and wiring harness assembly (34) onto case. 51. Make certain that 5 0-rings are attached to switch assembly. 52. Install spring and roller assembly (4 1) to valve body. 53. Install fluid indicator stop (43), wiring clips (33) lube pipe clamp (38) and lube pipe (39) to valve body. Long end of lube pipe (39) inserts into case (7) and short end inserts into valve body. 54. Install 21 valve body assembly bolts (35) and torque to I I N.m (97 lb. in.) using a 10mm socket. Be certain to torque bolts (35) in alphabetical sequence shown in illustration on Page 12. 55. Install pressure switch assembly (40) with 6 pressure switch assembly bolts (76). Torque bolts (76) to I I N.m (97 lb. in.) using an 8mm socket. Be certain to torque bolts in alphabetical sequence shown in illustration on Page 12. 56. Install lube pipe clip (37) to valve body with short bolt (36) and torque to 1 1 N.m (97 lb. in.) using 10mm socket. 57. Install wiring harness (34) to five or six connectors (if removed). 58. Install new filter assembly (31), filter neck seal assembly (32), reusable pan seal (29), pan (28 or 85 depending on model), and pan bolts (27). Torque pan bolts to 24 N.m (18 lb. ft.) using 10mm socket. 59. For C Trucks or G Vans with transmission models AJP, AFP, MJP, MKP, MLP, MPP, HTP, or TSP, install new sleeve output shaft yoke seal (682) and new seal output shaft (683) onto output shaft. Also, install extension assembly (19), seal (15) and six bolts (21). Torque bolts to 34 N.m (25 lb. ft.) using 15mm socket. 60. Install two speed sensors, bracket assemblies (22) and two bolts (23). Torque bolts to 11 N.m (97 lb. ft.) using 8mm socket. 61. Install torque converter assembly (1) and install holding strap J-21366.
Notice: Torque converter is extremely heavy (approx. 29 kilograms/65 lbs.), personal injury may result.
62. Remove transmission from bench fixture and install into vehicle 63. Disconnect holding strap J-21366. 64. Install transmission into vehicle. 65. Fill transmission to proper level per cold check procedure. 66. Test drive vehicle to ensure proper operation of transmission. 67. Check transmission fluid and fill to proper level when transmission is at proper temperature. 68. Install Campaign Identification Label.
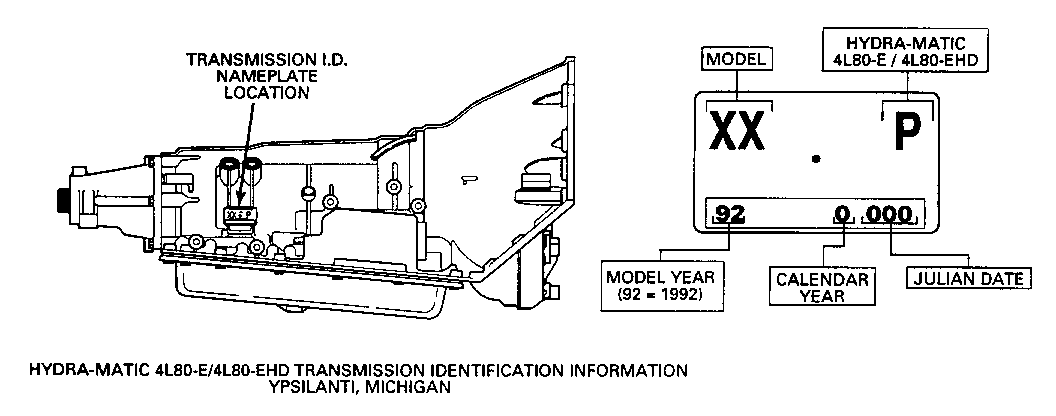
INSTALLATION OF CAMPAIGN IDENTIFICATION LABEL
Clean surface of radiator upper mounting panel and apply a Campaign Identification Label. Make sure the coffect campaign number is inserted on the label. This will indicate that the campaign has been completed.
THE FOLLOWING TEXT IS TO BE USED WITH THE FIGURES:
REFER TO FIGURE 2:
1 TORQUE CONVERTER ASSEMBLY 2 SEAL, O-RING (TURBINE SHAFTfrURBINE HUB) 3 BOLT & SEAL ASSEMBLY, PUMP TO CASE 4 PUMP ASSEMBLY, COMPLETE 5 SEAL, OIL PUMP TO CASE 6 GASKET, PUMP COVER TO CASE 7 CASE ASSEMBLY, COMPLETE 8 CONNECTOR, INVERTED FLARED TUBE 9 PIPE, VENT 10 SCREW, NAMEPLATE 1 1NAMEPLATE 12 CUP, ORIFICE W/SEALIPLUG-REAR LUBE (4WD) 13 SEAL ASSEMBLY, REAR LUBE 1 4RING, SNAP SEAL RETAINER 15 SEAL, EXTENSION TO CASE 16 RING, SNAP INTERNAL 17 BEARING ASSEMBLY, BALL 18 SPACER, BEARING 19 EXTENSION ASSEMBLY, CASE 20 HELIXSEAL ASSEMBLY, CASE EXTENSION 21 BOLT, HEX HD (MlO X 1.5 X 30.0) 22 SENSOR ASM, A/rRANS. INPUT SPD. & VEH. SPD. 23 BOLT, METRIC HEX 24 PLUG, OIL TEST HOLE (HEX HD 1/8 PIPE) 25 BOLT, CASE TO CENTER SUPPORT 26 BOLT, CASE (4TH CLUTCH) 27 BOLT, HEX FLANGE HD (PAN TO CASE) 28 PAN, TRANSMISSION OIL 29 SEAL, TRANS. OIL PAN 30 MAGNET, CHIP COLLECTOR 31 FILTER ASSEMBLY, TRANSMISSION OIL 32 SEAL ASSEMBLY, FILTER NECK 33 CLAMP, ELECTRICAL CABLE 34 HARNESS ASSEMBLY, ELECTRICAL WIRING 35 BOLT, HEX HD. (M6 X 1.0 X 55.0) 36 BOLT, M6 X 1.0 X 35.0 LG V/B TO C/P 37 RETAINER, LUBE PIPE 38 CLAMP, LUBE PIPE 39 PIPE, LUBE 40 SWITCH ASM., A/TRANS. FLUID PRESS. 41 SPRING ASSEMBLY, MANUAL DETENT 43 STOP, DIPSTICK (FLUID LEVEL INDICATOR) 44 BODY ASSEMBLY, CONTROL VALVE 45 GASKET, VALVE BODY TO SPACER PLATE 46 PLATE, VALVE BODY SPACER 47 GASKET, ACCUMULATOR HICG. TO SPACER PLATE 48 GASKET, SPACER PLATE TO CASE 49 SPRING, 4TH CLUTCH ACCUM. PISTON 50 SPRING, 3RD CLUTCH ACCUM. PISTON 51 HOUSING, ACCUMULATOR 52 BOLT, ACCUM. HOUSING TO VALVE BODY (LONG) 53 BOLT, ACCUM. HOUSING TO VALVE BODY (SHORT) 54 BALL,.25 DIAMETER 55 PIN, FRONT SERVO PISTON 56 RING, FRONT SERVO SPRING RETAINER 57 RING, OIL SEAL 58 PISTON, FRONT SERVO 59 RETAINER, FRONT SERVO SPRING 60 SPRING, FRONT SERVO PISTON 61 BOLT, REAR SERVO COVER 62 COVER, REAR SERVO 63 GASKET, REAR SERVO COVER 64 CLIP, RETAINING (BOTTOM) 65 PISTON, REAR SERVO 66 RING, OIL SEAL ACCUM .PISTON (OUTER) 67 RING, OIL SEAL ACCUM. PISTON (INNER) 68 PISTON, REAR ACCUMULATOR 69 SEAL, REVERSE SERVO PISTON 70 WASHER, SERVO PISTON 71 SPRING, REAR SERVO 72 RETAINER, REAR PISTON SPRING 73 PIN, REAR BAND APPLY (SELECTIVE) 74 SPRING, REAR ACCUMULATOR 75 SCREEN, PWM SOLENOID 76 BOLT, SPECIAL 77 BUSHING, CASE EXTENSION 78 BUSHING, TRANSMISSION CASE 79 PLUG, DIRECT OIL GAL (.25 DIA. CUP) 80 PIN, ANCHOR FRONT BAND 81 PIN, ANCHOR REAR BAND 82 DRAIN PLUG ASM., OIL PAN 83 WASHER, TYPE A FLAT GASKET 84 NUT, TRANS. OIL PAN DRAIN PLUG 85 PAN ASSEMBLY, TRANS. OIL
REFER TO FIGURE 3:
301 BODY, CONTROL VALVE 302 SCREEN FILTER, PRESSURE CONTROL SOL. FEED 303 PIN, COILED SPRING 304 PLUG, CHECKBALL 305 BALL (.375 DIA.) 306 BUSHING, 3RD/REVERSE CHECKBALL 307 SEAL, O-RING 308 VALVE, 3-4 SHIFT 309 SPRING, SHIFT VALVE RETURN (2-3 & 3-4) 310 BOLT, SOLENOID (1-2 & 2-3 SHIFT, PRESSURE CONTROL SOLENOID) 311 2-3 SHIFT SOLENOID & O-RING ASSEMBLY 312 VALVE, 2-3 SHIFT 313 1-2 SHIFT SOLENOID & O-RING ASSEMBLY 314 VALVE, 1-2 SHIFT 315 SPRING, 1-2 SHIFT VALVE RETURN 316 PLUG, SHIFT SOLENOID FEED FILTER 317 FILTER, SHIFT SOLENOID FEED 318 SLEEVE, LO/REVERSE CHECKBALL 319 VALVE, MANUAL 320 PRESSURE CONTROL SOLENOID 321 CLAMP, PRESSURE CONTROL SOL. RETAINING 322 CLIP, PWM SOLENOID RETAINING 323 SOLENOID ASSEMBLY, PWM 324 VALVE, TCC REGULATOR APPLY 325 SPRING, TCC REGULATOR APPLY VALVE 326 PLUG, VALVE BORE (ACTUATOR FEED) 327 SPRING, ACTUATOR FEED LIMIT VALVE 328 VALVE, ACTUATOR FEED LIMIT 329 PLUG, ACCUMULATOR VALVE BORE 330 SPRING, ACCUMULATOR VALVE 331 VALVE, ACCUMULATOR
REFER TO FIGURE 4:
501 RING, OIL SEAL (TURBINE SHAFT/STATOR HSG.) 502 SHAFT, TURBINE 503 RING, OIL SEAL (TURBINE SHAFT/FORWARD HSG.) 504 HOUSING ASSEMBLY, OVERRUN CLUTCH 505 PISTON ASSEMBLY, OVERRUN CLUTCH 506 SPRING & RETAINER ASSEMBLY 507 RING, SNAP RETAINER 508 PLATE, OVERRUN CLUTCH 509 PLATE ASSEMBLY, OVERRUN CLUTCH 510 PLATE, OVERRUN CLUTCH BACKING 511 RING, SNAP 512 ROLLER CLUTCH ASSEMBLY, OVERDRIVE 513 BEARING ASSEMBLY, THRUST CARRIER/OVERRUN CLUTCH 514 CARRIER ASSEMBLY, OVERDRIVE 515 WASHER, PINION THRUST 516 WASHER, PINION THRUST (STEEL) 517 ROLLER, NEEDLE BEARING 518 PINION, OVERDRIVE PLANET 519 PIN, OVERDRIVE PINION 520 RETAINER, PINION PIN 521 RING, SNAP 522 RING, SNAP (TURBINE SHAFT/CARRIER) 523 RING, SNAP (4TH CLUTCH) 524 PLATE, 4TH CLUTCH BACKING 525 PLATE ASSEMBLY, 4TH CLUTCH 526 PLATE, 4TH CLUTCH 527 SEAL, 4TH CLUTCH (INNER) 528 PISTON, 4TH CLUTCH 529 HOUSING, 4TH CLUTCH 530 PLUG, ORIFICE 531 SEAL, 4TH CLUTCH (OUTER) 532 SPRING GUIDE & RETAINER ASSEMBLY, 4TH CLUTCH 533 RING, SNAP (SPRING & RETAINER ASSEMBLY 4TH CLUTCH PISTON) 534 BALL, 0.28' DIA. 535 BUSHING, OVERRUN CLU. HSG. 536 BUSHING, 1.12' O.D. X 0.50' 537 BALL, CHECK
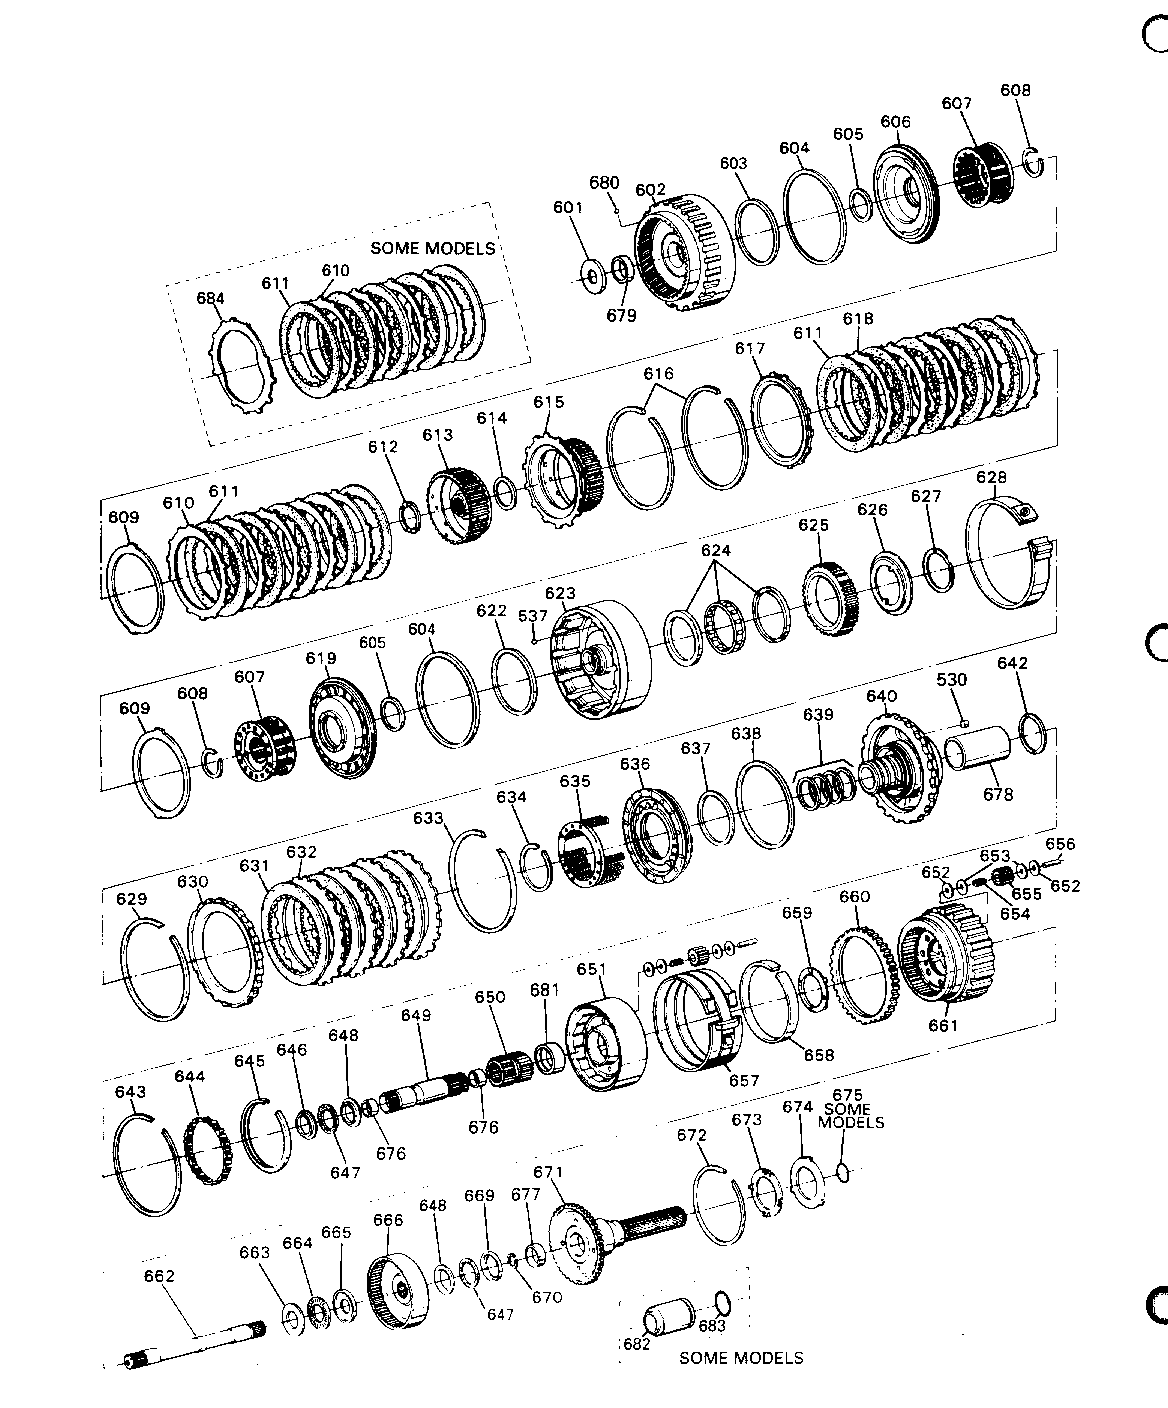
REFER TO FIGURE 5:
530 PLUG, ORIFICE CENTER SUPPORT 537 BALL, CHECK 601 BEARING ASM., THRUST CARRIER/FORWARD CLUTCH 602 HOUSING ASSEMBLY, FORWARD CLUTCH 603 SEAL, CLUTCH (CENTER) 604 SEAL, CLUTCH (OUTER) 605 SEAL, CLUTCH (INNER) 606 PISTON, FORWARD CLUTCH 607 SPRING & RETAINER ASSEMBLY 608 RING, SNAP 609 PLATE, CLUTCH (.054 DISHED) 610 PLATE, CLUTCH (.0775 FLAT) 611 PLATE ASSEMBLY, CLUTCH 612 WASHER, THRUST CLUTCH HUB HOUSING 613 HUB, FORWARD CLUTCH DRIVEN 614 WASHER, THRUST FORWARD CLUTCH 615 HUB, DIRECT CLUTCH DRIVING 616 RING, SNAP (6.24 O.D. X.062) 617 PLATE, DIRECT CLUTCH BACKING 618 PLATE, CLUTCH (.0915 FLAT) 619 PISTON, DIRECT CLUTCH 622 SEAL, CLUTCH (CENTER) 623 HOUSING, DIRECT CLUTCH 624 SPRAG ASSEMBLY, INTERMEDIATE CLUTCH 625 RACE, INTERMEDIATE CLUTCH (OUTER) 626 RETAINER, INTERMEDIATE CLUTCH 627 RING, EXTERNAL LOCKING 628 BAND ASSEMBLY, FRONT 629 RING, SNAP (INTERMEDIATE CLUTCH RETAINER) 630 PLATE, INTERMEDIATE CLUTCH BACKING 631 PLATE ASSEMBLY, INTERMEDIATE CLUTCH 632 PLATE, INTERMEDIATE CLUTCH 633 RING, SNAP CENTER SUPPORT/CASE 634 RING, SNAP INTERMEDIATE CLUTCH 635 SPRING & RETAINER ASM., INTERMEDIATE CLUTCH 636 PISTON, INTERMEDIATE CLUTCH 637 SEAL, INTERMEDIATE CLUTCH (INNER) 638 SEAL, INTERMEDIATE CLUTCH (OUTER) 639 RING, OIL SEAL 640 SUPPORT & RACE ASSEMBLY, CENTER 642 WASHER, THRUST SUPPORT/REACTION DRUM 643 SPACER, SUPPORT TO CASE 644 ROLLER CLUTCH ASSEMBLY 645 RING, REACTION DRUM SPACER 646 RACE, THRUST BEARING TO CENTER SUPPORT 647 BEARING, NEEDLE THRUST 648 RACE, THRUST BEARING 649 SHAFT ASSEMBLY, SUN GEAR 650 GEAR, SUN 651 DRUM & CARRIER ASSEMBLY, REACTION 652 WASHER, PINION THRUST (BRONZE) 653 WASHER, PINION THRUST (STEEL) 654 ROLLER, NEEDLE BEARING 655 PINION, PLANET 656 PIN, PLANET PINION 657 BAND ASSEMBLY, REAR BRAKE 658 RING, FRONT INTERNAL GEAR 659 WASHER, FRONT INTERNAL/REACTION CARRIER 660 RING, OUTPUT SPEED SENSOR 661 CARRIER ASSEMBLY, OUTPUT 662 SHAFT, TRANSMISSION MAIN 663 RACE, THRUST BEARING TO SUN GEAR 664 BEARING, NEEDLE THRUST RR INTERNAL GEAR 665 RACE, THRUST BEARING TO RR INTERNAL GEAR 666 GEAR, REAR INTERNAL 669 RACE, THRUST BEARING TO OUTPUT SHAFT 670 RING, SNAP MAINSHAFT INTERNAL GEAR 671 SHAFT & BUSHING ASSEMBLY, OUTPUT 672 RING, SNAP (OUTPUT SHAFT/ FRONT INTERNAL GEAR) 673 WASHER, THRUST 674 WASHER, THRUST SELECTIVE 675 SEAL, O-RING OUTPUT SHAFT 676 BUSHING, SUN GEAR SHAFT 677 BUSHING, OUTPUT SHAFT 678 BUSHING 679 BUSHING, 1.536' DIA. X 3.52" 680 BALL, CHECK 681 BUSHING, REACTION DRUM 682 SLEEVE, TRANS. OUTPUT SHAFT YOKE SEAL 683 SEAL, OUTPUT SHAFT 684 PLATE, CLUTCH (WAVED)
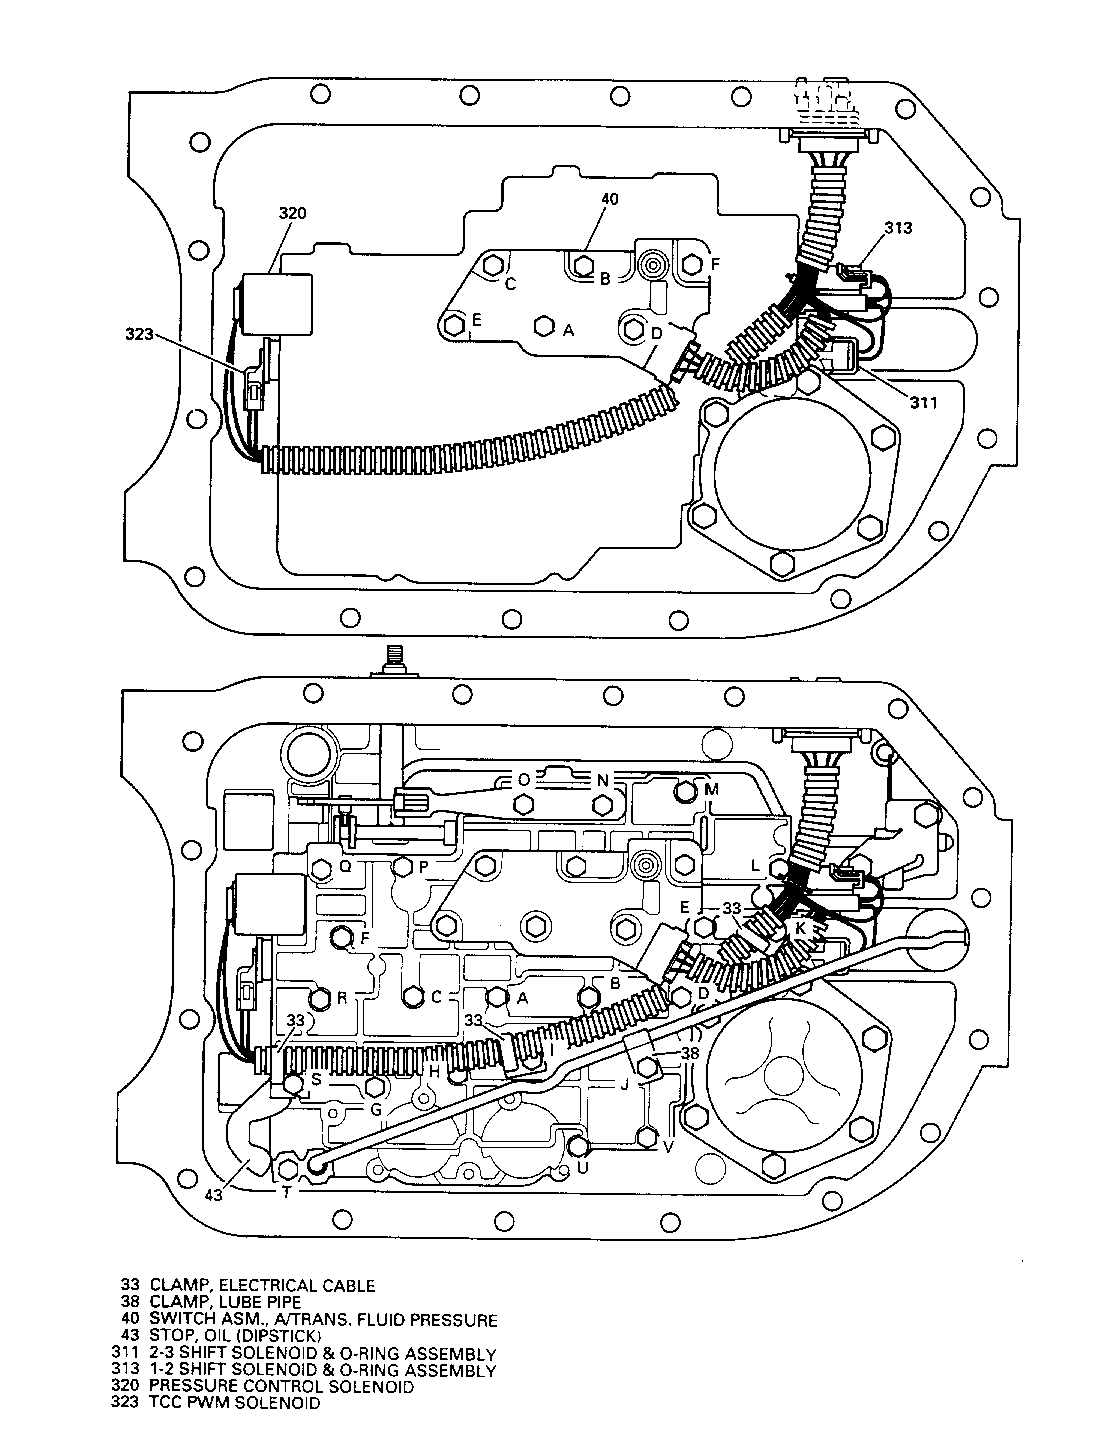
REFER TO FIGURE 6:
33 CLAMP, ELECTRICAL CABLE 38 CLAMP, LUBE PIPE 40 SWITCH ASM., A/TRANS. FLUID PRESSURE 43 STOP, OIL (DIPSTICK) 311 2-3 SHIFT SOLENOID & O-RING ASSEMBLY 313 1-2 SHIFT SOLENOID & O-RING ASSEMBLY 320 PRESSURE CONTROL SOLENOID 323 TCC PWM SOLENOID
General Motors bulletins are intended for use by professional technicians, not a "do-it-yourselfer". They are written to inform those technicians of conditions that may occur on some vehicles, or to provide information that could assist in the proper service of a vehicle. Properly trained technicians have the equipment, tools, safety instructions and know-how to do a job properly and safely. If a condition is described, do not assume that the bulletin applies to your vehicle, or that your vehicle will have that condition. See a General Motors dealer servicing your brand of General Motors vehicle for information on whether your vehicle may benefit from the information.
