DTC P2796 M33 Only
Circuit Description
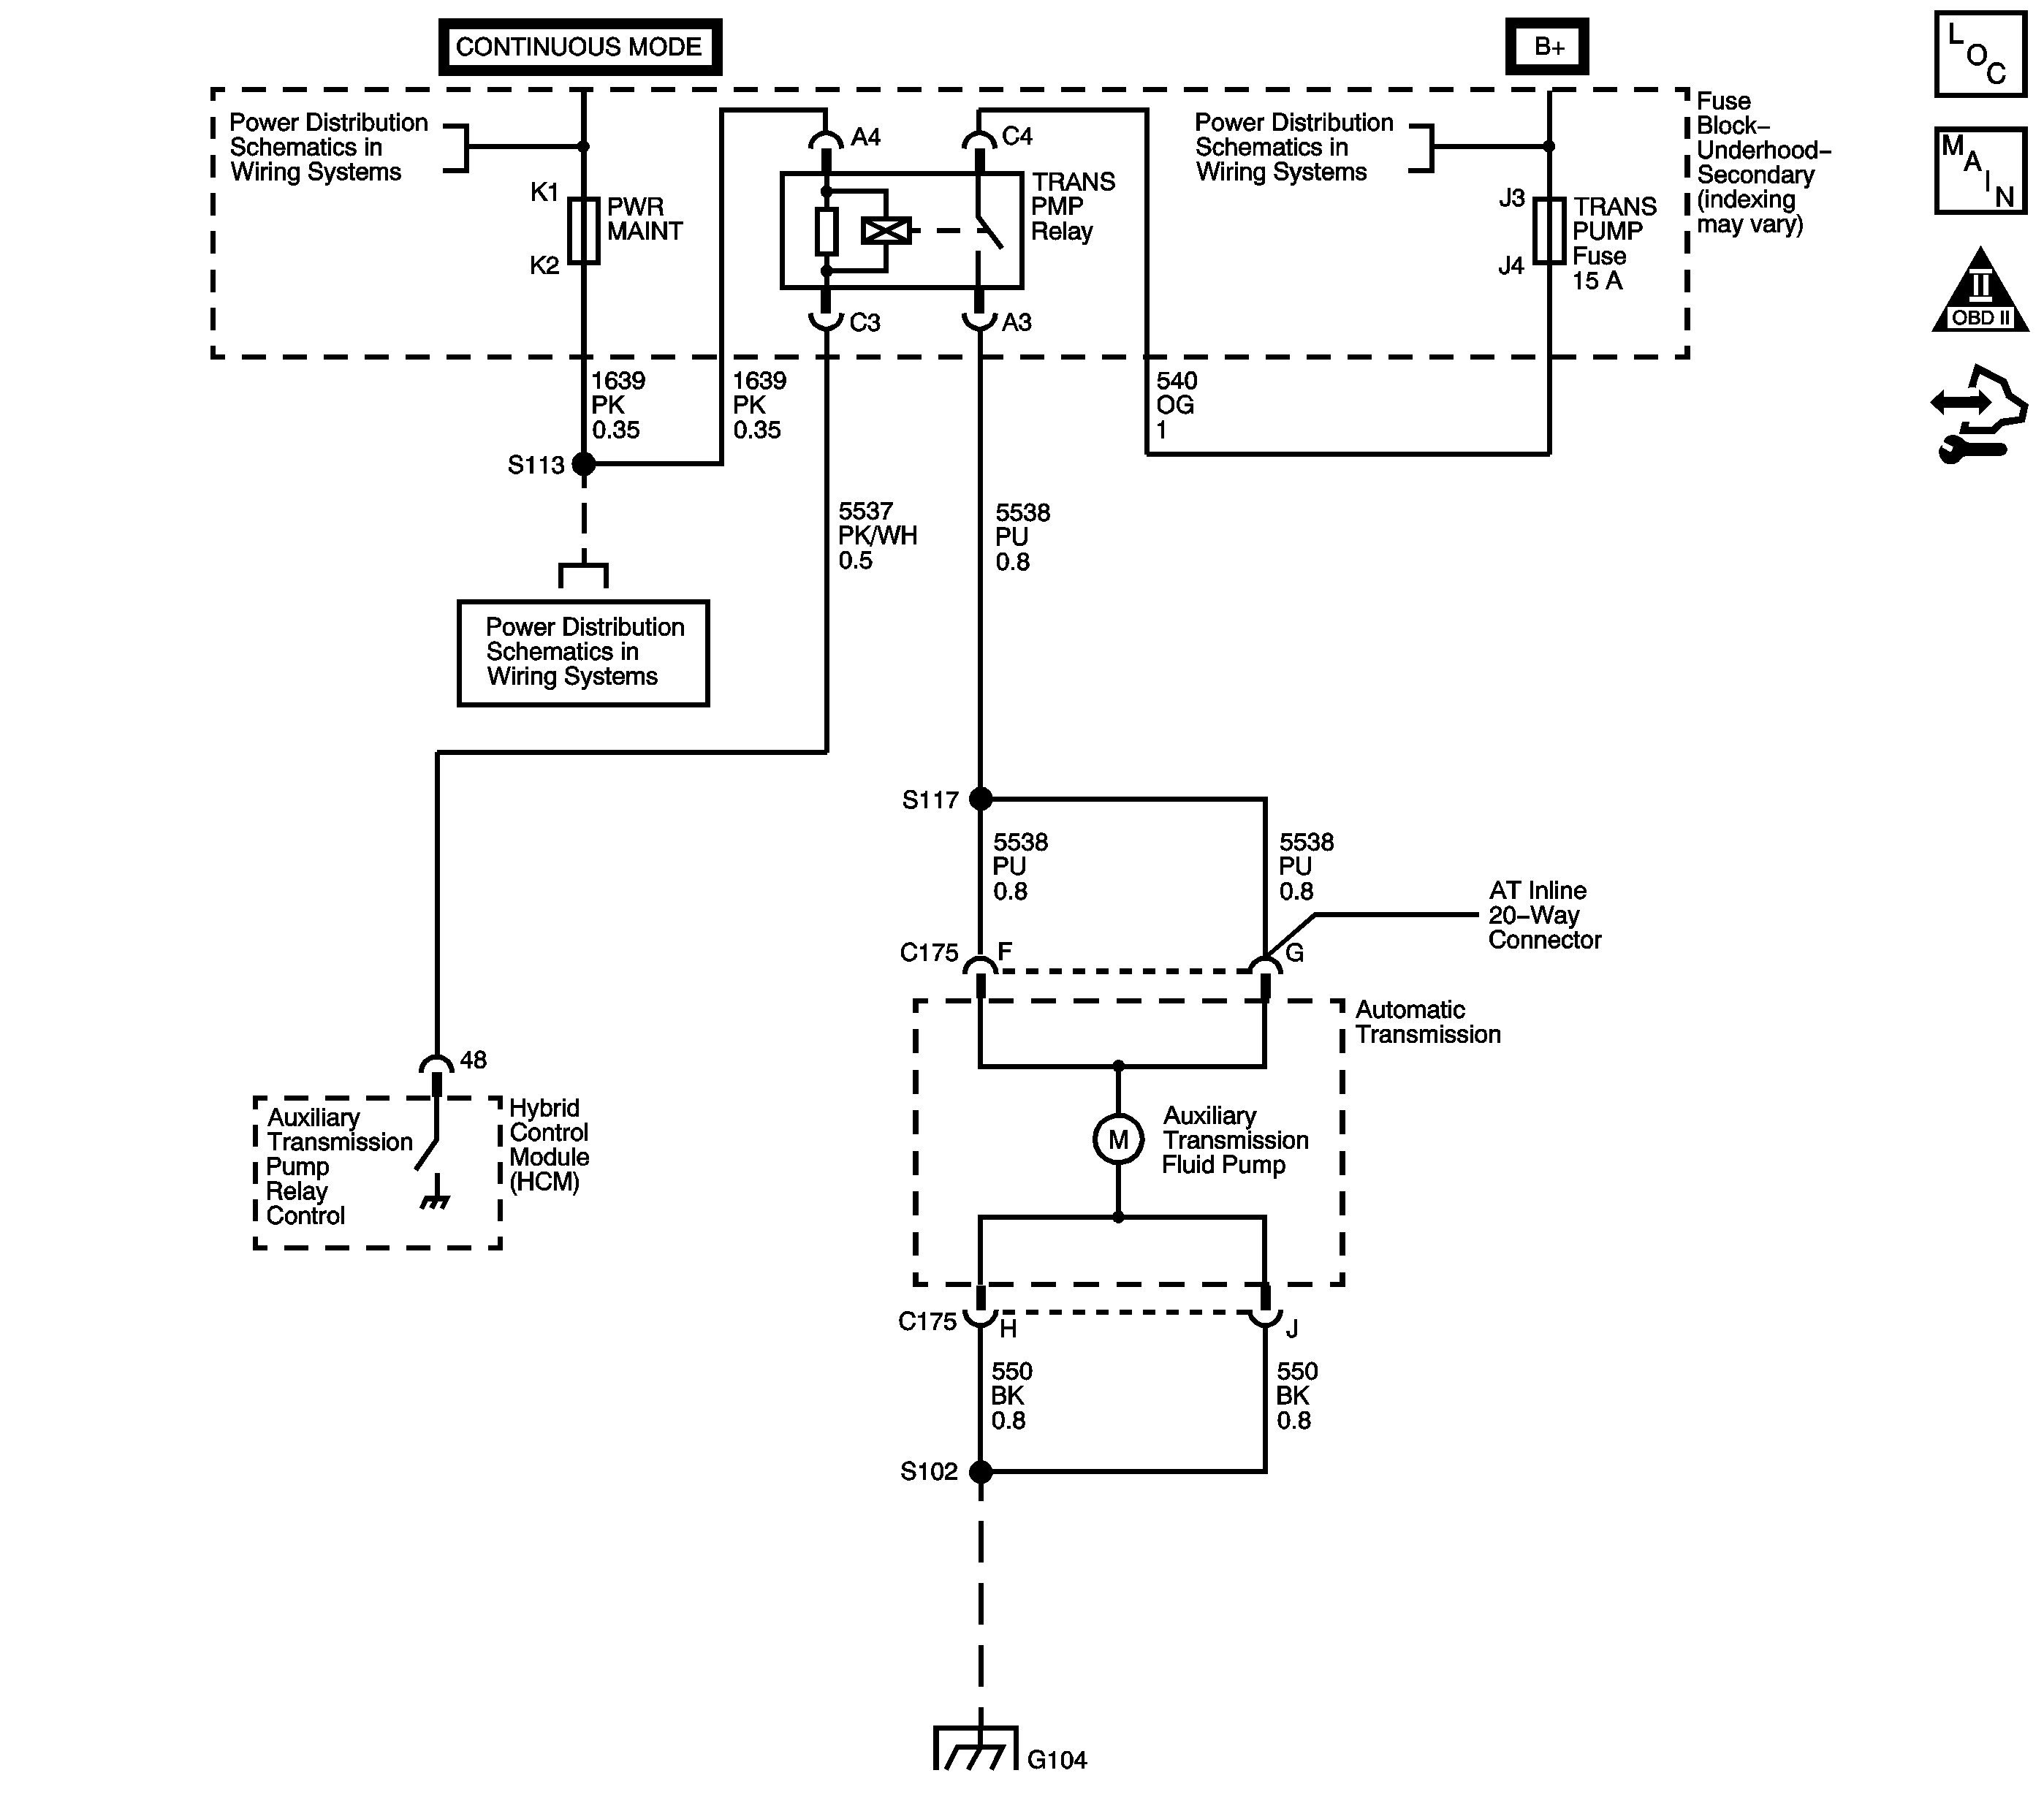
The Auxiliary Transmission Fluid Pump is an electrical device that is used with the Auxiliary Transmission Fluid Pump Relay to maintain Transmission Fluid line pressure to the forward clutch during Engine Idle Off mode. Engine Idle Off mode may also be referred to as PHT Engine Idle Off State. The Auxiliary Transmission Fluid Pump attaches to the transmission valve body assembly. The Auxiliary Transmission Fluid Pump Relay receives voltage through the Battery Positive voltage circuit. The Hybrid Control Module (HCM) controls the Auxiliary pump by providing the ground path on the Auxiliary Pump relay control circuit. The HCM monitors the Auxiliary Transmission Fluid pump relay control circuit voltage.
When the HCM detects a continuous open, short to ground or short to voltage in the Auxiliary Transmission pump circuit, then DTC P2796 sets. DTC P2796 is a type B DTC.
DTC Descriptor
This diagnostic procedure supports the following DTC:
DTC P2796 Auxiliary Transmission Fluid Pump Relay Control Circuit
Conditions for Running the DTC
| • | The system voltage is 10-18 volts. |
| • | Power Maintain relay is ON. |
| • | Accelerator pedal is not applied. |
| • | Hood switch is closed. |
| • | Vehicle is not in 4WD low. |
| • | 14-volt Bus load is less than 1.5 kw. |
| • | Skip impending is FALSE. |
| • | Engine speed is below 1000 RPM. |
| • | Not in EPTO continuous mode. |
| • | HVAC system is not requesting engine ON. |
| • | Engine run time is greater than 30 seconds. |
| • | Transmission is in D4, D3 or PARK for greater than 5 seconds. |
| • | Tow/Haul mode is not selected. |
| • | Transmission temperature is between 21-104°C (70-219°F). |
| • | More than 5 seconds has elapsed since the exit of the last IEO. |
| • | PRNDL is in D4, D3 and Brake Pedal is applied or PRNDL is in PARK. |
| • | Vehicle speed is less than 30 km/h (19 mph) then drops to 2 km/h (1 mph), or vehicle speed is greater than 30 km/h (19 mph) then drops to less than 20 km/h (12 mph). |
| • | If IAT is less than 10°C (50°F), ECT must be above 75°C (167°F). |
| • | If IAT is less than 15°C (59°F), ECT must be above 60°C (140°F). |
| • | If IAT is greater than 22°C (72°F), ECT must be between 45°C (113°F) and 150°C (302°F). |
| • | 42-Volt battery voltage is greater than 34-volt. |
| 42-Volt battery has enough state-of-charge to sustain EIO mode for greater than 15 seconds. |
Conditions for Setting the DTC
Condition 1
The HCM commands the relay ON and the voltage remains high, B+.
Condition 2
The HCM commands the relay OFF and the voltage feedback remains low, 0 volts.
Action Taken When the DTC Sets
| • | The PCM illuminates the malfunction indicator lamp (MIL) during the second consecutive trip in which the Conditions for Setting the DTC are met. |
| • | The HCM inhibits Auxiliary Transmission Fluid Pump Relay control output. |
| • | The PCM records the operating conditions when the Conditions for Setting the DTC are met. The PCM stores this information as Freeze Frame and Failure Records. |
| • | The PCM stores DTC P2796 in PCM history during the second consecutive trip in which the Conditions for Setting the DTC are met. |
Conditions for Clearing the MIL/DTC
| • | The PCM turns OFF the MIL during the third consecutive trip in which the diagnostic test runs and passes. |
| • | A scan tool can clear the MIL/DTC. |
| • | The PCM clears the DTC from PCM history if the vehicle completes 40 warm-up cycles without an emission-related diagnostic fault occurring. |
| • | The PCM cancels the DTC default actions when the fault no longer exists and/or the ignition switch is OFF long enough in order to power down the PCM. |
Diagnostic Aids
| • | The Auxiliary Transmission Fluid Pump Relay can be controlled using a Scan Tool. This feature is located in the HCM Output Controls on the scan tool. |
| • | For an intermittent condition, refer to Testing for Intermittent Conditions and Poor Connections in Wiring Systems. |
Test Description
The numbers below refer to the step numbers on the diagnostic table.
-
This step determines if the condition is located on the coil side or on the switch side of the Auxiliary Transmission Fluid pump relay.
-
This step verifies that the HCM is providing ground to the Auxiliary Transmission Fluid pump relay.
-
This step tests for an open in the ground circuit to the Auxiliary Transmission Fluid pump relay.
-
This step determines if a ground is constantly being applied to the Auxiliary Transmission Fluid pump relay.
Step | Action | Values | Yes | No |
|---|---|---|---|---|
1 | Did you perform the Diagnostic System Check - Vehicle? | -- | Go to Step 2 | Go to Diagnostic System Check - Vehicle in Vehicle DTC Information |
2 |
Listen for the Auxiliary Transmission Fluid Pump running. Can you hear the Auxiliary Transmission Fluid Pump running when you command it ON and OFF with a scan tool? | -- | Go to Diagnostic Aids | Go to Step 3 |
Command the auxiliary transmission fluid pump relay ON and OFF with a scan tool. Does the auxiliary transmission fluid pump relay turn ON and OFF when commanded with a scan tool? | -- | Go to Step 9 | Go to Step 4 | |
Refer to Probing Electrical Connectors in Wiring Systems. Does the test lamp turn ON and OFF when commanded with a scan tool? | -- | Go to Step 5 | Go to Step 6 | |
Does the test lamp turn ON and OFF when commanded with a scan tool? | -- | Go to Step 19 | Go to Step 22 | |
Does the test lamp remain illuminated? | -- | Go to Step 7 | Go to Step 8 | |
7 | Test the control circuit of the auxiliary transmission fluid pump relay for a short to ground. Refer to Circuit Testing and Wiring Repairs in Wiring Systems. Did you find and correct the condition? | -- | Go to Step 28 | Go to Step 27 |
8 | Test the control circuit of the auxiliary transmission fluid pump relay for an open or a short to voltage. Refer to Circuit Testing and Wiring Repairs in Wiring Systems. Did you find and correct the condition? | -- | Go to Step 28 | Go to Step 20 |
9 | Turn ON the ignition, with the engine OFF. Does the auxiliary transmission fluid pump operate continuously? | -- | Go to Step 10 | Go to Step 11 |
10 |
Does the auxiliary transmission fluid pump operate continuously? | -- | Go to Step 21 | Go to Step 26 |
11 | Inspect the Trans pump fuse. Is the Trans pump fuse open? | -- | Go to Step 12 | Go to Step 14 |
12 |
Refer to Circuit Testing and Wiring Repairs in Wiring Systems. Did you find and correct the condition? | -- | Go to Step 28 | Go to Step 13 |
13 |
Is the auxiliary transmission fluid pump fuse open? | -- | Go to Step 24 | Go to Testing for Intermittent Conditions and Poor Connections in Wiring Systems |
14 |
Does the test lamp illuminate? | -- | Go to Step 15 | Go to Step 23 |
15 | Connect a 15-amp fused jumper wire between the battery positive voltage circuit of the auxiliary transmission fluid pump relay switch and the voltage supply circuit of the auxiliary transmission fluid pump. Does the auxiliary transmission fluid pump operate? | -- | Go to Step 19 | Go to Step 16 |
16 | Test the voltage supply circuit of the auxiliary transmission fluid pump, between the auxiliary transmission fluid pump relay and the auxiliary transmission fluid pump for an open or for high resistance. Refer to Circuit Testing and Wiring Repairs in Wiring Systems. Did you find and correct the condition? | -- | Go to Step 28 | Go to Step 17 |
17 |
Important: Inspect the ground circuit for being tight, corrosion on terminals or damage to the wiring harness. Test the ground circuit of the auxiliary transmission fluid pump for an open or for high resistance. Refer to Circuit Testing and Wiring Repairs in Wiring Systems. Did you find and correct the condition? | -- | Go to Step 28 | Go to Step 18 |
18 | Test for an intermittent or for a poor connection at the auxiliary transmission fluid pump connector. Refer to Testing for Intermittent Conditions and Poor Connections and Connector Repairs in Wiring Systems. Did you find and correct the condition? | -- | Go to Step 28 | Go to Step 24 |
19 | Test for an intermittent or for a poor connection at the auxiliary transmission fluid pump relay. Refer to Testing for Intermittent Conditions and Poor Connections and Connector Repairs in Wiring Systems. Did you find and correct the condition? | -- | Go to Step 28 | Go to Step 26 |
20 | Test for an intermittent and for a poor connection at the harness connector of the HCM. Refer to Testing for Intermittent Conditions and Poor Connections and Connector Repairs in Wiring Systems. Did you find and correct the condition? | -- | Go to Step 28 | Go to Step 27 |
21 | Repair the short to voltage in the supply voltage circuit of the auxiliary transmission fluid pump. Refer to Wiring Repairs in Wiring Systems. Did you complete the repair? | -- | Go to Step 28 | -- |
22 | Repair the open in the auxiliary transmission fluid pump relay ignition voltage circuit. Refer to Wiring Repairs in Wiring Systems. Did you complete the repair? | -- | Go to Step 28 | -- |
23 | Repair the open in the ignition voltage circuit of the auxiliary transmission fluid pump relay. Refer to Wiring Repairs in Wiring Systems. Did you complete the repair? | -- | Go to Step 28 | -- |
24 | Test for an intermittent and for a poor connection at the auxiliary transmission fluid pump connector within the transmission. Refer to Testing for Intermittent Conditions and Poor Connections and Connector Repairs in Wiring Systems. Did you find and correct the conditions? | -- | Go to Step 28 | Go to Step 25 |
25 |
Refer to Secondary Fluid Pump Replacement . Did you complete the replacement? | -- | Go to Step 28 | -- |
26 | Replace the auxiliary transmission fluid pump relay. Did you complete the replacement? | -- | Go to Step 28 | -- |
27 | Replace the HCM. Refer to Control Module References in Computer/Integrating Systems for replacement, setup and programming. Did you complete the replacement? | -- | Go to Step 28 | -- |
28 | Operate the system in order to verify the repair. Did you correct the condition? | -- | System OK | Go to Step 2 |
