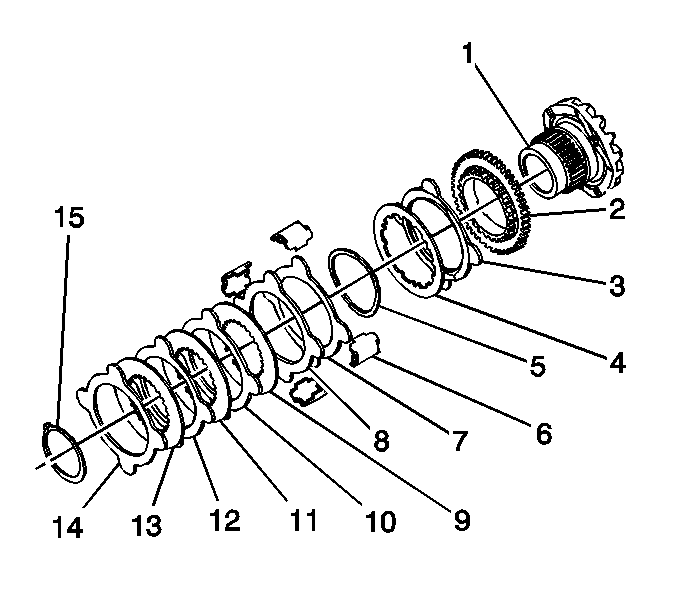
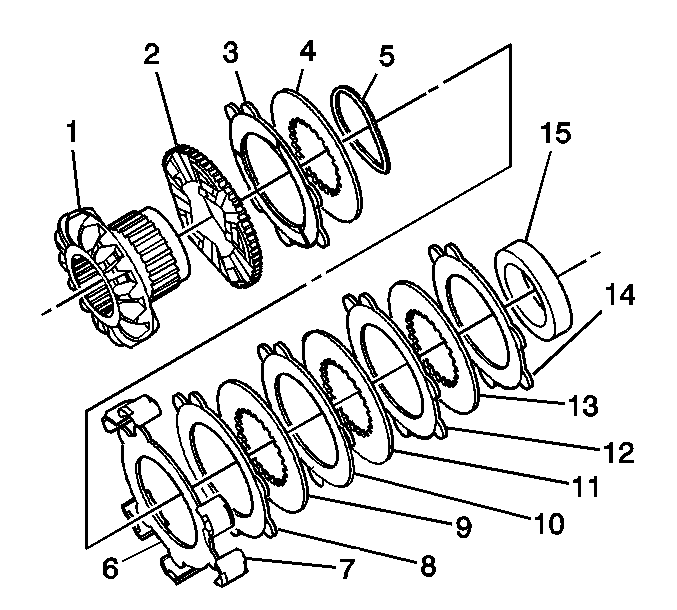
Locking Differential Cam Unit Assemble 8.6 Inch Axle
- Apply
axle lubricant, GM P/N 12378261 (Canadian P/N 10953455)
or equivalent meeting GM Specification 9986115, to the surface of each
disc.
- Assemble the left side or the flange-end side locking differential
side gear cam unit and clutch disc assembly as follows:
| 2.1. | Install the cam plate (2) to the cam side gear (1). |
| 2.2. | Install the carbon-faced eared disc (3). |
| 2.3. | Install the fuse disc (4). |
| 2.4. | Install the 1st non-carbon eared disc (7). |
| 2.5. | Install the 2nd non-carbon eared disc (8). |
| 2.6. | Install the wave washer (5). |
| 2.7. | Install the 1st splined disc (9). |
| 2.8. | Install the 3rd non-carbon eared disc (10). |
| 2.9. | Install the 2nd splined disc (11). |
| 2.10. | Install the 4th non-carbon eared disc (12). |
| 2.11. | Install the 3rd splined disc (13). |
| 2.12. | Install the 5th non-carbon eared disc (14). |
| 2.13. | Install the retaining ring (15). |
Compress the clutch
disc assembly and align the teeth on the 3rd splined disc with the teeth on the cam
plate in order to seat the retaining ring in the groove on the cam side gear.
| 2.14. | Install the guide clips (2) to the clutch disc assembly. |
Apply chassis grease, GM P/N 12377985 (Canadian P/N 88901242) or equivalent,
to the guide clips in order to hold the clips in place on the disc ears.
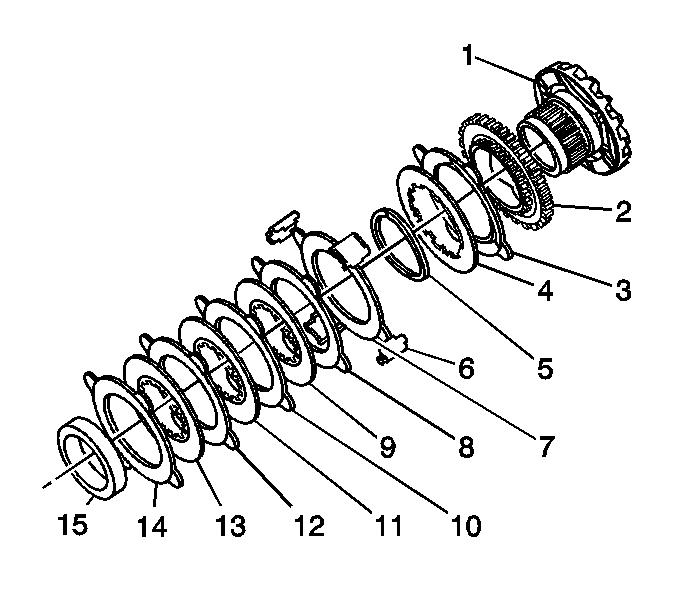
Locking Differential Cam Unit Assemble 9.5 Inch Axle
Tools Required
J 29710
Differential Side
Bearing Installer
- Apply axle lubricant, GM P/N 12378261
(Canadian P/N 10953455) or equivalent meeting GM Specification 9986115,
to the surface of each disc.
- Assemble the left side or the flange-end side locking differential side
gear cam unit and clutch disc assembly as follows:
| 2.1. | Install the cam plate (2) to the cam side gear (1). |
| 2.2. | Install the carbon-faced eared disc (3). |
| 2.3. | Install the fuse disc (4). |
| 2.4. | Install the wave washer (5). |
| 2.5. | Install the 1st non-carbon eared disc (7). |
| 2.6. | Install the 2nd non-carbon eared disc (8). |
| 2.7. | Install the 1st splined disc (9). |
| 2.8. | Install the 3rd non-carbon eared disc (10). |
| 2.9. | Install the 2nd splined disc (11). |
| 2.10. | Install the 4th non-carbon eared disc (12). |
| 2.11. | Install the 3rd splined disc (13). |
| 2.12. | Install the 5th non-carbon eared disc (14). |
| 2.13. | Align the splined discs with the teeth on the cam plate in order to compress
the clutch disc assembly. |
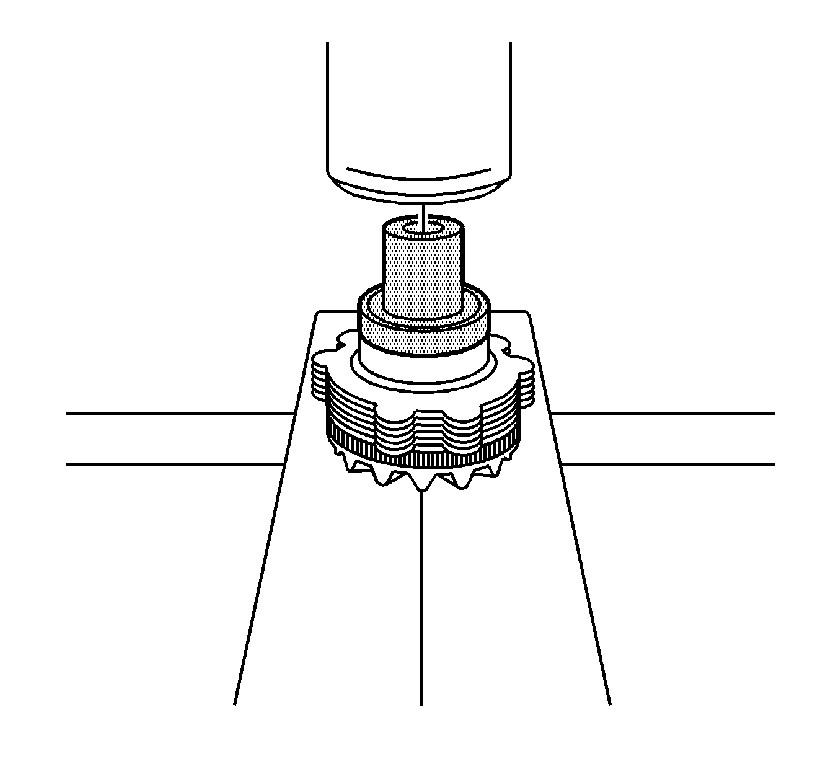
- Install the thrust sleeve (15) onto the cam side gear.
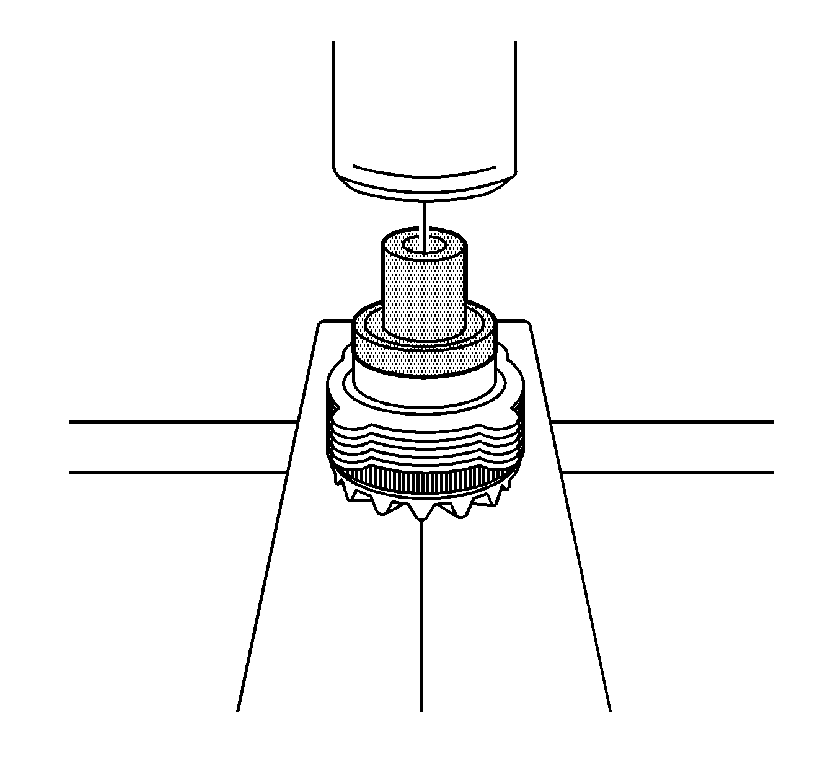
- Install the thrust sleeve onto the cam side gear using a hydraulic press and
the
J 29710
, if necessary, until
the thrust sleeve is fully seated onto the locking differential cam gear.
- If the cam side gear or the thrust sleeve has been replaced, measure the
overall length of the gear assembly by doing the following:
| 5.1. | Place the locking differential clutch disc thrust washer on top of the
thrust sleeve. |
| 5.2. | Measure the overall length of the gear assembly from the front of the
cam side gear to the back of the locking differential clutch disc thrust washer. |
| 5.3. | Compare this measurement to the measurement obtained during disassembly. |
| 5.4. | If the new reading is more than 0.762 mm (0.003 in) higher
or lower than the original, select a locking differential clutch disc thrust washer
that will return the reading closest to the original reading. |
- Align the ears of all the clutch discs.
- Install the guide clips to the clutch disc assembly.
Apply
chassis grease, GM P/N 12377985 (Canadian P/N 88901242) or equivalent, to the guide
clips in order to hold the clips in place on the disc ears.
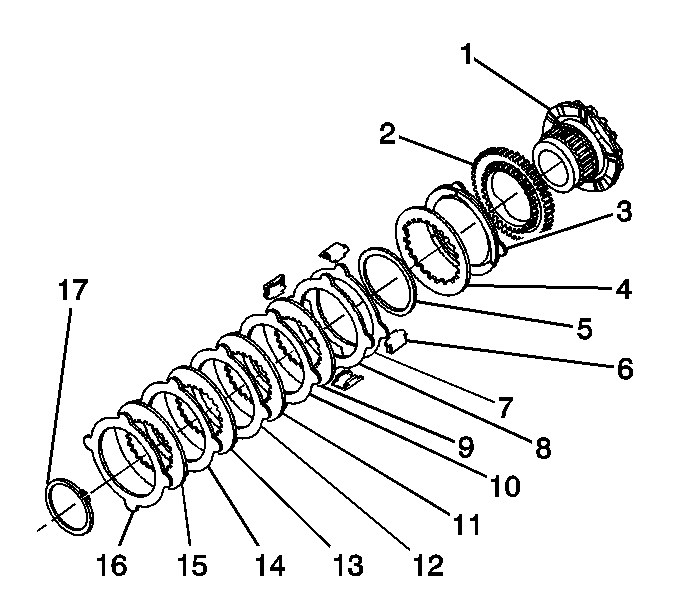
Locking Differential Cam Unit Assemble 11.5 Inch Axle
- Apply axle lubricant, GM P/N 12378261 (Canadian P/N 10953455)
or equivalent meeting GM Specification 9986115, to the surface of each
disc.
- Assemble the left side or the flange-end side cam unit and clutch disc
assembly as follows:
| 2.1. | Install the cam plate (2) to the cam side gear (1). |
| 2.2. | Install the carbon-faced eared disc (3). |
| 2.3. | Install the fuse disc (4). |
| 2.4. | Install the wave washer (5). |
| 2.5. | Install the 1st non-carbon eared disc (7). |
| 2.6. | Install the 2nd non-carbon eared disc (8). |
| 2.7. | Install the 1st splined disc (9). |
| 2.8. | Install the 3rd non-carbon eared disc (10). |
| 2.9. | Install the 2nd splined disc (11). |
| 2.10. | Install the 4th non-carbon eared disc (12). |
| 2.11. | Install the 3rd splined disc (13). |
| 2.12. | Install the 5th non-carbon eared disc (14). |
| 2.13. | Install the 4th splined disc (15). |
| 2.14. | Install the 6th non-carbon eared disc (16). |
| 2.15. | Install the retaining ring (17). |
Compress the clutch disc
pack and align the teeth on the 4th splined disc with the teeth on the cam plate in
order to seat the retaining ring in the groove on the cam side gear.
| 2.16. | Install the guide clips (6) to the clutch disc pack. |
Apply
grease to the guide clips in order to hold the clips in place on the disc ears.
Locking Differential Cam Unit Assemble 10.5 Inch Axle
Tools Required
J 29710
Differential Side
Bearing Installer
- Apply axle lubricant, GM P/N 12378261 (Canadian P/N 10953455)
or equivalent meeting GM Specification 9986115, to the
surface of each disc.
- Assemble
the right side locking differential side gear cam unit and clutch disc assembly as
follows:
| 2.1. | Install the cam plate (2) to the cam side gear (1). |
| 2.2. | Install the carbon-faced ear disc (3). |
| 2.3. | Install the fuse disc (4). |
| 2.4. | Install the wave washer (5). |
| 2.5. | Install the 1st non-carbon eared disc (7). |
| 2.6. | Install the 2nd non-carbon eared disc (8). |
| 2.7. | Install the 1st splined disc (9). |
| 2.8. | Install the 3rd non-carbon eared disc (10). |
| 2.9. | Install the 2nd splined disc (11). |
| 2.10. | Install the 4th non-carbon eared disc (12). |
| 2.11. | Install the 3rd splined disc (13). |
| 2.12. | Install the 5th non-carbon eared disc (14). |
| 2.13. | Align the splined discs with the teeth on the cam side gear in order to
compress the clutch disc disc. |
- Install the thrust sleeve (15) onto the cam side gear.
- Install the thrust sleeve onto the cam side gear using a hydraulic press and
the
J 29710
, if necessary, until
the thrust sleeve is fully seated onto the cam side gear.
- If the cam side gear or the thrust sleeve has been replaced, measure the
overall length of the gear assembly by doing the following:
| 5.1. | Place the locking differential clutch disc thrust washer on top of the
thrust sleeve. |
| 5.2. | Measure the overall length of the gear assembly from the front of the
cam side gear to the back of the locking differential clutch disc thrust washer. |
| 5.3. | Compare this measurement to the measurement obtained during disassembly. |
| 5.4. | If the new reading is more than 0.762 mm (0.003 in) higher
or lower than the original, select a locking differential clutch disc thrust washer
that will return the reading closest to the original reading. |
- Align the ears of all the clutch discs.
- Install the guide clips to the clutch disc assembly.
Apply
chassis grease, GM P/N 12377985 (Canadian P/N 88901242) or equivalent, to the guide
clips in order to hold the clips in place on the disc ears.
