For 1990-2009 cars only
Removal Procedure
- Disconnect the battery negative cable.
- Raise the hood to the servicing position and secure it. Refer to Hood Replacement in Body Front End.
- Drain the engine coolant. Refer to Cooling System Draining and Filling in Engine Cooling.
- Remove the upper and lower radiator hoses from the engine. Refer to Radiator Outlet Hose Replacement .
- Remove the air cleaner duct from the engine. Refer to Air Cleaner Assembly Replacement in Engine Controls.
- Remove the A/C condenser mounting bolts, if equipped. Refer to Condenser Replacement in HVA Systems C with A/C -- Manual.
- Remove the radiator support and radiator form vehicle. Refer to Radiator Support Replacement in Body Front End.
- Remove the A/C pressure hose from the A/C compressor, if equipped, and set it aside. Refer to Compressor Hose Assembly Replacement in HVAC Systems with A/C -- Manual.
- Remove the engine cooling fan. Refer to Fan Clutch Replacement in Engine Cooling.
- Remove the drive belt. Refer to Drive Belt Replacement .
- Remove the A/C drive belt, if equipped. Refer to Drive Belt Replacement .
- Remove the engine sight shield. Refer to Upper Intake Manifold Sight Shield Replacement .
- Remove the electrical wiring harness from the thermostat housing.
- Remove the water pump. Refer to Water Pump Replacement in Engine Cooling.
- Raise the vehicle. Refer to Lifting and Jacking the Vehicle in General Information.
- Remove the starter motor. Refer to Starter Motor Replacement in Engine Electrical.
- Remove the right side closeout cover and bolt.
- Remove the crankshaft balancer. Refer to Crankshaft Balancer Removal .
- Remove the engine oil pan. Refer to Oil Pan Replacement .
- Remove the engine front cover. Refer to Engine Front Cover Removal .
- Remove the cylinder heads from the engine. Refer to Cylinder Head Replacement .
- Remove the valve lifters from the engine. Refer to Valve Lifter Removal .
- Align the timing marks on the camshaft and crankshaft sprockets. Make sure that the number 1 piston is in the firing position.
- Remove the camshaft sprocket. Refer to Timing Chain and Sprockets Removal .
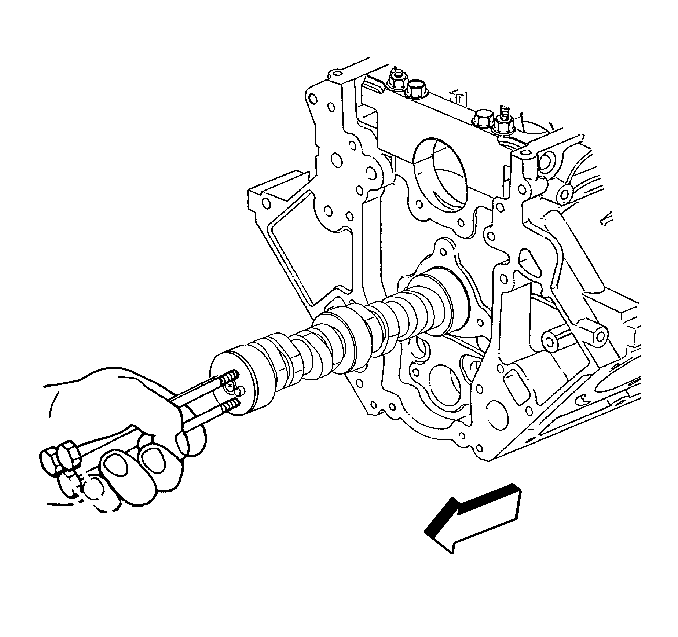
- Remove the camshaft. Refer to Camshaft Removal .
- Clean and inspect all sealing surfaces. Refer to Camshaft and Bearings Cleaning and Inspection .
Caution: Unless directed otherwise, the ignition and start switch must be in the OFF or LOCK position, and all electrical loads must be OFF before servicing any electrical component. Disconnect the negative battery cable to prevent an electrical spark should a tool or equipment come in contact with an exposed electrical terminal. Failure to follow these precautions may result in personal injury and/or damage to the vehicle or its components.
Installation Procedure
- Install the camshaft to the engine. Refer to Camshaft Installation .
- Install the camshaft sprocket and timing chain. Refer to Timing Chain and Sprockets Installation .
- Install the valve lifters. Refer to Valve Lifter Installation .
- Install the cylinder heads. Refer to Cylinder Head Replacement .
- Install the engine front cover to the engine. Refer to Engine Front Cover Installation .
- Install the engine oil pan. Refer to Oil Pan Installation .
- Install the right side closeout cover.
- Install the starter motor to the engine. Refer to Starter Motor Replacement in Engine Electrical.
- Install the crankshaft balancer to the crankshaft. Refer to Crankshaft Balancer Installation .
- Install the water pump to the engine. Refer to Water Pump Replacement in Engine Cooling.
- Connect the electrical wiring harness to the thermostat housing.
- Install the A/C drive belt, if equipped. Refer to Drive Belt Replacement .
- Install the drive belt. Refer to Drive Belt Replacement .
- Install the engine sight shield. Refer to Upper Intake Manifold Sight Shield Replacement .
- Install the A/C pressure hose to the A/C compressor, if equipped. Refer to Compressor Hose Assembly Replacement in HVAC Systems with A/C -- Manual.
- Install the radiator support and radiator. Refer to Radiator Support Replacement in Body Front End.
- Install the A/C condenser mounting bolts, if equipped. Refer to Condenser Replacement in HVAC Systems with A/C -- Manual.
- Install the engine cooling fan. Refer to Fan Clutch Replacement in Engine Cooling.
- Install the air cleaner duct. Refer to Air Cleaner Assembly Replacement in Engine Controls.
- Connect the battery negative cable to the battery.
- Lower the hood. Refer to Hood Replacement in Body Front End.
- Connect the negative battery cable.
