SPECIAL POLICY BALL JOINTS (GREASABLE) UPPER & LOWER

Subject: SPECIAL POLICY ADJUSTMENT GREASEABLE UPPER AND LOWER CONTROL ARM BALL JOINTS AND FRONT END ALIGNMENT PARTS KIT
Model and Year: 1988-90 C/K TRUCKS
THIS BULLETIN SUPERSEDES CHEVROLET DEALER SERVICE BULLETIN 90-392-3C DATED DECEMBER, 1990, TO REVISE THE SERVICE PROCEDURE AND CLAIMS INFORMATION SECTIONS FOR ALL REPAIRS COMPLETED ON OR AFTER AUGUST 5,1991.
REVISIONS TO THIS BULLETIN INCLUDE ADDITION OF A REQUIREMENT TO CHECK THE CONDITION OF 1990 MODEL YEAR C/K TRUCK MAINTENANCE FREE BALL JOINTS BEFORE REPLACEMENT, ELIMINATION OF CASTER/CAMBER ALIGNMENT AND THE ADDITION OF TOE-IN ALIGNMENT.
BALL JOINTS:
A contaminated ball joint can cause squeaking while turning and/or require more frequent steering input while driving down the road. Contamination could also cause a ball joint to wear out and eventually to separate.
Notice: Any vehicle equipped with greaseable ball joints are not to be replaced as a part of this special policy.
1988-89:
Some of the maintenance-free front suspension ball joints used on 1988 and 1989 model C/K trucks have experienced contamination.
1990
Later design maintenance-free ball joints were used in early 1990 model C truck front suspension upper control arms and K truck front suspension upper and lower control arms. These maintenance-free front suspension ball joints, used in the 1990 model C/K trucks, incorporated two significant changes that greatly reduce the possibility of contamination.
- An enhancement was made at the neck of the ball joint by changing the material of seal insert to glass- filled nylon for greater stiffness and less shrinkage when cold.
- In addition, the composition of the seal was changed to make it more flexible in cold weather.
Since the first publication of the Special Policy Adjustment Bulletin, stringent lab testing, Proving Ground durability tests and a Fleet Field Test have demonstrated the durability of the 1990 model C/K truck maintenance-free front suspension ball joints.
THEREFORE TO DETERMINE WHETHER A CUSTOMER COMPLAINT IS ATTRIBUTABLE TO CONTAMINATION OF A MAINTENANCE-FREE BALL JOINT ON A 1990 MODEL TRUCK, DO NOT REPLACE ANY SUCH BALL JOINT UNLESS THE BALL JOINT WEAR CHECK PROCEDURE INCLUDED IN THIS BULLETIN INDICATES OVER 1 MM (0.040 INCH) OF VERTICAL LOOSENESS, THIS DIMENSION IS TO BE RECORDED ON THE REPAIR ORDER,
Greaseable ball joints were also used in 1990 model car production as follows since:
- start of production on C truck front suspension lower control arms; - interim production on C truck front suspension upper control arms; and - interim production on K truck front suspension upper and lower control arms.
The greaseable style ball joint incorporates a zerk fitting to facilitate maintenance and is designed to allow grease to purge at the interface of the rubber dust cover and the ball joint shell (or socket).
Replacement Ball Joints:
Greaseable ball joints should be used as replacements for contaminated maintenance-free ball joints. Since it is important to lubricate the greaseable ball joint, customers must be given the information slip, shown in figure 1 below, which explains the greaseable ball joint maintenance requirements. This slip is packaged in each service ball joint kit.
----------------------------------------------------------- | BALL JOINT SERVICE REPAIR KIT NOTICE | | ------------------------------------ | | NOTICE TO CUSTOMER: | | | | YOUR VEHICLE IS EQUIPPED WITH LUBEABLE BALL JOINTS | | THAT REQUIRE LUBRICATION AT REGULAR INTERVALS. | | LUBRICATE FITTINGS AT THE SCHEDULED TIMES LISTED IN | | SECTION 2A OF THE LIGHT DUTY TRUCK MAINTENANCE | | SCHEDULE BOOKLET USING WATER RESISTANT EXTREME | | PRESSURE CHASSIS LUBRICANT WHICH MEETS GM | | SPECIFICATION 6031M (REF PART NUMBER 1052497 | | LUBRICANT). CONTINUE TO FILL WITH LUBRICANT UNTIL IT | | IS PURGED PAST THE SEAL. | | | | | | Figure 1 | -----------------------------------------------------------
FRONT WHEEL CASTER/CAMBER ALIGNMENT PARTS KIT: ---------------------------------------------- The 1988-90 C/K trucks, incorporate a front suspension feature designed to improve the vehicle's ability to maintain front wheel caster/camber alignment. The front wheel alignment set by the assembly plant will not change and should not need adjustment except in cases where accident or road hazard damage has occurred. Through the listed VIN breakpoints, in customer pay situations, if caster/camber alignment was performed the customer was also charged for the required alignment parts kit. Due to the cost of the parts kit, the charge for a wheel alignment would not be competitive in today's marketplace. In view of this, Chevrolet Motor Division has issued a special policy which covers the cost of the caster/camber alignment parts kit, but not the installation cost. This kit is included in vehicles currently being produced.
VEHICLES INVOLVED
Involved are all 1988-90 Chevrolet C/K 1500-3500 Series Trucks built within the following VIN breakpoints:
COMPONENTS MODEL YEAR PLANT FROM THROUGH INVOLVED ----- ---- ---------- -------- -------- ---------------- C/K 1988 Pont. East JE100001 JE211189 All Ball Joints " " Ft. Wayne JZ000037 JZ331451 " " " " " Oshawa J1100014 J1309126 " " "
C/K 1989 Pont. East KE100001 KE282858 All Ball Joints " " Ft. Wayne KZ100001 KZ285940 " " " " " Oshawa K1100015 K1262167 " " "
C 1990 Pont. East LE100002 LE187809 Upper Ball Jnts " " Ft. Wayne LZ100001 LZ205050 " " " " " Oshawa L1100015 L1198892 " " "
K 1990 Pont. East LE100001 LE187809 All Ball Joints " 1990 Ft. Wayne LZ100004 LZ209446 " " " " 1990 Oshawa L1100017 L1198892 " " "
BEGINNING BREAKPOINTS FOR PRODUCTION INSTALLATION OF ALIGNMENT KITS:
COMPONENTS MODEL YEAR PLANT FROM THROUGH INVOLVED ----- ---- ---------- -------- -------- ------------- C/K 1988 Pont.East JE100001 JE211189 Alignment Kit " " Ft. Wayne JZ000037 JZ331451 " " " " " Oshawa J1100014 J1309126 " " "
C/K 1989 Pont. East KE100001 KE282858 " " " " " Ft. Wayne KZ100001 KZ285940 " " " " " Oshawa K1100015 K1262167 " " "
C/K 1990 Pont. East LE100001 LE196361 " " " " " Ft. Wayne LZ100001 LZ181940 " " " " " Oshawa L1100015 L1186255 " " "
SPECIAL POLICY ADJUSTMENT
Ball Joints:
On all 1988, 1989, and 1990 models up to the VIN breakpoints, for a period of 5 years or 100,000 miles (160,000 km) from purchase whichever occurs first, if a customer experiences contamination of any of the maintenance-free ball joints, all maintenance-free ball joints will be replaced with greaseable ball joints at no charge. Due to the improved performance of 1990 model year maintenance-free ball joints, there is a reduced likelihood that a 1990 model truck will experience symptoms due to contamination. For 1990 model trucks only, conduct the ball joint wear check included in this bulletin to determine whether a customer complaint is attributable to contamination of a maintenance-free ball joint. Do not replace the maintenance-free ball joints in a 1990 model truck unless a ball joint check indicates over 1 mm (0.040 inch) of vertical looseness. This dimension is to be recorded on the repair order.
Field testing has now confirmed that a 1988-90 C/K truck does not require front wheel alignment due to ball joint replacement. Therefore, caster/camber alignment will no longer be provided upon customer request under this special policy. However, in the interest of customer satisfaction and upon customer request, a toe-in alignment may be completed after maintenance free ball joint replacement under this special policy.
Wheel Caster/Camber Alignment Parts Kit ---------------------------------------- On all 1988, 1989 and 1990 models up to the VIN breakpoints, for a period of 5 years or 100,000 miles (160,000 km) from purchase, whichever occurs first, if a customer's vehicle requires caster/camber alignment, the caster/camber alignment parts kit will be provided at no charge (but not the installation cost). Testing has confirmed that caster/camber alignment is only required due to accident or road hazard damage.
This "Special Policy Adjustment Bulletin" should be filed in your "Special Policy Adjustment Bulletins" binder.
OWNER NOTIFICATION
Owners of all vehicles involved in this SPECIAL POLICY ADJUSTMENT have been notified previously by Chevrolet Motor Division (see copy of owner letter included with this bulletin). No additional notification will be made.
PARTS INFORMATION
Parts are to be obtained from General Motors Service Parts Operations (GMSPO).
QUANTITY/ PART NUMBER YEAR MODEL DESCRIPTION VEHICLE ---------- ----- ----------- --------------- ---------- 15657212 88-89 C10, 20, 30 Lower Control Arm 2 Ball Joint Kit
15634942 88-90 K10,20,30 " " " 2
15659518 88-90 C/K 10 or Upper Control Arm 2 C/K20 & C5Z Ball Joint Kit
15634909 89-90 C/K20 & C6P Upper Control Arm 2 or C/K 30 Ball Joint Kit
15635534 1988 C/K 30 " " " 2
15654867 88-90 C/K 10, 20, Upper Control Arm 1 30 Alignment Kit
SERVICE PROCEDURE - Follow procedure appropriate to model type and year. Illustrations noted in the text are located on the following pages.
BALL JOINT WEAR CHECK (1990 ONLY)
The following checking procedures apply to 1990 K Model upper and lower ball joints and 1990 C Model upper ball joints only. (1 990 C Models have greaseable lower ball joints).
1990 K MODEL LOWER
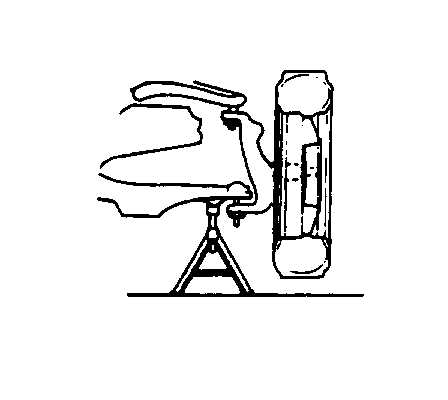
- Be sure vehicle rests on a level surface. - Raise and support front of vehicle with suitable safety stands. Support the lower control arm with a floor stand or jack as far outboard as possible. - The vehicle must be stable and should not rock on floor stands. - If vehicle is equipped with aluminum wheels it may be necessary to first remove wheel.
Check the ball joints for vertical looseness:
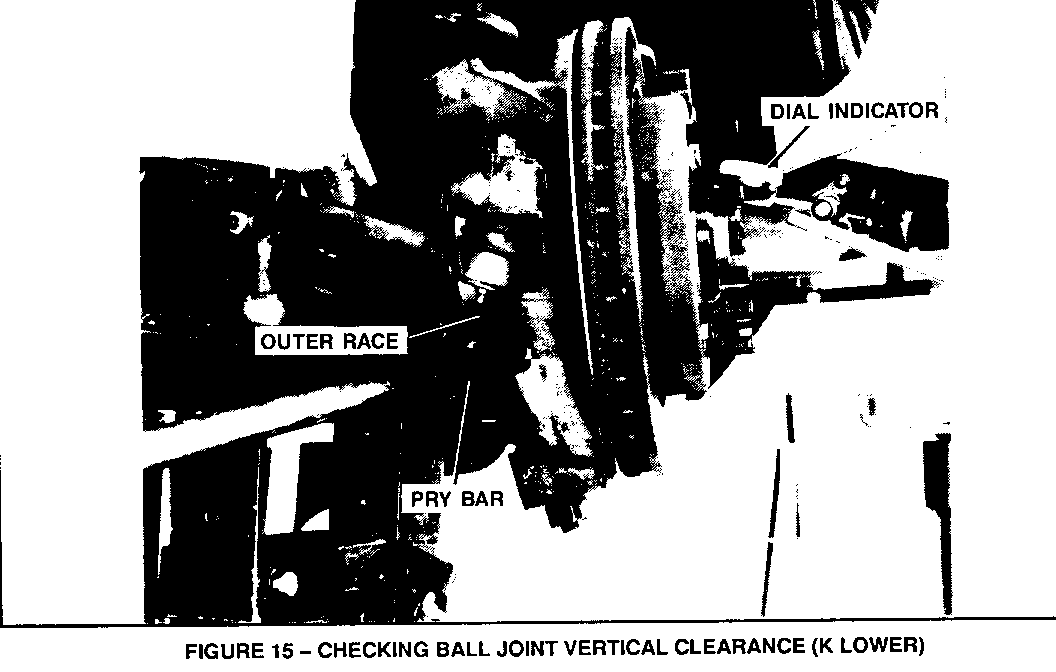
- With vehicle on the jack stands, place dial indicator against spindle to show vertical movement (Figure 15). - Pry between lower control arm and outer race while reading dial indicator. This will show vertical looseness in ball joints (Figure 15). - If dial indicator reading is more than 1 mm (0.040 inch), replace ball joint.
NOTICE: Do not pry between lower arm and drive axle seal or in such a manner that ball joint seal is contacted. Damage to the seal will result (4WD).
1990 C AND K MODEL UPPER
- Be sure vehicle rests on a level surface.
- Raise and support front of vehicle with suitable safety stands. Support the lower control arm with a floor stand or jack as far outboard as possible.
- The vehicle must be stable and should not rock on the floor stands.
- If the vehicle is equipped with aluminum wheels it may be necessary to first remove the wheel.
Check the ball joints for vertical looseness:
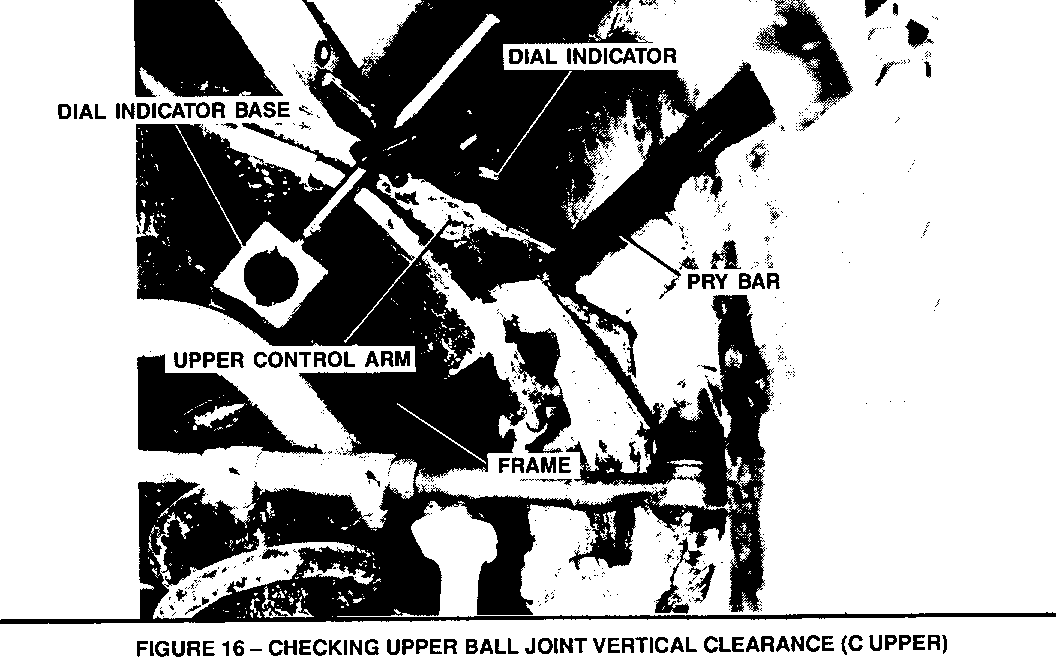
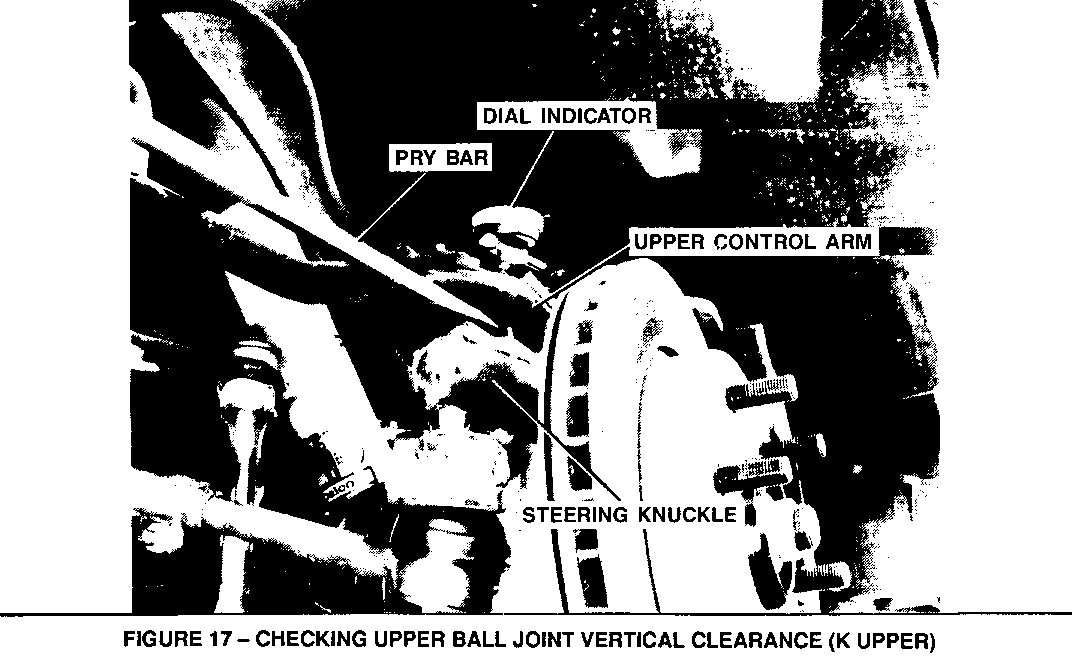
- With front of vehicle supported, position dial indicator with magnetic base on the frame and measurement needle on the top of the upper ball joint or control arm (figure 16).
- With a pry bar, pry between the upper control arm and steering knuckle while observing the dial indicator (figure 17).
- If the reading is more than 1 mm (0.040 inch) replace the ball joint.
NOTICE: Do not pry in such a manner that the ball joint seal is contacted. Damage to the seal will result.
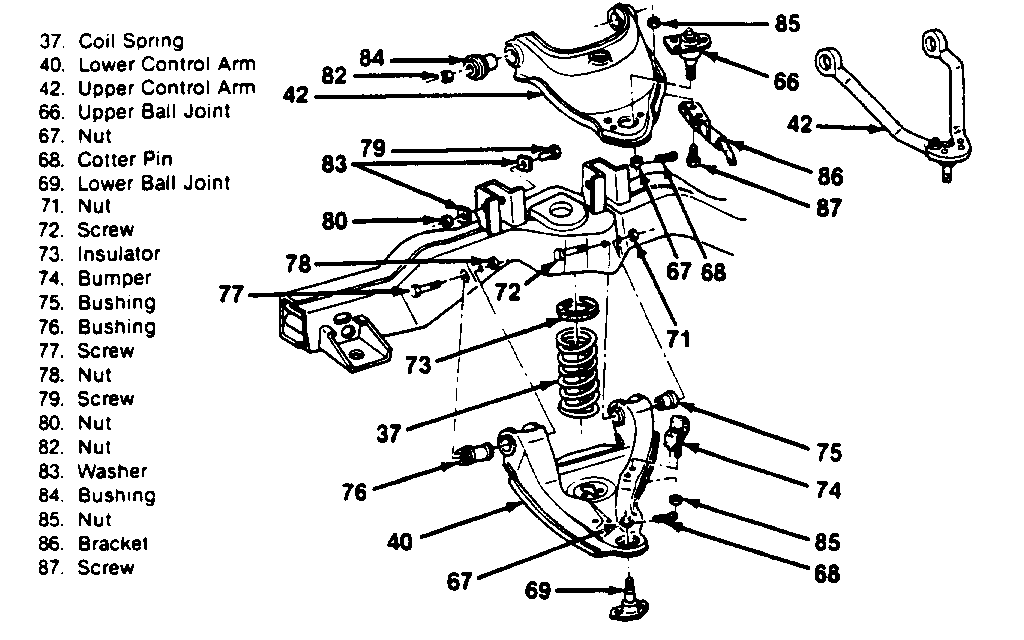
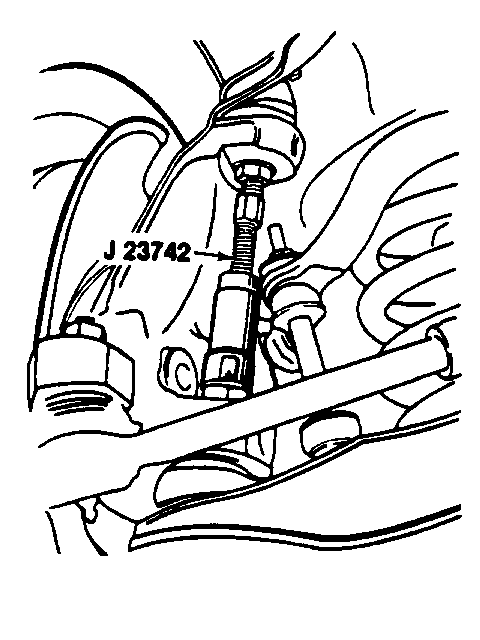
BALL JOINT REPLACEMENT, UPPER & LOWER: 1988-89 C K -------------------------------------------------- Required Tools: J-23742 Ball Joint Separator J-9519-D Ball Joint Remover And Installer Set J-24319-01 Steering Linkage Puller
1. Raise vehicle and support it with safety jack stands. 2. Support lower control arm with jack and secure spring with a safety chain.
NOTICE: Jack or stand must remain under the lower control arm spring seat during removal and installation to retain spring and control arm in position
3. Remove wheel and tire assembly. 4. Remove brake line support (Fig. 2, 86) from upper control arm (Fig. 2, 42). 5. Remove brake caliper and rotor.
NOTICE: Support caliper with a piece of wire to prevent damage to brake line.
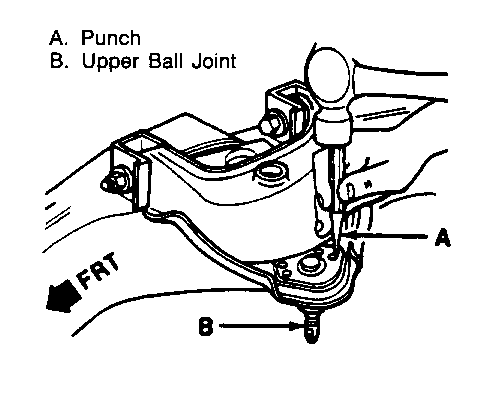
6. Remove cotter pin (Fig. 2, 68) and stud nut (Fig. 2, 67) from the upper ball joint (Fig. 2, 66). 7. Remove upper ball joint (Fig. 2, 66) from knuckle. a. Support knuckle assembly. b. Use J-23742 as shown in Figure 3. c. Inspect tapered hole in knuckle and remove any dirt. If hole is out of round, deformed or damaged, the knuckle must be replaced.
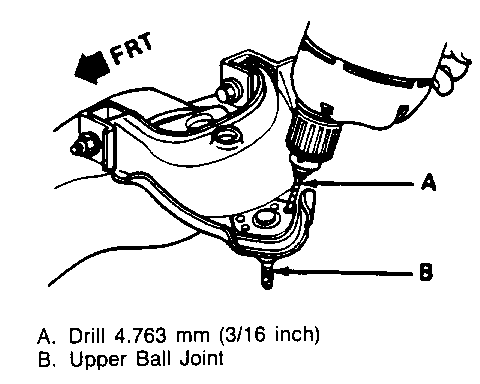
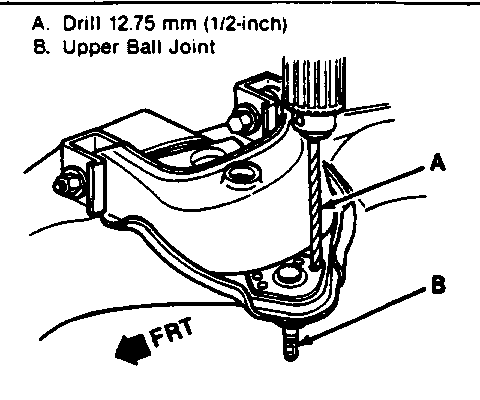
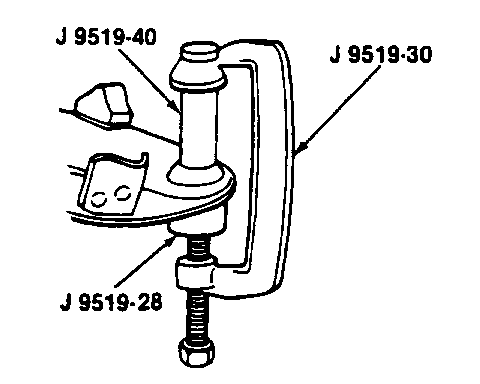
8. Remove rivets from upper ball joint (Fig. 2, 66). If ball joint has been previously replaced, remove bolts and skip to step 9. a. Center punch top of rivets. b. Use a 4.763mm (3/16-inch) drill to cut a 6.35mm (1/4 inch) deep hole in center of each rivet (Figure 4). c. Drill rivet heads away using a 12.7mm (1/2-inch) drill (Figure 5). d. Punch rivets out using a punch (Figure 6).
9. Remove upper ball joint (Fig. 2, 66).
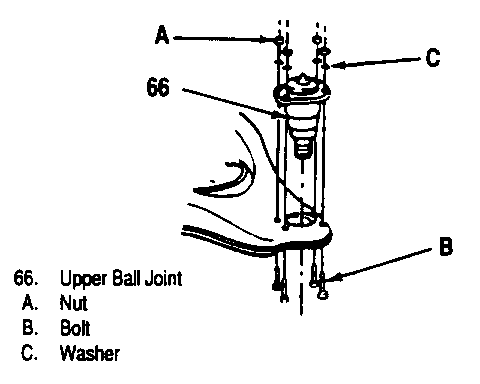
10. Install new upper ball joint (Fig. 7, 66) to upper control arm (Fig. 2, 42). a. Position four attaching bolts (pointing upwards), washers and nuts. b. Tighten nuts (A) to 23Nm (17 lb. ft.).
11. Remove cotter pin (Fig. 2, 68) and stud nut (Fig. 2, 67) from the lower ball joint (Fig. 2, 69). 12. Remove lower ball joint (Fig. 2, 69) from knuckle.
a. Support knuckle assembly. b. Use J-24319-01 to break ball joint loose from knuckle. c. Inspect tapered hole in knuckle and remove any dirt. If hole is out of round, deformed or damaged, the knuckle must be replaced. d. Move knuckle assembly aside and support.
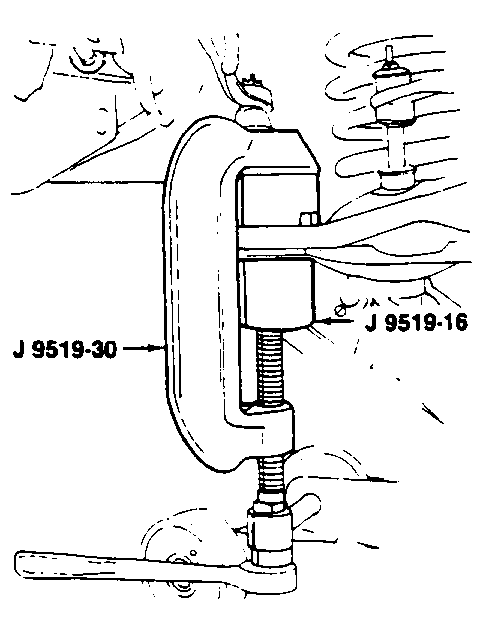
13. Remove lower ball joint (Fig. 2, 69) from lower control arm (Fig. 2, 40) using tools as shown in Figure 8. 14. Install new lower ball joint (Fig. 2, 69) to lower control arm (Fig. 2, 40). a. Press in ball joint using tools as shown in Figure 9. Ball joint will bottom on control arm.
15. Install new lower ball joint (Fig. 2, 69) to knuckle. 16. Install lower stud nut (Fig. 2, 67) and new cotter pin (Fig. 2, 68). a. Tighten stud nut (Fig. 2, 67) to 128Nm (94 lb. ft.). b. Align slot in stud with hole in stud by tightening stud nut. c. Bend pin ends against stud nut.
17. Install brake rotor and caliper. 18. Install brake line support (Fig. 2, 86) to upper control arm (Fig. 2, 42). 19. Install wheel and tire assembly. 20. Repeat procedure for opposite side of vehicle.
BALL JOINT REPLACEMENT, UPPER ONLY: 1990 C TRUCK ------------------------------------------------ Required Tool: J-23742 Ball Joint Separator
1. Raise vehicle and support it with safety jack stands. 2. Support lower control arm with jack and secure spring with safety chain.
NOTICE: Jack or stand must remain under lower control arm spring seat during removal and installation to retain spring and control arm in position.
3. Remove wheel and tire assembly. 4. Remove brake line support (Fig. 2, 86) from upper control arm (Fig. 2, 42). 5. Remove brake caliper and rotor.
NOTICE: Support caliper with a piece of wire to prevent damage to brake line.
6. Remove cotter pin (Fig. 2, 68) and stud nut (Fig. 2, 67) from upper ball joint (Fig. 2, 66). 7. Remove upper ball joint (Fig. 2, 66) from knuckle. a. Support knuckle assembly. b. Use J-23742 as shown in Figure 3. c. Inspect tapered hole in knuckle and remove any dirt. If hole is out of round, deformed or damaged, knuckle must be replaced.
8. Remove rivets from upper ball joint (Fig. 2, 66). If ball joint has been previously replaced, remove bolts and skip to step 9. a. Use a 4.763mm (3/16-inch) drill to cut a 6.35mm (1/4-inch) deep hole in center of each rivet (Figure 4). b. Drill rivet heads away using a 12.7mm (1 /2-inch) drill (Figure 5). c. Punch rivets out using a punch (Figure 6).
9. Remove upper ball joint (Fig. 2, 66).
10. Install new upper ball joint (Fig. 2, 66) to upper control arm (Fig. 2, 42). a. Position four attaching bolts (pointing upward), washers and nuts (Figure 7). b. Tighten nuts (A) to 23 Nm (171b.ft.).
11. Install new upper ball joint (Fig.2, 66) to knuckle. 12. Install upper stud nut (Fig. 2, 67) and new cotter pin (Fig. 2, 68). a. Tighten stud nut (Fig. 2, 67) to 100 Nm (751b.ft.). b. Align slot in stud nut with hole in stud by tightening stud nut. c. Bend pin ends against stud nut.
13. Install brake rotor and caliper. 14. Install brake line support (Fig. 2, 86) to upper control arm (Fig. 2, 42). 15. Install wheel and tire assembly. 16. Repeat above procedure for opposite side of vehicle.
BALL JOINT REPLACEMENT, UPPER & LOWER: 1988-1990 K TRUCK --------------------------------------------------------- Required Tools: J-36607 Ball Joint Separator J-24319-01 Steering Linkage Puller
1. Raise vehicle and support it with safety jack stands. 2. Support lower control arm with jack.
NOTICE: Jack or stand must remain under lower control arm during removal and installation to retain torsion bar and control arm in position.
3. Remove wheel and tire assembly. 4. Remove brake caliper and rotor.
NOTICE: Support caliper with a piece of wire to prevent damage to brake line.
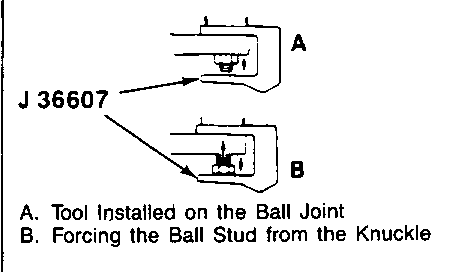
5. Remove cotter pin (Fig. 10, 130) and stud nut (Fig. 10, 129) from upper ball joint (Fig. 10, 115). 6. Remove upper ball joint (Fig. 10, 11 5) from knuckle (Fig. 10, 11 7) a. Support knuckle assembly. b. Use J-36607 as shown in Figure 11. c. Inspect tapered hole in knuckle and remove any dirt. If hole is out of round, deformed or damaged, knuckle must be replaced.
7. Remove rivets from upper ball joint (Fig. 10, 115). If ball joint has been previously replaced, remove bolts and upper ball joint, and skip to step 9. a. Center punch top of rivets. b. Use a 4.763 mm (3/16-inch) drill to cut a 6.35 mm (1/4-inch) deep hole in the center of each rivet (Fig. 4). c. Drill rivet heads away using a 12.7 mm (1/2-inch) drill (Fig. 5).
8. Remove upper ball joint (Fig. 10, 115) from upper control arm (Fig. 10, 101). Rivets will remain in control arm.
NOTICE: Do not damage upper control arm mounting surface when removing ball joint or rivets.
a. Remove remaining rivet shanks flush with control arm. b. Support upper control arm and punch rivets out using a punch (Fig. 6).
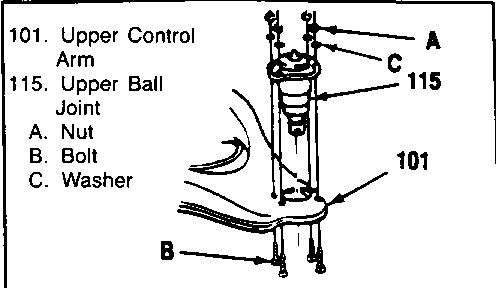
9. Install new upper ball joint (Fig. 12, 115) to upper control arm (Fig. 12, 101 - C Truck arm shown, K Truck arm typical). a. Position four (4) attaching bolts (pointing upward), washers and nuts. b. Tighten nuts (A) to 23 Nm (17 lb.ft.).
10. Remove drive axle shaft nut (Fig. 10, 120) and washer (Fig. 10, 119) from hub assembly (Fig 10,114). 11. Remove cotter pin (Fig. 10, 130) and stud nut (Fig. 10, 131) from lower ball joint (Fig. 10, 127). 12. Remove lower ball joint (Fig. 10, 127) from knuckle (Fig. 10, 117). a. Support knuckle assembly. b. Use J-24319-01. c. Remove drive axle from hub assembly at same time. d. Move knuckle assembly aside and support. e. Move drive axle aside and support. f. Inspect tapered hole in steering knuckle and remove any dirt. If hole is out of round, deformed or damaged, knuckle must be replaced.
13. Remove rivets from lower ball joint (Fig. 10, 127). If ball joint has been previously replaced remove bolts and skip to step 14. a. Center punch top of rivets. b. Use a 4.763mm (3/16-inch) drill to drill through center of each rivet (Figure 4). c. Use a 7.938mm (5/16-inch) drill to enlarge hole through the center of each rivet. d. Drill rivet heads away using a 12.7mm (1/2-inch) drill (Figure 5).
NOTICE: Use caution to avoid drilling through rivet head and into lower control arm.
e. Use a chisel and hammer to remove any remaining rivet head. f. Punch rivets out using a small pin punch (Figure 6).
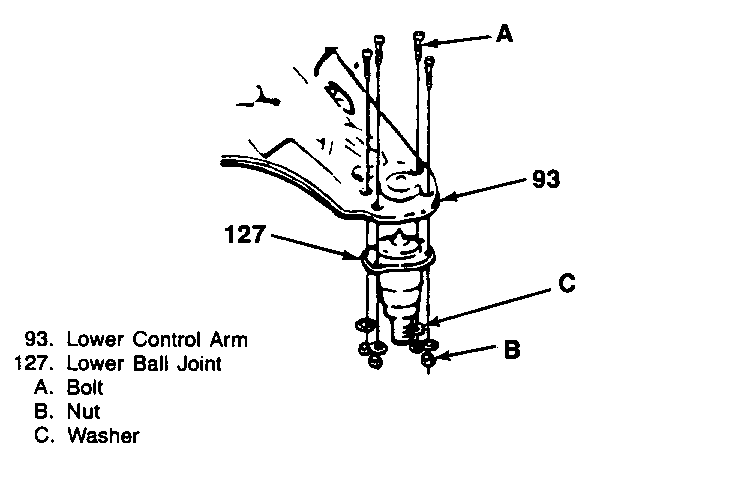
14. Remove lower ball joint (Fig. 10, 127) from lower control arm (Fig. 10, 93). 15. Install new lower ball joint (Fig. 10, 127) to lower control arm (Fig. 13, 93). a. Ball joint is installed between flanges of the lower control arm. b. Position four (4) attaching bolts (pointing downward), washers and nuts. c. Tighten nuts (B) to 60 Nm (45 lb. ft.).
16. Install new lower ball joint (Fig. 10, 127) to knuckle (Fig. 10, 117). Drive axle should be installed through hub assembly at same time. 17. Install stud nut (Fig. 10, 131) and new cotter pin (Fig. 10, 130). a. Tighten stud nut to 128 Nm (94 lb. ft.). b. Align slot in stud nut with hole in stud. c. Bend cotter pin ends against nut.
18. Install upper ball joint (Fig. 10, 115) to knuckle (Fig. 10, 117). 19. Install stud nut (Fig. 10, 129) and new cotter pin (Fig. 10, 130). a. Tighten stud nut (Fig. 10, 129) to 100 Nm (75 lb. ft.). b. Align slot in stud nut with hole in stud. c. Bend cotter pin ends against nut.
20. Install washer (Fig. 10, 11 9) and drive axle nut (Fig. 10, 120). Tighten nut to 235 Nm (1 73 lb. ft.). 21. Install brake rotor and caliper. 22. Install wheel and tire assembly. 23. Repeat procedure on opposite side of vehicle.
CLAIM INFORMATION
Submit a claim with the information indicated below. Verify part numbers to year/application:
1988-1989 Models * FAILED PARTS CC-FC LABOR LAB REPAIR PERFORMED PC PART NO. ALLOW OP HRS -------------------- --- ----------- ----- ----- ----- --- 1988-89 C Truck Uppers 2 15659518 or ** NR-95 T7306 1.1 Replace 2 Ball Joints 15634909
1988-89 C Truck - 4 15657212 ** NR-95 T7306 1.5 Replace 4 Ball Joints
1988-89 K Truck - 4 15634942 ** NR-95 T7306 3.9 Replace 4 Ball Joints Alignment Parts Kit 1 15654867 ** VM-95 T7309 0.0 Supplied To Customer
Times below should be added or deleted as necessary from the applicable Labor Hours.
1988-89 C/K Truck Times ------------------------- Add: To Check & Adjust Front Wheel Toe-In Alignment 0.3 Hours Delete: For EACH previously installed ball joint 0.1 Hours.
1990 Models
* FAILED PARTS CC-FC LABOR LAB REPAIR PERFORMED PC PART NO. ALLOW OP HRS -------------------- --- ----------- ----- ----- ----- --- 1990 C/K Truck Wear Check 2 or 4 Ball - -- ** VM-95 T7312 0.3 Joints No Replacement
1990 C Truck Uppers 2 15659518 or ** NR-95 T7306 1.3 Replace 2 Ball Joints 15634909 (includes Wear Check)
1990 K Truck 4 15634942 ** NR-95 T7306 4.1 Replace 4 Ball Joints (Includes Wear Check)
Alignment Parts Kit 1 15654867 ** VM-95 T7309 0.0 Supplied To Customer
* Times below should be added or deleted as necessary from the applicable Labor Hours.
1990 C/K Truck Times -------------------- Add: To Check & Adjust Front Wheel Toe-In Alignment 0.3 Hours Delete: For EACH previously installed ball joint 0.1 Hours.
** The "Parts Allowance" should be the sum total of the current GMSPO Dealer Net price plus 30% of all parts required for the repair.
Refer to the Chevrolet Claims Processing Manual for details on Claim Submission.
Dear Chevrolet Owner:
This notice is sent to inform you of a special policy covering the front suspension of your 1500-3500 Series Chevrolet Pickup ?Truck. Specifically, the policy covers the maintenance-free ball joints and the front wheel alignment.
Your full size 1500-3500 Series Chevrolet Pickup Truck incorporates maintenance-free front suspension ball joints and also a front suspension feature designed to improve the vehicle's ability to maintain front wheel caster/camber alignment. These changes were made in the interest of improving your satisfaction with our product by reducing the amount of required maintenance. In some cases, however, the actual vehicle maintenance required may not have been reduced.
Ball Joints:
The maintenance-free front suspension ball joints in some of these trucks have experienced contamination. Because of this, we have changed the design of our current production ball joint to a greaseable style ball joint. A contaminated ball joint can cause squeaking while turning, and/or more frequent steering input while driving. Contamination could result in a ball joint wearing out and eventually separating. If any sign of contamination occurs in your vehicle, please have it repaired at your dealer.
Should ball joint contamination cause this condition in your vehicle within 5 years or 100,000 miles of vehicle purchase (whichever occurs first) the maintenance free ball joints will be replaced with greaseable style ball joints free of charge. Greaseable style ball joints should be lubricated at the same interval as the other chassis lubrication fittings on your vehicle. Vehicles requiring ball joint replacement do not necessarily require front wheel alignment. If you have had the ball joints replaced on your vehicle prior to receiving this letter, you can obtain reimbursement for any parts and/or labor charges you have incurred by providing your dealer with the original paid receipt prior to March 1, 1991. This offer does not apply if the replacement was due to collision damage.
Front Wheel Alignment Parts Kit:
The wheel alignment as set by the assembly plant will not change and should not need adjustment except in cases where accident or road hazard damage has occurred. Previously, if caster/camber alignment was performed at your expense, you were also charged for the required alignment parts kit. Due to the cost of the parts kit, the charge for a wheel alignment would not be competitive in today's marketplace. In view of this, Chevrolet has issued a special policy to cover the cost of the caster/camber alignment parts kit but not the installation cost. This kit is included in vehicles currently being produced.
In the event your vehicle requires a caster/camber alignment in the first 5 years or 100,000 miles, (whichever occurs first), your Chevrolet dealer will not charge you for the cost of the required alignment parts kit. If you have paid for a caster/camber alignment performed on your vehicle prior to receiving this letter, you can obtain reimbursement for the cost of the alignment parts kit, but not the labor to install it, by providing your dealer with the original paid receipt. Claims for reimbursement must be filed by March 1, 1991.
We are sorry if either of these conditions have caused you any inconveniences; however, we have taken these action in the interest of your continued satisfaction with our products.
General Motors bulletins are intended for use by professional technicians, not a "do-it-yourselfer". They are written to inform those technicians of conditions that may occur on some vehicles, or to provide information that could assist in the proper service of a vehicle. Properly trained technicians have the equipment, tools, safety instructions and know-how to do a job properly and safely. If a condition is described, do not assume that the bulletin applies to your vehicle, or that your vehicle will have that condition. See a General Motors dealer servicing your brand of General Motors vehicle for information on whether your vehicle may benefit from the information.
