BRAKE ROTORS REFINISHING INFORMATION

Subject: BRAKE ROTORS
Model and Year: 1988-90 C/K TRUCKS
TO: ALL CHEVROLET DEALERS
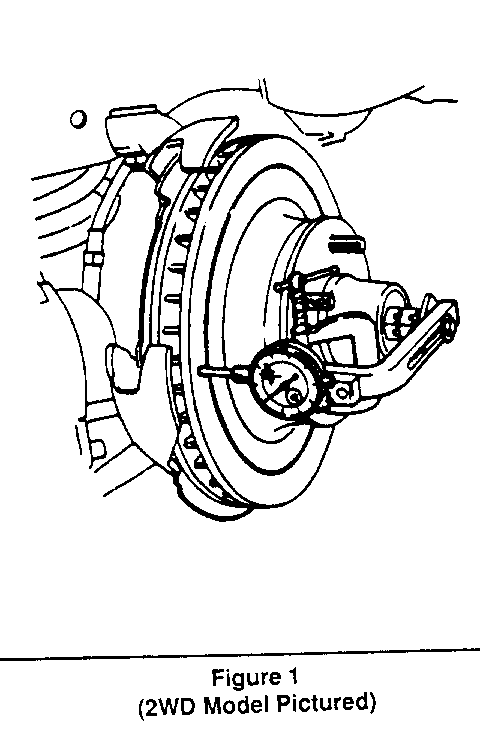
In the manufacturing of brake rotors, all the tolerances regarding surface finish, parallelism and lateral runout are held very closely. The maintenance of these tolerances provide the surface necessary to prevent a loss of braking performance. C1, C2, and C3 trucks have a one-piece rotor and hub assembly with outer and inner bearings. C1 trucks under 5600 GVWR have a 1" rotor. C1 trucks over 5600 GVWR, SS454 trucks (Chevrolet only), C2 and C3 trucks all have 1 1/4" rotors. The rotor on the K2 and K3 with C6P brakes is a complete three piece assembly consisting of a 1 1/4" rotor, bearings and hub. The rotor on C/K3 with R05 (dual rear wheels) is a complete four piece assembly consisting of a rotor, bearings, hub, and extension. The rotor is 1 1/4" for 88-89 models, 1 1/2" for 90 models. The C3 with R05 is a one piece casting but also has 1 1/4" wide rotors for 88-89 models and 1 1/2" wide rotors for 90 models. The rotors on the K1 and K2 models are composite construction and require special tool J 37620 when service is required. Light scoring of the rotor surface not in excess of 0.38 mm (0.015-inch) in depth is normal This condition will not affect brake operation.
LATERAL RUNOUT
Lateral runout is the movement of the rotor from side to side as it rotates on the spindle. This could also be referred to as "rotor wobble." This movement causes the brake pad and piston to be knocked back into its' bore. This condition results in additional pedal travel and a vibration during braking.
Inspecting for Lateral Runout (see Figure 1)
1. Install tool J37620 on Kl, K2 trucks to provide clamp load to simulate "as installed" conditions.
2. Adjust the wheel bearings to eliminate all freeplay (2 wheel drive only).
3. Attach a dial indicator to some portion of the suspension.
The point of the stylus must contact the rotor face about 25 mm (1-inch) from the edge of the rotor.
4. Turn the rotor one complete rotation.
o The lateral runout should not exceed 0.13 mm (0.005-inch)
5. Readjust the wheel bearings, refer to section 3C of the appropriate service manual (2 wheel drive only).
PARALLELISM
Parallelism is the measurement of the thickness of the rotor at four or more points around the circumference of the rotor. All measurements must be made at the same distance in from the edge of the rotor. The rotor thickness must not vary more than 0.013 mm (0.0005- inch) from any point to point. Rotors exceeding this specification may cause a vibration/ pedal pulsation as the brake pads open and close slightly. Parallelism checks on Kl, K2 trucks should also be done with tool J37620 installed to simulate "as installed" conditions.
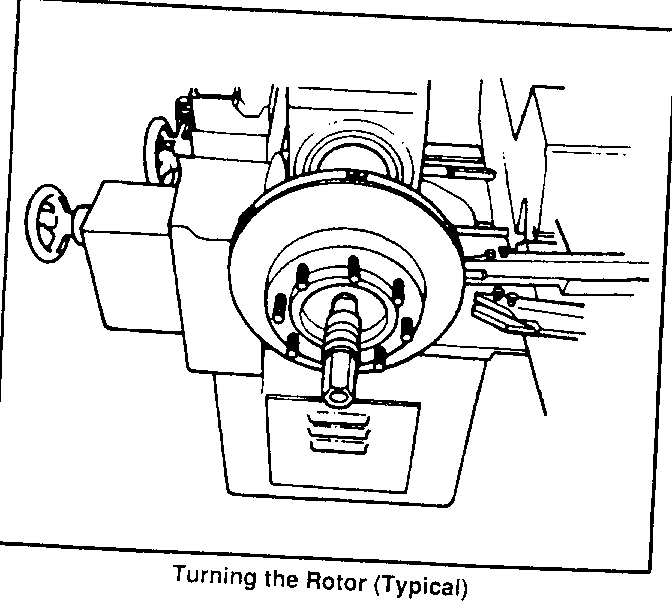
REFINISHING
It is NOT necessary to refinish the brake rotors during routine replacement of disc brake linings. The rotors should be refinished only if non-parallelism, runout, or deep scoring has occurred.
All brake rotors have a minimum thickness dimension cast into them. This dimension is the minimum wear dimension and not a refinishing dimension. Do not use a brake rotor that will not meet the specifications after refinishing. A rotor that has been refinished too thin will not have proper heat transfer capabilities. Replace it with a new brake rotor. Refer to the specifications given in this bulletin or the appropriate service manual.
Accurate control of the rotor tolerances is necessary for the proper performance of the disc brakes. Refinishing of the rotor should be done only with precision equipment.
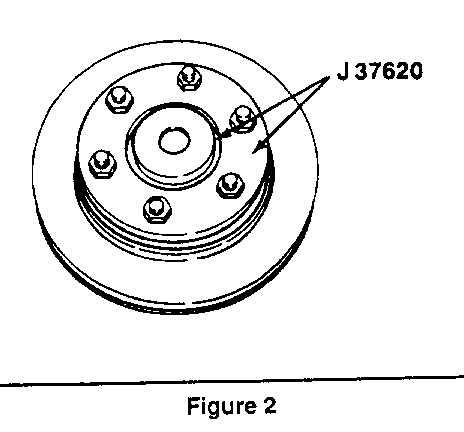
When refinishing rotors, always use sharp cutting tools or bits. Dull or worn tools leave a poor surface finish which will affect initial braking performance. Vibration dampening attachments should always be used when refinishing braking surfaces. These attachments eliminate tool chatter and will result in a better surface finish. Tool J 37620 should be used on the composite rotors to reduce flexing of the rotor when measuring and refinishing. Tighten the nuts to 34 N.m (25 lbs. ft.) (see Figure 2). The groove in the back of the clamp ring should go against the rotor.
When refinishing the rotor surface, the speed of the cutting will vary on each machine. If cutting information is unavailable, the following should be used as a guide only. The best speed for refinishing braking rotor surfaces is a spindle speed of 200 rpm. Rough cutting crossfeed should range from 0.15 to 0.25 mm (0.006 to 0.010 inch) per revolution. The lathe finish cuts should be made non-directional by dressing toe rotor surfaces with a sanding disc power tool or AMMCO Model 8350 Safe Swirl Disc Rotor Grinder (or Equivalent).
IMPORTANT: Both sides of the rotor should be refinished simultaneously.
CALIPER INSPECTION:
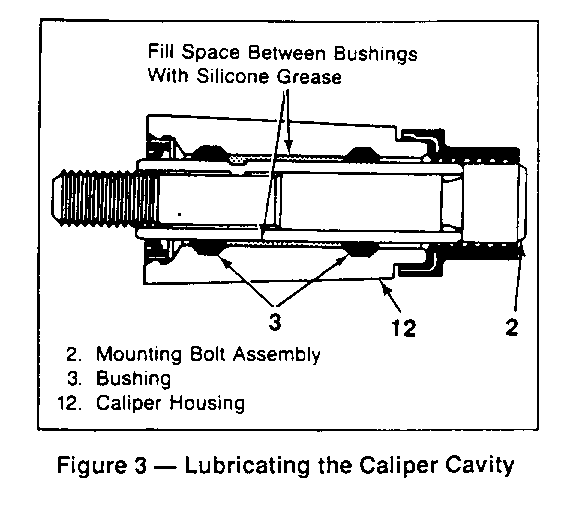
When brake rotors are refinished, or whenever brake calipers are removed to service brake components, the calipers should be inspected. Check caliper mounting bolt and sleeve assemblies for corrosion and replace if corrosion is found. When reinstalling the caliper liberally fill both cavities between the bushings in the housing with silicone grease (see Figure 3). Once reinstalled, the clearance between the caliper and the bracket should be checked. If necessary, remove the caliper and file the ends of the bracket stops to obtain 0.127 - 0.356 mm/side (0.005 - 0.014 inch/side) or 0.254 - 0.712 mm (0.010 - 0.028 inch) total clearance. (Measure clearances individually and then together (see Figure 4).
BRAKE BURNISH PROCEDURE:
Whenever rotors are refinished and/or braked pads are replaced the following brake burnishing procedure must be used to ensure proper initial "break in" of components.
On a dry clean level roadway, make twelve stops using the following procedure:
First Stop:
Stop vehicle from 40 mph by applying the brakes to achieve a deceleration rate of 10 ft./ sec./sec. (A 10 ft./sec./sec deceleration is equivalent to stopping the vehicle from 40 mph in 6 seconds.)
Second through Eleventh Stops: Stop vehicle from 50 mph by applying the brakes to achieve a deceleration rate of 15 ft./ sec./sec. (A 15 ft./sec./sec deceleration is equivalent to stopping the vehicle from 50 mph in 5 seconds.)
Twelfth Stop:
Stop vehicle from 40 mph by applying the brakes to achieve a deceleration rate of 10 ft./ sec./sec.
In order to allow brake temperatures to stabilize, it will be necessary to drive 1/2 mile between stops without applying brakes. Following completion of burnish procedure (twelfth stop) drive vehicle 3 miles keeping brake usage to a minimum in order to achieve sufficient brake cool down.
SYSTEM FRONT BRAKES REAR BRAKES BRAKE ASSIST ------ ------------- -------------- --------------------- JB3 Disc 11.57- 254 mm x 57 mm Vacuum-Dual Diaphragm JD3 inch x 1-inch (Leading/Trailing) Hydraulic-Hydro Boost
JB5 Disc 11.57- 2.54 mm x 57 mm Vacuum-Dual Diaphragm JD5 inch x 1.25-inch (Leading/Trailing) Hydraulic-Hydro Boost
JB6 Disc 11.57-inch 11.15-inch x 2.75-inch Vacuum-Dual Diaphragm JD6 x 1.25-inch (Leading/Trailing) Hydraulic-Hydro Boost
JB7 Disc 12.5-inch 13.00-inch x 2.5-inch Vacuum-Dual Diaphragm JD7 x 1.26-inch (Duo-Servo) Hydraulic-Hydro Boost
JB8 Disc 12.5-inch 13.00-inch x 3.54nch Hydraulic-Hydro Boost x 1.26-inch (Duo-Servo)
JF9 Disc 14.25-inch Disc 13.75 x 1.54 Hydraulic-Hydro Boost x 1.54inch
DRUM DIAMETERS
Maximum Replacement Original Refinish (Discard) ---------- -------- ----------- 254 mm 255.3 mm 256.3 mm 11.150-Inch 11.210-Inch 11.240-Inch 13.000-Inch 13.060-Inch 13.090-Inch
ROTOR THICKNESS
Minimum Replacement After Refinishing (Discard) -------------------- --------------------- 0.980-Inch (24.88 mm) 0.965-Inch (24.5 mm) 1.230-Inch (31.25 mm) 1.215-Inch (30.86 mm) 1.480-Inch 1.465-inch

General Motors bulletins are intended for use by professional technicians, not a "do-it-yourselfer". They are written to inform those technicians of conditions that may occur on some vehicles, or to provide information that could assist in the proper service of a vehicle. Properly trained technicians have the equipment, tools, safety instructions and know-how to do a job properly and safely. If a condition is described, do not assume that the bulletin applies to your vehicle, or that your vehicle will have that condition. See a General Motors dealer servicing your brand of General Motors vehicle for information on whether your vehicle may benefit from the information.
