Growl/Moan Noise During Sharp Left Turn (Modify Engine Mount Stamping)

| Subject: | Growl/Moan Noise During Sharp Left Turn (Modify Engine Mount Stamping) |
| Models: | 2000-2001 Chevrolet Cavalier |
| 2000-2001 Pontiac Sunfire |
| with 2.2L Engine (VIN 4 -- RPO LN2) |
Thlis bulletin is being revised to add the 2001 model year. Please discard Corporate Bulletin Number 00-06-01-018 (Section 06-Engine/Propulsion System).
Condition
Some customers may comment on a growl/moan type noise coming from the front of the vehicle on heavy acceleration when making a sharp left hand turn.
Cause
The cast arm of the engine mount may contact the outer stamped cage of the mount assembly.
Correction
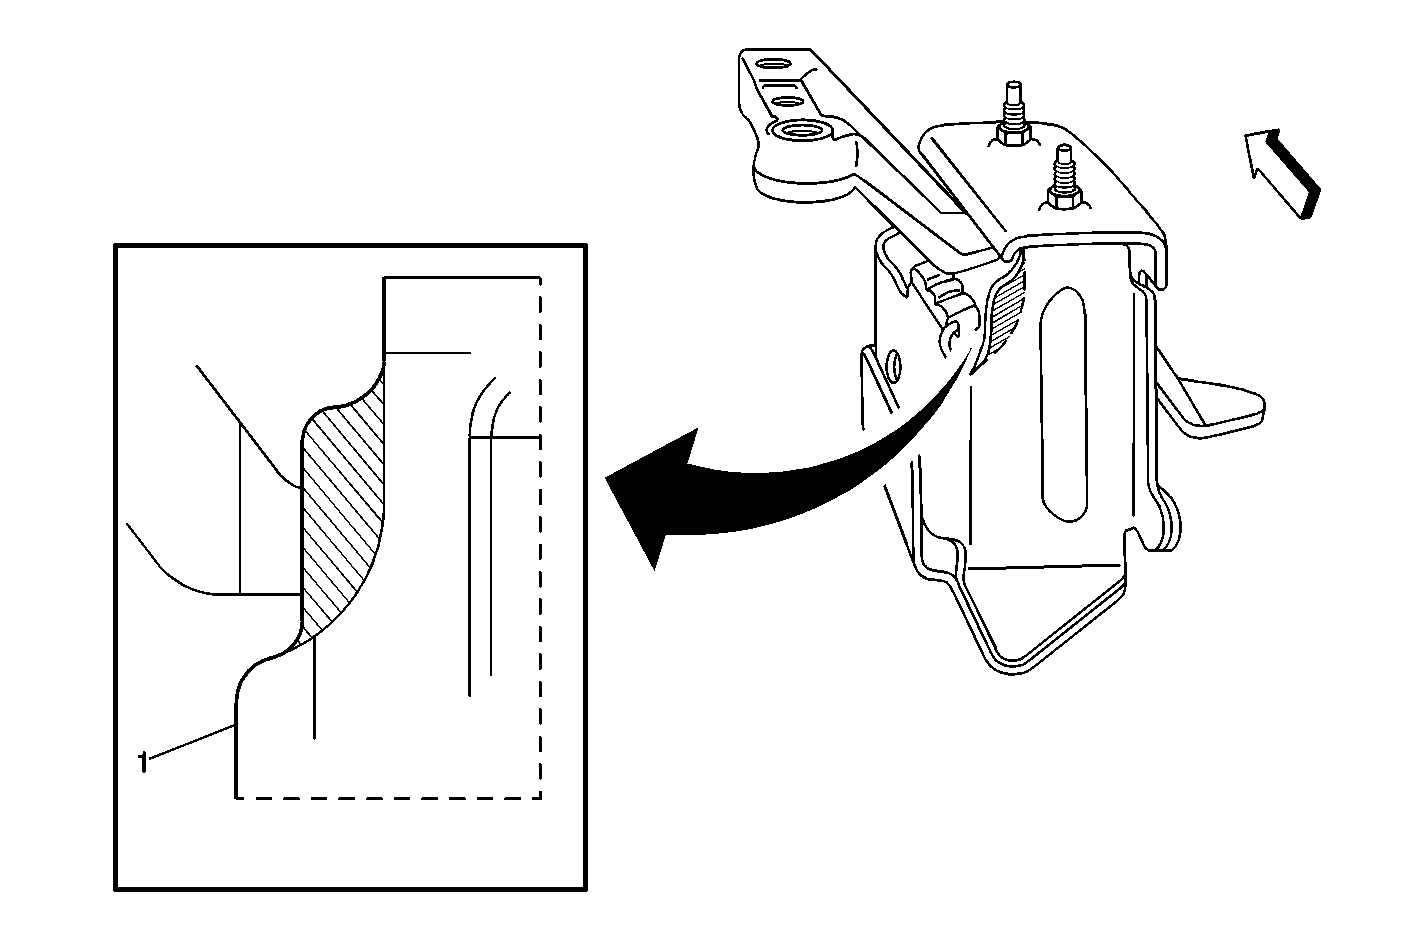
Following the service procedure below, trim the stamped cage of the mount assembly of the area highlighted in the illustration.
- Remove the bolt securing the coolant recovery bottle and position the bottle to gain access to the engine mount attachment.
- Install the J 28467-360, Engine Support Fixture.
- Remove the A/C line from the clip secured to the engine mount assembly.
- Remove the nuts securing the engine mount to the body.
- Remove the bolts securing the mount to the engine bracket.
- Remove the engine mount assembly from the vehicle.
- Cut out the template (1) and position on the engine mount assembly. Identify the area that is to be removed from the mount to provide additional clearance.
- Grind and/or file away material until the mount conforms to configuration of the template.
- Touch up the exposed bare metal edge of the trimmed mount surface.
- Install the engine mount assembly. Hand start the attaching bolts and nuts.
- Install the bolts securing the mount to the engine bracket.
- Install the nuts securing the mount to the body.
- Install the A/C line into the clip secured to the engine mount assembly.
- Remove the J 28467-360, Engine Support Fixture.
- Position the coolant recovery bottle and secure to the body with the attaching bolt.

Refer to your 2001 GM Approved Refinish Materials Booklet, GM 40901M-D-2001 for specific material recommendations and refer to your paint manufacturer for specific application information.
Tighten
Tighten the bolts to 60 N·m (44 lb ft) +
90°.
Tighten
Tighten the nuts to 75 N·m (55 lb ft).
Tighten
Tighten the bolt to 10 N·m (89 lb in).
Warranty Information
For vehicles repaired under warranty, use:
Labor Operation | Description | Labor Time |
|---|---|---|
J1506 | Mount, Front Engine | 0.6 hr |
Add | For Mount Modification | 0.1 hr |
