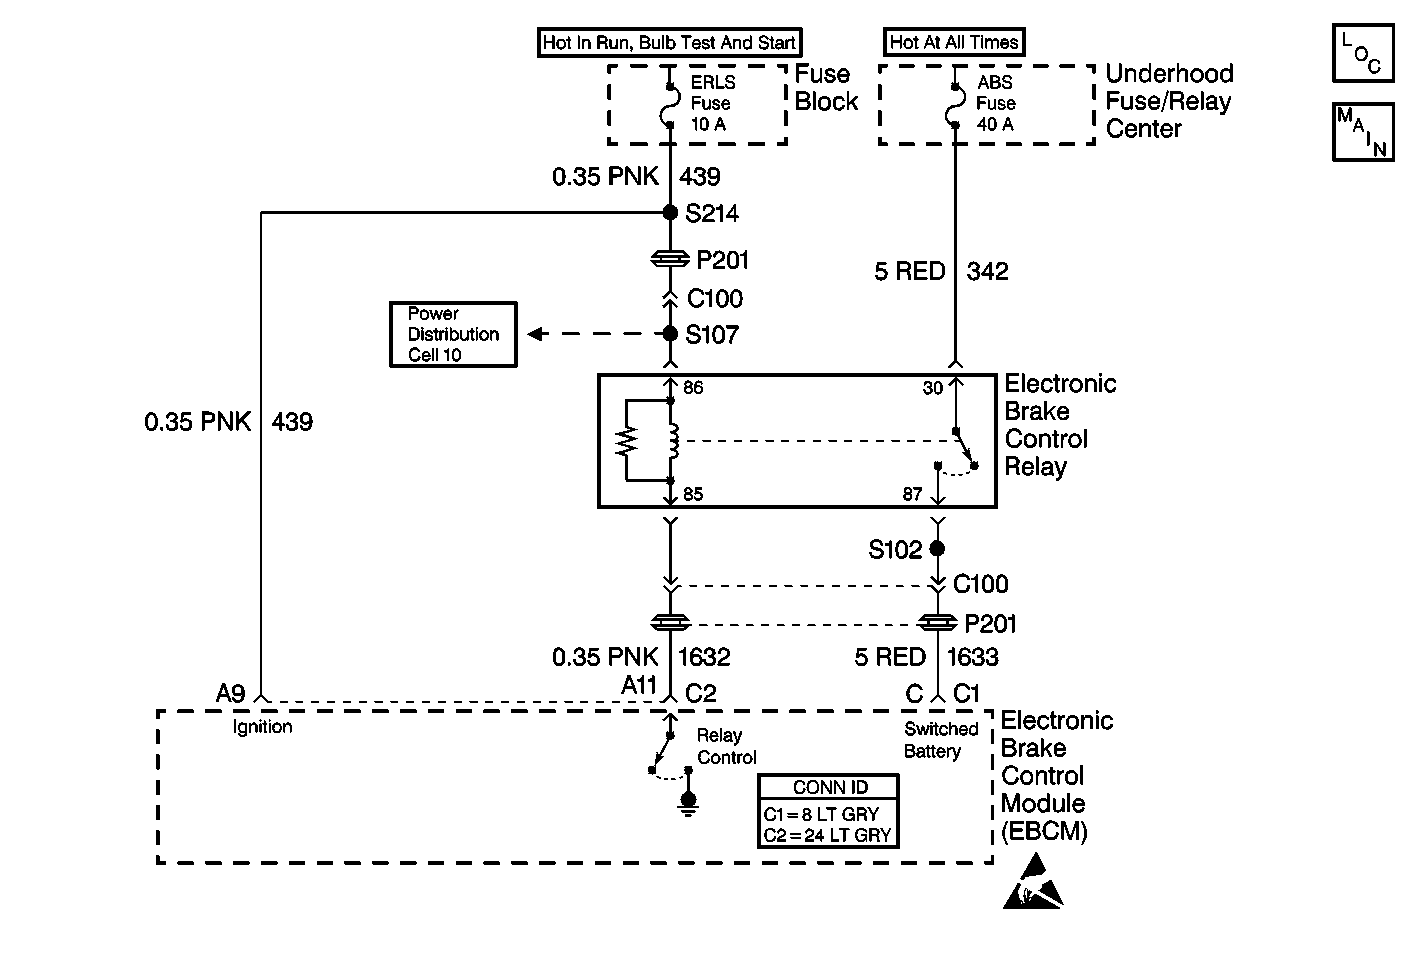
Circuit Description
DTC C1236 monitors the voltage level available to the EBCM controller. If the voltage drops below 11.2 volts, full performance of the ABS system is not guaranteed. During ABS operation, there are several current requirements that will cause battery voltage at the EBCM to drop. As a result, voltage is monitored prior to an ABS event to indicate good charging system condition. Voltage is also monitored during an ABS event when voltage may drop significantly.
Conditions for Setting the DTC
DTC C1236 can set only if the vehicle's speed is greater than 5 km/h (3 mph).
A malfunction exists if the switched battery voltage is less than 11.4 volts without ABS being active or less than 8.4 volts during an ABS event.
Action Taken When the DTC Sets
| • | A malfunction DTC stores. |
| • | The ABS disables. |
| • | The ABS warning indicator turns on. |
Conditions for Clearing the DTC
| • | The condition responsible for setting the DTC no longer exists and the Scan Tool Clear DTCs function is used. |
| • | 100 drive cycles pass with no DTCs detected. A drive cycle consists of starting the vehicle, driving the vehicle over 16 km/h (10 mph), stopping and then turning the ignition off. |
Diagnostic Aids
The following conditions may cause an intermittent malfunction:
| • | A poor connection |
| • | Rubbed-through wire insulation |
| • | A broken wire inside the insulation |
Use the enhanced diagnostic function of the Scan Tool in order to measure the frequency of the malfunction.
Thoroughly inspect any circuitry that may be causing the intermittent complaint for the following conditions:
| • | Backed out terminals |
| • | Improper mating |
| • | Broken locks |
| • | Improperly formed or damaged terminals |
| • | Poor terminal-to-wiring connections |
| • | Physical damage to the wiring harness |
While performing a Voltage Load test, CKT 439 should be measured for high resistance or an open condition if it is noted that only the ignition voltage drops below acceptable voltage levels.
Ensure the starting and charging systems are in proper working order. The battery should be fully charged and in good condition before beginning the diagnostic table. Refer to Battery and Charging System.
Test Description
-
This test determines if the malfunction is present.
-
This test checks for excessive resistance in the switched battery input circuit.
-
This test checks for excessive resistance in the battery feed circuit.
-
This test checks for an open or high resistance in the switched ignition circuit.
-
This test determines if the malfunction is caused by the EBCM.
Step | Action | Value(s) | Yes | No | ||||||||||||||||||
|---|---|---|---|---|---|---|---|---|---|---|---|---|---|---|---|---|---|---|---|---|---|---|
|
Important: Zero the J 39200 test leads before making any resistance measurements. Refer to the J 39200 user's manual. | ||||||||||||||||||||||
1 | Was the ABS Diagnostic System Check performed? | -- | ||||||||||||||||||||
Do not start the engine. Does DTC C1236 set as a current DTC? | -- | |||||||||||||||||||||
3 |
Are the ignition voltage and the battery voltage equal to or greater than the specified range? | 10 V | ||||||||||||||||||||
Is the resistance within the specified range? | 0-2 ohms | |||||||||||||||||||||
Is the resistance within the specified range? | 0-2 ohms | |||||||||||||||||||||
Is the resistance within the specified range? | 0-2 ohms | |||||||||||||||||||||
7 | Use the J 39200 in order to measure the resistance between the fuse block terminal (ERLS Fuse [10A]) and the positive battery cable. Is the resistance within the specified range? | 0-2 ohms | ||||||||||||||||||||
8 |
Are there signs of terminal damage, poor terminal contact, or terminal corrosion? | -- | ||||||||||||||||||||
Does DTC C1236 set as a current DTC? | -- | |||||||||||||||||||||
10 | Repair the low voltage condition. Refer to Charging System Check in Engine Electrical. Is the low voltage condition repaired? | -- | -- | |||||||||||||||||||
11 | Repair the open or high resistance in CKT 1633. Refer to Wiring Repairs in Wiring Systems. Is the repair complete? | -- | -- | |||||||||||||||||||
12 | Repair the open or high resistance in CKT 342. Refer to Wiring Repairs in Wiring Systems. Is the repair complete? | -- | -- | |||||||||||||||||||
13 | Repair the open or high resistance in CKT 439. Refer to Wiring Repairs in Wiring Systems. Is the repair complete? | -- | -- | |||||||||||||||||||
14 | Repair the open or high resistance in CKT 3 or CKT 1. Refer to Wiring Repairs in Wiring Systems. Is the repair complete? | -- | -- | |||||||||||||||||||
15 | Replace all of the terminals or the connectors that exhibit signs of poor terminal contact, corrosion, or damaged terminals. Is the repair complete? | -- | -- | |||||||||||||||||||
16 | Replace the EBCM. Refer to Electronic Brake Control Module Replacement . Is the repair complete? | -- | -- | |||||||||||||||||||
17 | The malfunction is intermittent or is not present at this time. Refer to Diagnostic Aids for more information. Is the action complete? | -- | System OK | -- | ||||||||||||||||||
