Engine Wiring Harness Assembly Installation LWBLHD
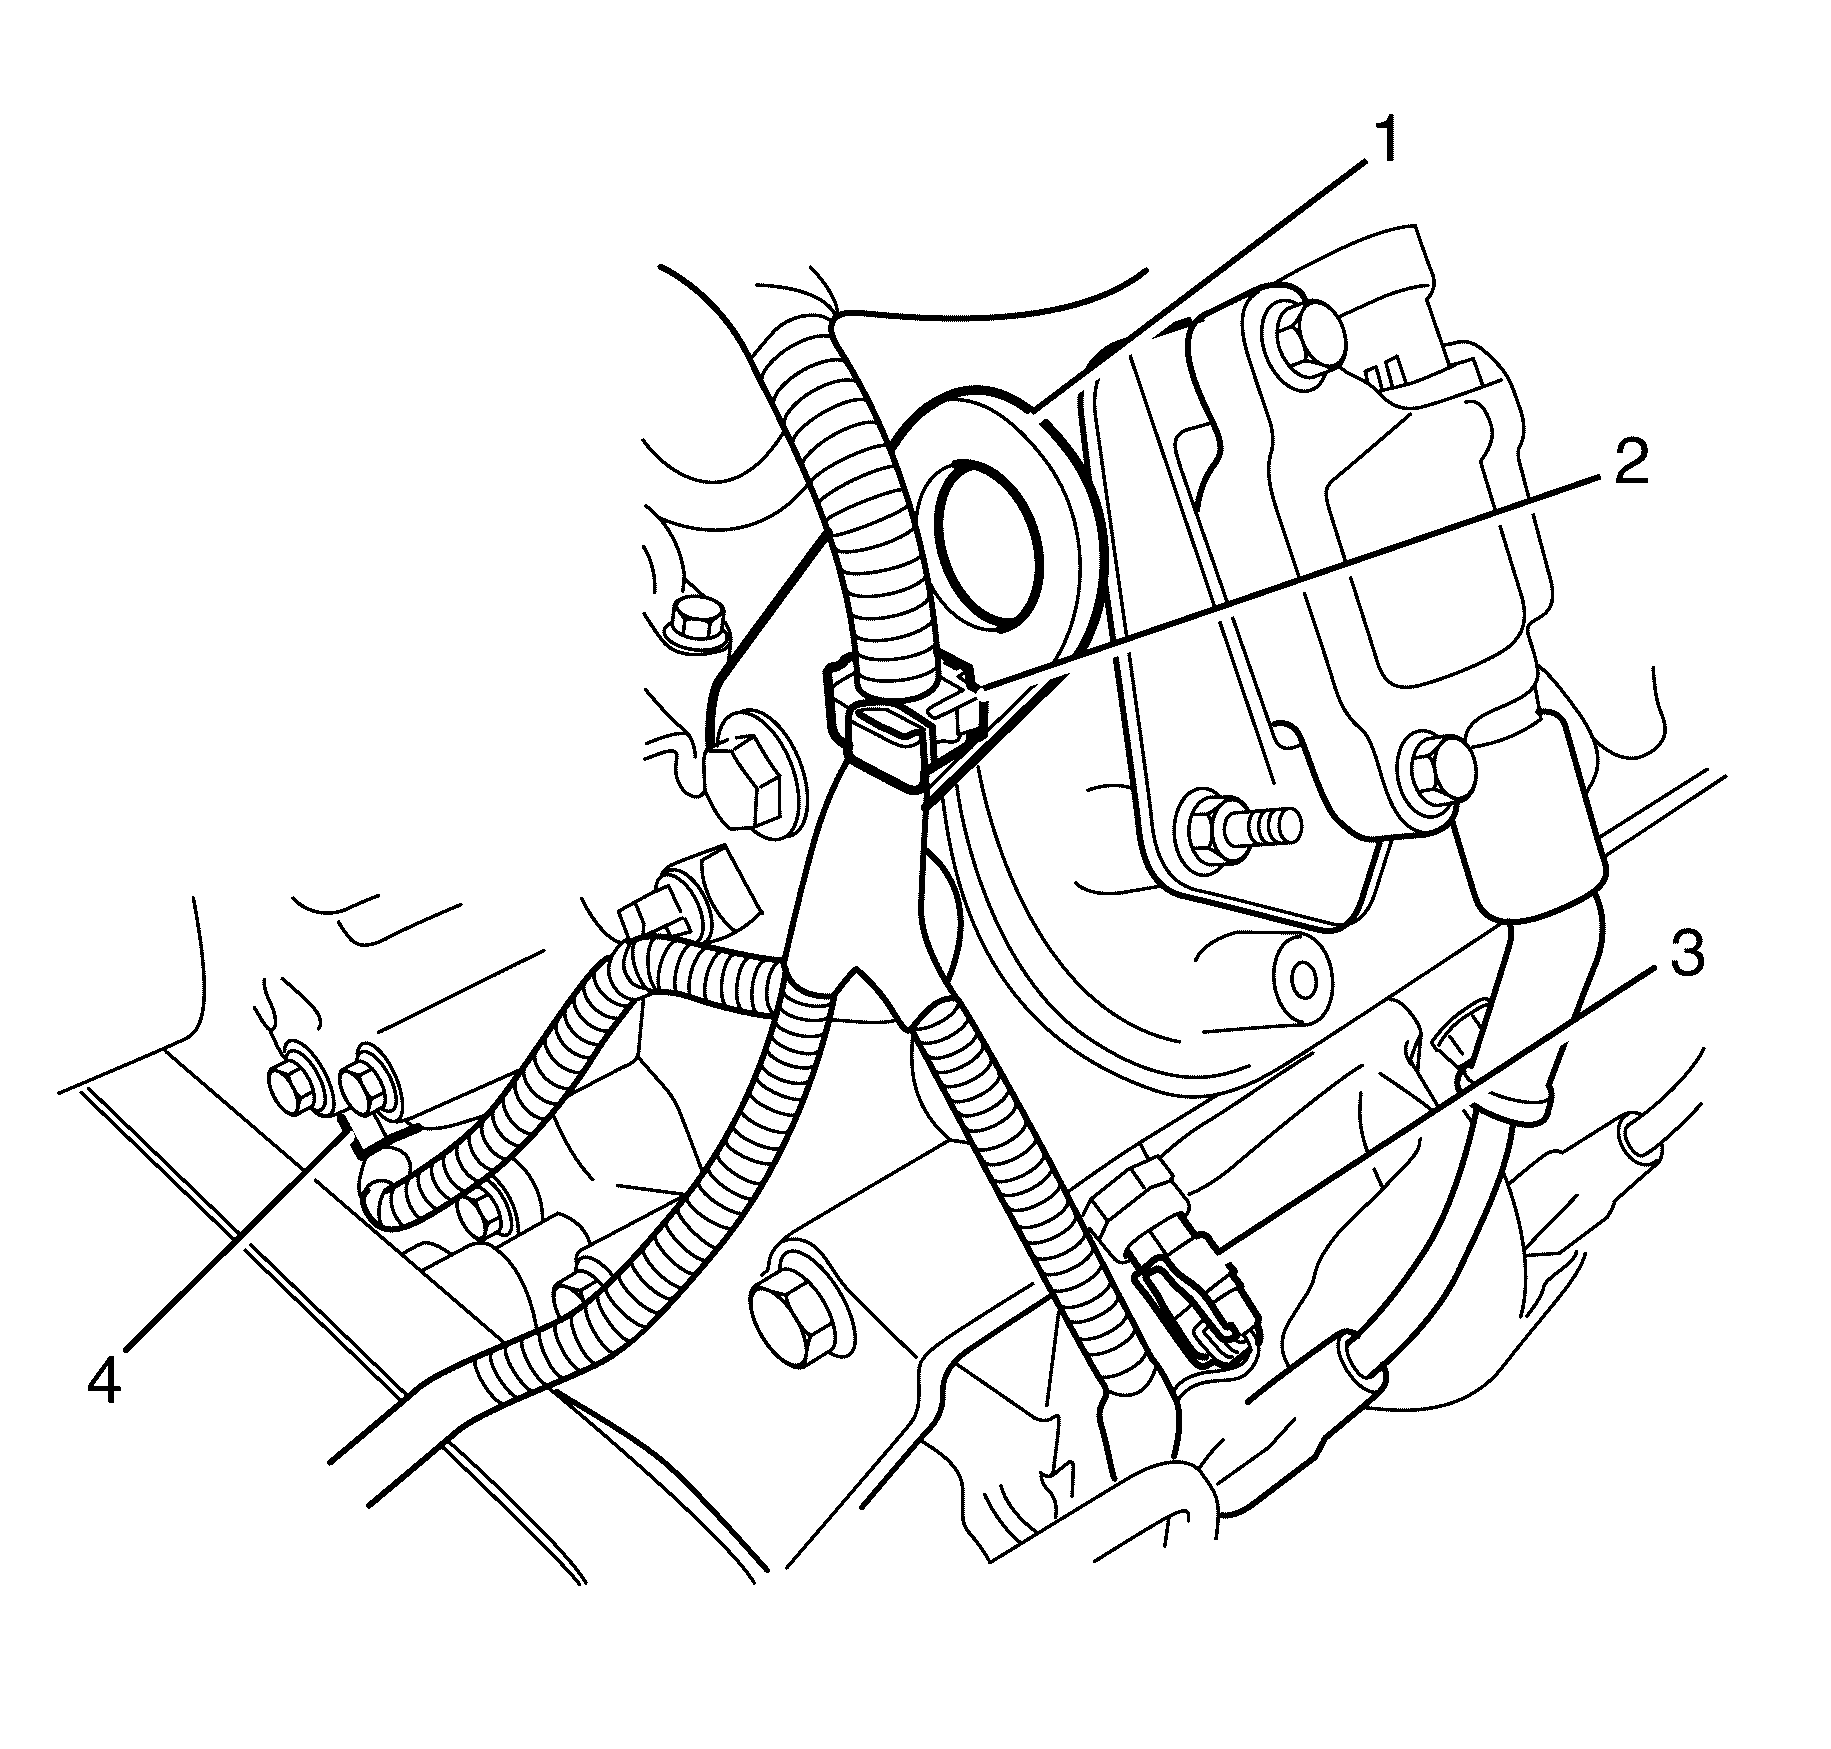
- Connect the oil pressure sensor electrical connector (1).
- Install the wiring harness assembly earth to cylinder head retaining bolt (3)
- Attach the wiring harness assembly retaining clip (2) to the left side cylinder head (4).
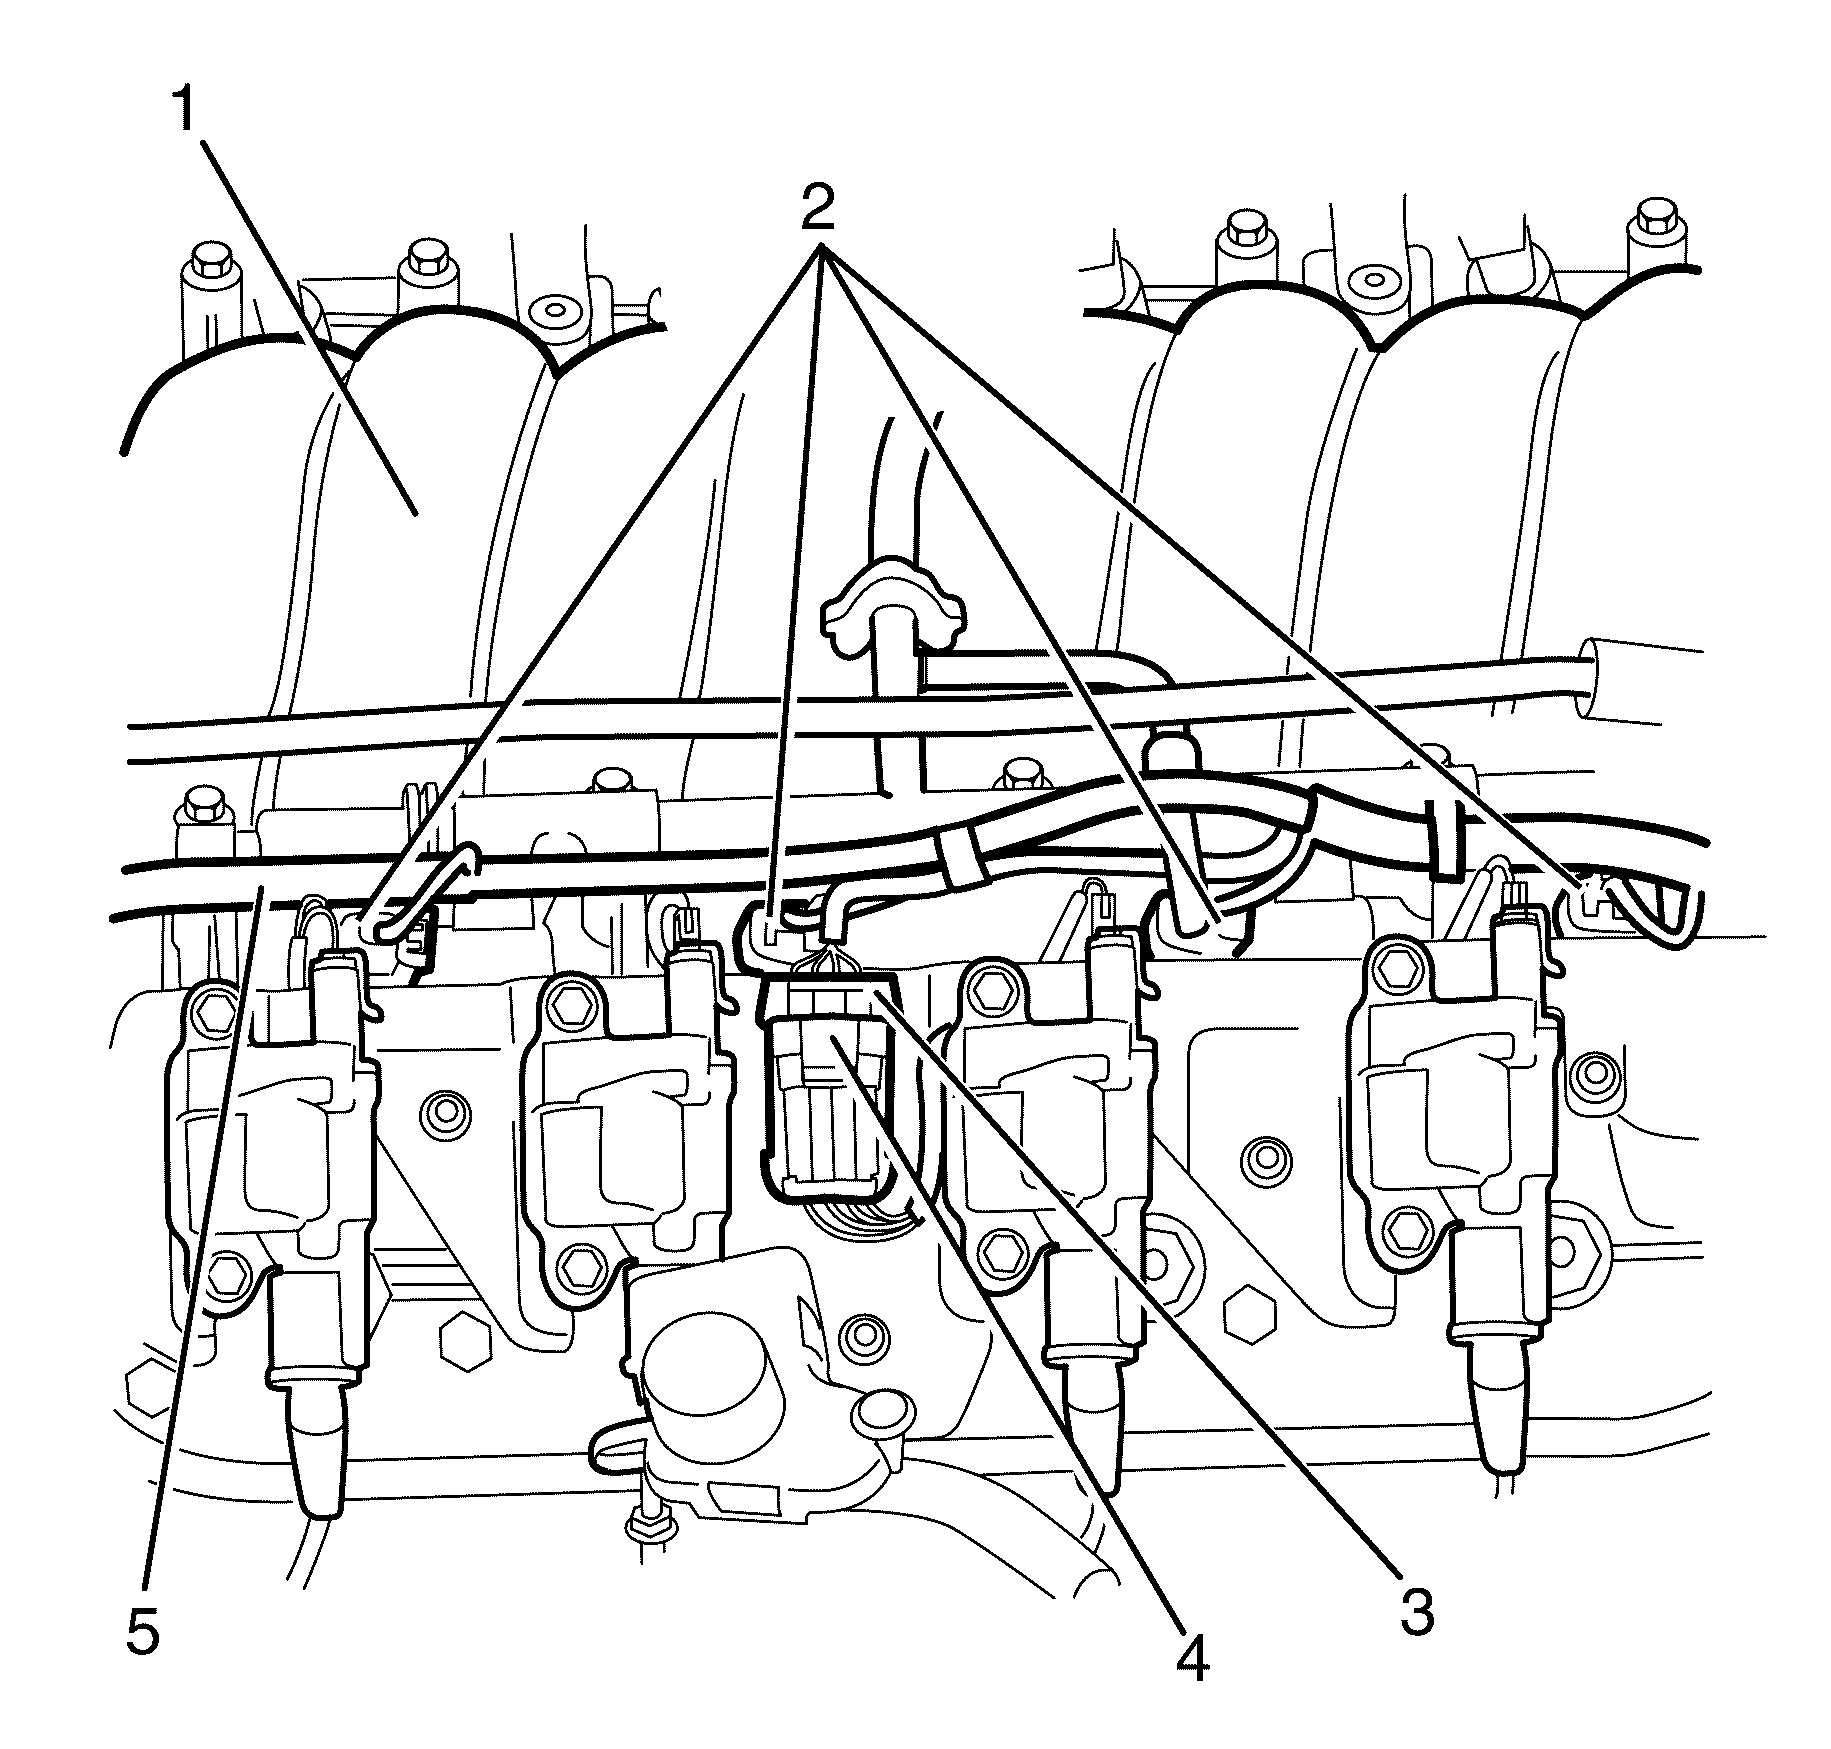
- Position and secure the left side fuel injector wiring harness (5) away from the intake manifold (1).
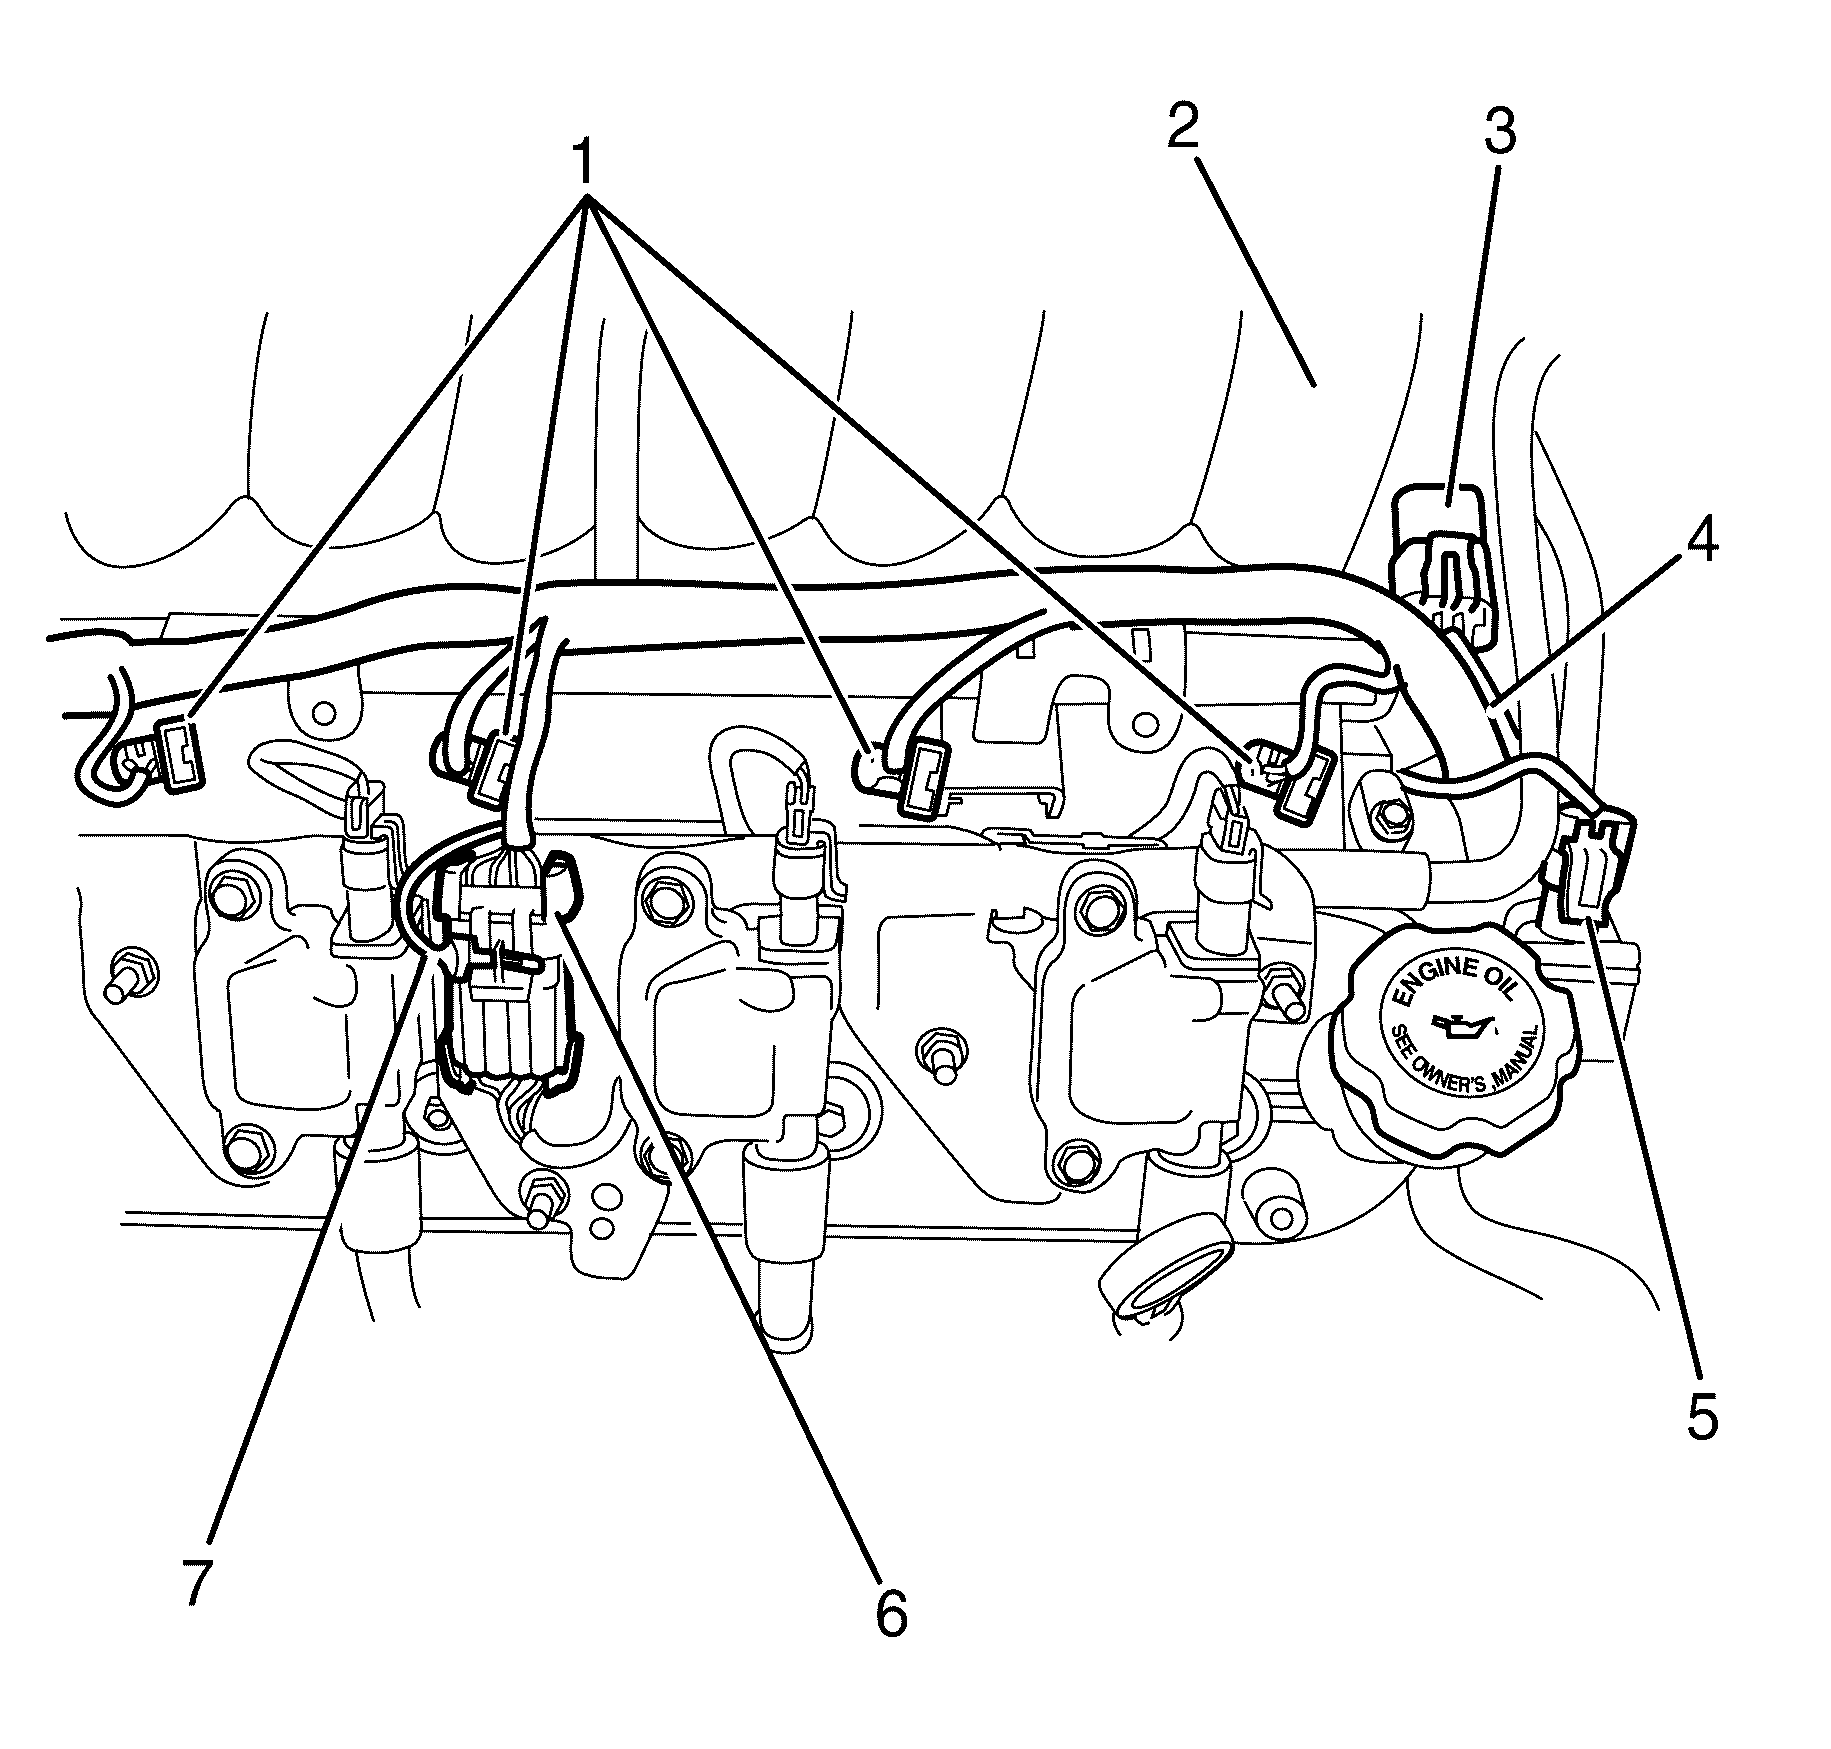
- Connect the left side ignition coil main connector (3).
- Install the CPA lock (4) from the left side ignition coil main connector (3).
- Connect the left side fuel injector wiring harness connectors (2).
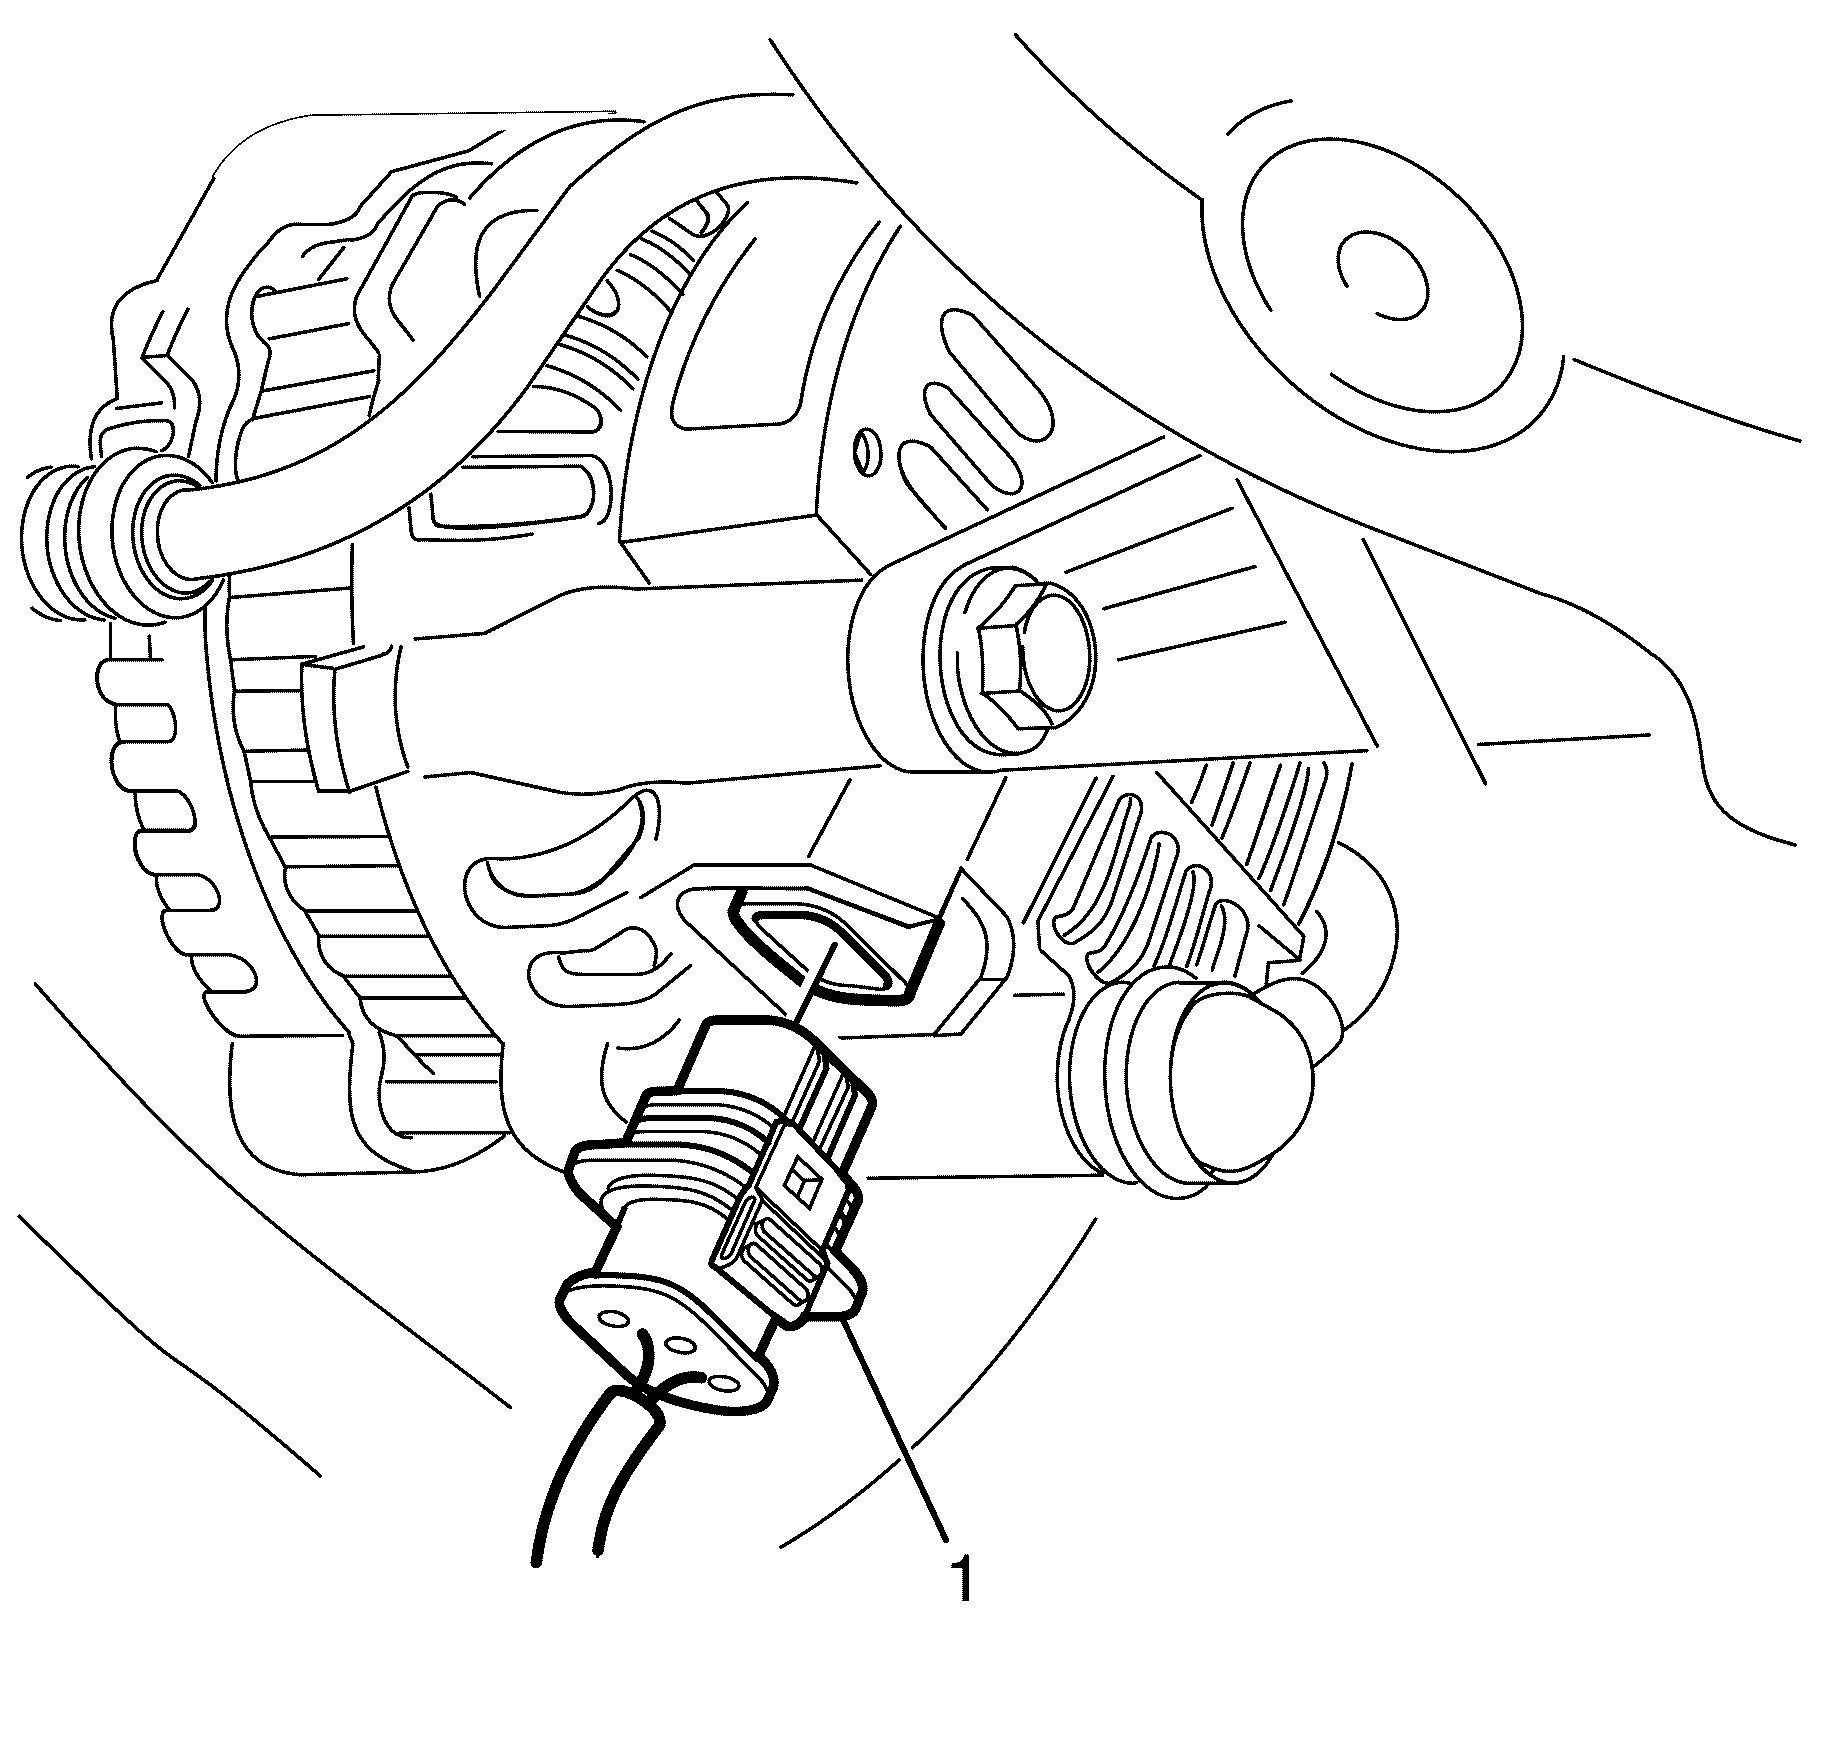
- Connect the alternator electrical connector (1).
- Connect the camshaft position sensor connector (4).
- Connect the coolant temperature sensor connector (3).
- Attach the wiring harness retaining clip (2) to the engine lifting bracket (1).
- Install the power steering reservoir (2) to the power steering pump power steering reservoir bracket (1).
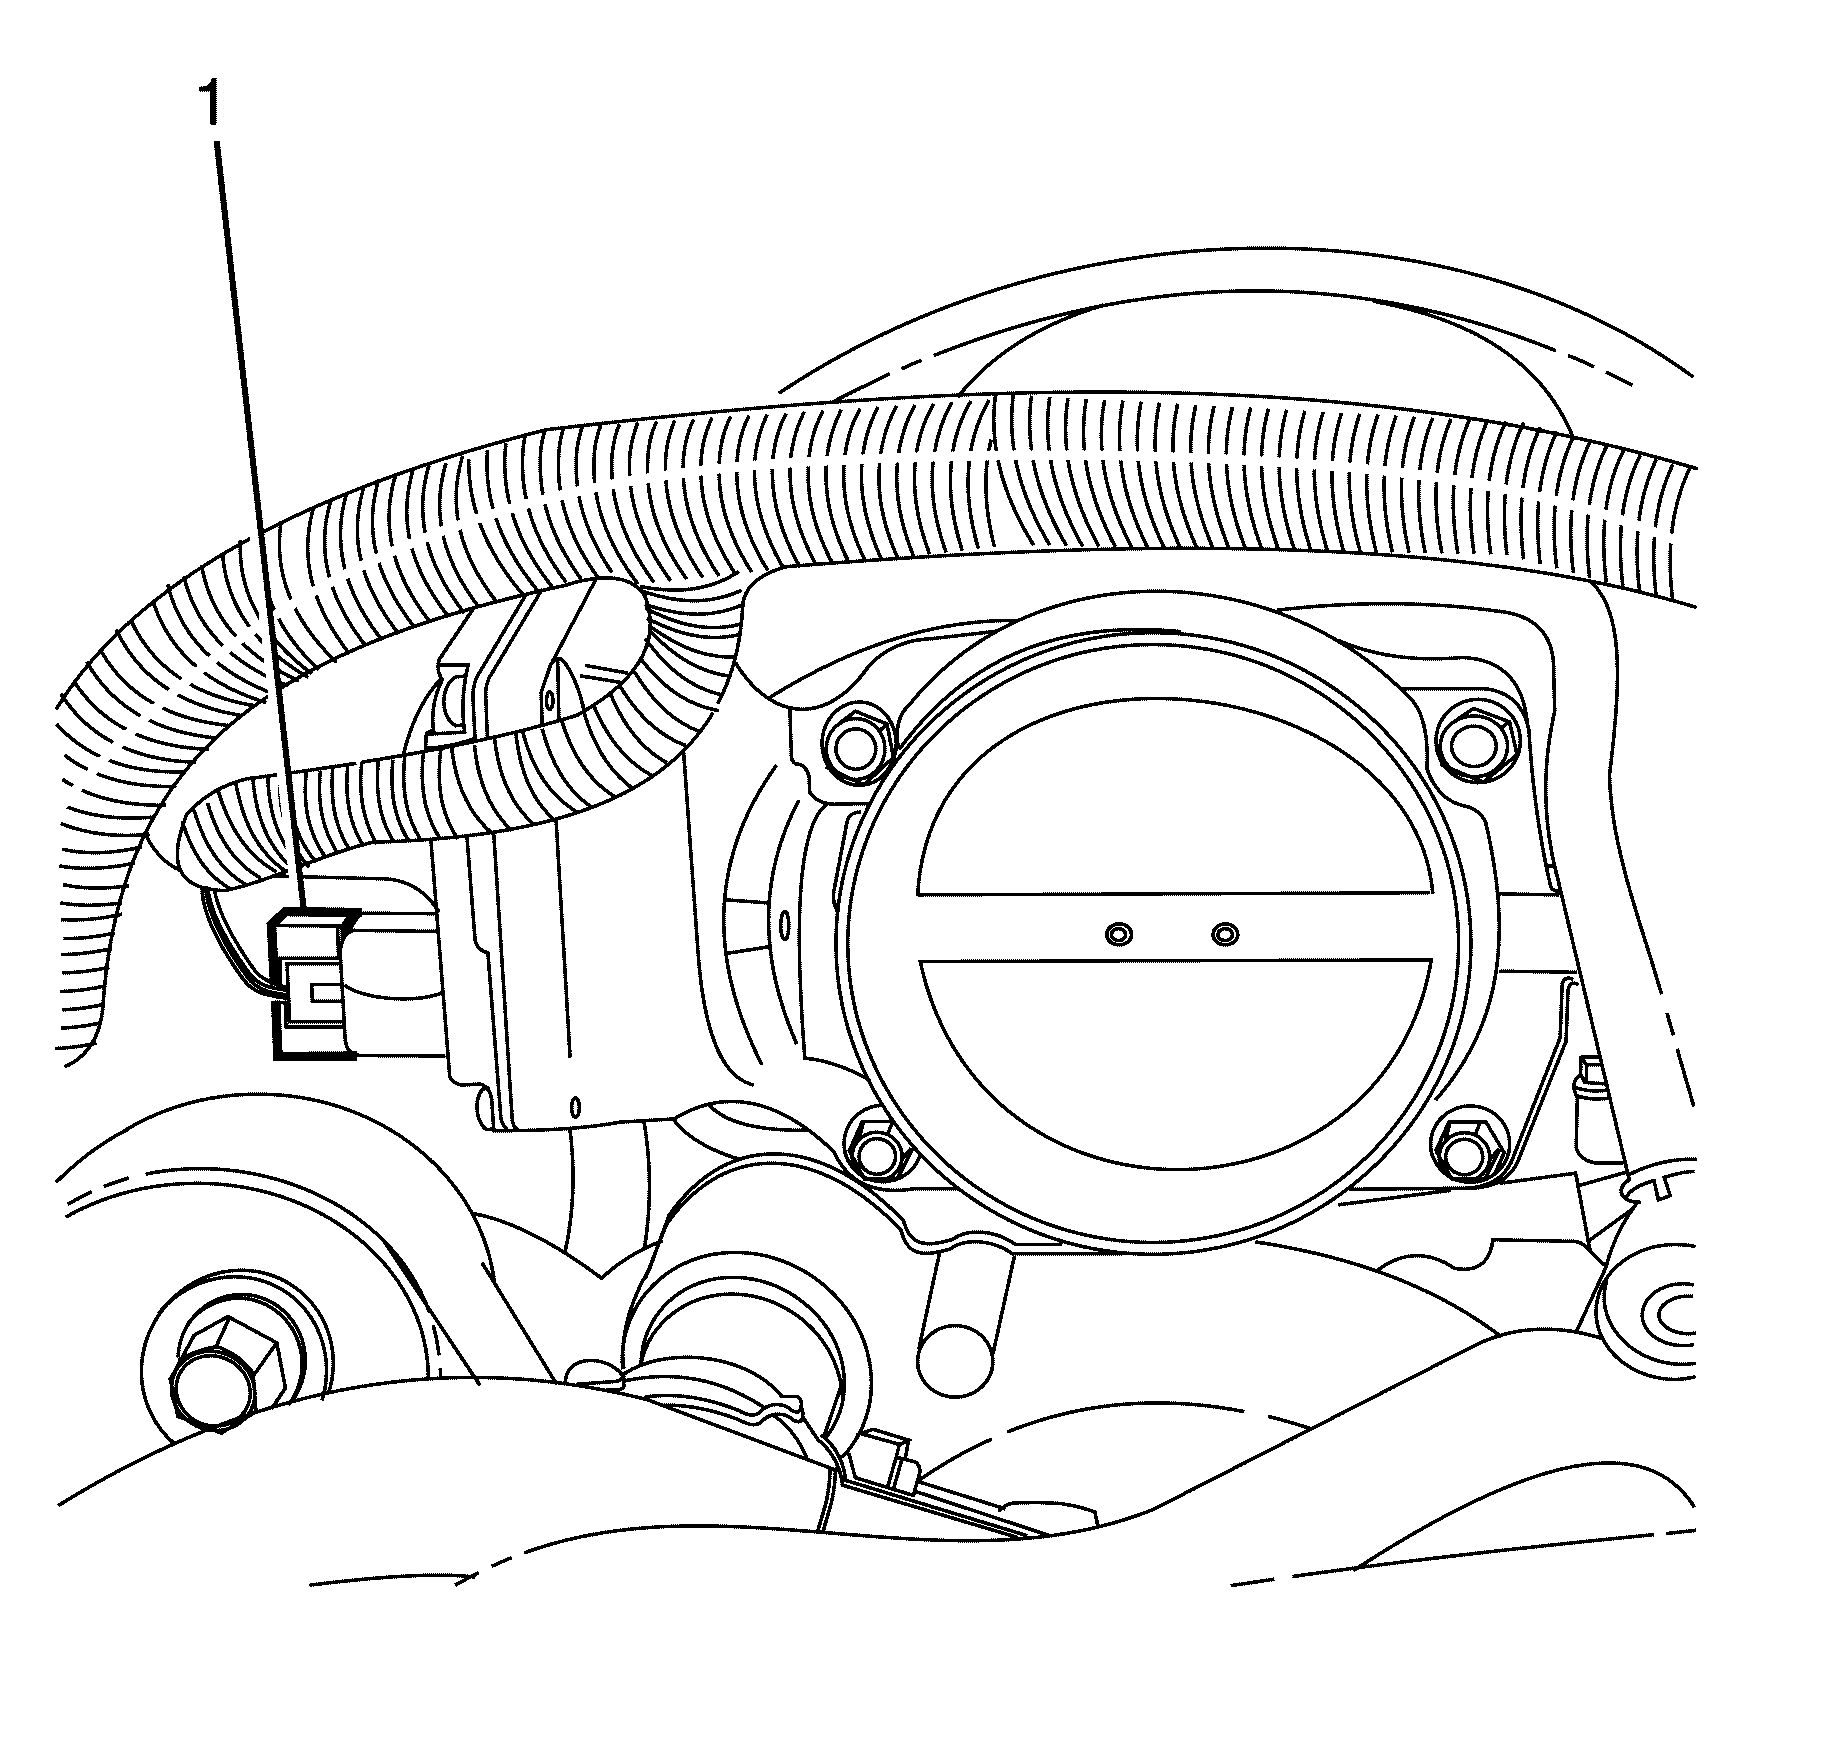
- Connect the electronic throttle body wiring harness connector (1).
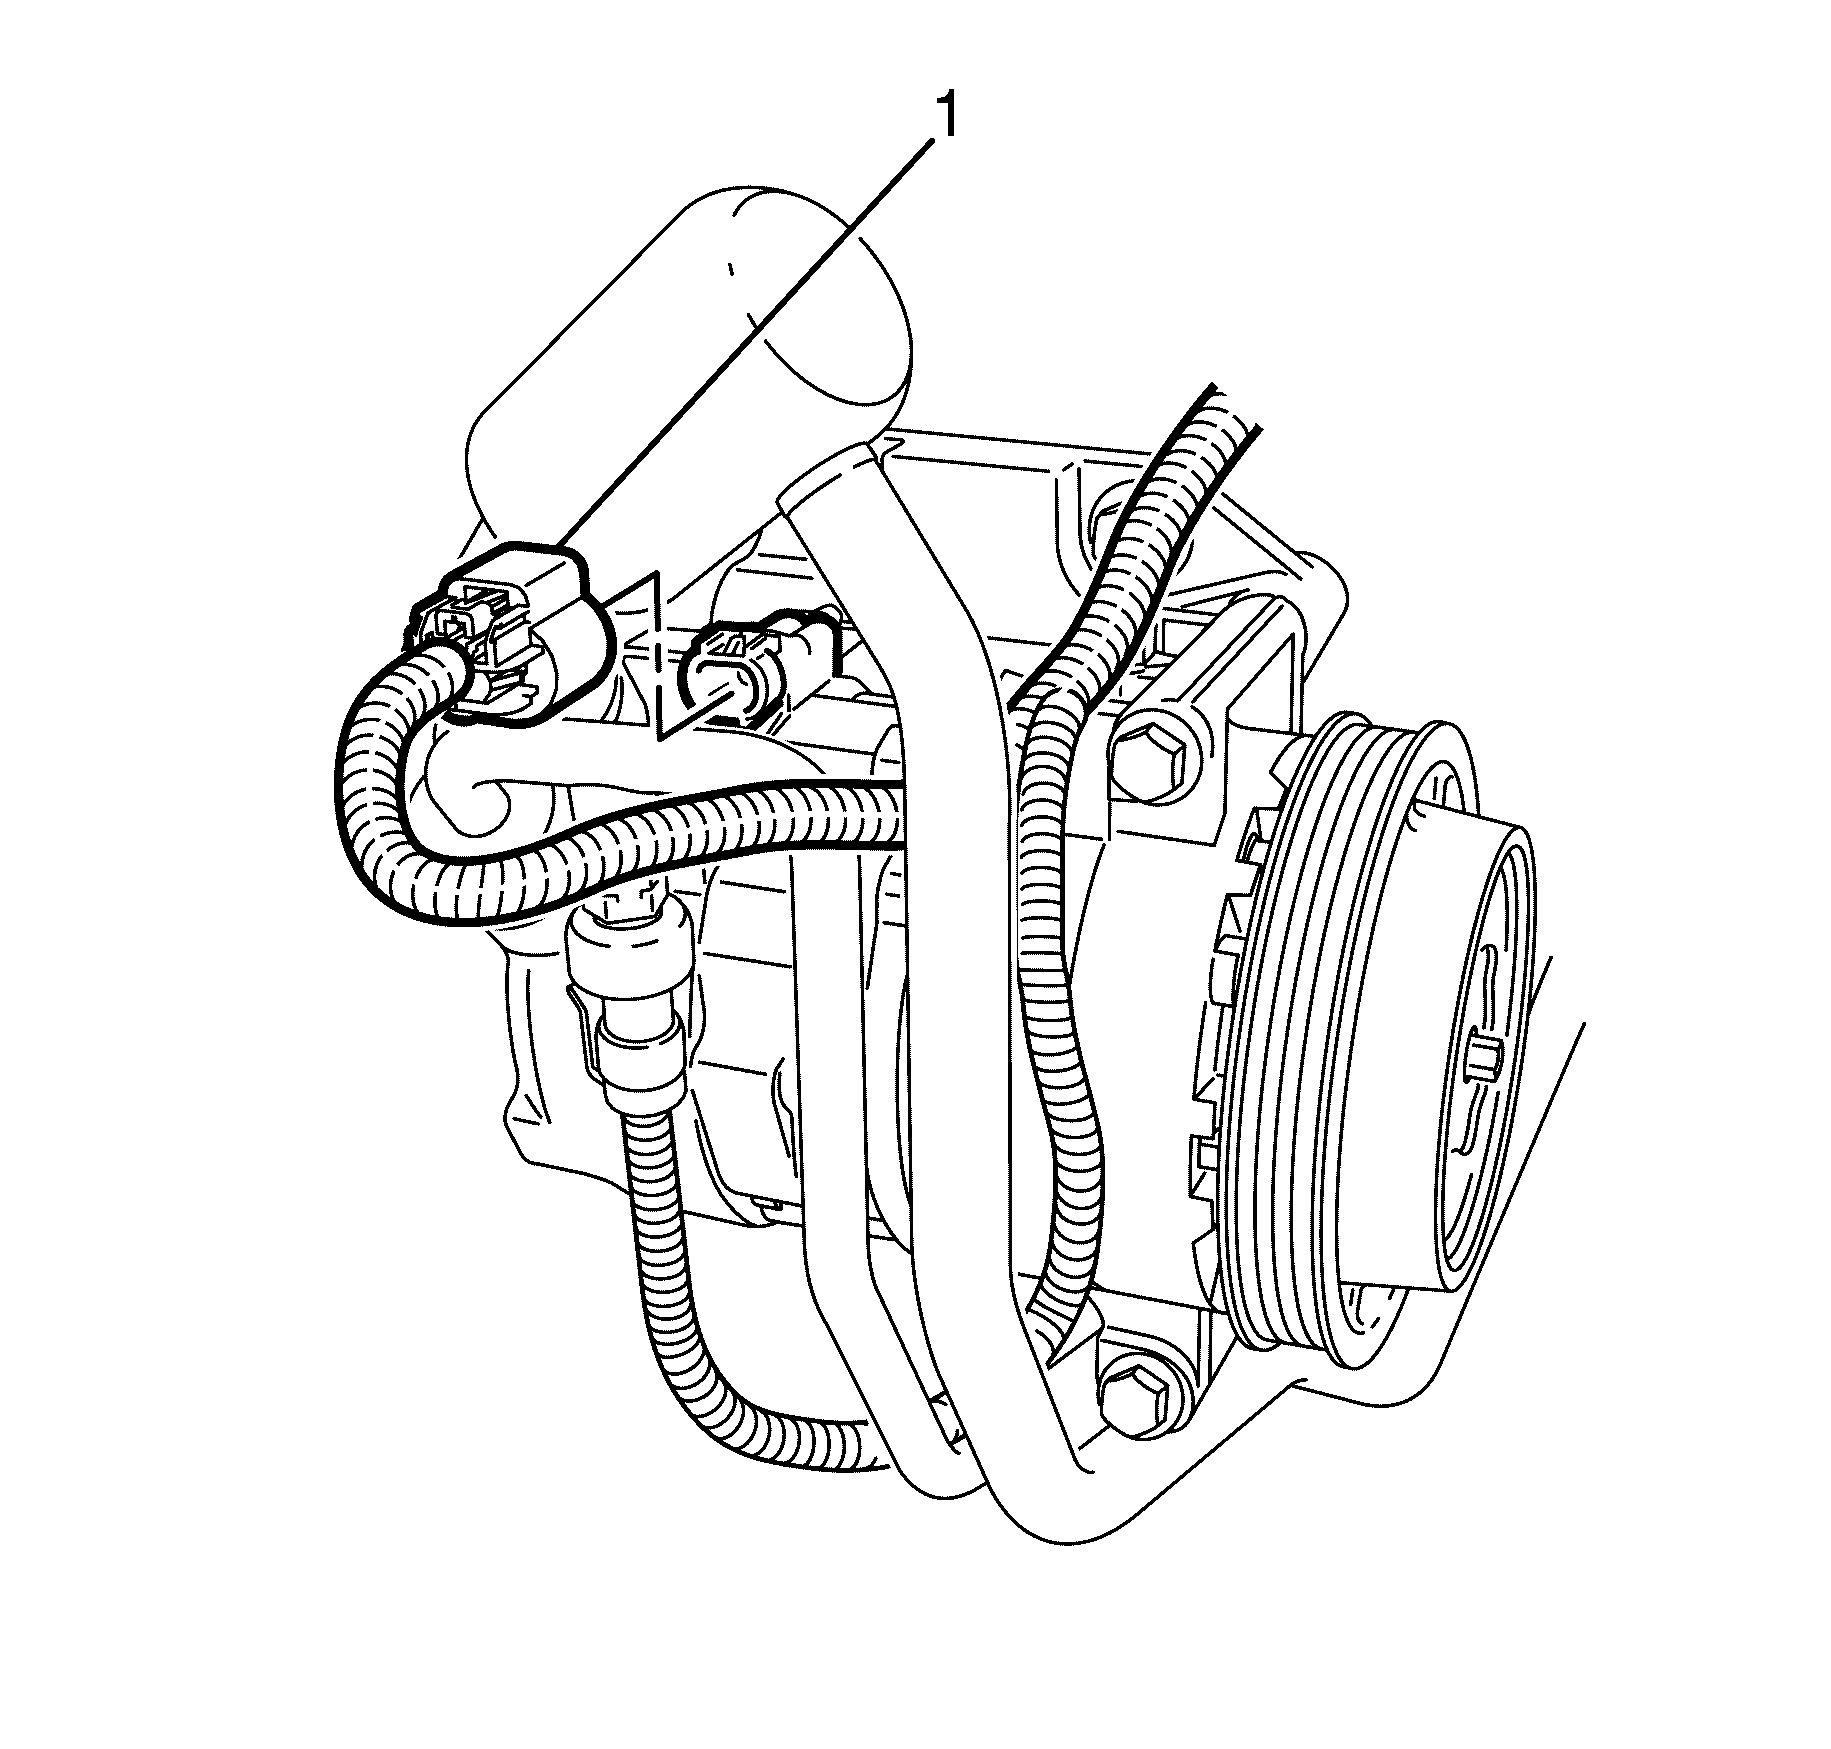
- Connect the electrical connector to the A/C Refrigerant Pressure Sensor (1).
- Connect the A/C electrical connector (1).
- Position the wiring harness ground (1) on he cylinder head (2).
- Install the cylinder head stud (3) to the cylinder head (2).
- Position the vehicle body ground cable (3) on the cylinder head stud (2).
- Install the vehicle body ground cable to cylinder head retaining nut (1).
- Position the right side fuel injector wiring harness (4) on the intake manifold (2).
- Connect the manifold absolute pressure (MAP) sensor wiring harness connector (3).
- Connect the canister purge valve wiring harness connector (5).
- Connect the right side ignition coil main connector (6).
- Install the CPA lock (7) from the right side ignition coil main connector (6).
- Connect the right side fuel injector wiring harness connectors (1).
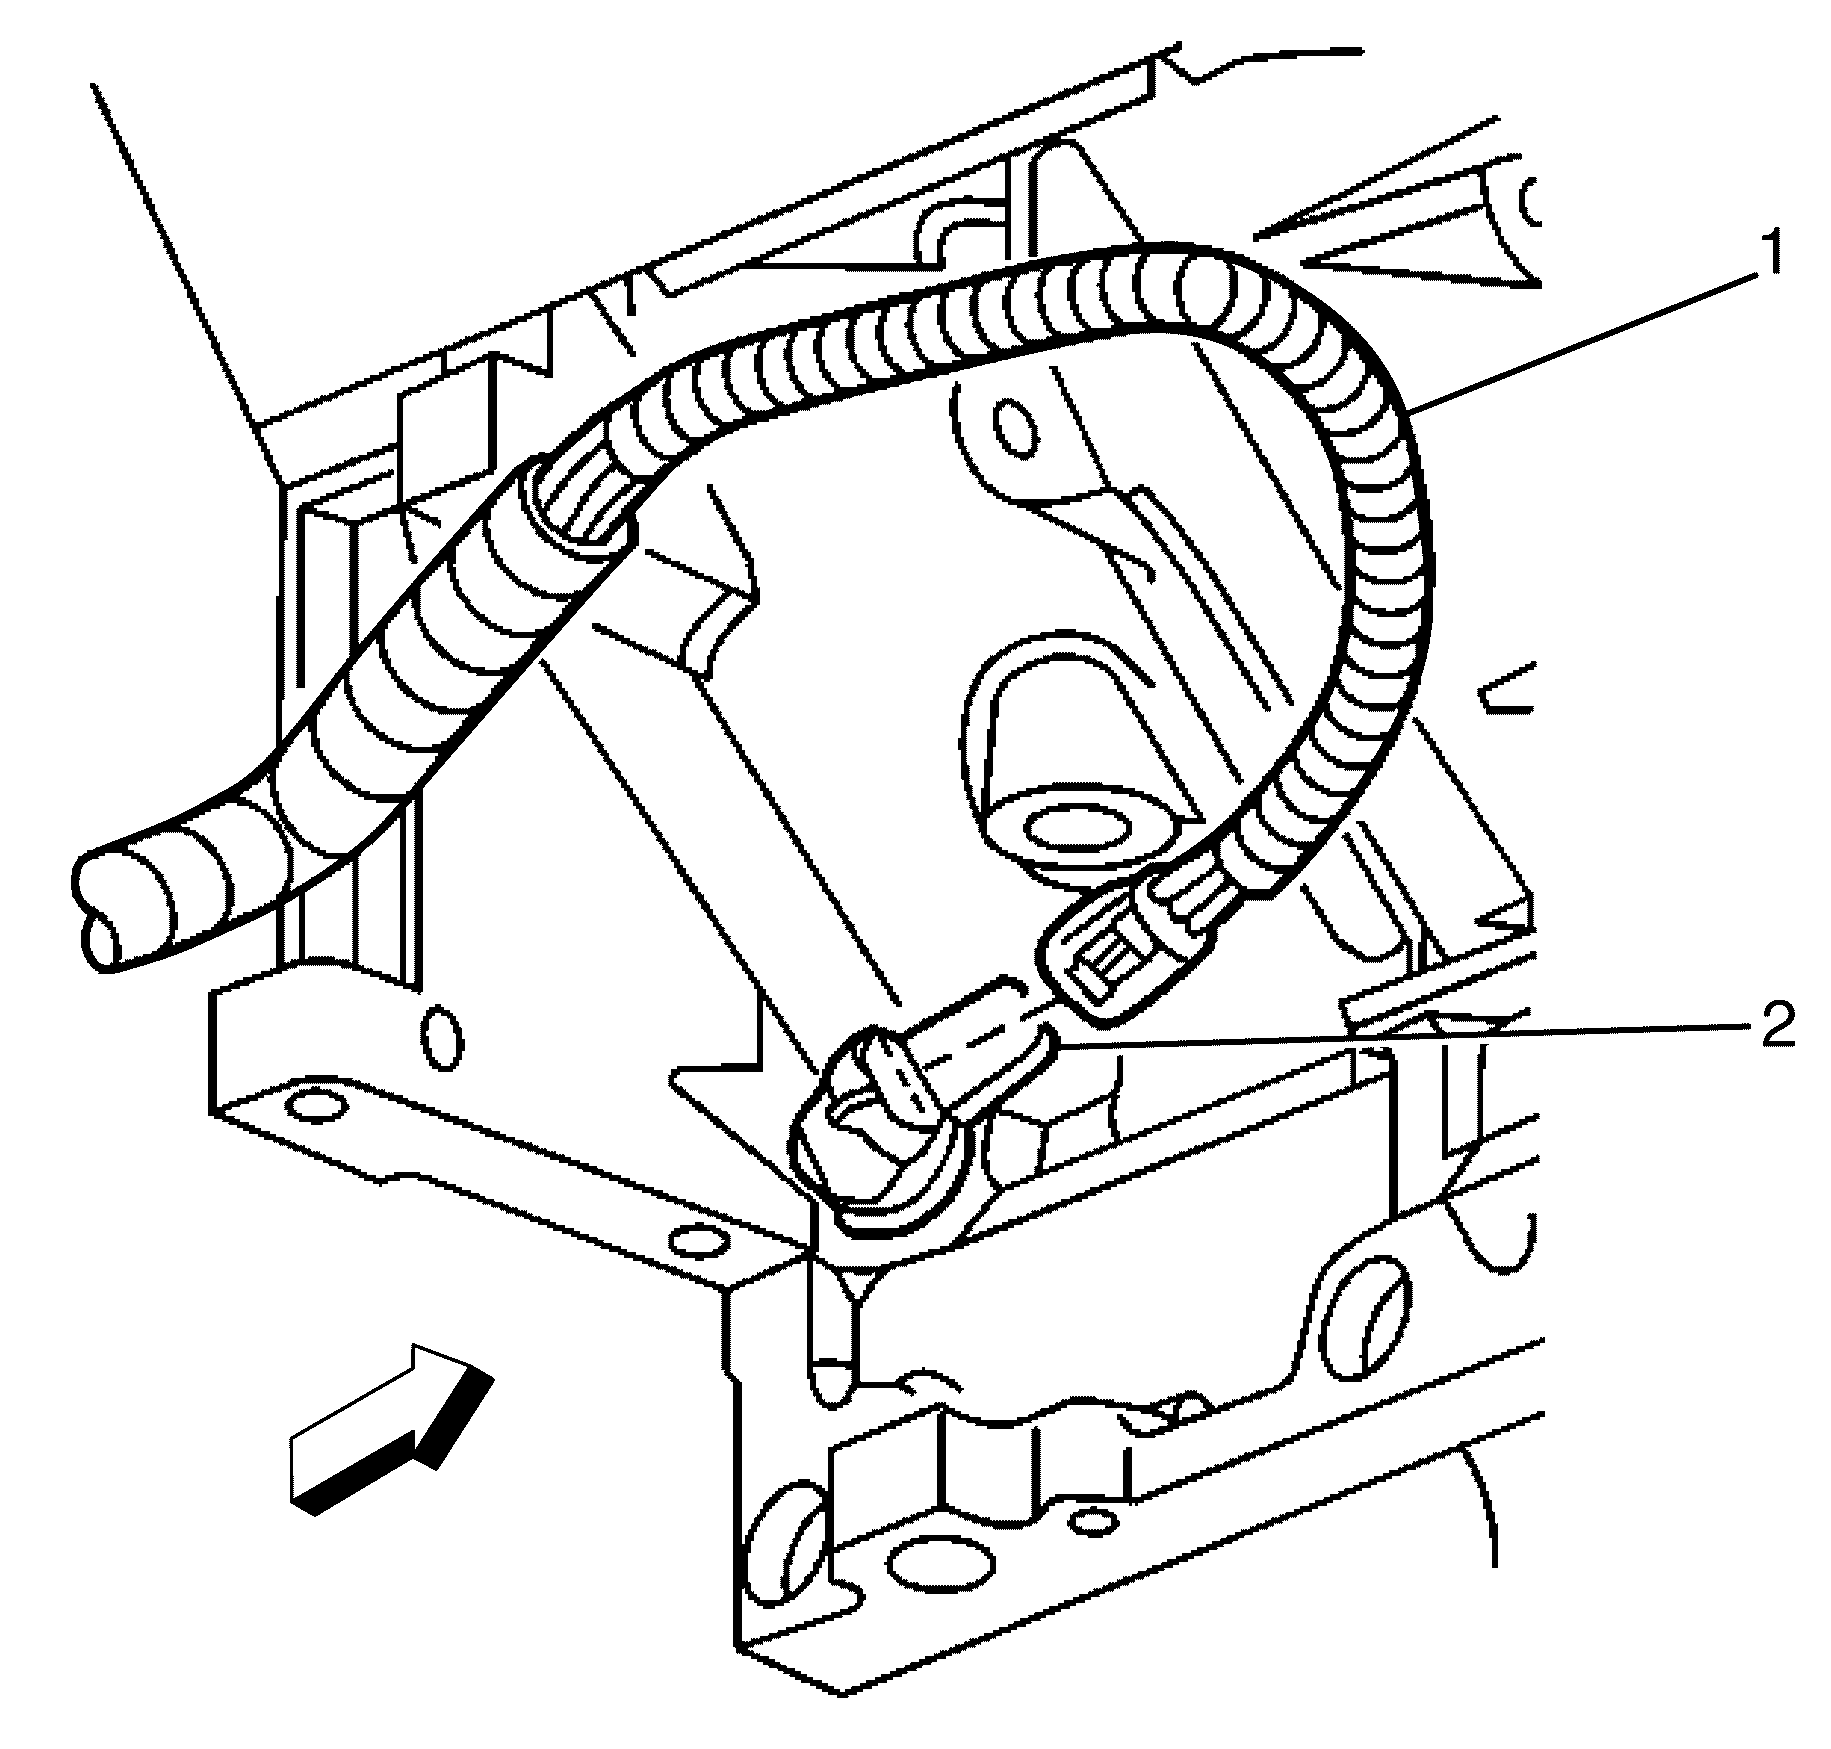
- Connect the right side knock sensor electrical connector (1).
- Connect the oil level/temperature sensor electrical connector (2).
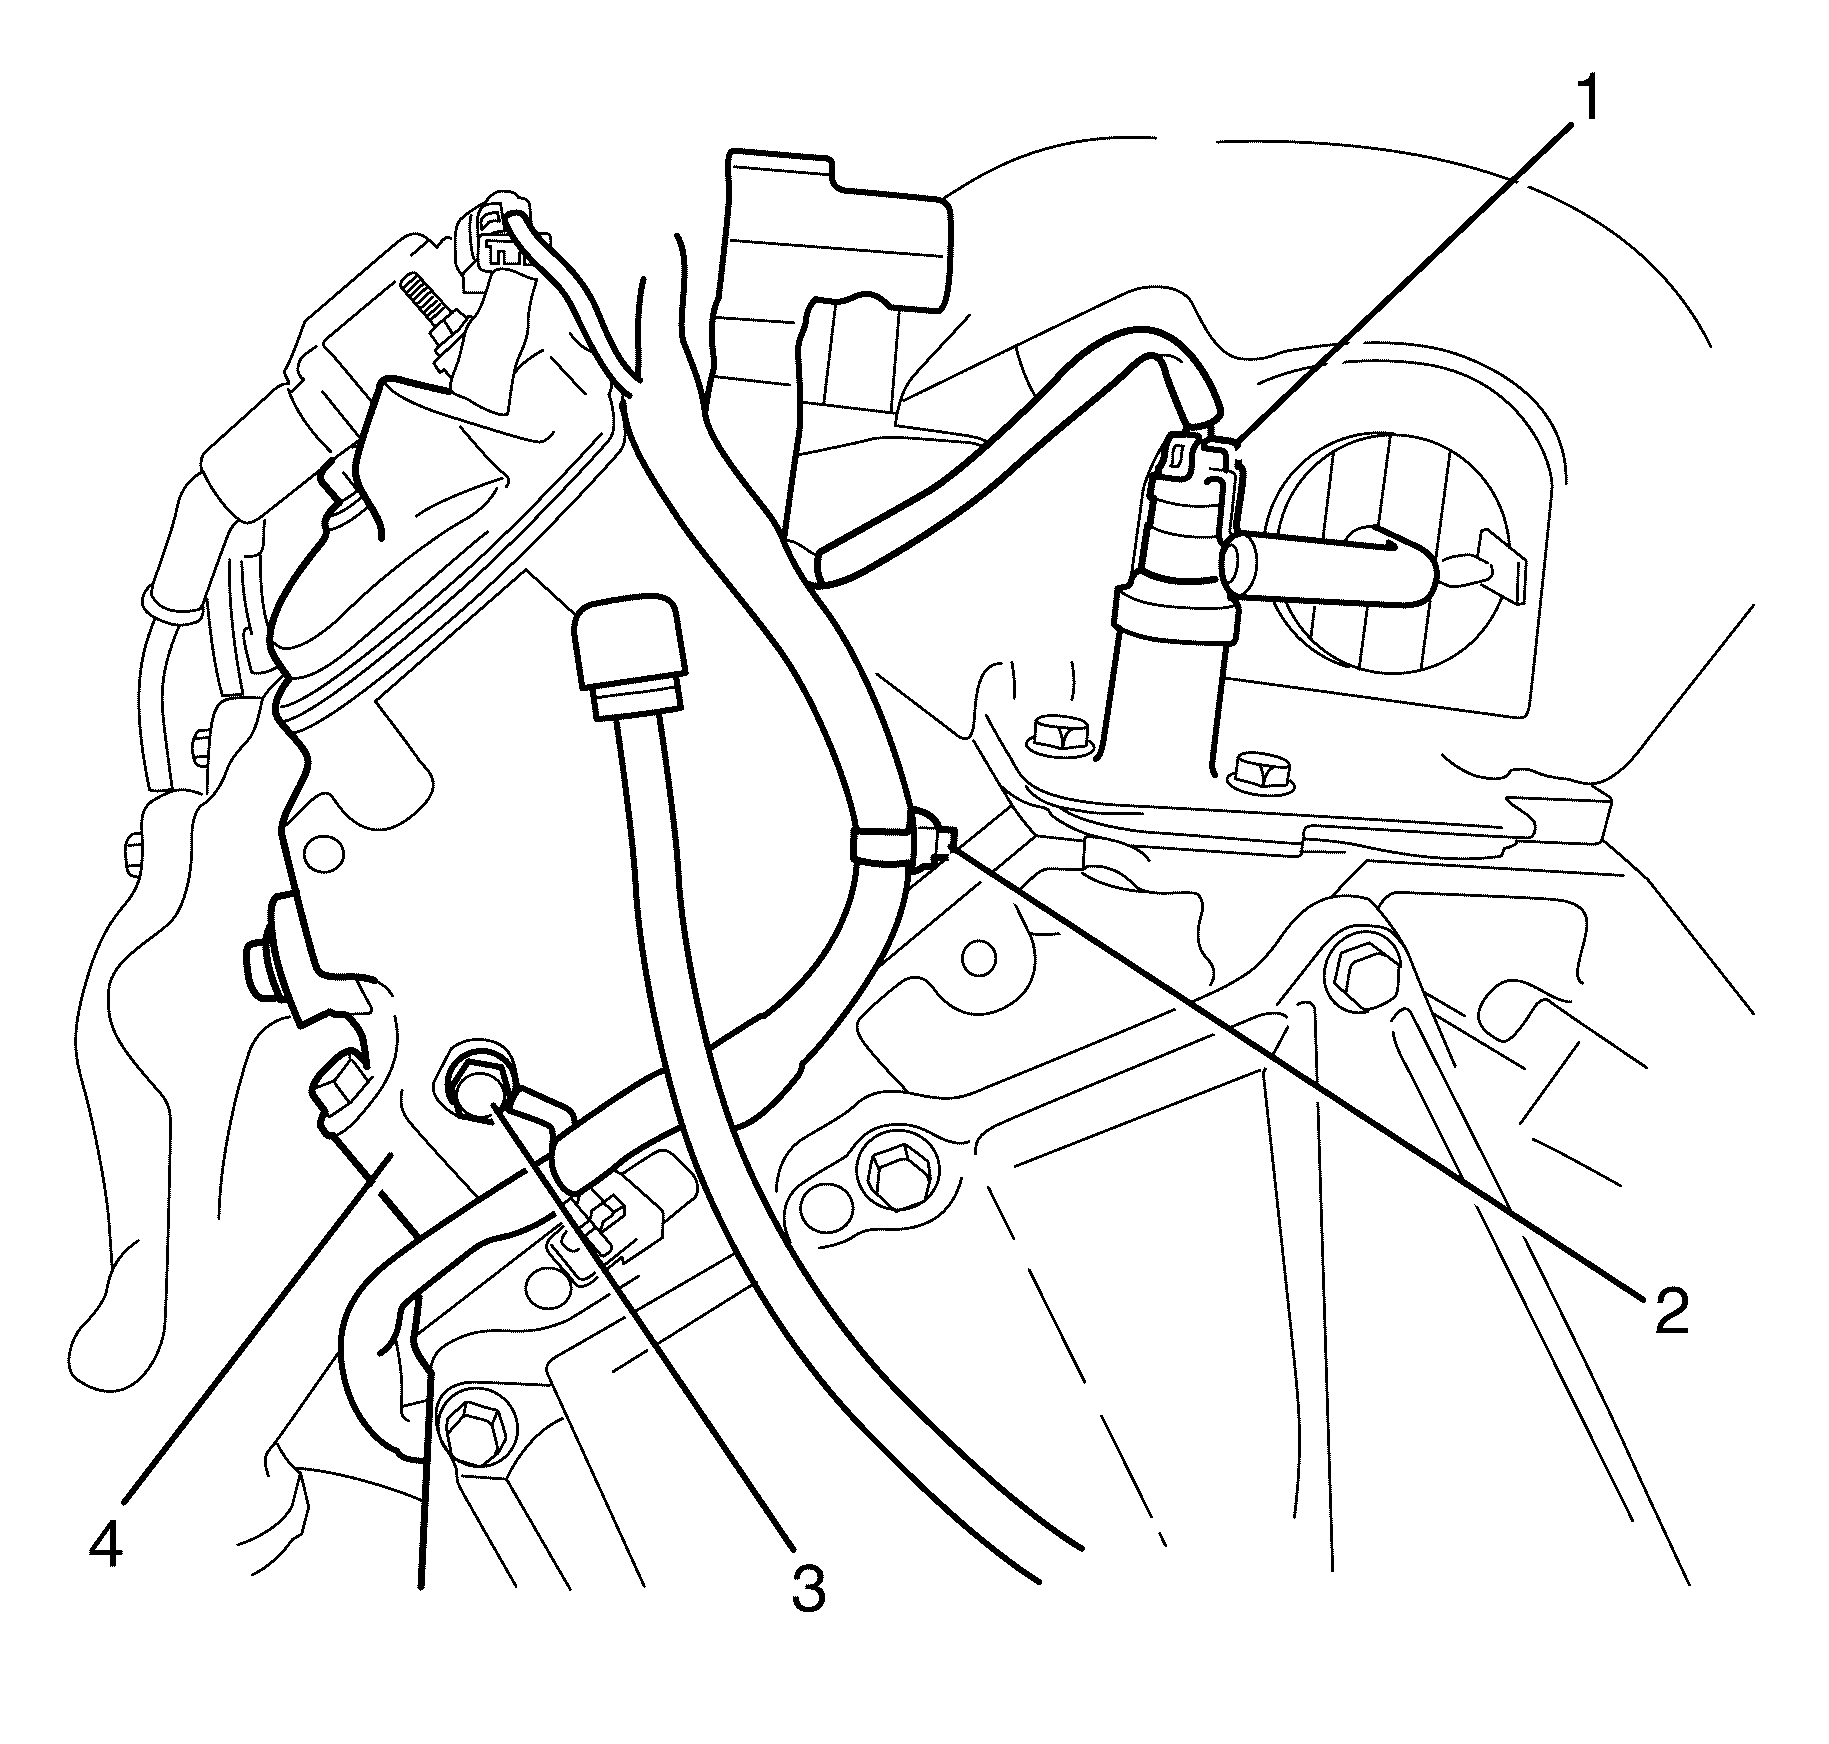
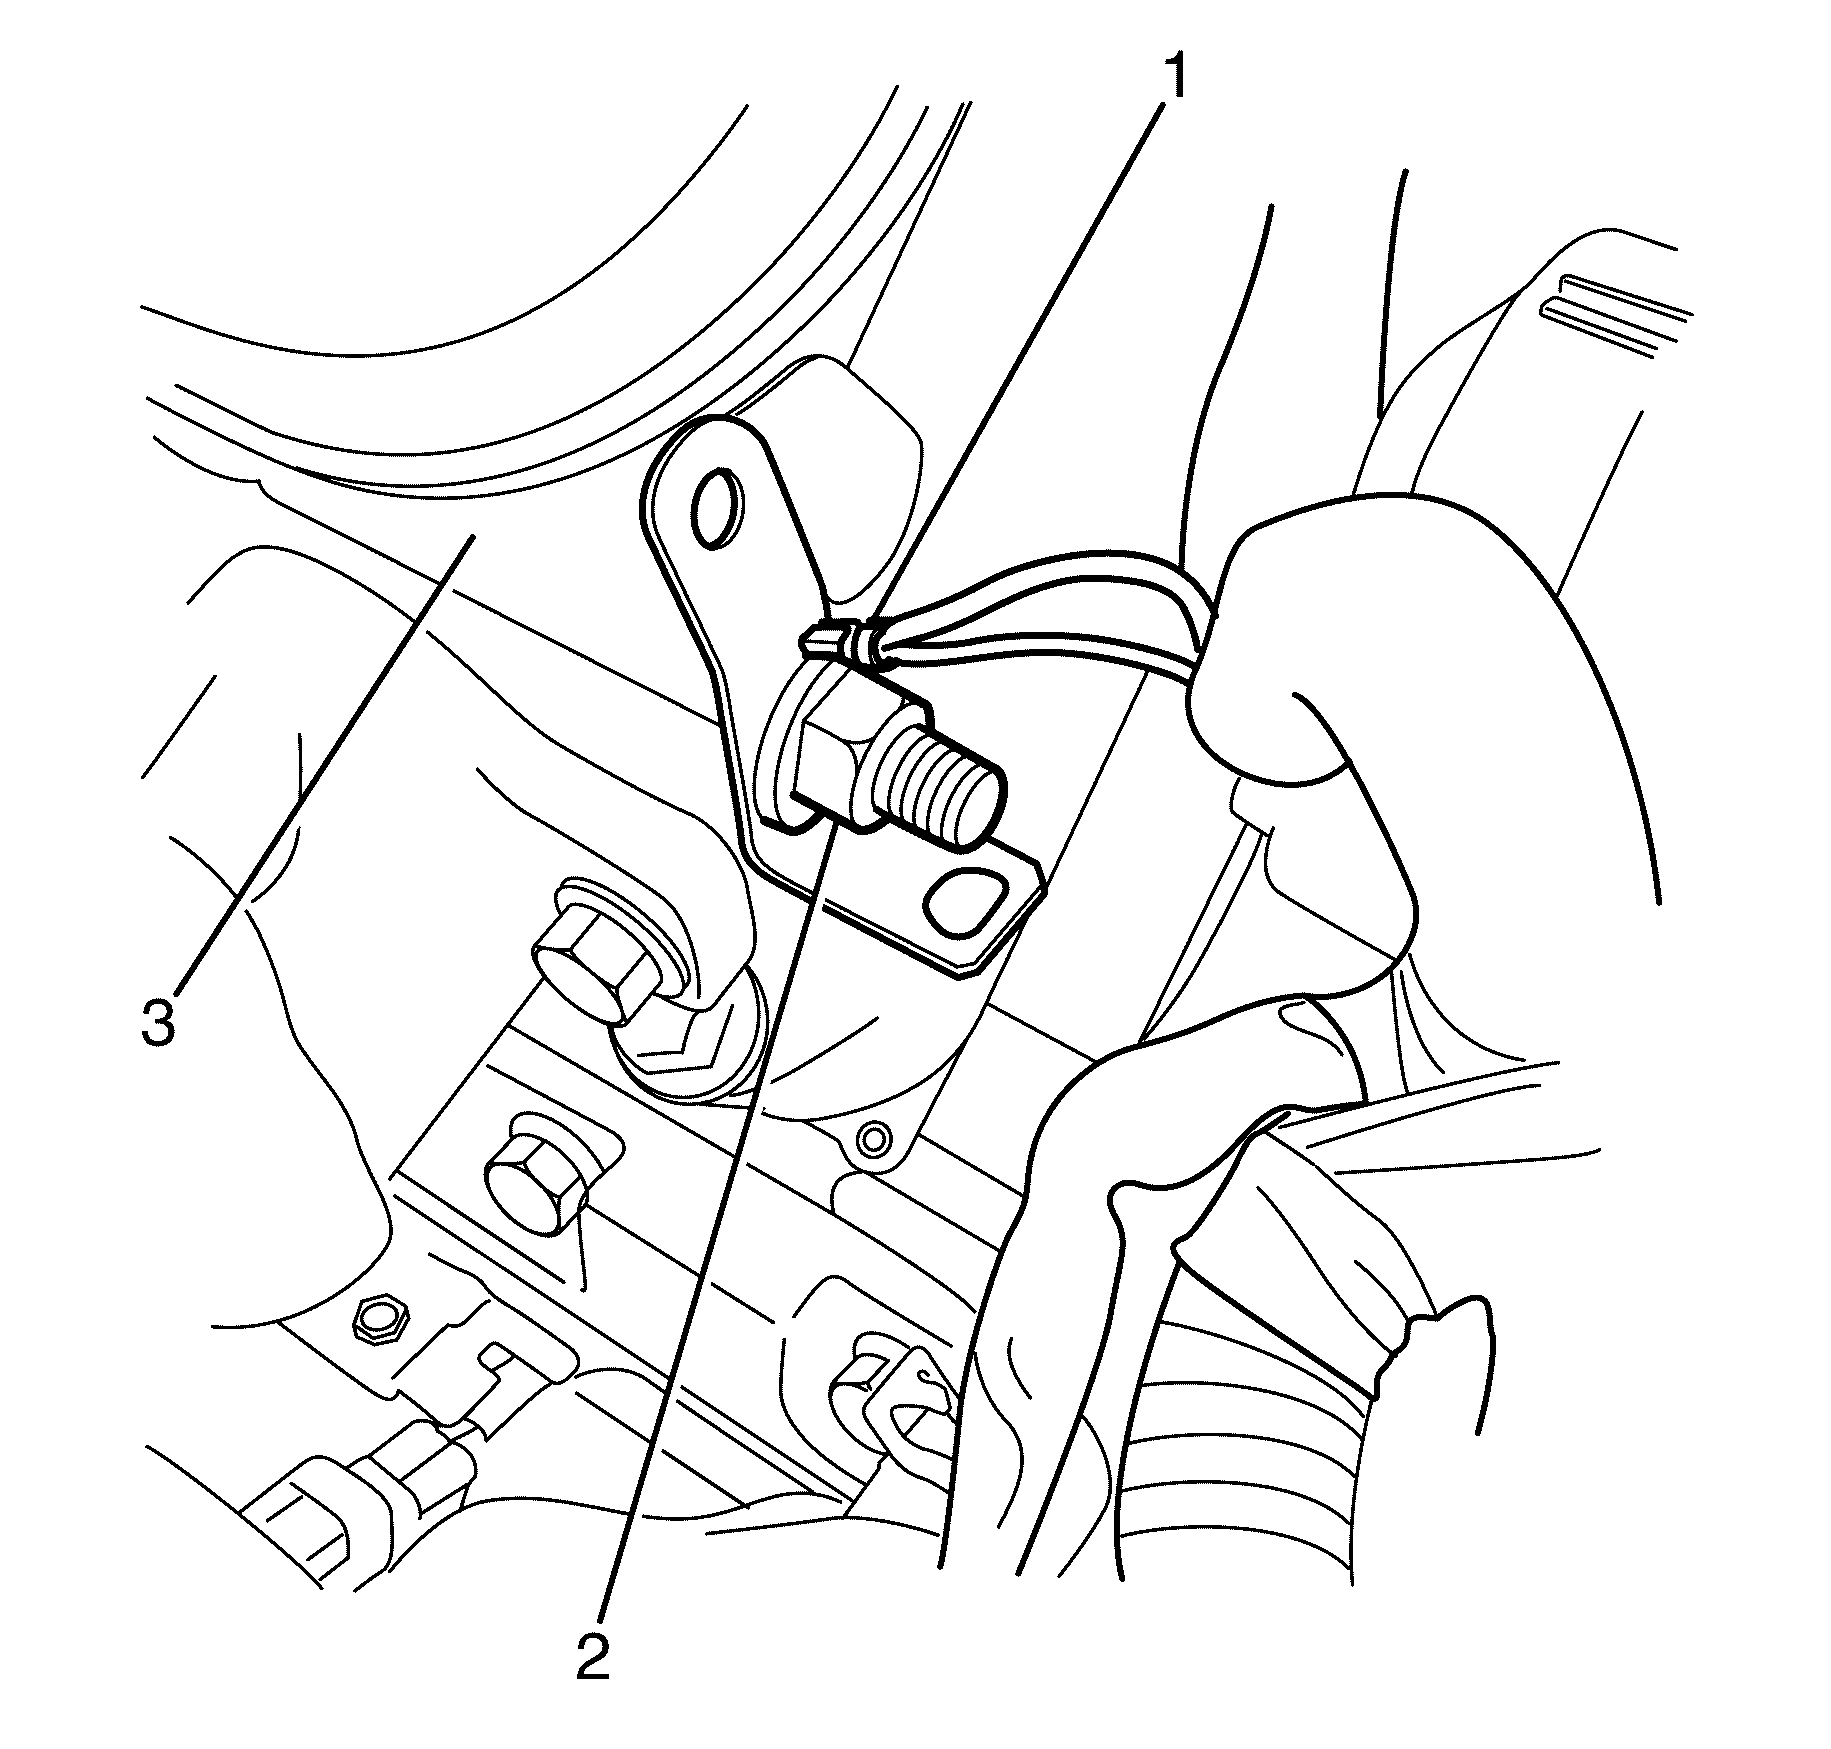
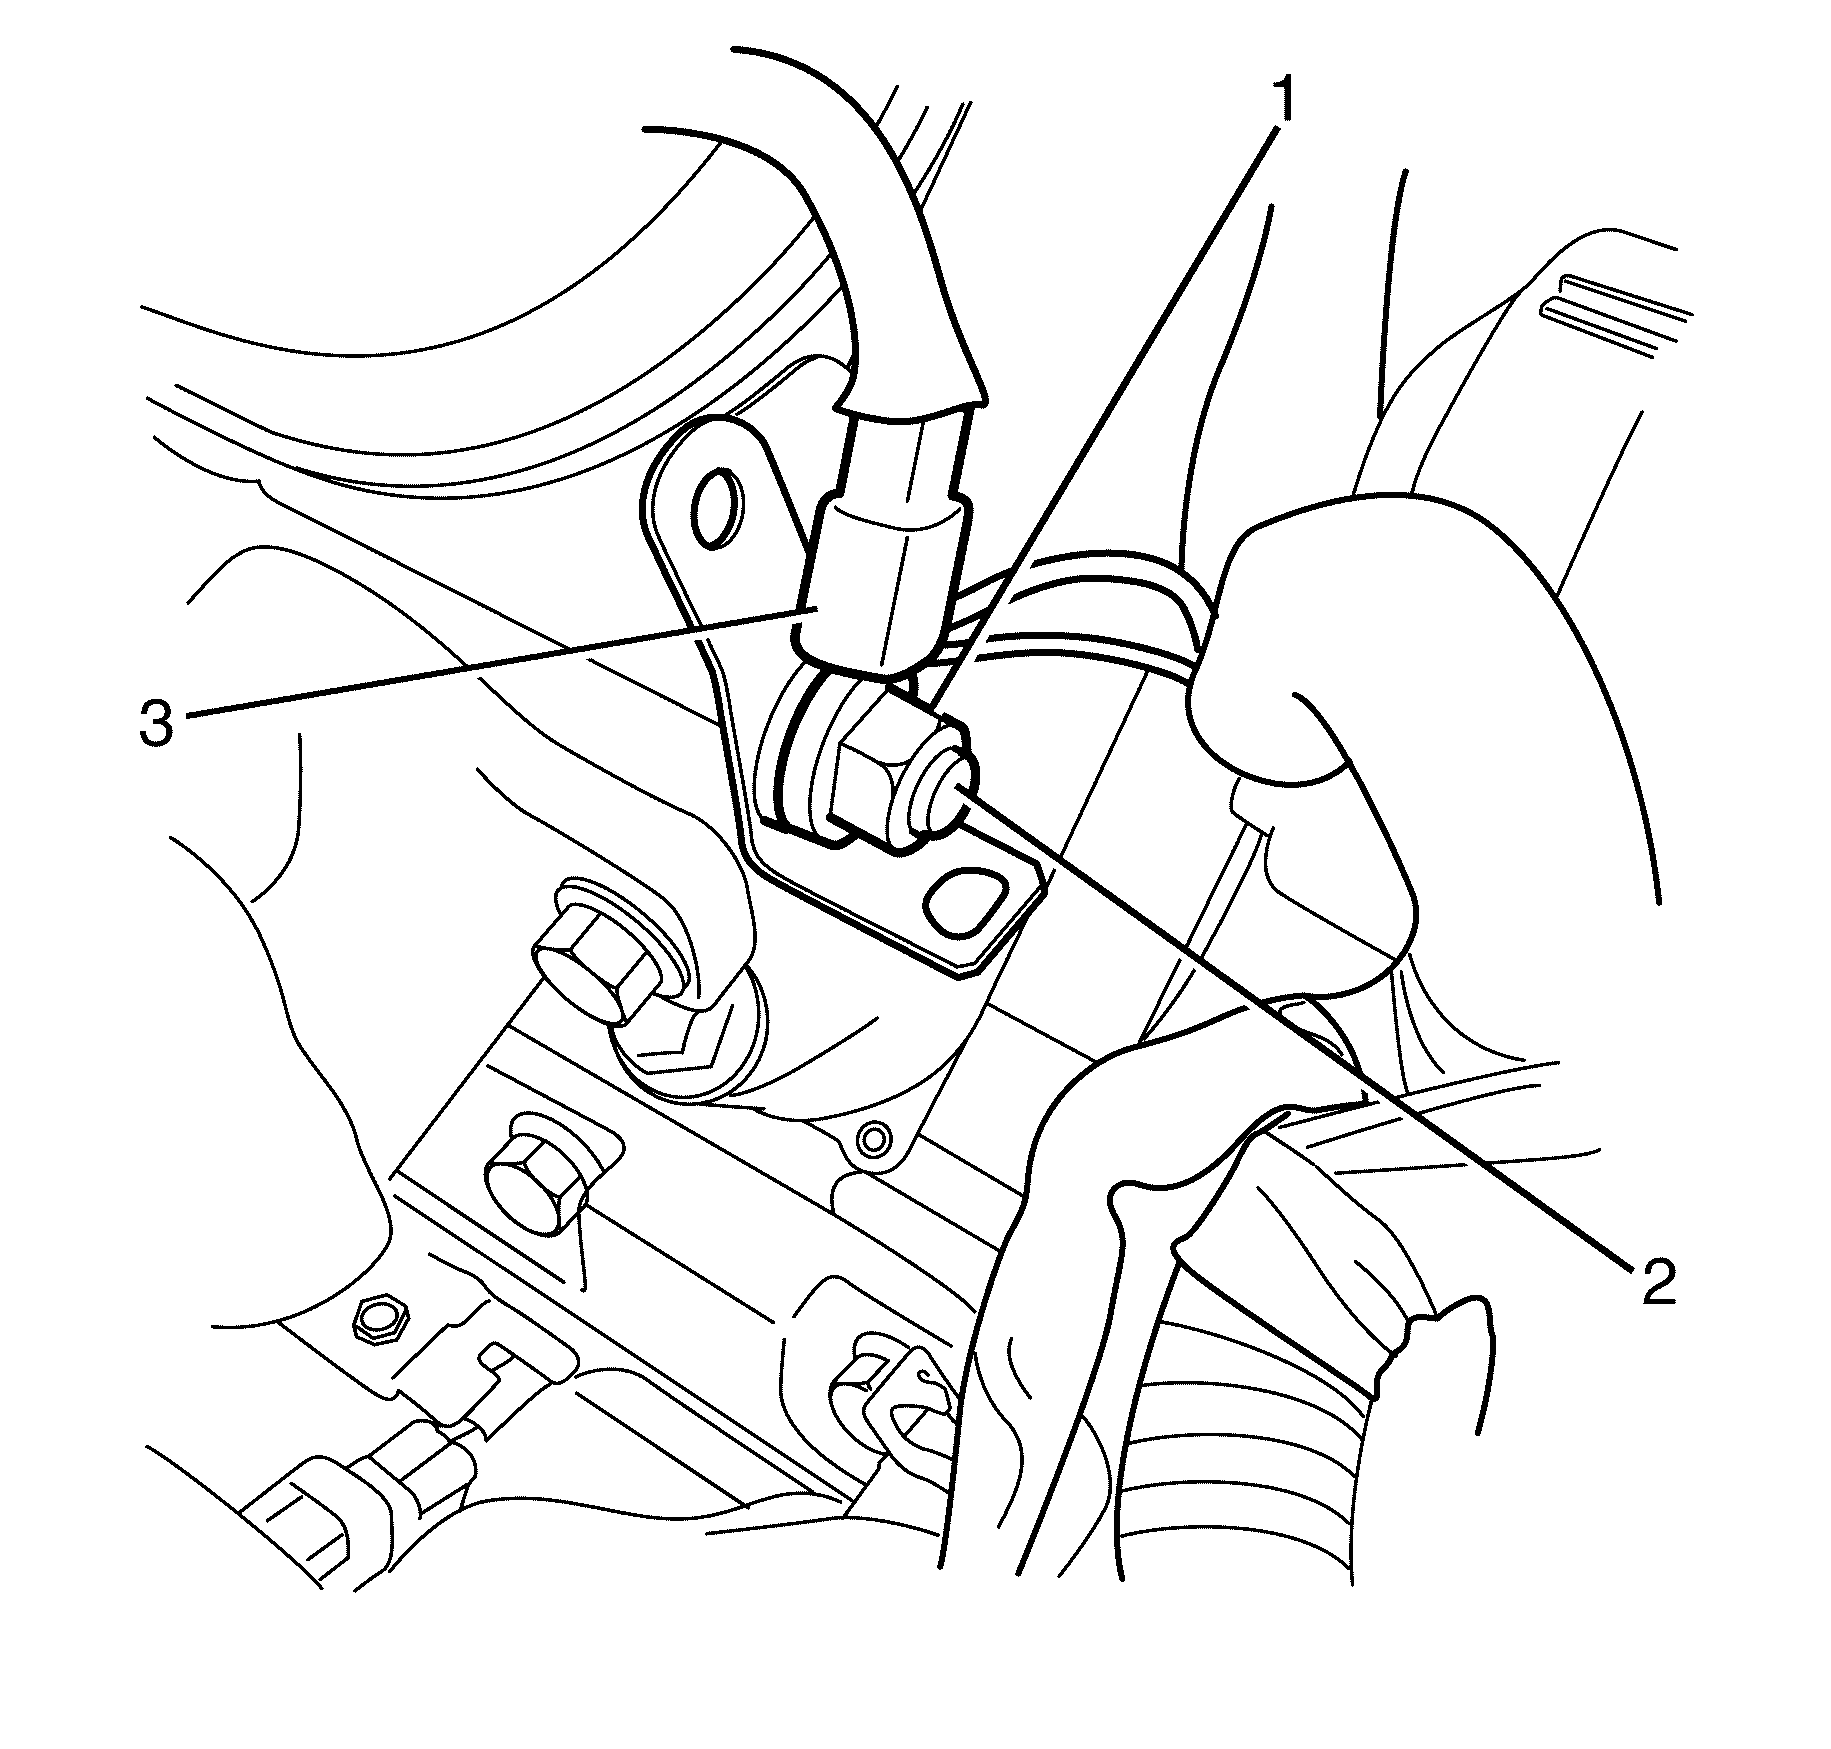
- Connect the crankshaft position (CKP) sensor electrical connector (1).
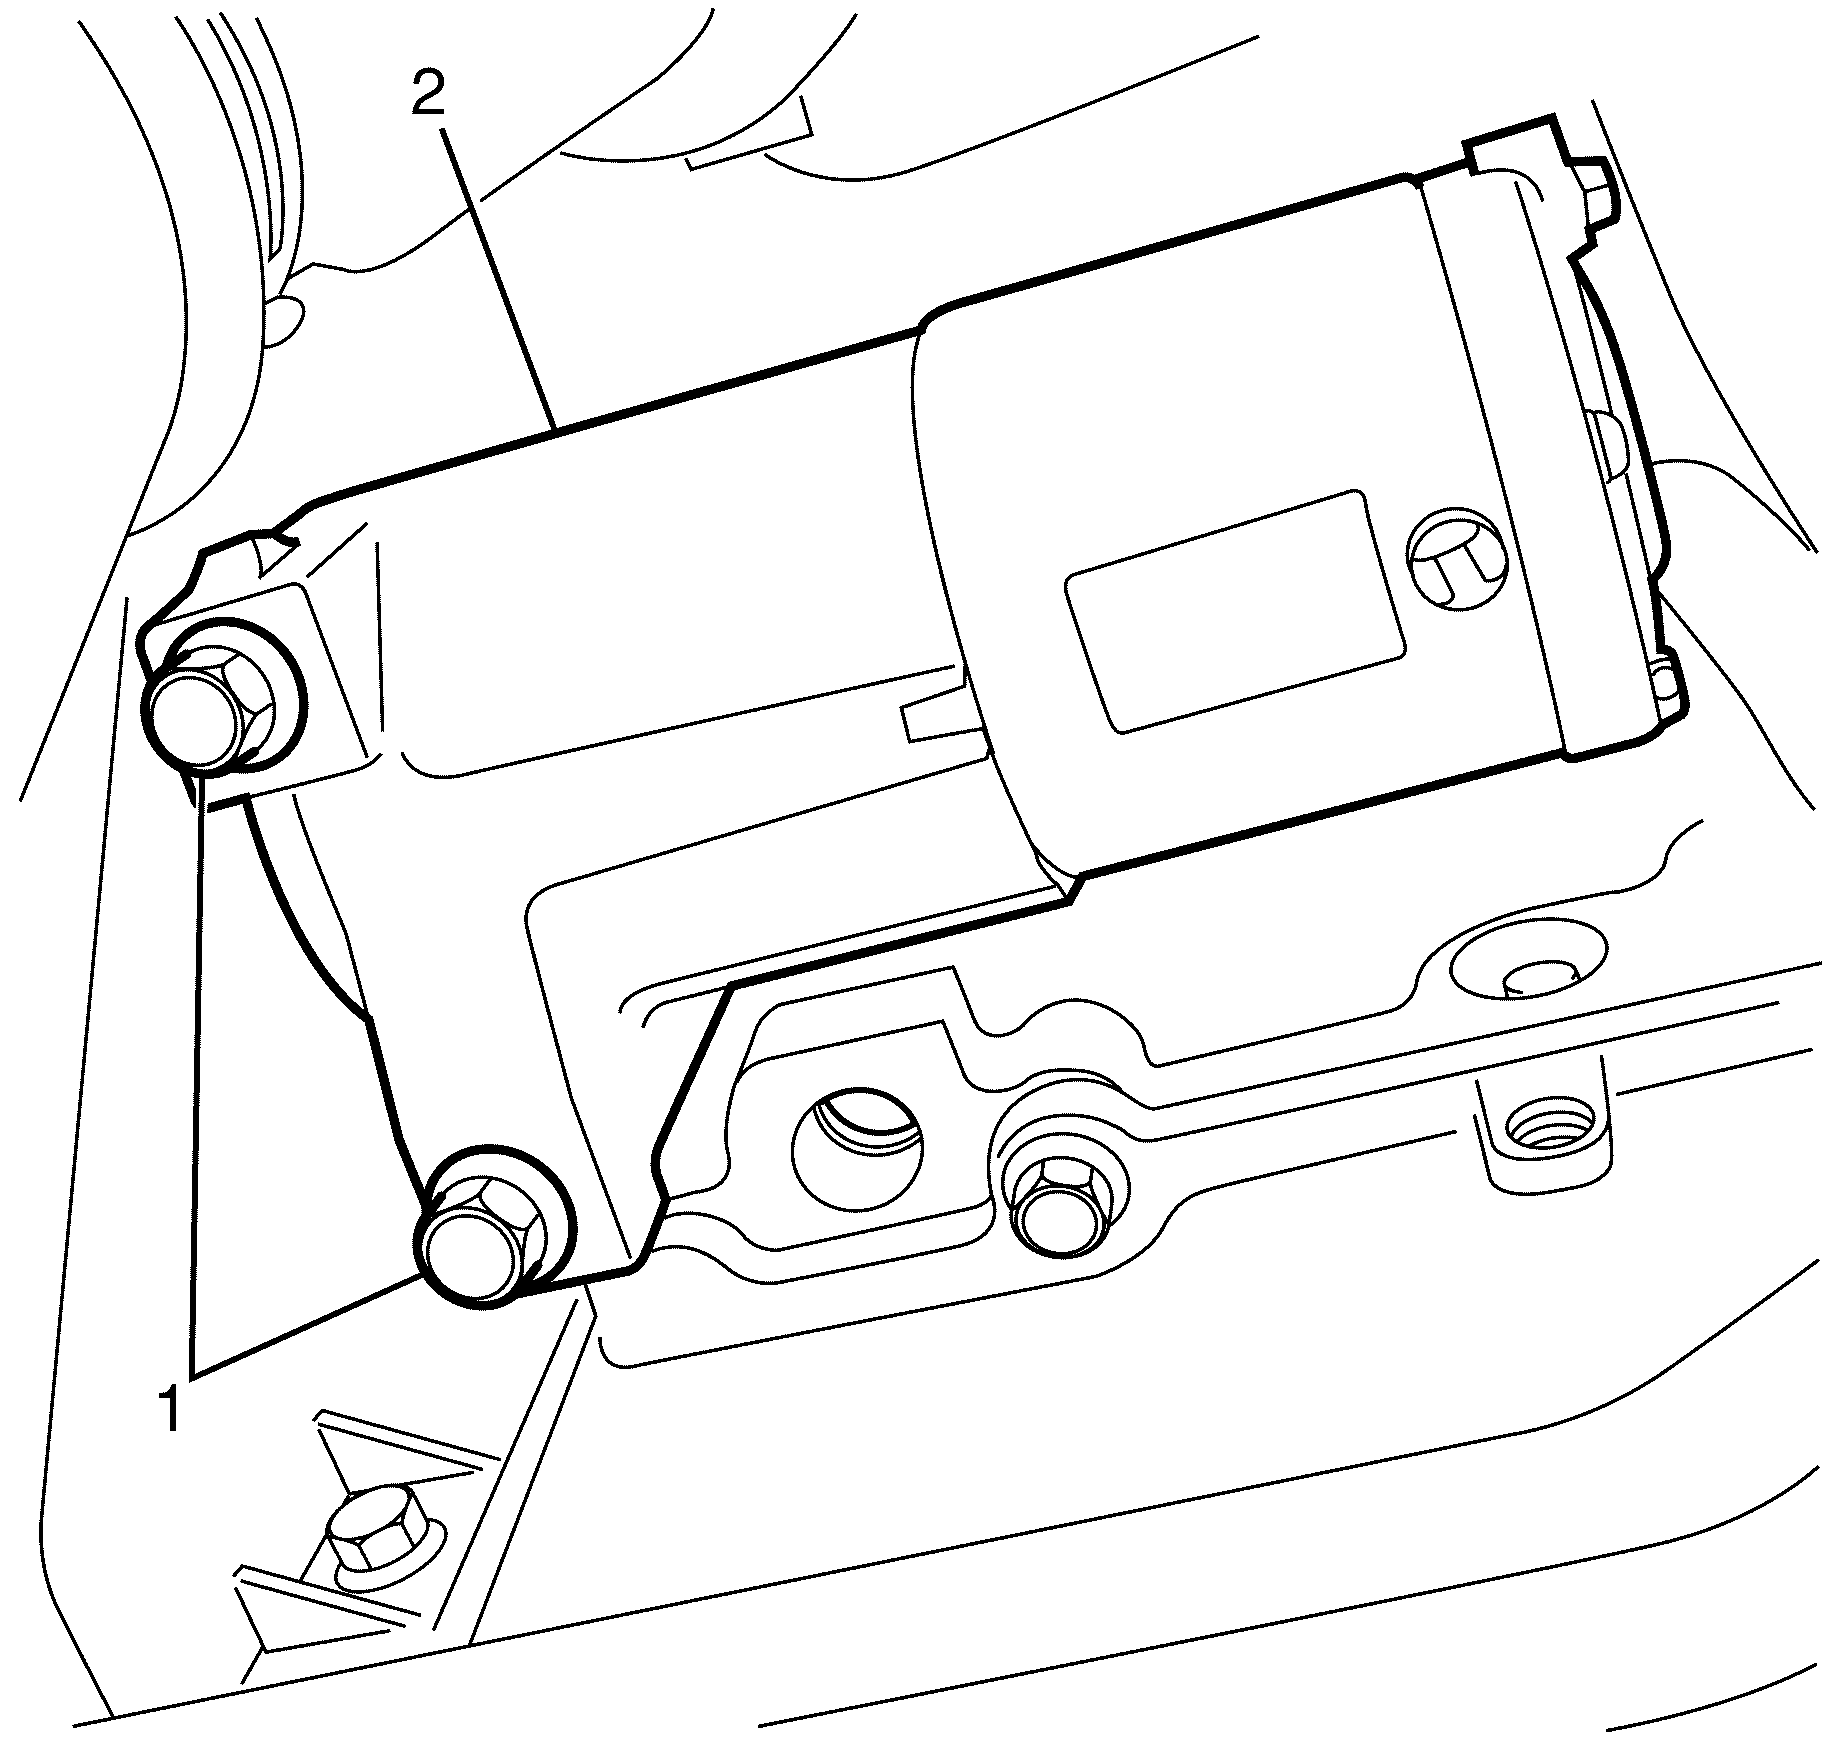
- Install the starter motor (2) Into position.
- Install starter motor to bell housing retaining bolts (1).
- Connect the starter motor electrical connector (2)
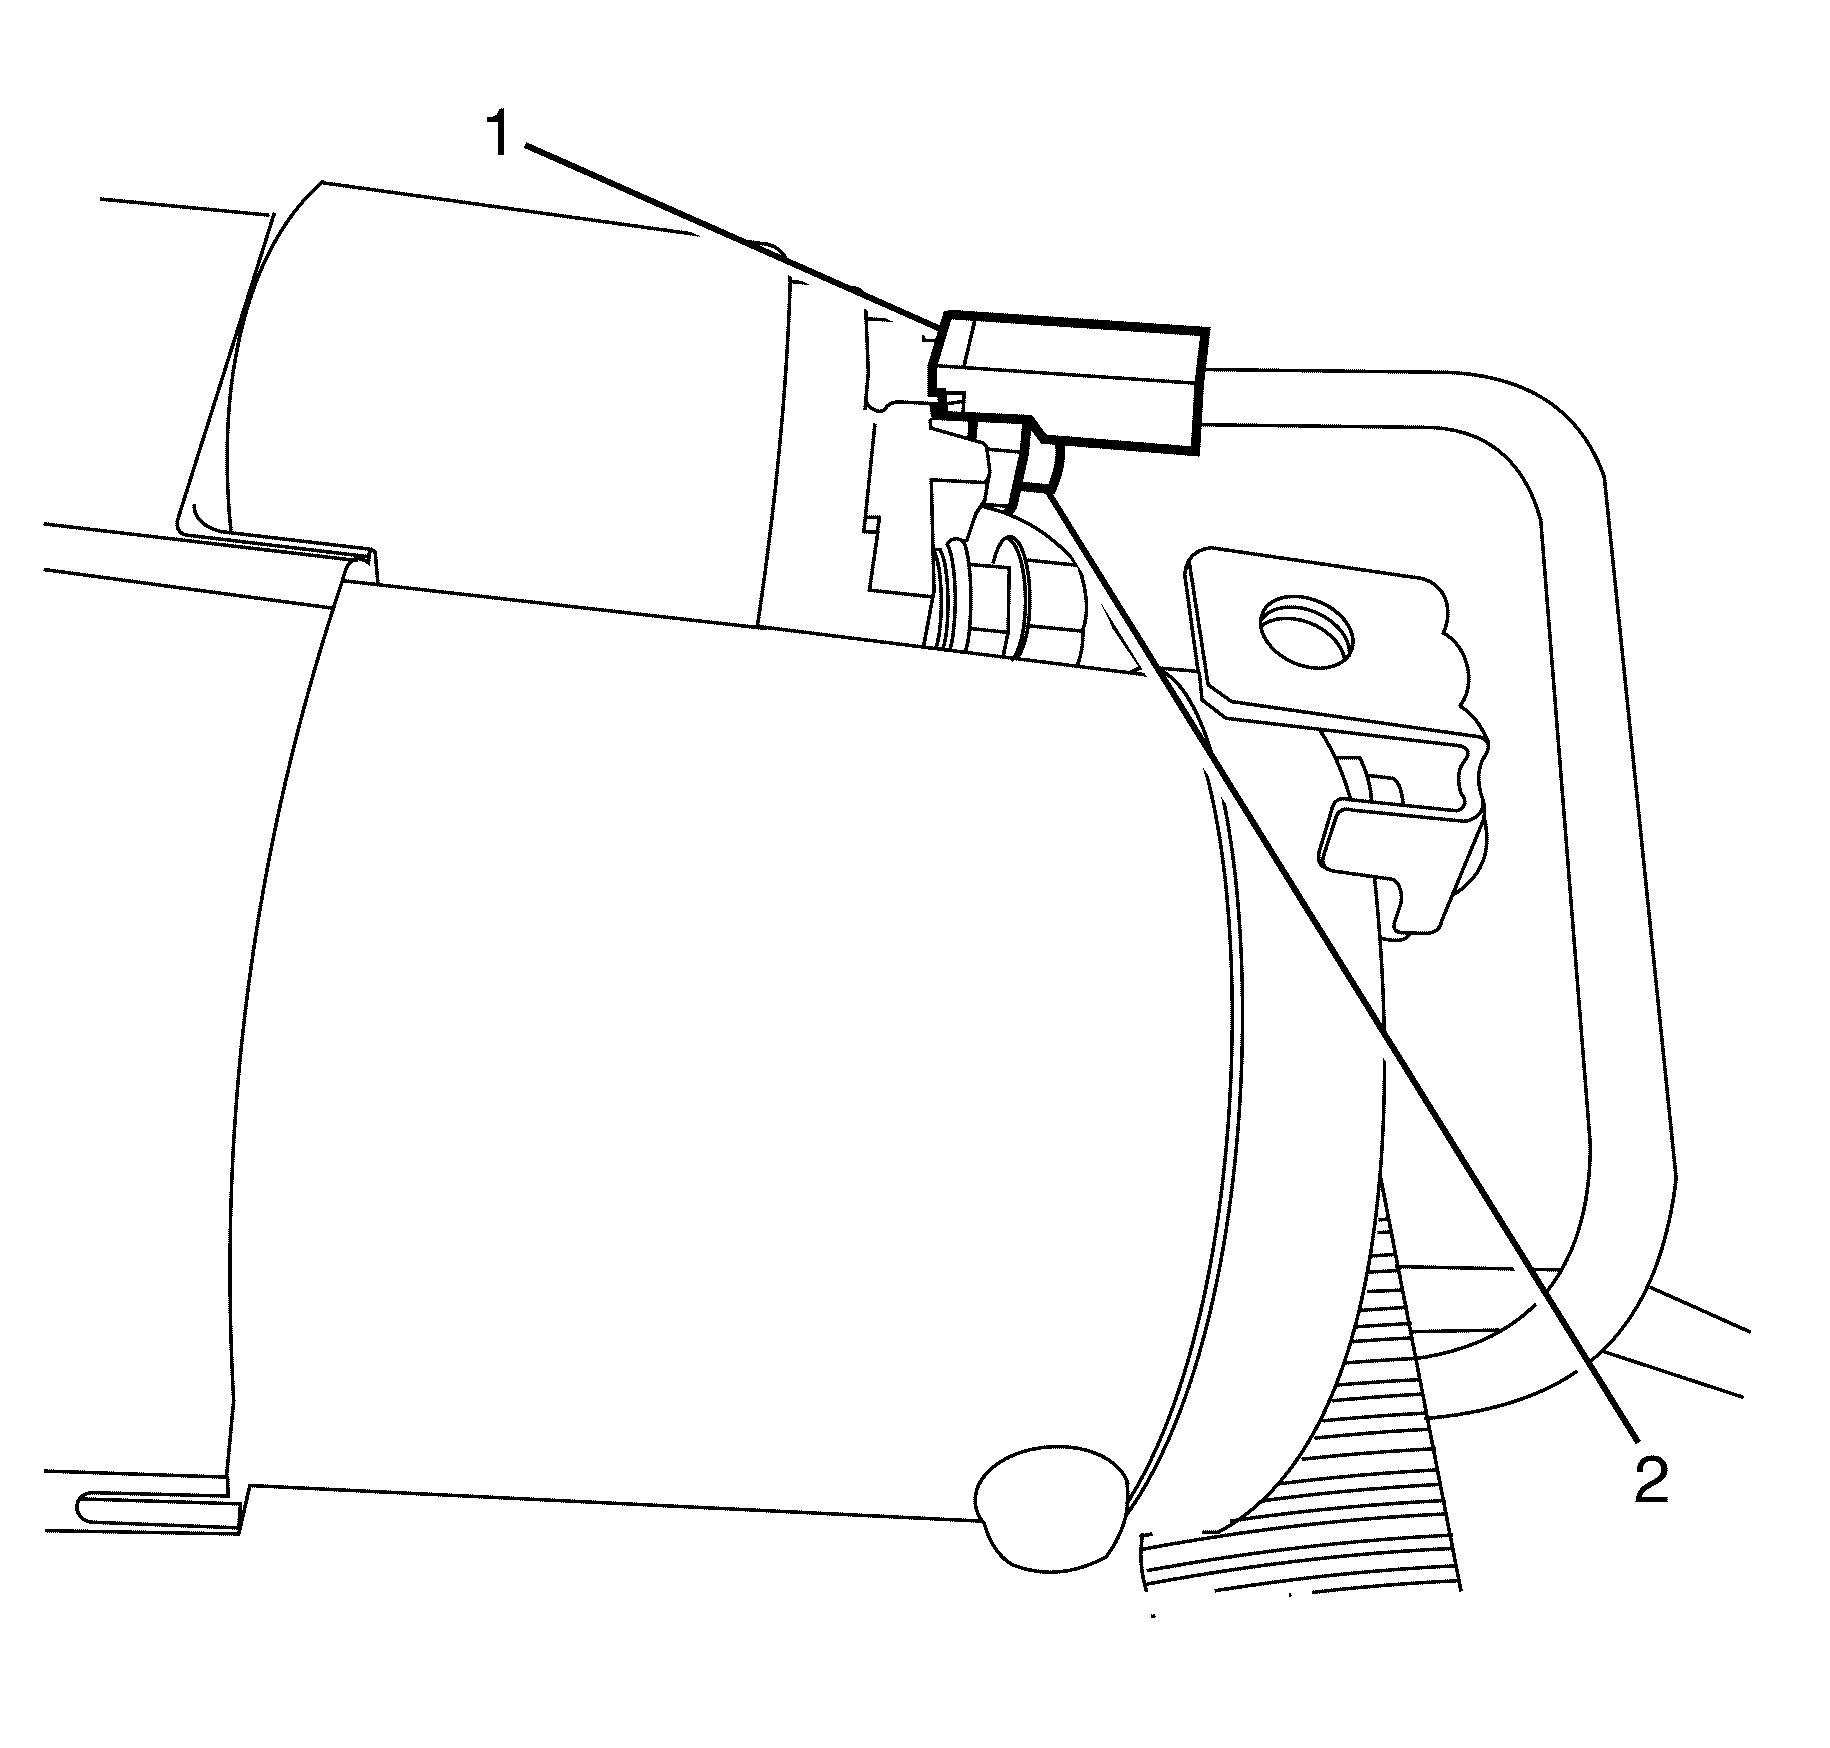
- Install the battery positive cable and retaining nut (1).
- Install the heat shield to the vehicle (2).
- Install the heat shield to starter motor retaining bolts (1).
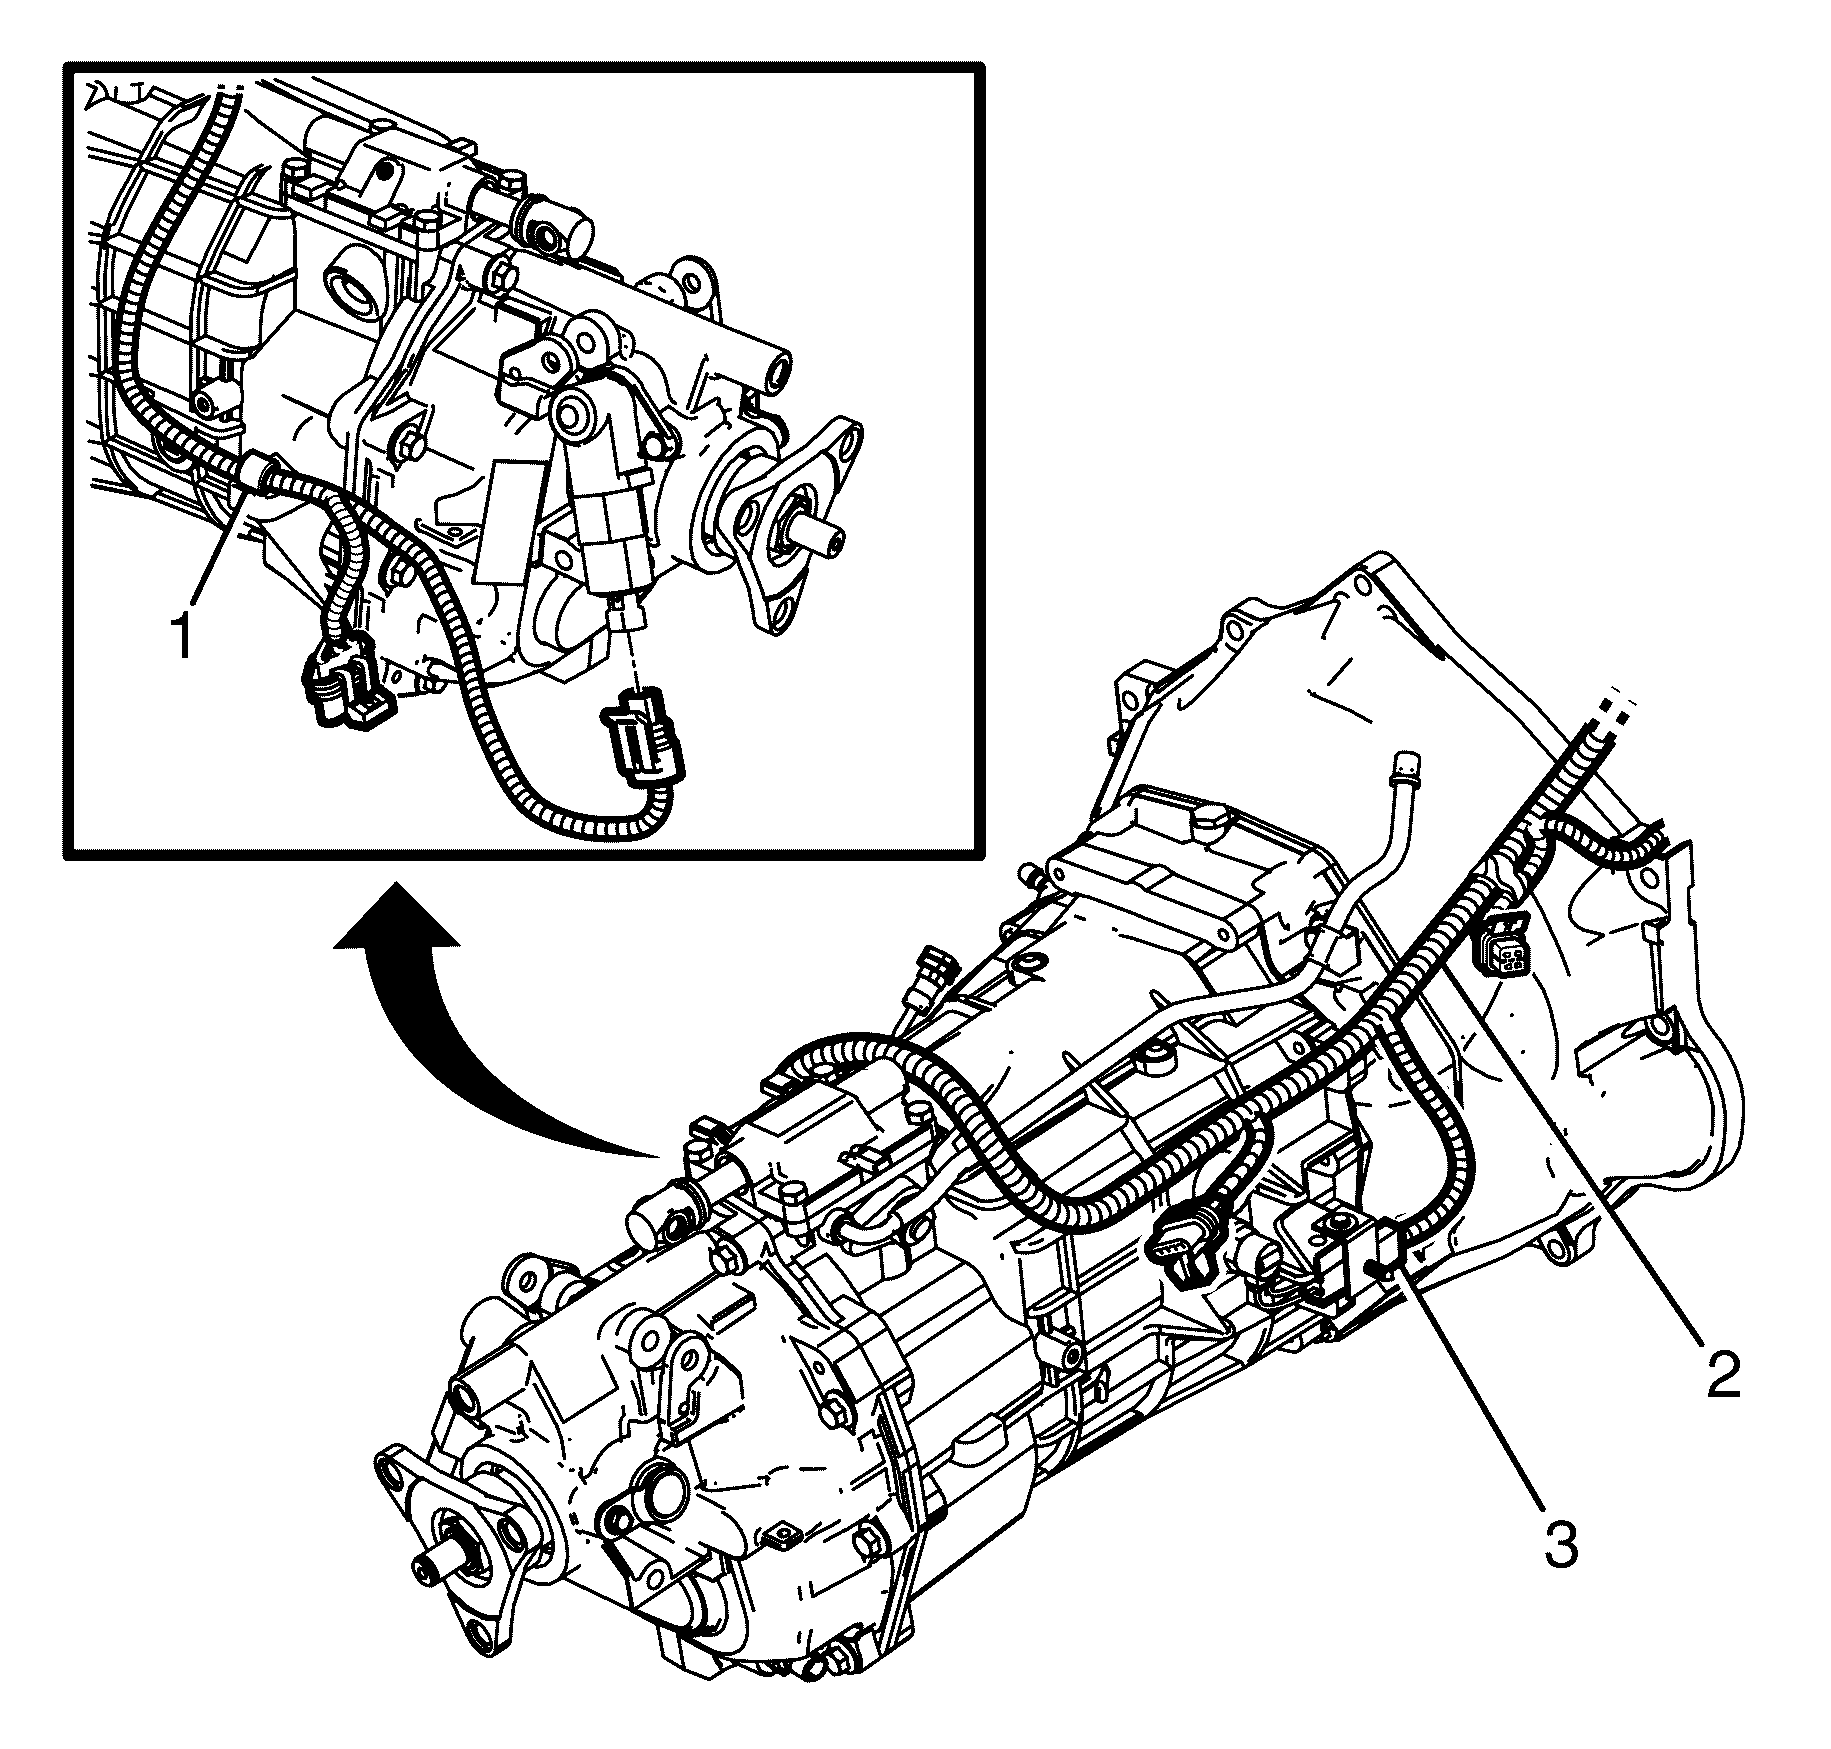
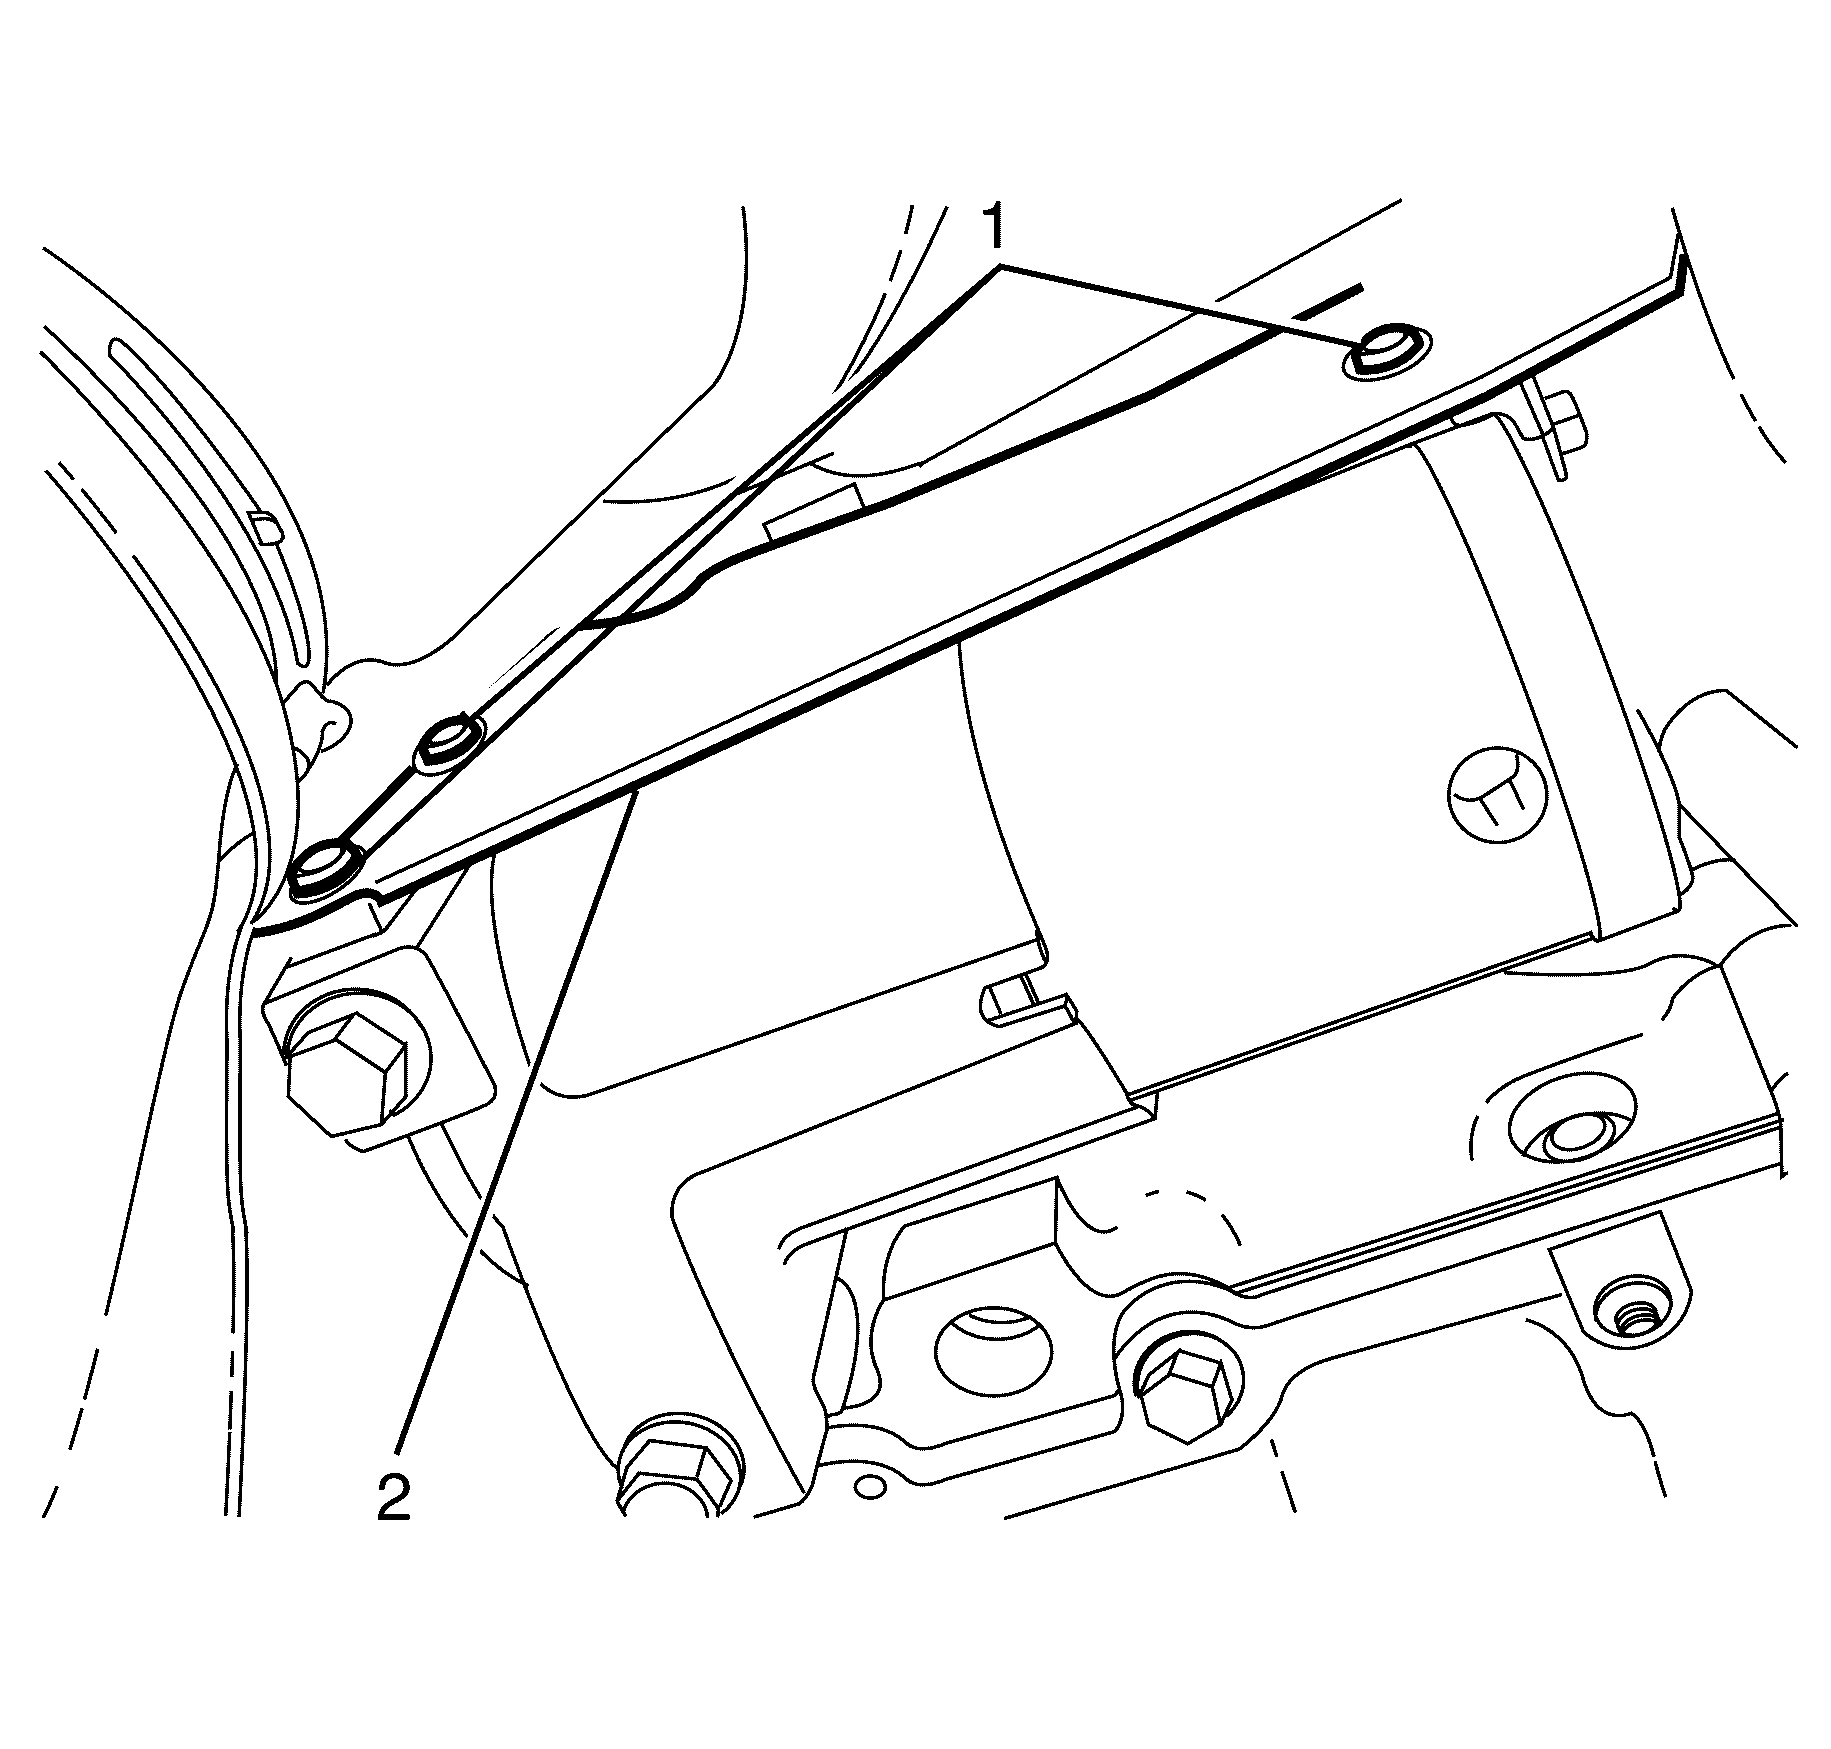
- Connect the vehicle speed sensor electrical connector (6).
- Connect the main transmission electrical connector (5).
- Connect the park/neutral position switch electrical connector (1).
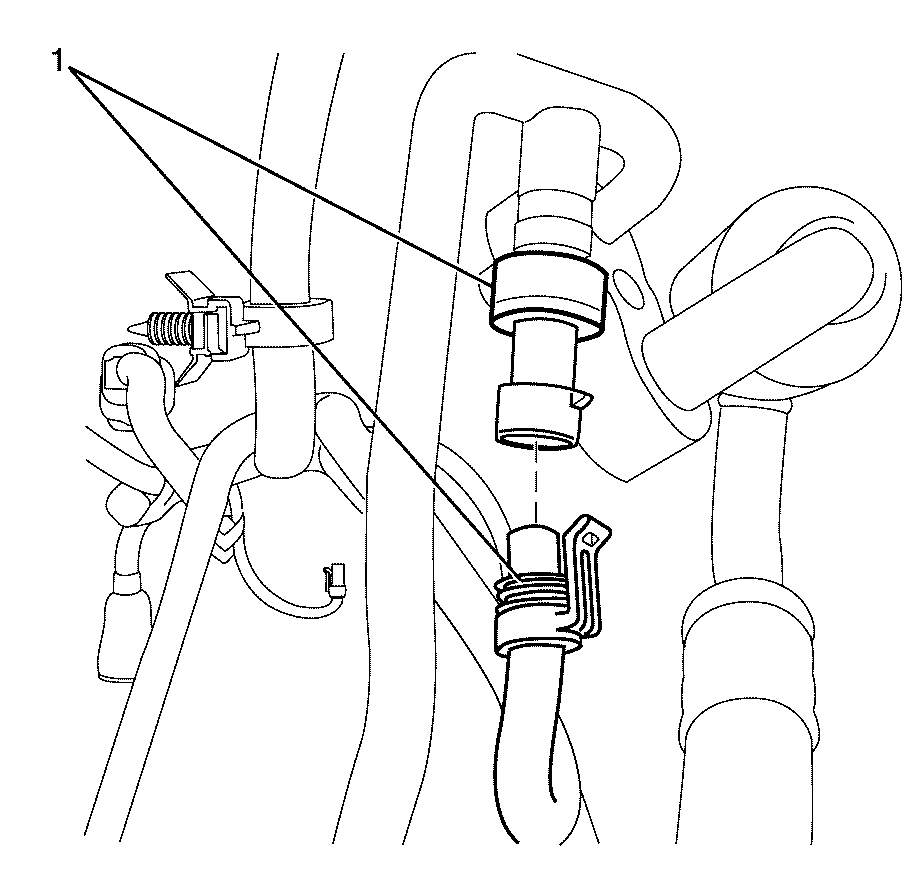
- Attach the engine wiring loom assembly (3) from the retaining clip (4).
- Attach the engine wiring loom assembly (3) from the retaining clip (2).
- Connect the main transmission electrical connector (4).
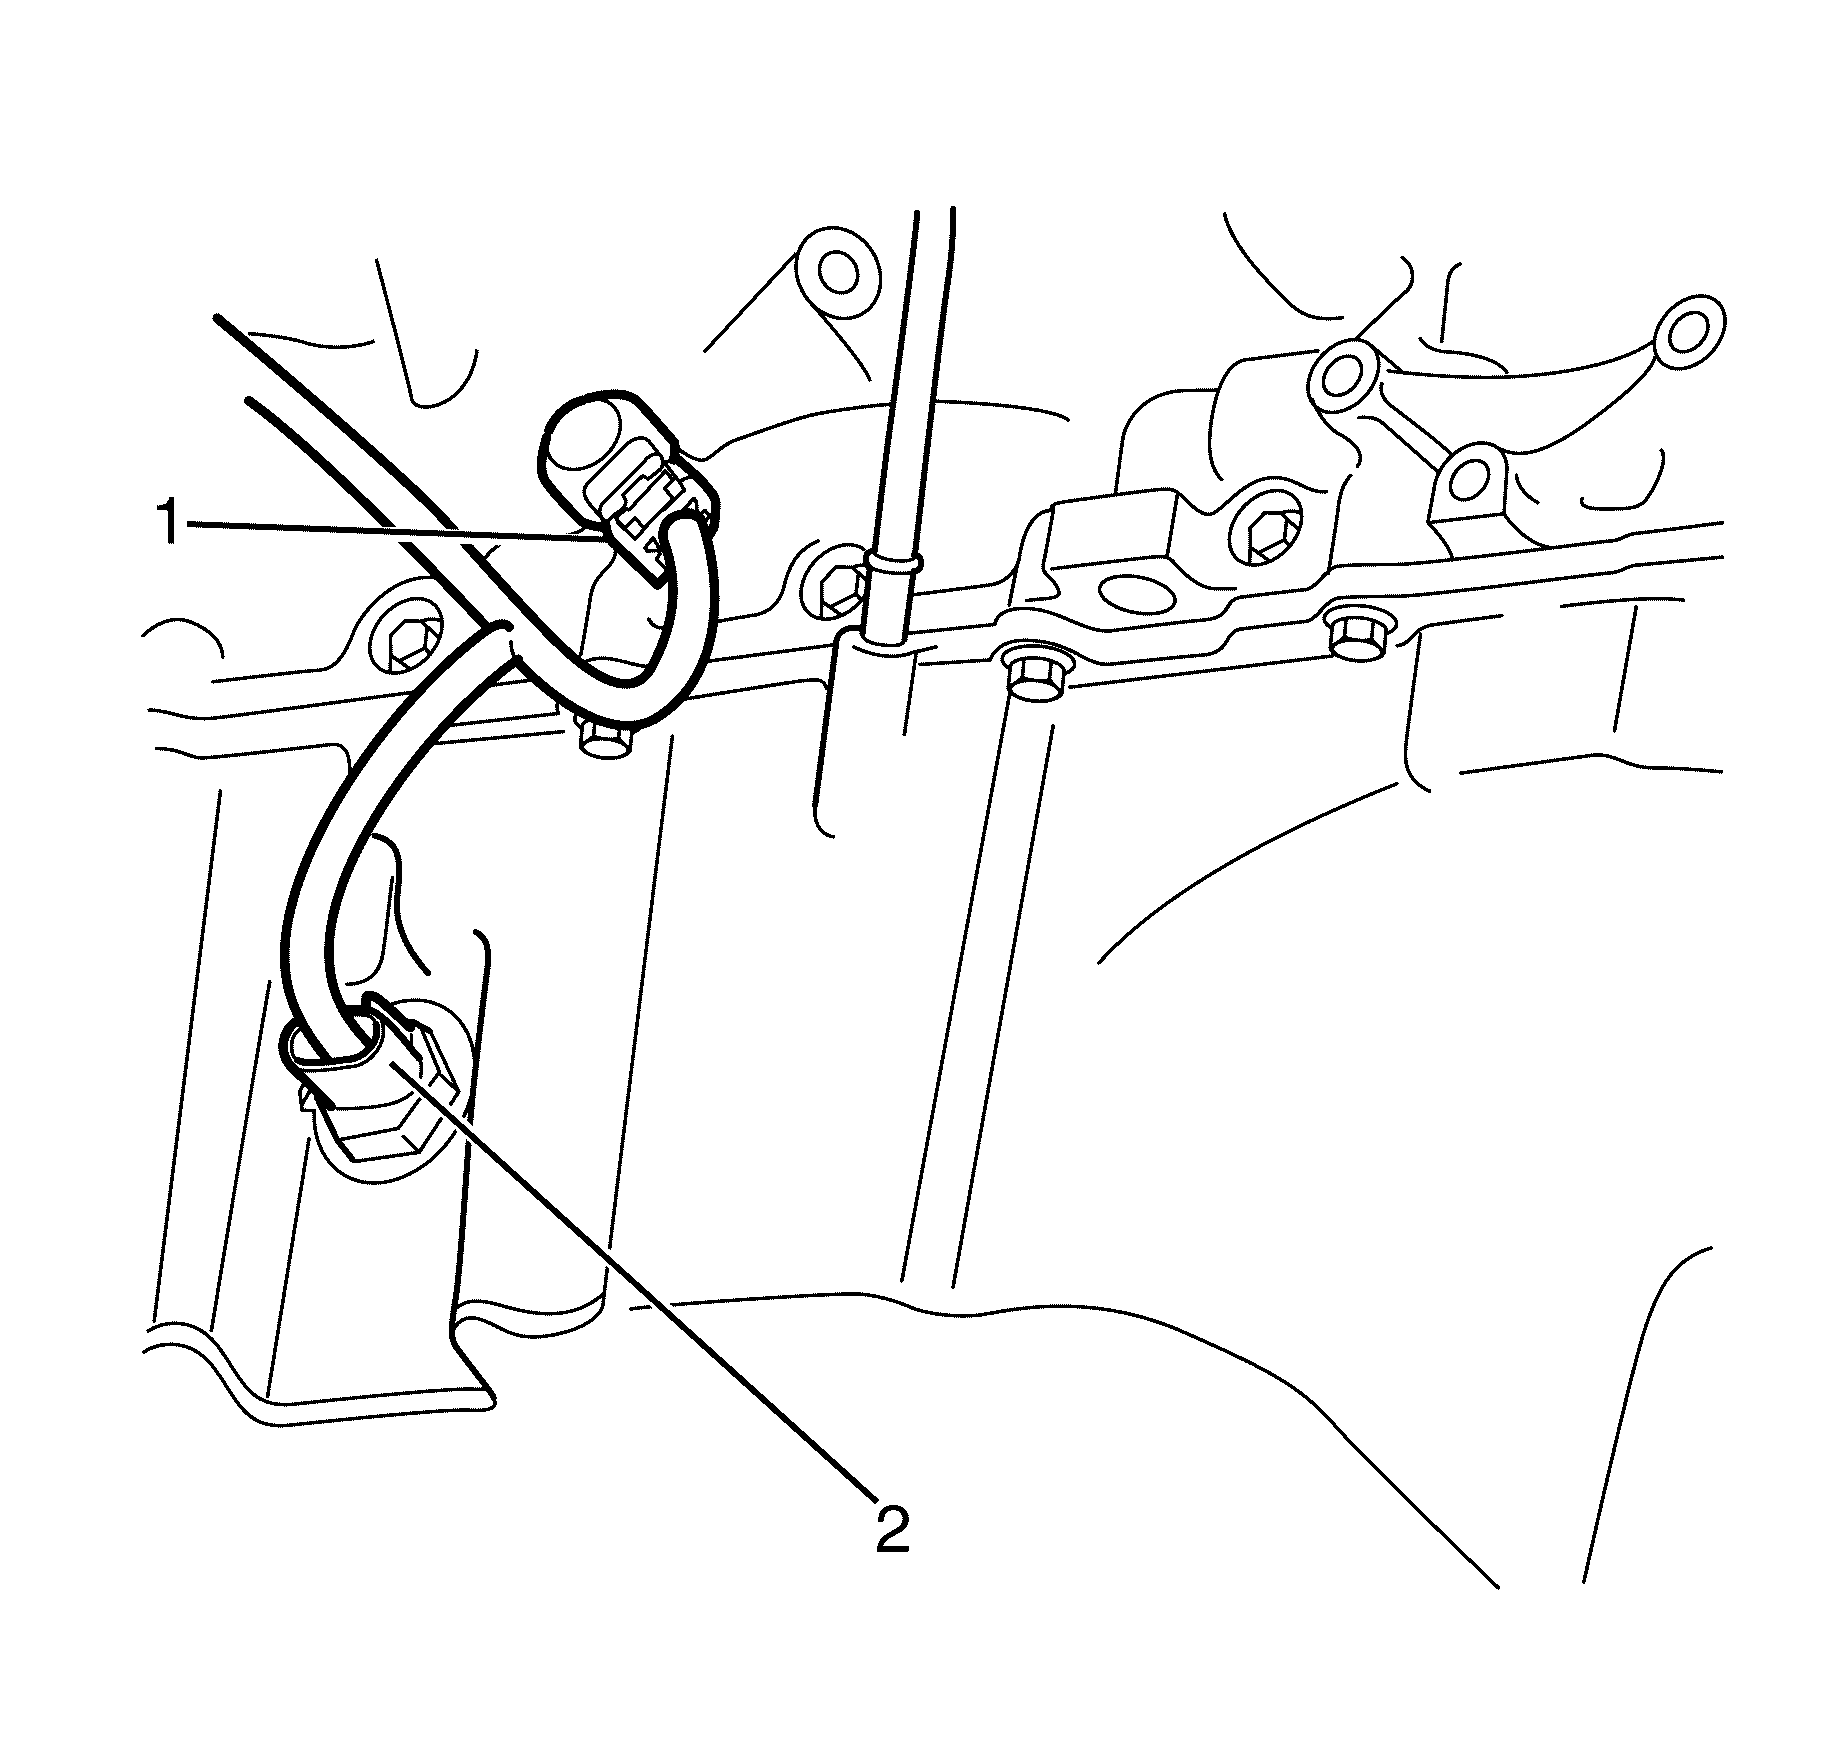
- Connect the heated oxygen sensor electrical connector (1).
- Attach the engine wiring loom assembly (2) to the retaining clip (1).
Notice: Refer to Fastener Notice in the Preface section.
Tighten
Tighten the bolt to 4 N·m (35 lb in).
Important: Listen for an audible click to confirm fitting of the electrical connector.

Important: Make sure the power steering reservoir (2) and the power steering reservoir bracket locking tang (1) are engaged to avoid an induced rattle condition.
Tighten
Tighten the stud to 30 N·m(22 lb ft).
Tighten
Tighten the nut to 12 N·m(106 lb in).
Tighten
Tighten the bolts to 50 N·m (37 lb ft).
Tighten
Tighten the nut to 10 N·m (88 lb in).
Tighten
Tighten the bolts to (5) N·m (44) lb in).
Important: Steps 35 - 39 refer to the 4L60E 4 speed automatic transmission only.
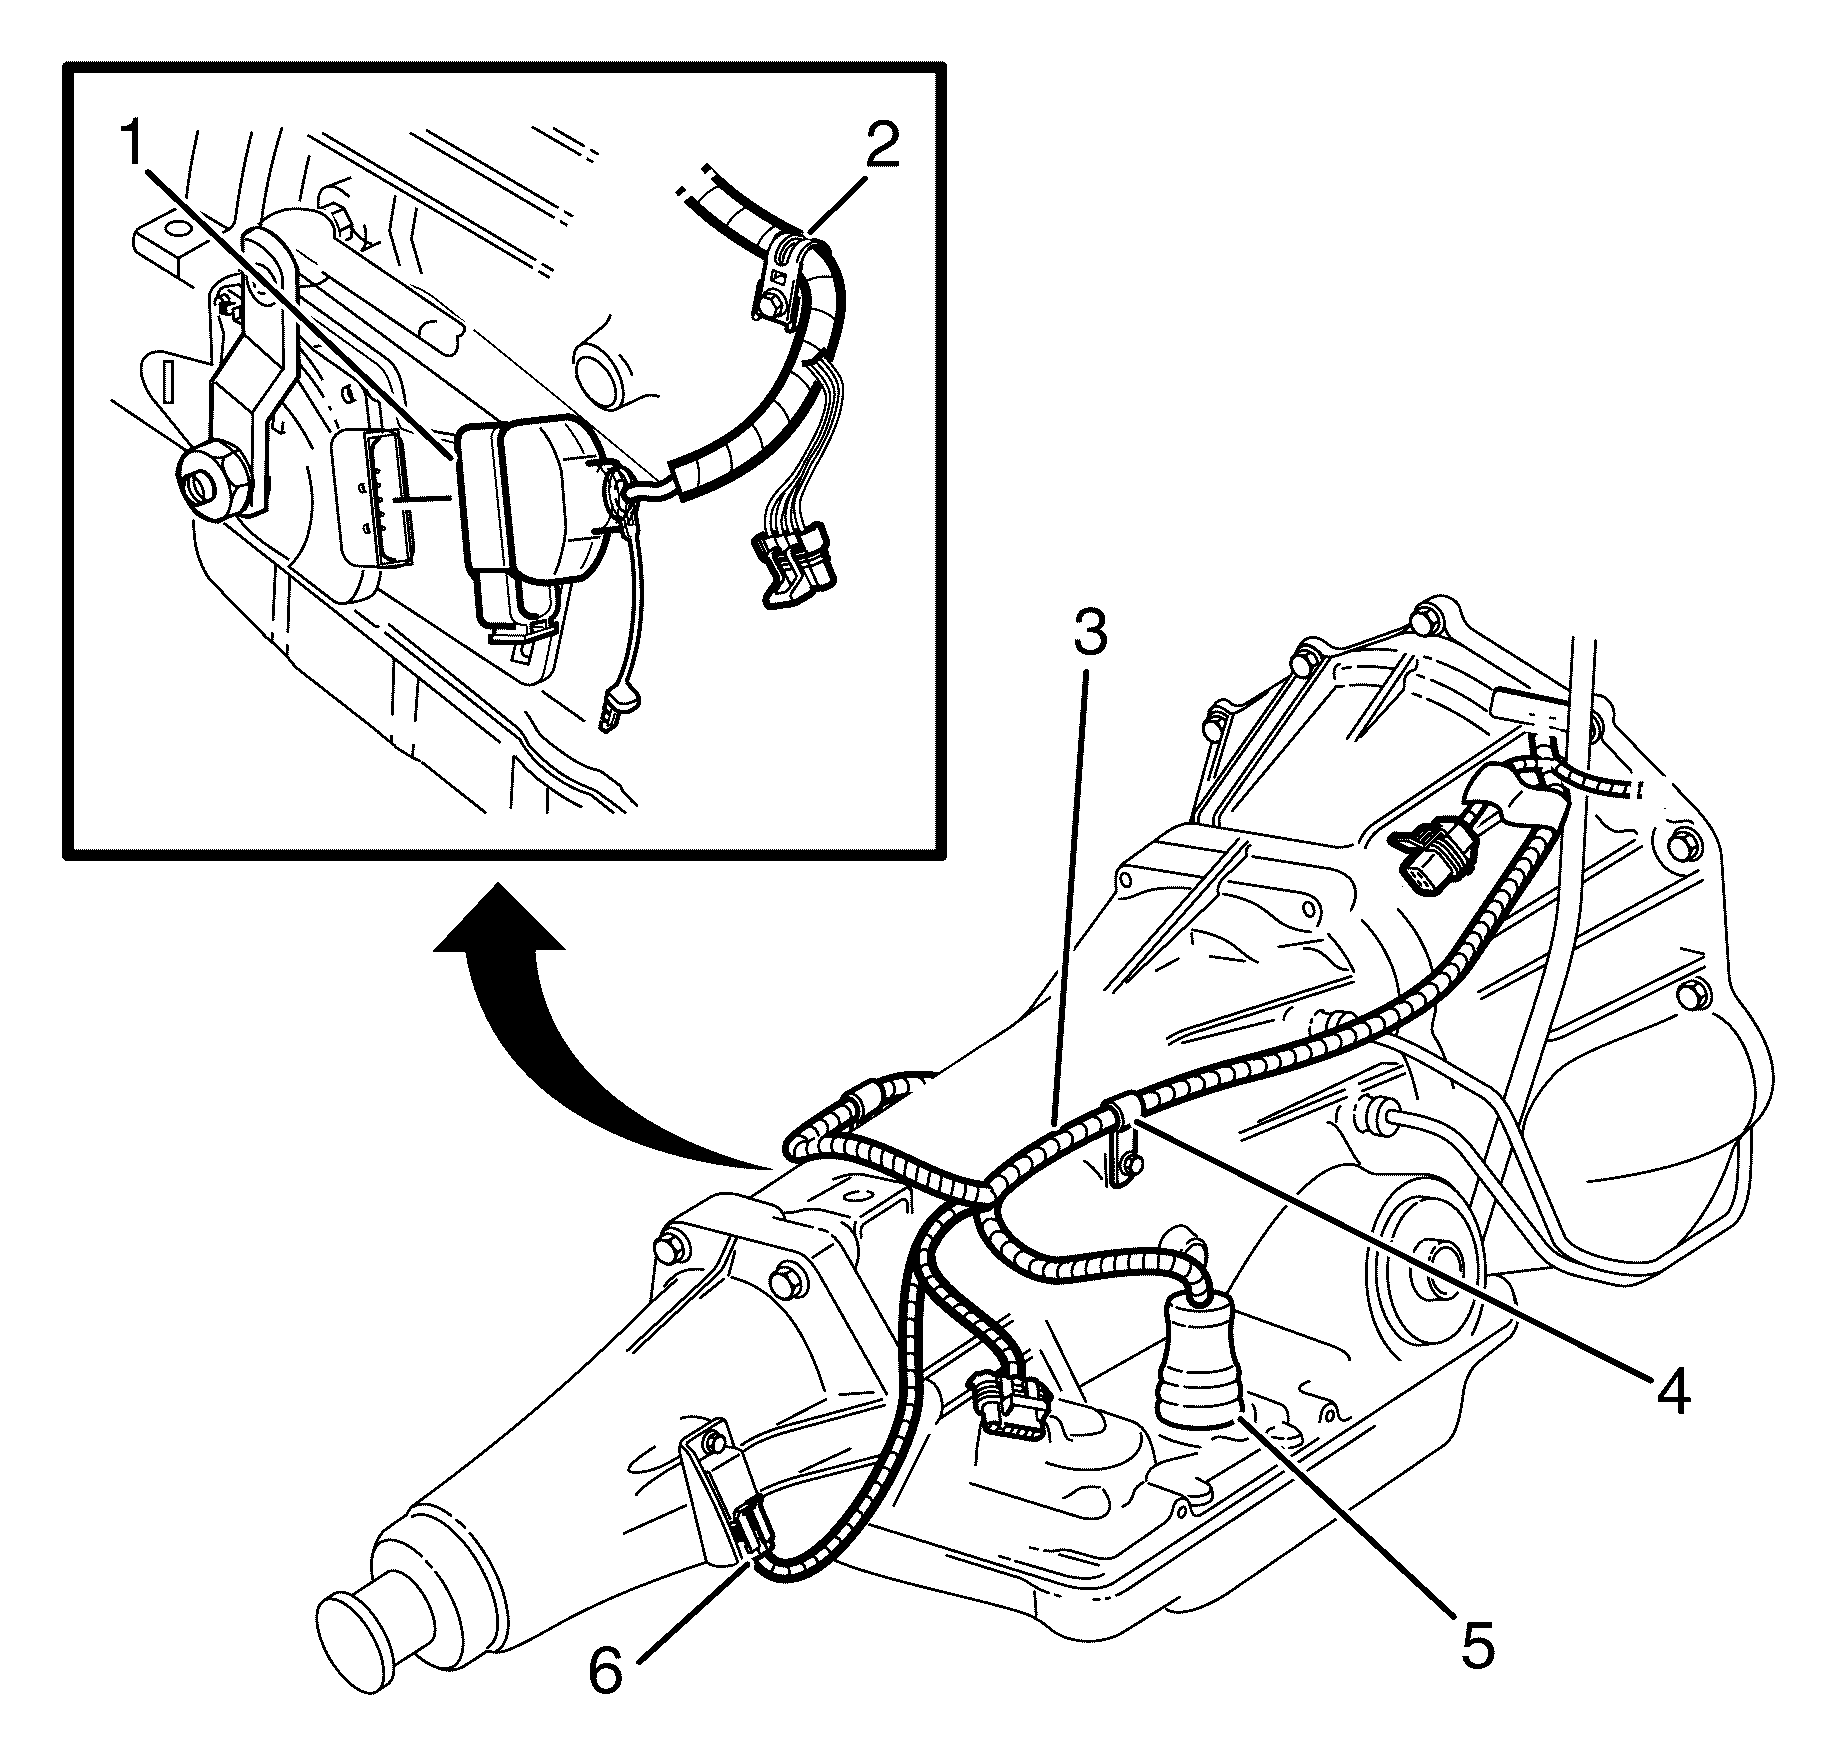
Important: Steps 40 - 42 refer to the 6L80E 4 speed automatic transmission only.

Engine Wiring Harness Assembly Installation LWBRHD
- Connect the oil pressure sensor electrical connector (1).
- Install the wiring harness assembly earth to cylinder head retaining bolt (3)
- Attach the wiring harness assembly retaining clip (2) to the left side cylinder head (4).
- Position and secure the left side fuel injector wiring harness (5) away from the intake manifold (1).
- Connect the left side ignition coil main connector (3).
- Install the CPA lock (4) from the left side ignition coil main connector (3).
- Connect the left side fuel injector wiring harness connectors (2).
- Connect the alternator electrical connector (1).
- Connect the camshaft position sensor connector (4).
- Connect the coolant temperature sensor connector (3).
- Attach the wiring harness retaining clip (2) to the engine lifting bracket (1).
- Install the power steering reservoir (2) to the power steering pump power steering reservoir bracket (1).
- Connect the electronic throttle body wiring harness connector (1).
- Connect the electrical connector to the A/C Refrigerant Pressure Sensor (1).
- Connect the A/C electrical connector (1).
- Position the wiring harness ground (1) on he cylinder head (2).
- Install the cylinder head stud (3) to the cylinder head (2).
- Position the vehicle body ground cable (3) on the cylinder head stud (2).
- Install the vehicle body ground cable to cylinder head retaining nut (1).
- Position the right side fuel injector wiring harness (4) on the intake manifold (2).
- Connect the manifold absolute pressure (MAP) sensor wiring harness connector (3).
- Connect the canister purge valve wiring harness connector (5).
- Connect the right side ignition coil main connector (6).
- Install the CPA lock (7) from the right side ignition coil main connector (6).
- Connect the right side fuel injector wiring harness connectors (1).
- Connect the right side knock sensor electrical connector (1).
- Connect the oil level/temperature sensor electrical connector (2).
- Connect the crankshaft position (CKP) sensor electrical connector (1).
- Install the starter motor (2) Into position.
- Install starter motor to bell housing retaining bolts (1).
- Connect the starter motor electrical connector (2)
- Install the battery positive cable and retaining nut (1).
- Install the heat shield to the vehicle (2).
- Install the heat shield to starter motor retaining bolts (1).
- Connect the vehicle speed sensor electrical connector (6).
- Connect the main transmission electrical connector (5).
- Connect the park/neutral position switch electrical connector (1).
- Attach the engine wiring loom assembly (3) from the retaining clip (4).
- Attach the engine wiring loom assembly (3) from the retaining clip (2).
- Connect the main transmission electrical connector (4).
- Connect the heated oxygen sensor electrical connector (1).
- Attach the engine wiring loom assembly (2) to the retaining clip (1).
Notice: Refer to Fastener Notice in the Preface section.
Tighten
Tighten the bolt to 4 N·m (35 lb in).
Important: Listen for an audible click to confirm fitting of the electrical connector.
Important: Make sure the power steering reservoir (2) and the power steering reservoir bracket locking tang (1) are engaged to avoid an induced rattle condition.
Tighten
Tighten the stud to 30 N·m(22 lb ft).
Tighten
Tighten the nut to 12 N·m(106 lb in).
Tighten
Tighten the bolts to 50 N·m (37 lb ft).
Tighten
Tighten the nut to 10 N·m (88 lb in).
Tighten
Tighten the bolts to (5) N·m (44) lb in).
Important: Steps 35 - 39 refer to the 4L60E 4 speed automatic transmission only.
Important: Steps 40 - 42 refer to the 6L80E 4 speed automatic transmission only.
Engine Wiring Harness Assembly Installation SWBRHD
- Connect the oil pressure sensor electrical connector (1).
- Install the wiring harness assembly earth to cylinder head retaining bolt (3)
- Attach the wiring harness assembly retaining clip (2) to the left side cylinder head (4).
- Position and secure the left side fuel injector wiring harness (5) away from the intake manifold (1).
- Connect the left side ignition coil main connector (3).
- Install the CPA lock (4) from the left side ignition coil main connector (3).
- Connect the left side fuel injector wiring harness connectors (2).
- Connect the alternator electrical connector (1).
- Connect the camshaft position sensor connector (4).
- Connect the coolant temperature sensor connector (3).
- Attach the wiring harness retaining clip (2) to the engine lifting bracket (1).
- Install the power steering reservoir (2) to the power steering pump power steering reservoir bracket (1).
- Connect the electronic throttle body wiring harness connector (1).
- Connect the electrical connector to the A/C Refrigerant Pressure Sensor (1).
- Connect the A/C electrical connector (1).
- Position the wiring harness ground (1) on he cylinder head (2).
- Install the cylinder head stud (3) to the cylinder head (2).
- Position the vehicle body ground cable (3) on the cylinder head stud (2).
- Install the vehicle body ground cable to cylinder head retaining nut (1).
- Position the right side fuel injector wiring harness (4) on the intake manifold (2).
- Connect the manifold absolute pressure (MAP) sensor wiring harness connector (3).
- Connect the canister purge valve wiring harness connector (5).
- Connect the right side ignition coil main connector (6).
- Install the CPA lock (7) from the right side ignition coil main connector (6).
- Connect the right side fuel injector wiring harness connectors (1).
- Connect the right side knock sensor electrical connector (1).
- Connect the oil level/temperature sensor electrical connector (2).
- Connect the crankshaft position (CKP) sensor electrical connector (1).
- Install the starter motor (2) Into position.
- Install starter motor to bell housing retaining bolts (1).
- Connect the starter motor electrical connector (2)
- Install the battery positive cable and retaining nut (1).
- Install the heat shield to the vehicle (2).
- Install the heat shield to starter motor retaining bolts (1).
- Connect the vehicle speed sensor electrical connector (6).
- Connect the main transmission electrical connector (5).
- Connect the park/neutral position switch electrical connector (1).
- Attach the engine wiring loom assembly (3) from the retaining clip (4).
- Attach the engine wiring loom assembly (3) from the retaining clip (2).
- Connect the main transmission electrical connector (4).
- Connect the heated oxygen sensor electrical connector (1).
- Attach the engine wiring loom assembly (2) to the retaining clip (1).
- Connect the reverse switch assembly electrical connector (3).
- Attach the engine wiring loom assembly (2) to the retaining clip (1).
Notice: Refer to Fastener Notice in the Preface section.
Tighten
Tighten the bolt to 4 N·m (35 lb in).
Important: Listen for an audible click to confirm fitting of the electrical connector.
Important: Make sure the power steering reservoir (2) and the power steering reservoir bracket locking tang (1) are engaged to avoid an induced rattle condition.
Tighten
Tighten the stud to 30 N·m(22 lb ft).
Tighten
Tighten the nut to 12 N·m(106 lb in).
Tighten
Tighten the bolts to 50 N·m (37 lb ft).
Tighten
Tighten the nut to 10 N·m (88 lb in).
Tighten
Tighten the bolts to (5) N·m (44) lb in).
Important: Steps 35 - 39 refer to the 4L60E 4 speed automatic transmission only.
Important: Steps 40 - 42 refer to the 6L80E 4 speed automatic transmission only.
Important: Steps 43 and 44 refer to the T56 6 speed manual transmission only.