Tools Required
EN 46109 Engine Front Cover Installation Guide Pins
Removal Procedure
- Remove the engine covers. Refer to Engine Cover Replacement .
- Remove the upper intake manifold with the lower intake manifold. Refer to Lower Intake Manifold Replacement .
- Remove the camshaft covers. Refer to Camshaft Cover Replacement - Left Side and Camshaft Cover Replacement - Right Side .
- Drain the engine coolant. Refer to Cooling System Draining and Filling .
- Remove the radiator outlet hose. Refer to Radiator Outlet Hose Replacement .
- Compress the coolant bleed hose retaining clamp (4) at the outlet housing (1) end and slide 50 mm (2 in) along the coolant bleed hose (3).
- Remove the coolant bleed hose (3) from the outlet housing (1).
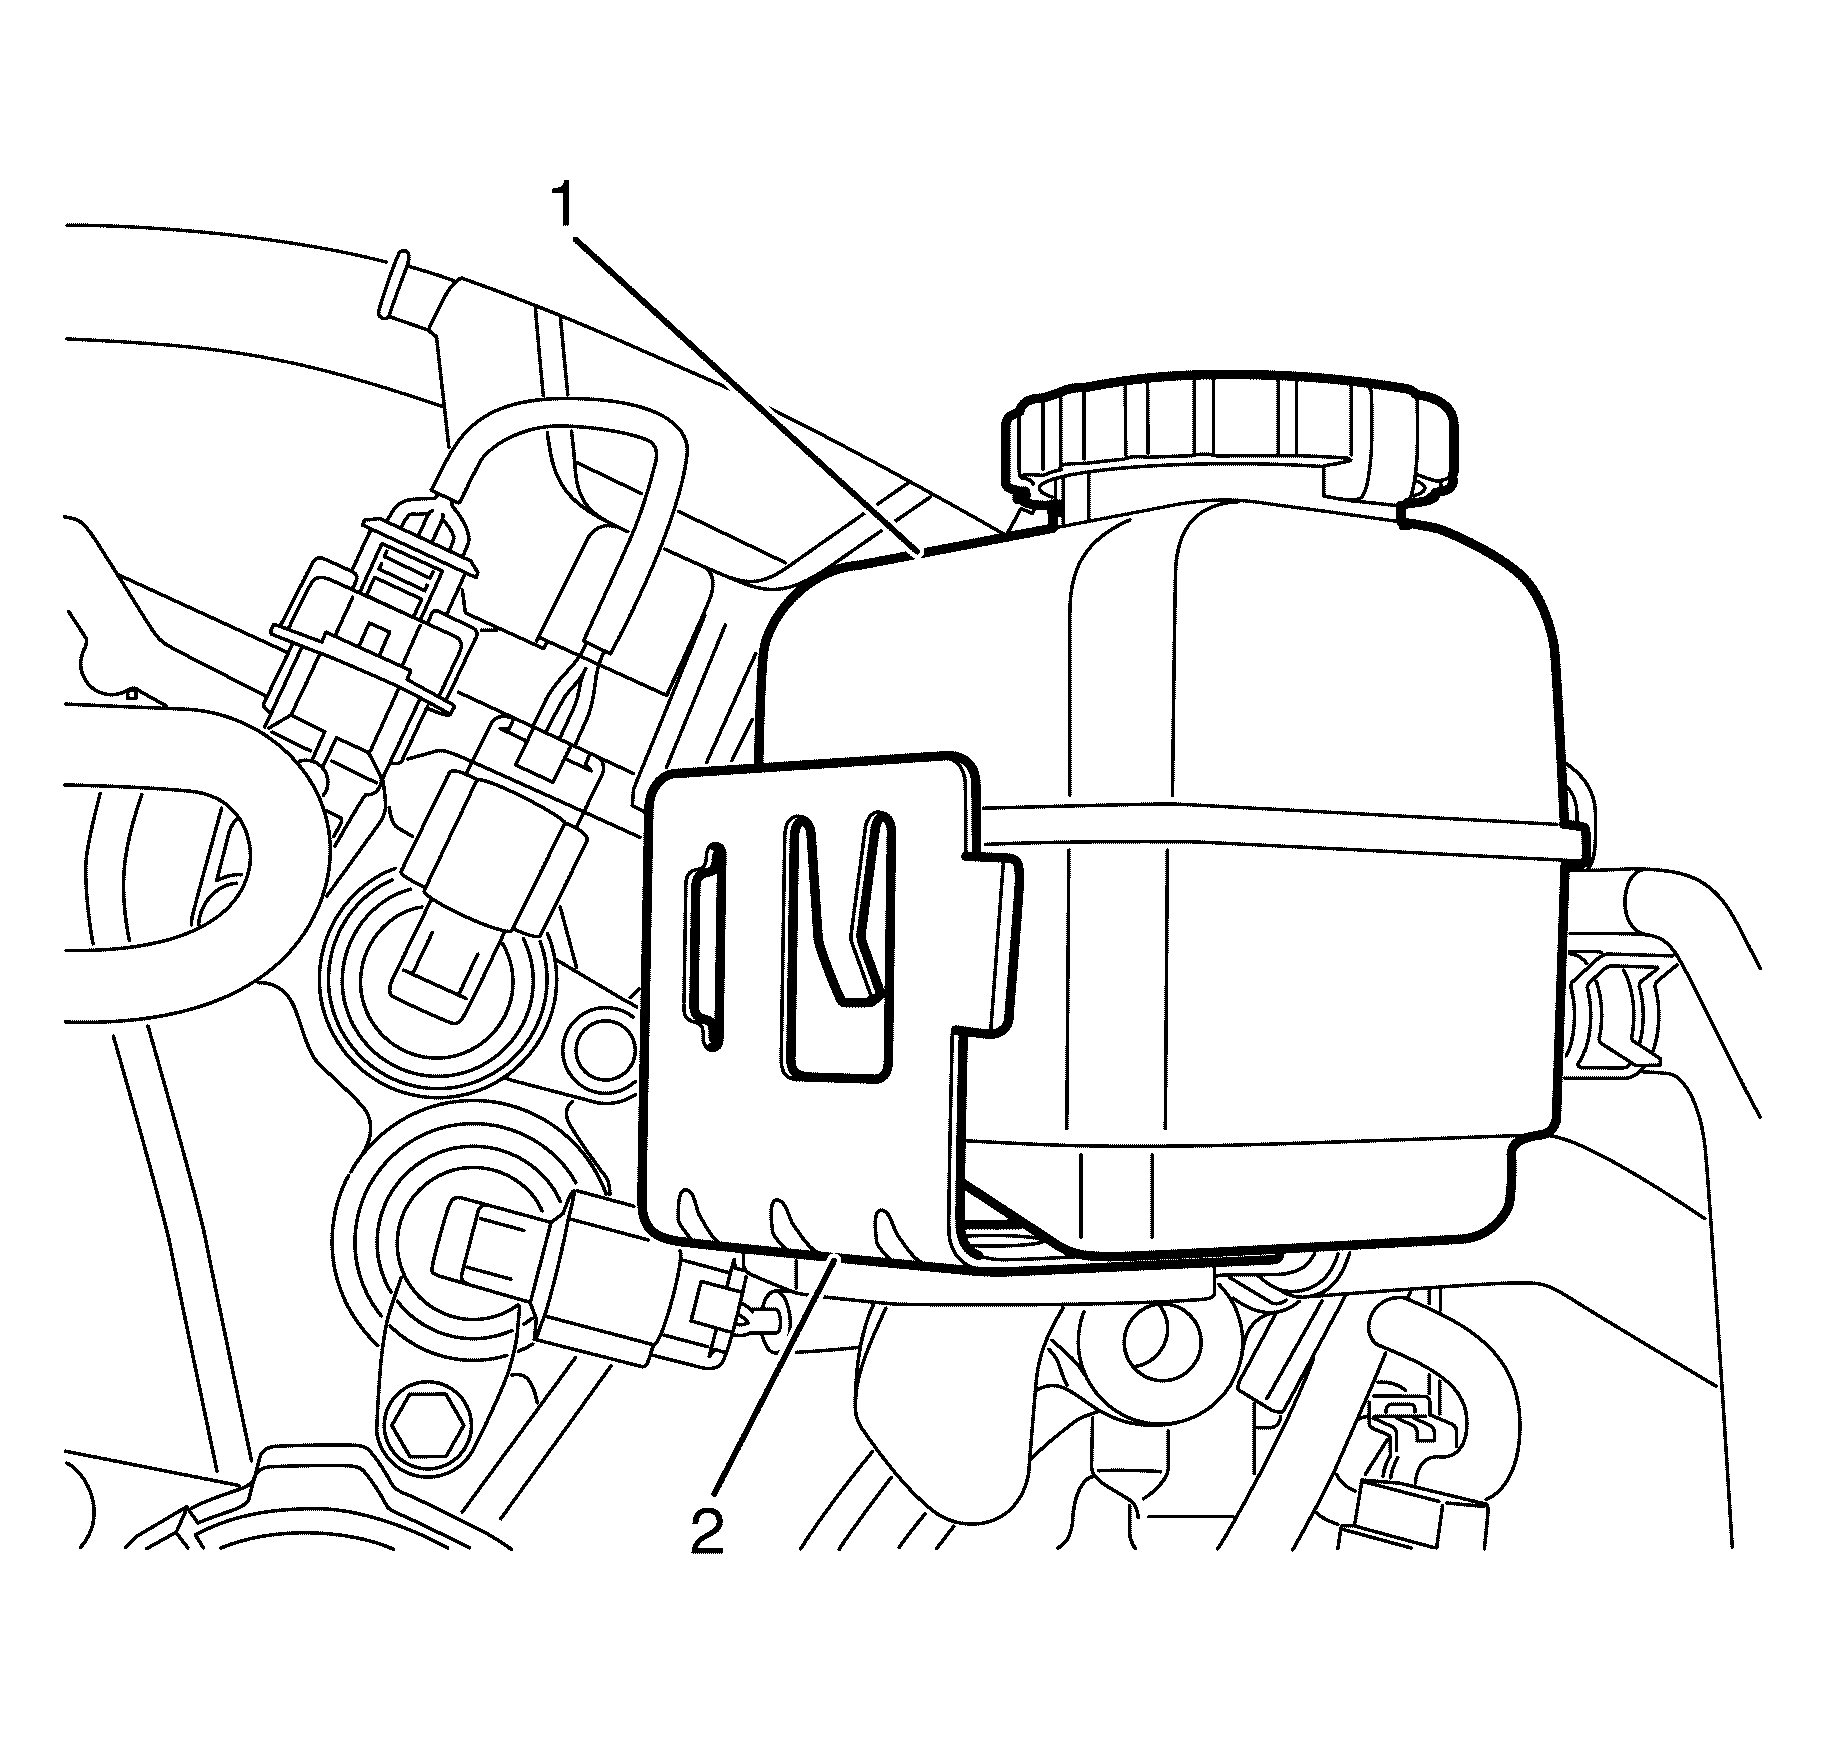
- Disconnect the coolant recovery hose (2) from the outlet housing (1).
- Plug or cap the cooling system hoses and inlets
- Remove the water outlet housing. Refer to Water Outlet Housing Replacement .
- Remove the drive belt. Refer to Drive Belt Replacement .
- Remove the drive belt tensioner. Refer to Drive Belt Tensioner Replacement .
- Remove the alternator bracket with the alternator. Refer to Generator Bracket Replacement .
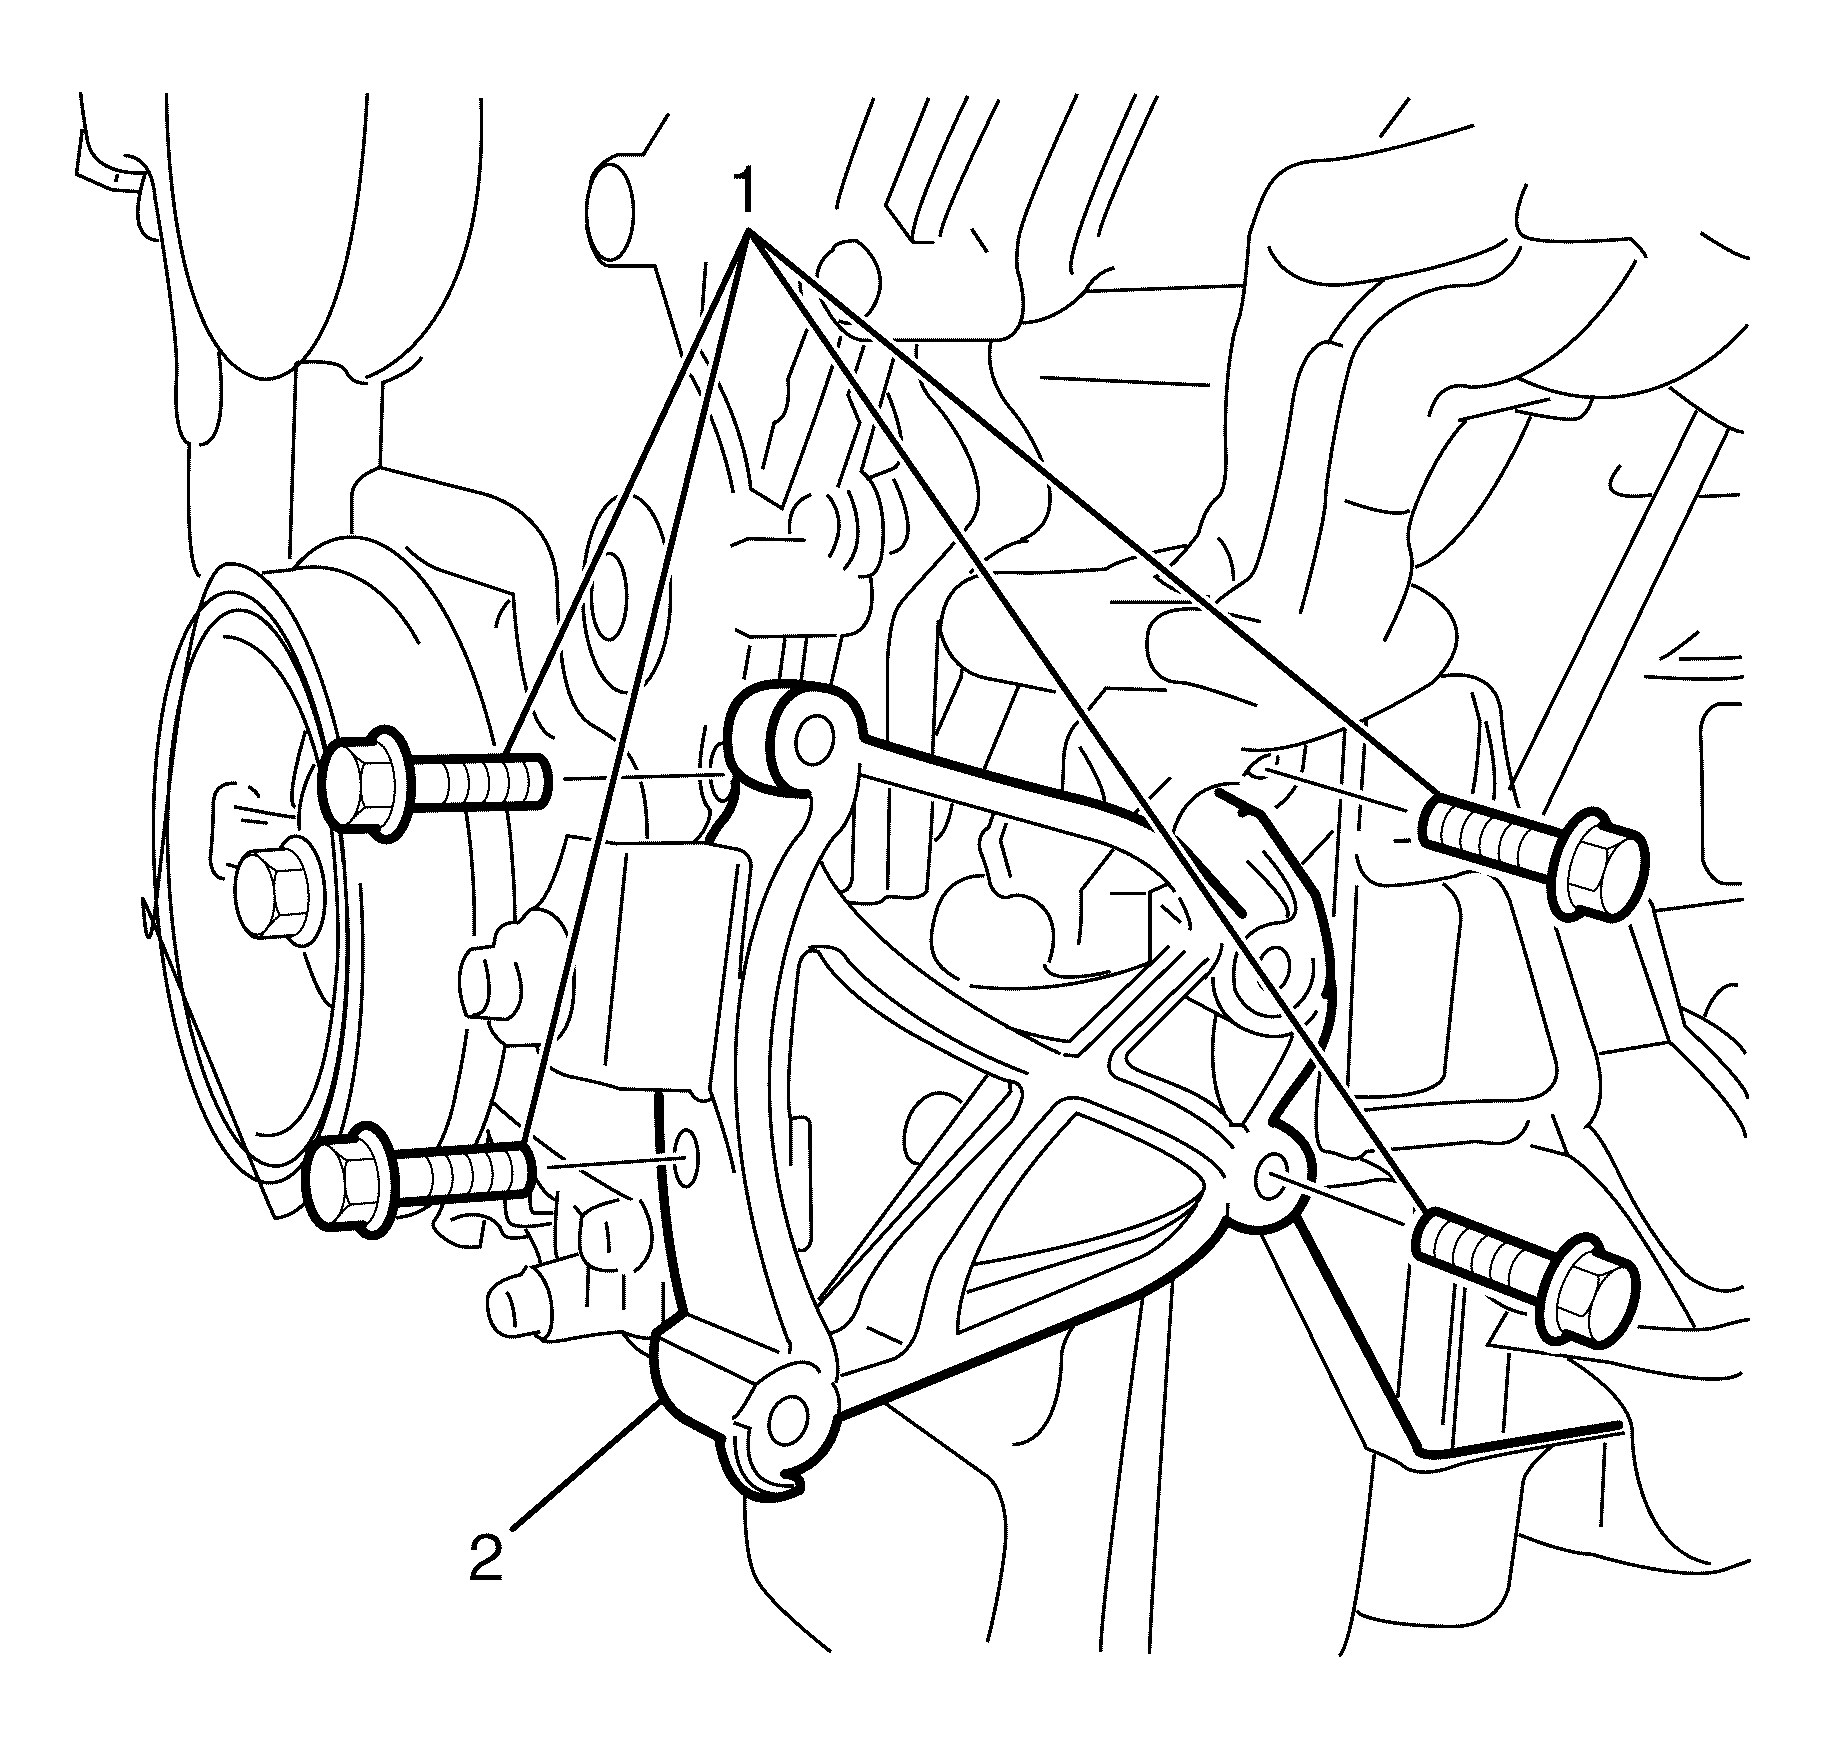
- Separate power steering fluid reservoir (1) from the power steering fluid reservoir bracket (2).
- Reposition and secure the power steering fluid reservoir away from the power steering fluid reservoir (1) bracket (2).
- Remove the power steering pump to power steering bracket retaining bolts (3).
- Remove the power steering pump (1) from the power steering bracket (2).
- Secure and reposition the power steering pump (1) away from the power steering bracket (2).
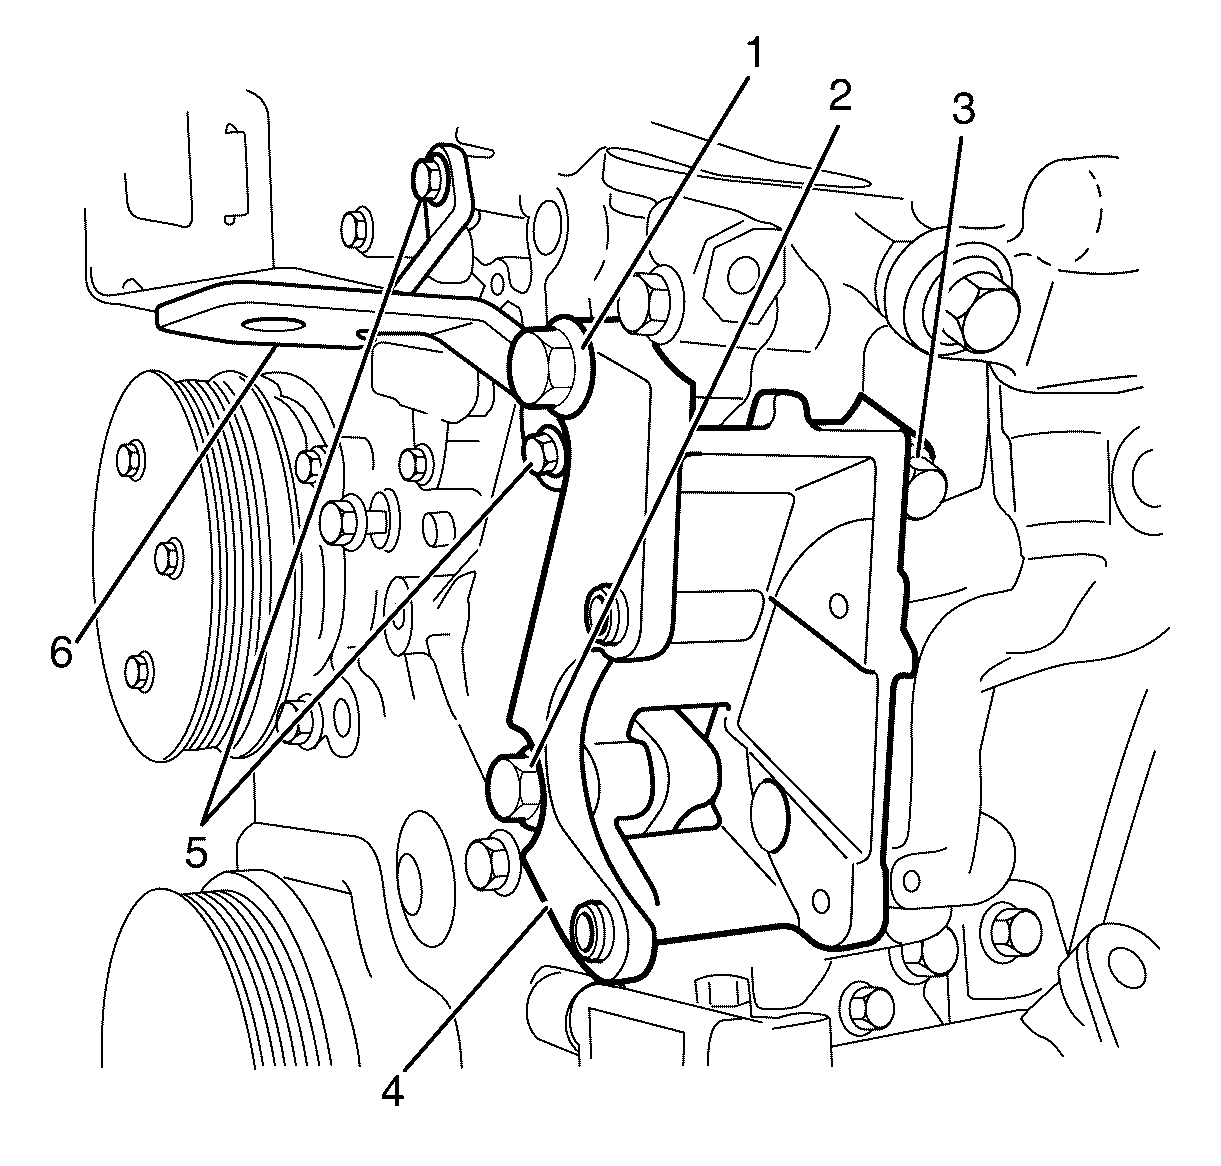
- Remove the power steering fluid reservoir bracket to engine front cover retaining bolts (5).
- Remove the power steering fluid reservoir bracket (6).
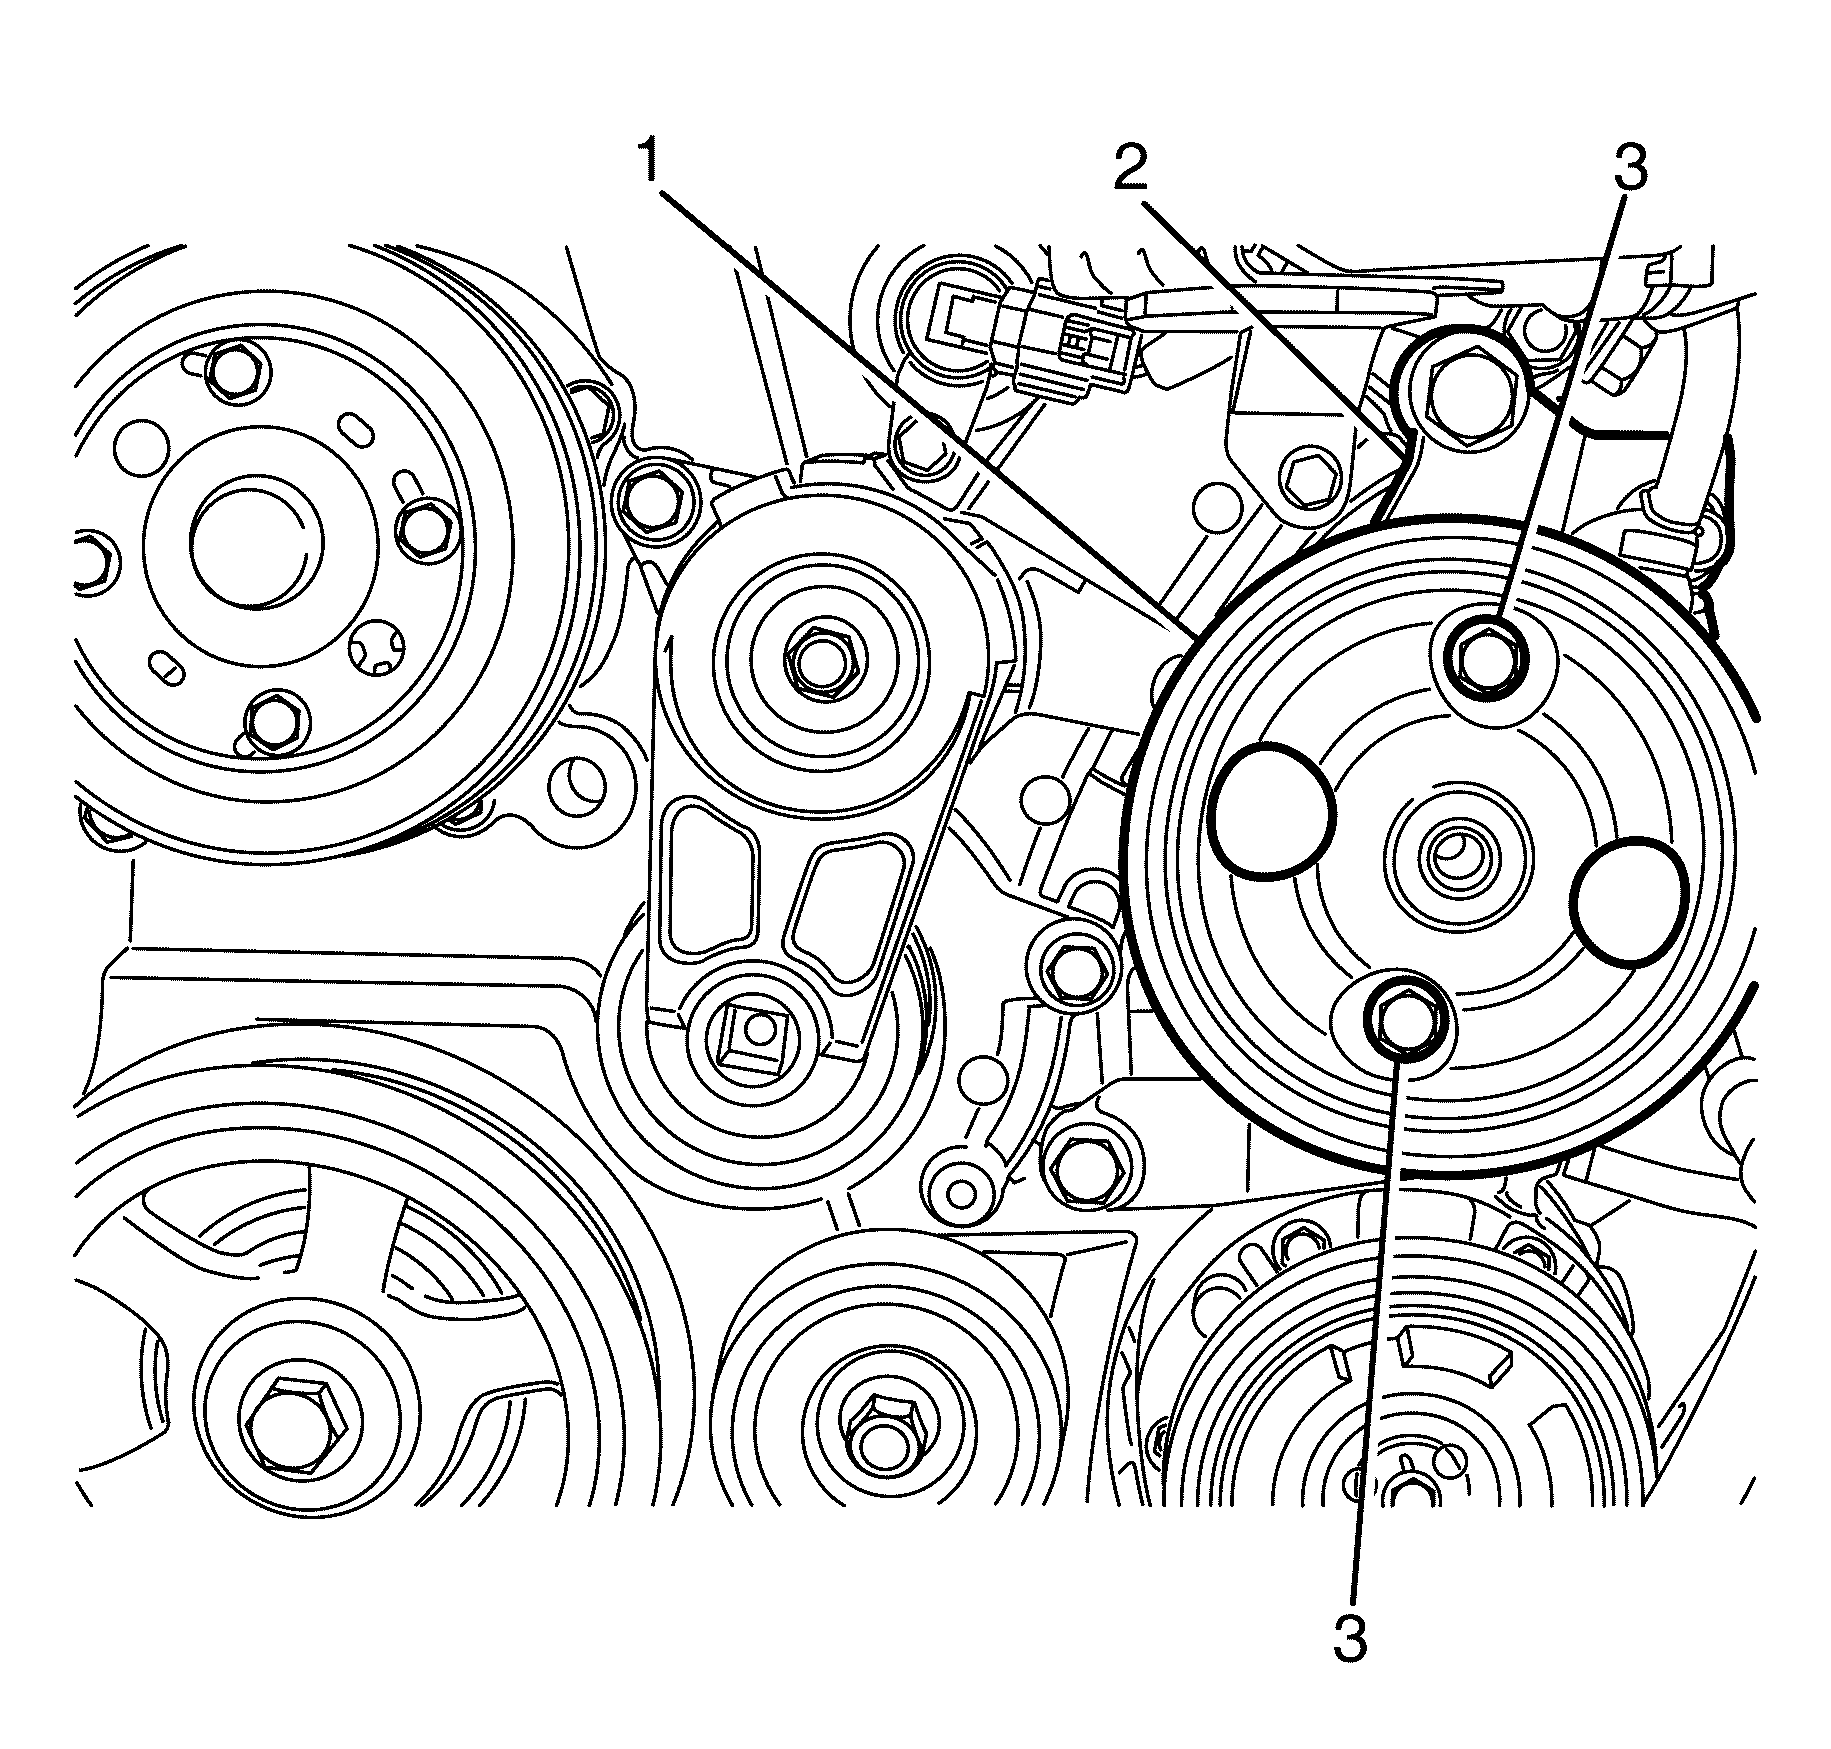
- Remove the power steering bracket to cylinder head retaining bolt (3).
- Remove the power steering bracket to engine front cover retaining bolt (1).
- Remove the power steering bracket to cylinder block retaining bolt (2).
- Remove the power steering pump bracket (4).
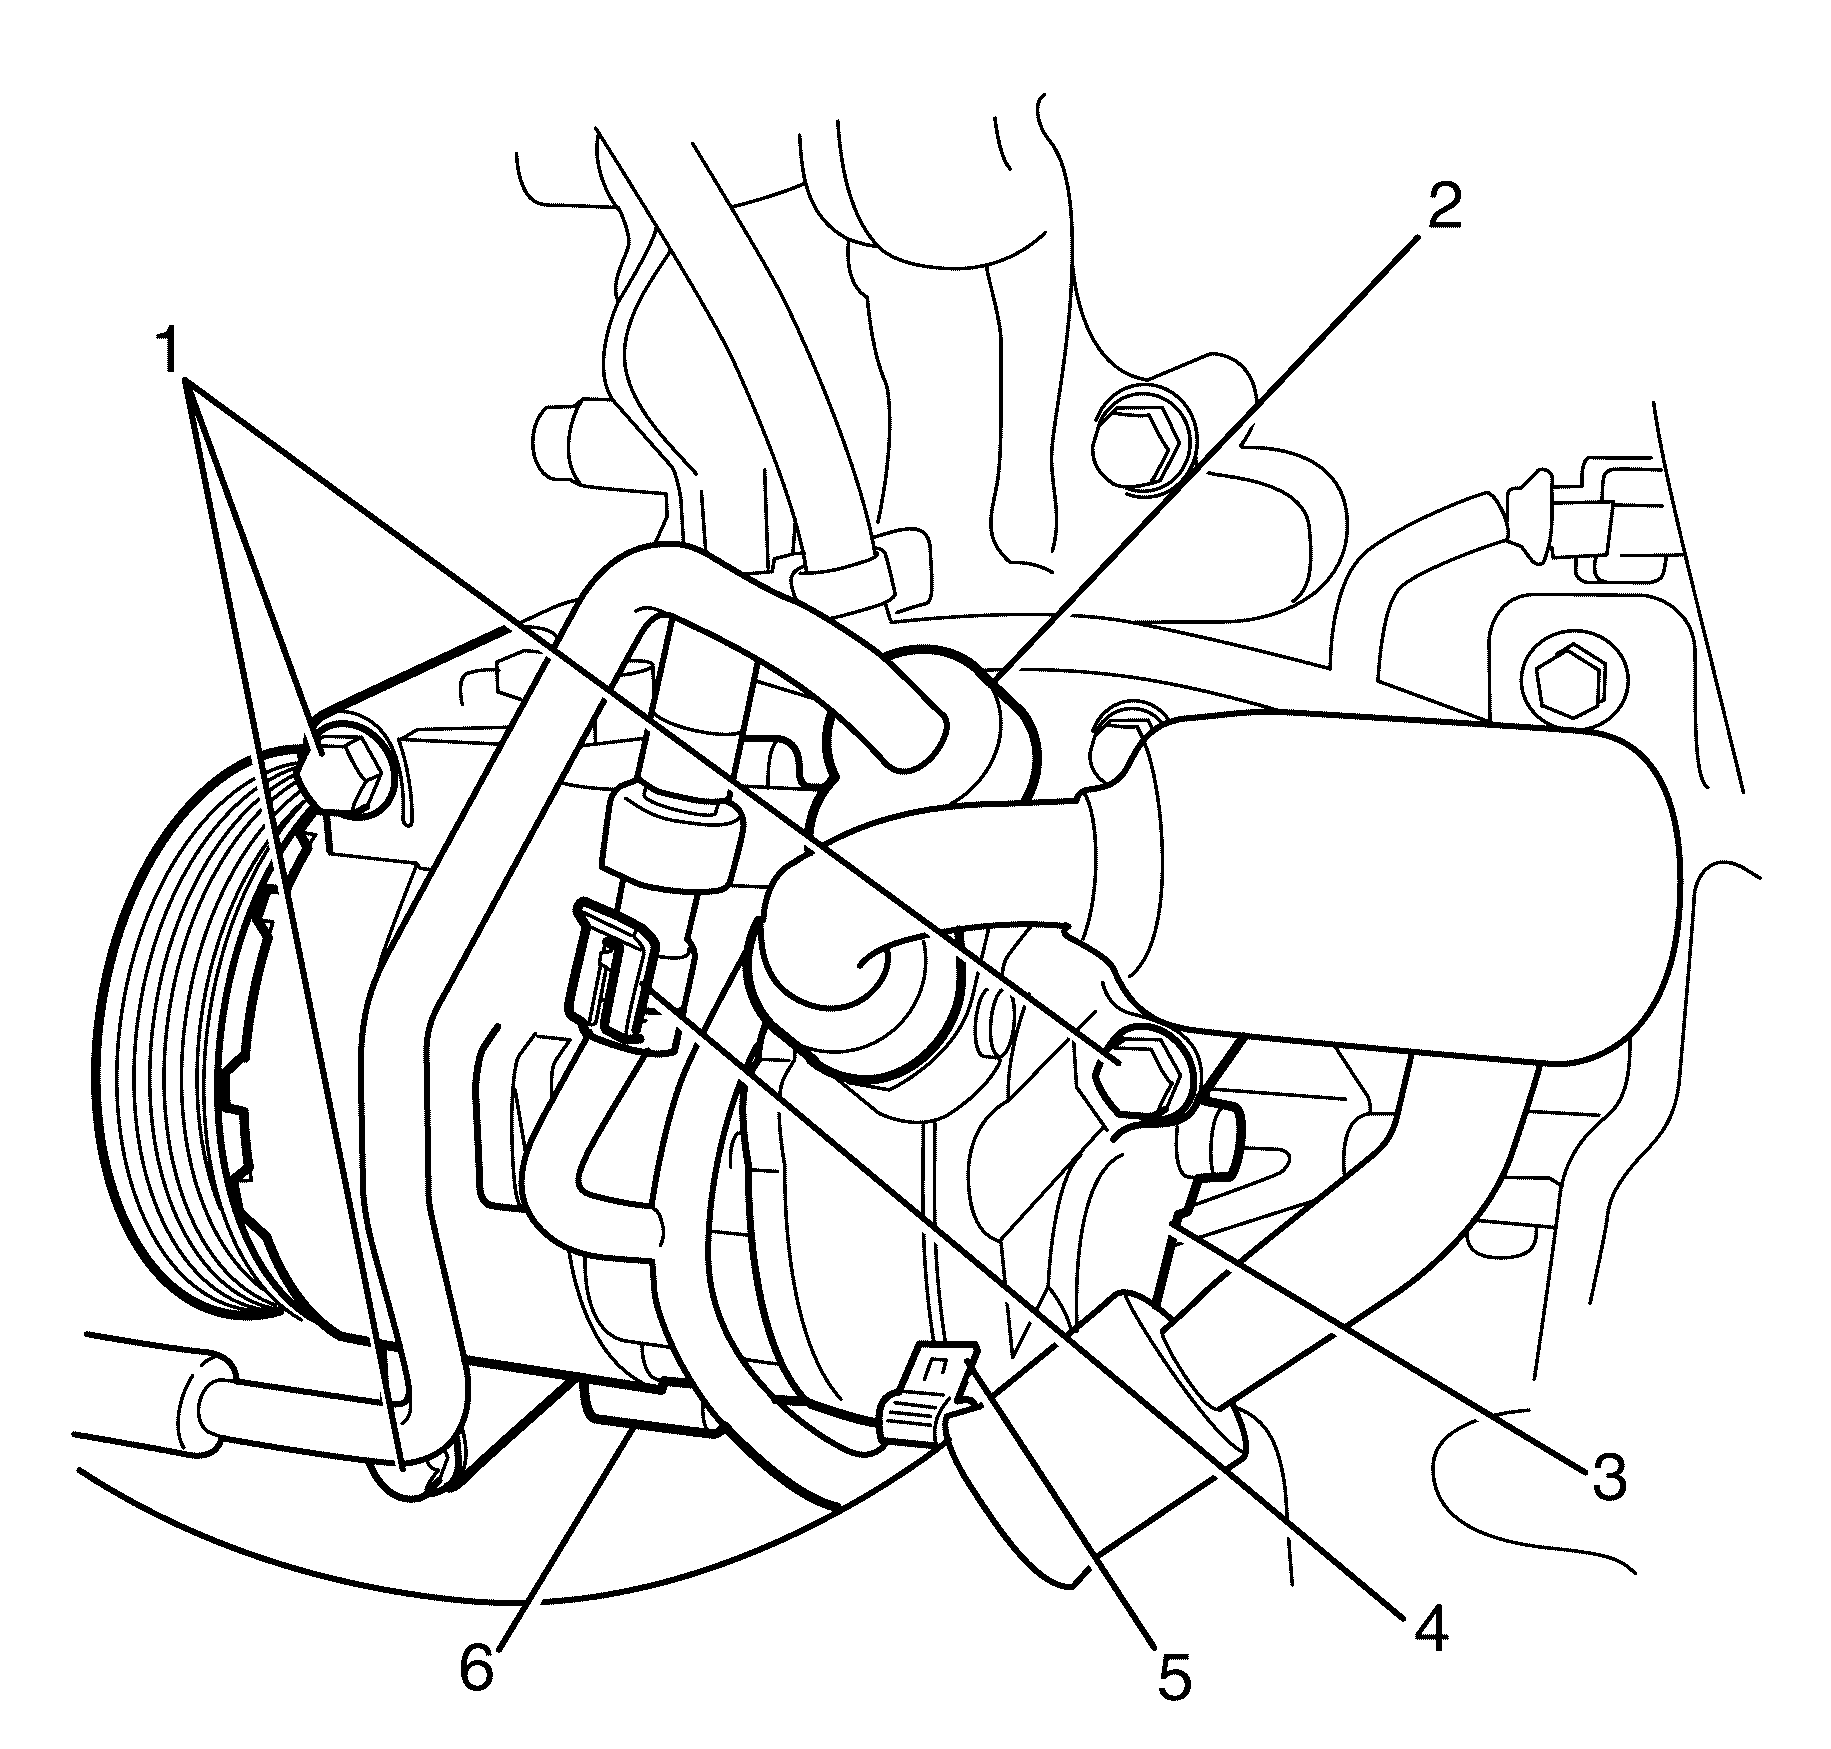
- Disconnect the A/C pressure transducer electrical connector (4).
- Disconnect the A/C compressor electrical connector (5).
- Remove the A/C compressor to A/C compressor/power steering pump mounting bracket retaining bolts (1).
- Secure and reposition the A/C compressor (6) away from the A/C compressor mounting bracket (3).
- Remove the compressor bracket mounting bolts (1).
- Remove the compressor bracket (2).
- Remove the crankshaft balancer. Refer to Crankshaft Balancer Replacement .
- Remove the camshaft position sensors. Refer to (if fitted) Camshaft Position Sensor Replacement - Bank 2 (Left Side) Exhaust . Refer to (if fitted) Camshaft Position Sensor Replacement - Bank 1 (Right Side) Exhaust and Camshaft Position Sensor Replacement - Bank 2 (Left Side) Intake . Refer to Camshaft Position Sensor Replacement - Bank 1 (Right Side) Intake .
- Remove the camshaft position (CMP) actuator solenoids. Refer to (if fitted) Camshaft Position Actuator Solenoid Valve Solenoid Replacement - Bank 2 (Left Side) Exhaust and Camshaft Position Actuator Solenoid Valve Solenoid Replacement - Bank 2 (Left Side) Intake (if fitted) Camshaft Position Actuator Replacement - Bank 1 (Right Side) Exhaust and Camshaft Position Actuator Replacement - Bank 1 (Right Side) Intake .
- Remove the engine front cover with the water pump. Refer to Engine Front Cover Removal .
- Disassemble the engine front cover as necessary. Refer to Engine Front Cover Disassemble .
- Carefully clean the engine front cover sealing surfaces. Refer to Engine Front Cover Cleaning and Inspection .
- Carefully clean the engine front cover sealing surfaces. Refer to Engine Front Cover Cleaning and Inspection .
- Use compressed air in order to remove any engine coolant from the engine cooling passages and from the top of the oil pan scraper (windage tray).

Important: Twist and pull the coolant recovery hose (2) to remove from the outlet housing (1).
Important: Plug or cap the hoses and inlets when separating the cooling system components, this prevents dirt and other contaminants from entering the cooling system.
Important: DO NOT disconnect the power steering pipes or drain the power steering fluid.
Important: The locking tang on the power steering reservoir bracket (2) must be released before removing the power steering reservoir (1). Release the locking tang on the power steering reservoir bracket (2) with a suitable tool.
Important: DO NOT disconnect the power steering pipes/hoses.
Important: Bolts with micro-encapsulated thread sealant must be discarded after removal.
Important: Make sure all the bolt holes are thoroughly cleaned and all micro-encapsulated thread sealant is removed.
| • | Discard the bolts. |
| • | Clean the bolt holes. |
Important: Bolts with micro-encapsulated thread sealant must be discarded after removal.
Important: Make sure all the bolt holes are thoroughly cleaned and all micro-encapsulated thread sealant is removed.
| • | Discard the bolts. |
| • | Clean the bolt holes. |
Important: Bolts with micro-encapsulated thread sealant must be discarded after removal.
Important: Make sure all the bolt holes are thoroughly cleaned and all micro-encapsulated thread sealant is removed.
| • | Discard the bolt. |
| • | Clean the bolt hole. |
Important: Bolts with micro-encapsulated thread sealant must be discarded after removal.
Important: Make sure all the bolt holes are thoroughly cleaned and all micro-encapsulated thread sealant is removed.
| • | Discard the bolt. |
| • | Clean the bolt hole. |
Important: Bolts with micro-encapsulated thread sealant must be discarded after removal.
Important: Make sure all the bolt holes are thoroughly cleaned and all micro-encapsulated thread sealant is removed.
| • | Discard the bolt. |
| • | Clean the bolt hole. |
Important: DO NOT disconnect the A/C pipes (2) from the A/C compressor (6).
Important: DO NOT use sharp and/or metal gasket scrapers in order to clean the sealing surfaces.
Important: Insert a piece of cardboard between the oil pan front and the oil pump in order to prevent any contaminants from falling into the oil pan.
Installation Procedure
- Assemble the engine front cover as necessary. Refer to Engine Front Cover Assemble .
- Use the EN 46109 to install the engine front cover. Refer to Engine Front Cover Installation .
- Install the camshaft position (CMP) actuator solenoids. Refer to (if fitted) Camshaft Position Actuator Solenoid Valve Solenoid Replacement - Bank 2 (Left Side) Exhaust and Camshaft Position Actuator Solenoid Valve Solenoid Replacement - Bank 2 (Left Side) Intake . Refer to (if fitted) Camshaft Position Actuator Replacement - Bank 1 (Right Side) Exhaust and Camshaft Position Actuator Replacement - Bank 1 (Right Side) Intake .
- Install the camshaft position sensors. Refer to (if fitted) Camshaft Position Sensor Replacement - Bank 2 (Left Side) Exhaust and Camshaft Position Sensor Replacement - Bank 2 (Left Side) Intake . Refer to (if fitted) Camshaft Position Sensor Replacement - Bank 1 (Right Side) Exhaust and Camshaft Position Sensor Replacement - Bank 1 (Right Side) Intake .
- Install the crankshaft balancer. Refer to Crankshaft Balancer Replacement .
- install the compressor bracket (2).
- Install the compressor bracket mounting bolts (1).
- Install the A/C compressor (6) with the A/C pipes (2) to the A/C compressor mounting bracket (3).
- Install the compressor to compressor mounting bracket retaining bolts (1)
- Connect the A/C pressure transducer electrical connector (4).
- Connect the A/C compressor electrical connector (5).
- Install the power steering pump bracket (4).
- Install a NEW power steering bracket to cylinder head retaining bolt (3).
- Install a NEW power steering bracket to engine front cover retaining bolts (1).
- Install a NEW power steering bracket to cylinder block retaining bolt (2).
- Install the power steering fluid reservoir bracket (6).
- Install the NEW power steering fluid reservoir bracket to engine front cover retaining bolts (5).
- Install the power steering pump (2) to the power steering pump bracket (1).
- Install the NEW power steering pump to power steering pump bracket retaining bolts (3).
- Install the power steering fluid reservoir (1) to the power steering fluid reservoir bracket (2).
- Install the alternator bracket with the alternator. Refer to Generator Bracket Replacement .
- Install the belt tensioner. Refer to Drive Belt Tensioner Replacement .
- Install the drive belt. Refer to Drive Belt Replacement .
- Install the water outlet housing. Refer to Water Outlet Housing Replacement .
- Remove the plug or cap at the cooling system hoses and inlets
- Install the coolant bleed hose (3) to the outlet housing (1).
- Compress the coolant bleed hose retaining clamp (4) and position back to its original location on the coolant bleed hose (3).
- Connect the coolant recovery hose (2) from the outlet housing (1).
- Install the radiator outlet hose. Refer to Radiator Outlet Hose Replacement .
- Install the camshaft covers. Refer to Camshaft Cover Replacement - Left Side and Camshaft Cover Replacement - Right Side .
- Install the upper intake manifold with the lower intake manifold. Refer to Lower Intake Manifold Replacement .
- Install the engine covers. Refer to Engine Cover Replacement .
- Fill the cooling system. Refer to Cooling System Draining and Filling .
- Change the engine oil. Refer to Engine Oil and Oil Filter Replacement .
Important: Make sure the A/C pipes (2) are not twisted or kinked upon compressor installation.
Notice: Refer to Fastener Notice in the Preface section.
Tighten
Tighten the bolts to 22 N·m (16 lb ft).
Tighten
Tighten the bolt to 58 N·m (43 lb ft).
Tighten
Tighten the bolt to 58 N·m (43 lb ft).
Tighten
Tighten the bolt to 58 N·m (43 lb ft).
Tighten
Tighten the bolts to 9 N·m (80 lb ft).
Tighten
Tighten the bolts to 27 N·m (22 lb ft).
Important: Make sure the power steering reservoir (1) and the locking tang on the power steering reservoir bracket (2) are engaged to avoid an induced rattle condition.
