Engine Coolant Thermostat Housing Replacement 3.6L Engine SWB
Removal Procedure
- Disconnect the battery ground cable from the battery. Refer to Battery Negative Cable Disconnection and Connection.
- Remove the engine cover. Refer to Engine Cover Replacement.
- Remove the air intake duct. Refer to Air Cleaner Inlet Duct Replacement.
- Remove the radiator air baffle and deflector. Refer to Radiator Air Upper Baffle and Deflector Replacement.
- Remove the catalytic converter assembly from the vehicle. Refer to Catalytic Converter Replacement - Right Side.
- Lower the transmission by 65mm. Refer to Transmission Replacement.
- Drain the cooling system. Refer to Cooling System Draining and Filling.
- Remove the intake manifolds. Refer to Lower Intake Manifold Replacement.
- Cover the exposed intake ports.
- Remove the coolant inlet pipe. Refer to Engine Coolant Inlet Pipe Replacement.
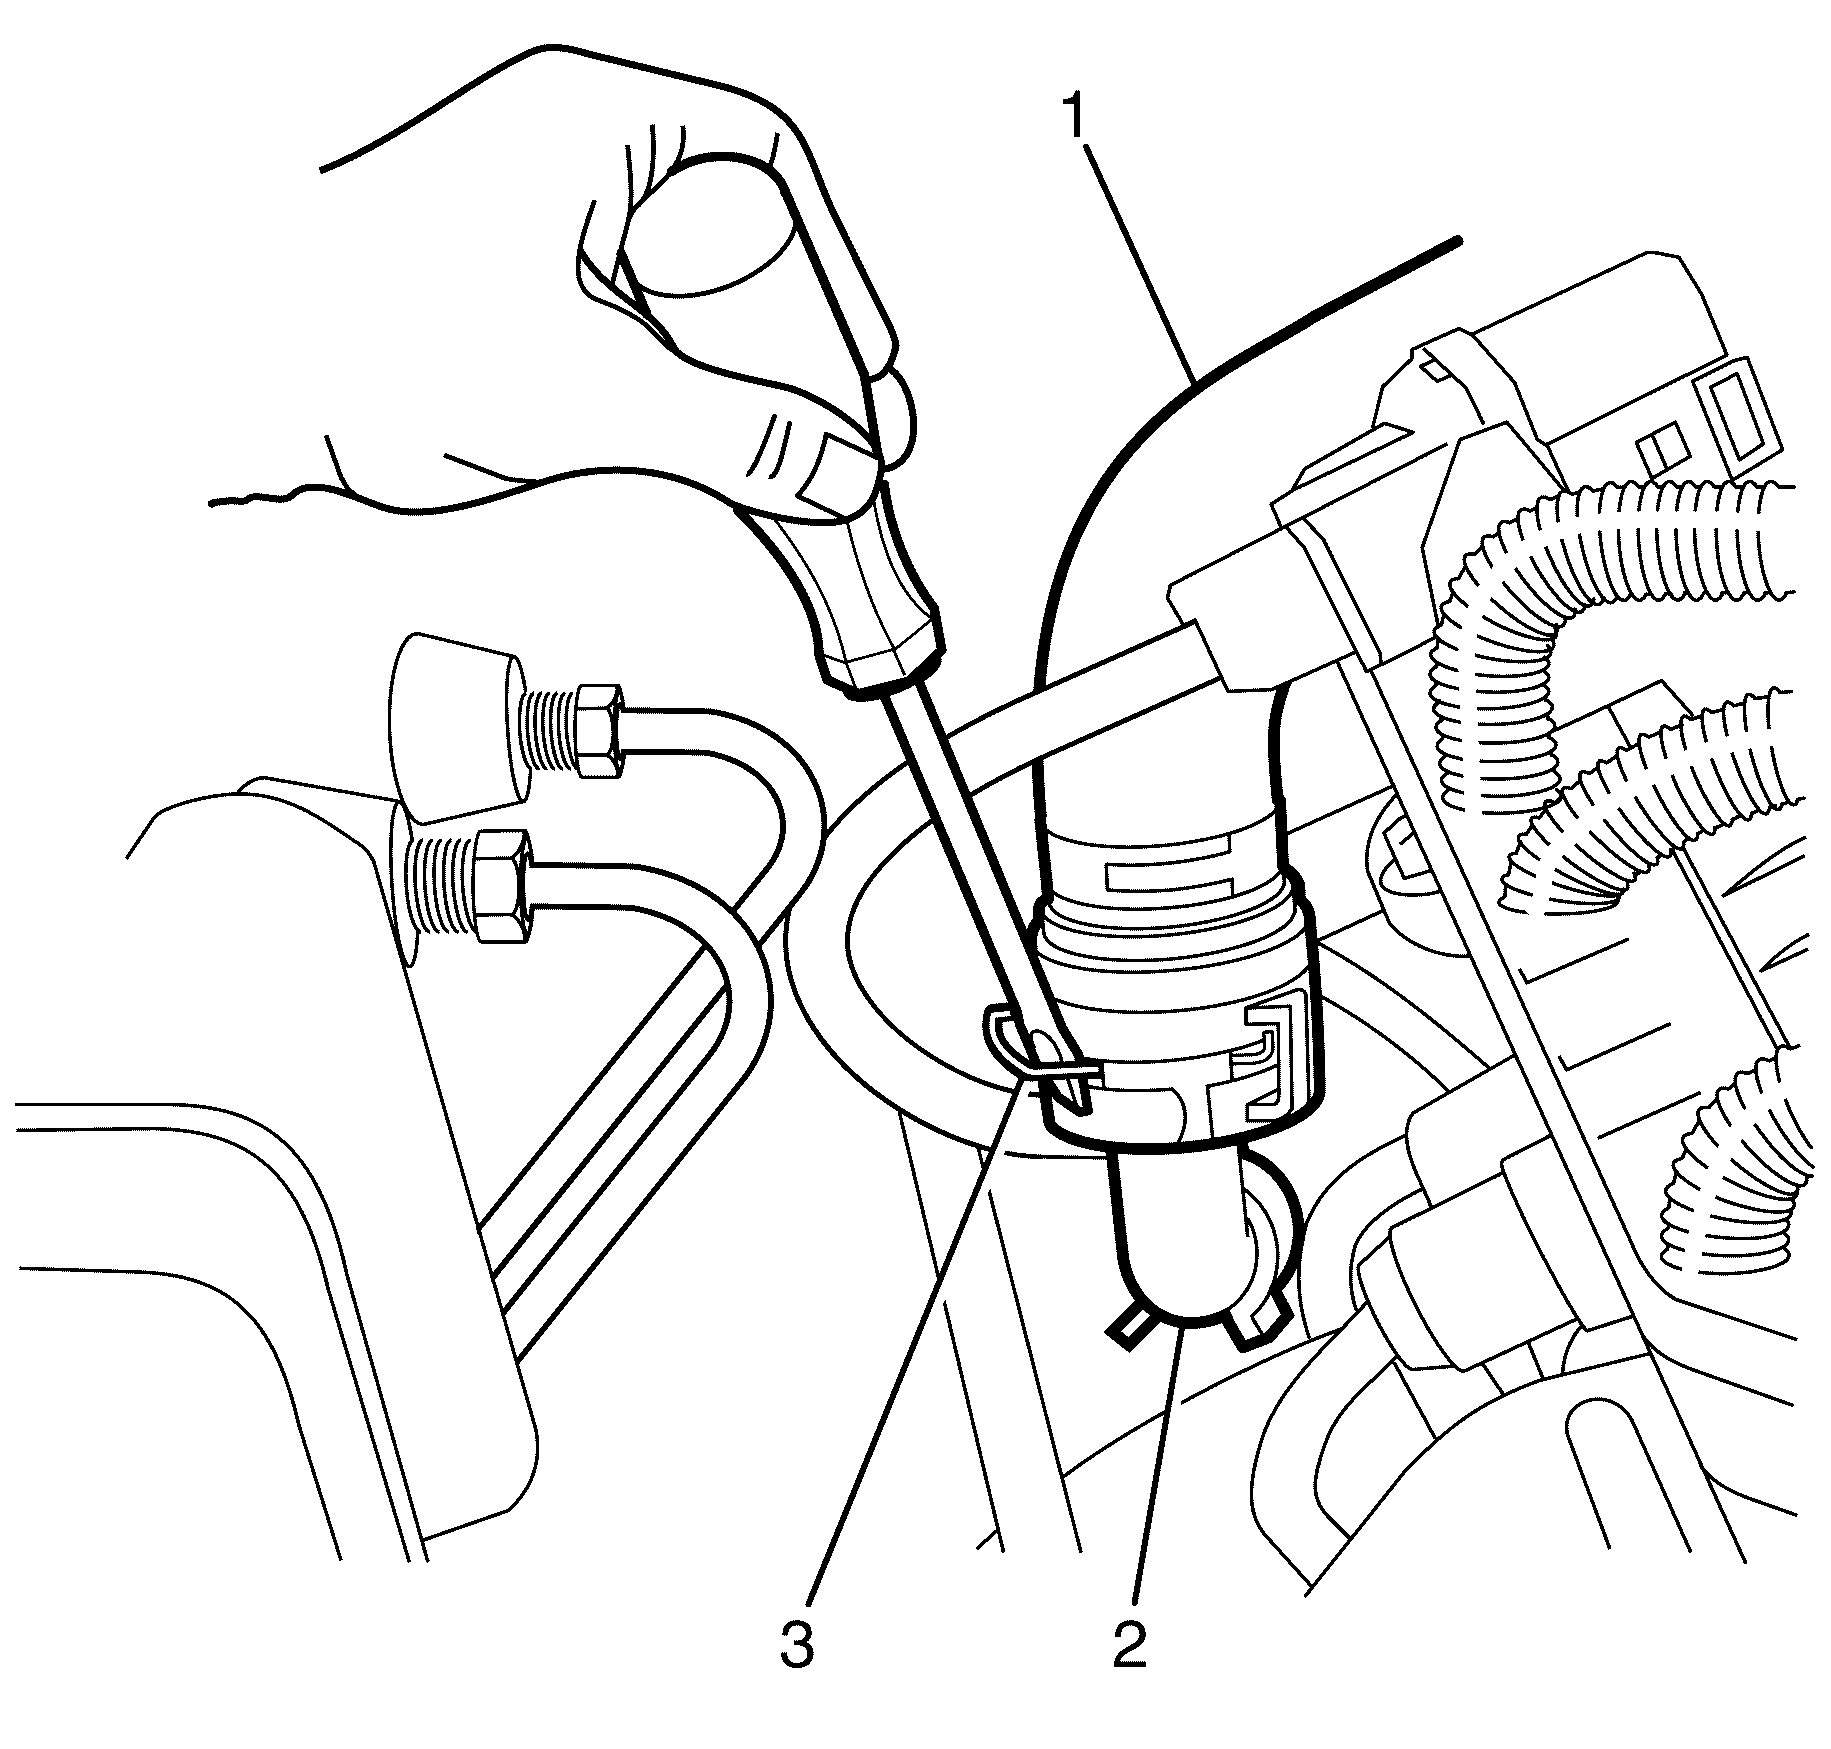
- Detach the heater hose (1) quick connect fitting by releasing the retaining clip (3) with a suitable screwdriver, from the heater pipe (2).
- Disconnect the heater hoses (1) from the heater pipes (2).
- Disconnect the engine harness to obtain easier access to the heater hose flange and thermostat housing bolts. Refer to Ignition Coil Replacement - Bank 1 and Ignition Coil Replacement - Bank 2.
- Remove the heater hose assembly to right hand cylinder head retaining bolt (3).
- Remove the heater hose assembly to thermostat housing retaining bolts (5).
- Remove the heater hose assembly (4) from the thermostat housing (1) and cylinder head (2).
- Remove the O-ring seals (6)
- Remove the thermostat housing retaining bolts (4) rubber grommets (3) then remove the thermostat housing (2).
Caution: Refer to Battery Disconnect Caution in the Preface section.
Important: Store used coolant in the correct manner, such as in a used engine coolant holding tank. Do not pour used coolant down a drain. Ethylene glycol antifreeze is a very toxic chemical. Do not dispose of coolant into the sewer system or ground water. This is illegal and ecologically unsound.
Important: Do NOT separate the upper and lower intake manifolds.
Important: Assure material used to cover intake ports is lint free to prevent any foreign matter entering the ports.
Caution: Refer to Safety Glasses Caution in the Preface section.

Discard the O-ring seals
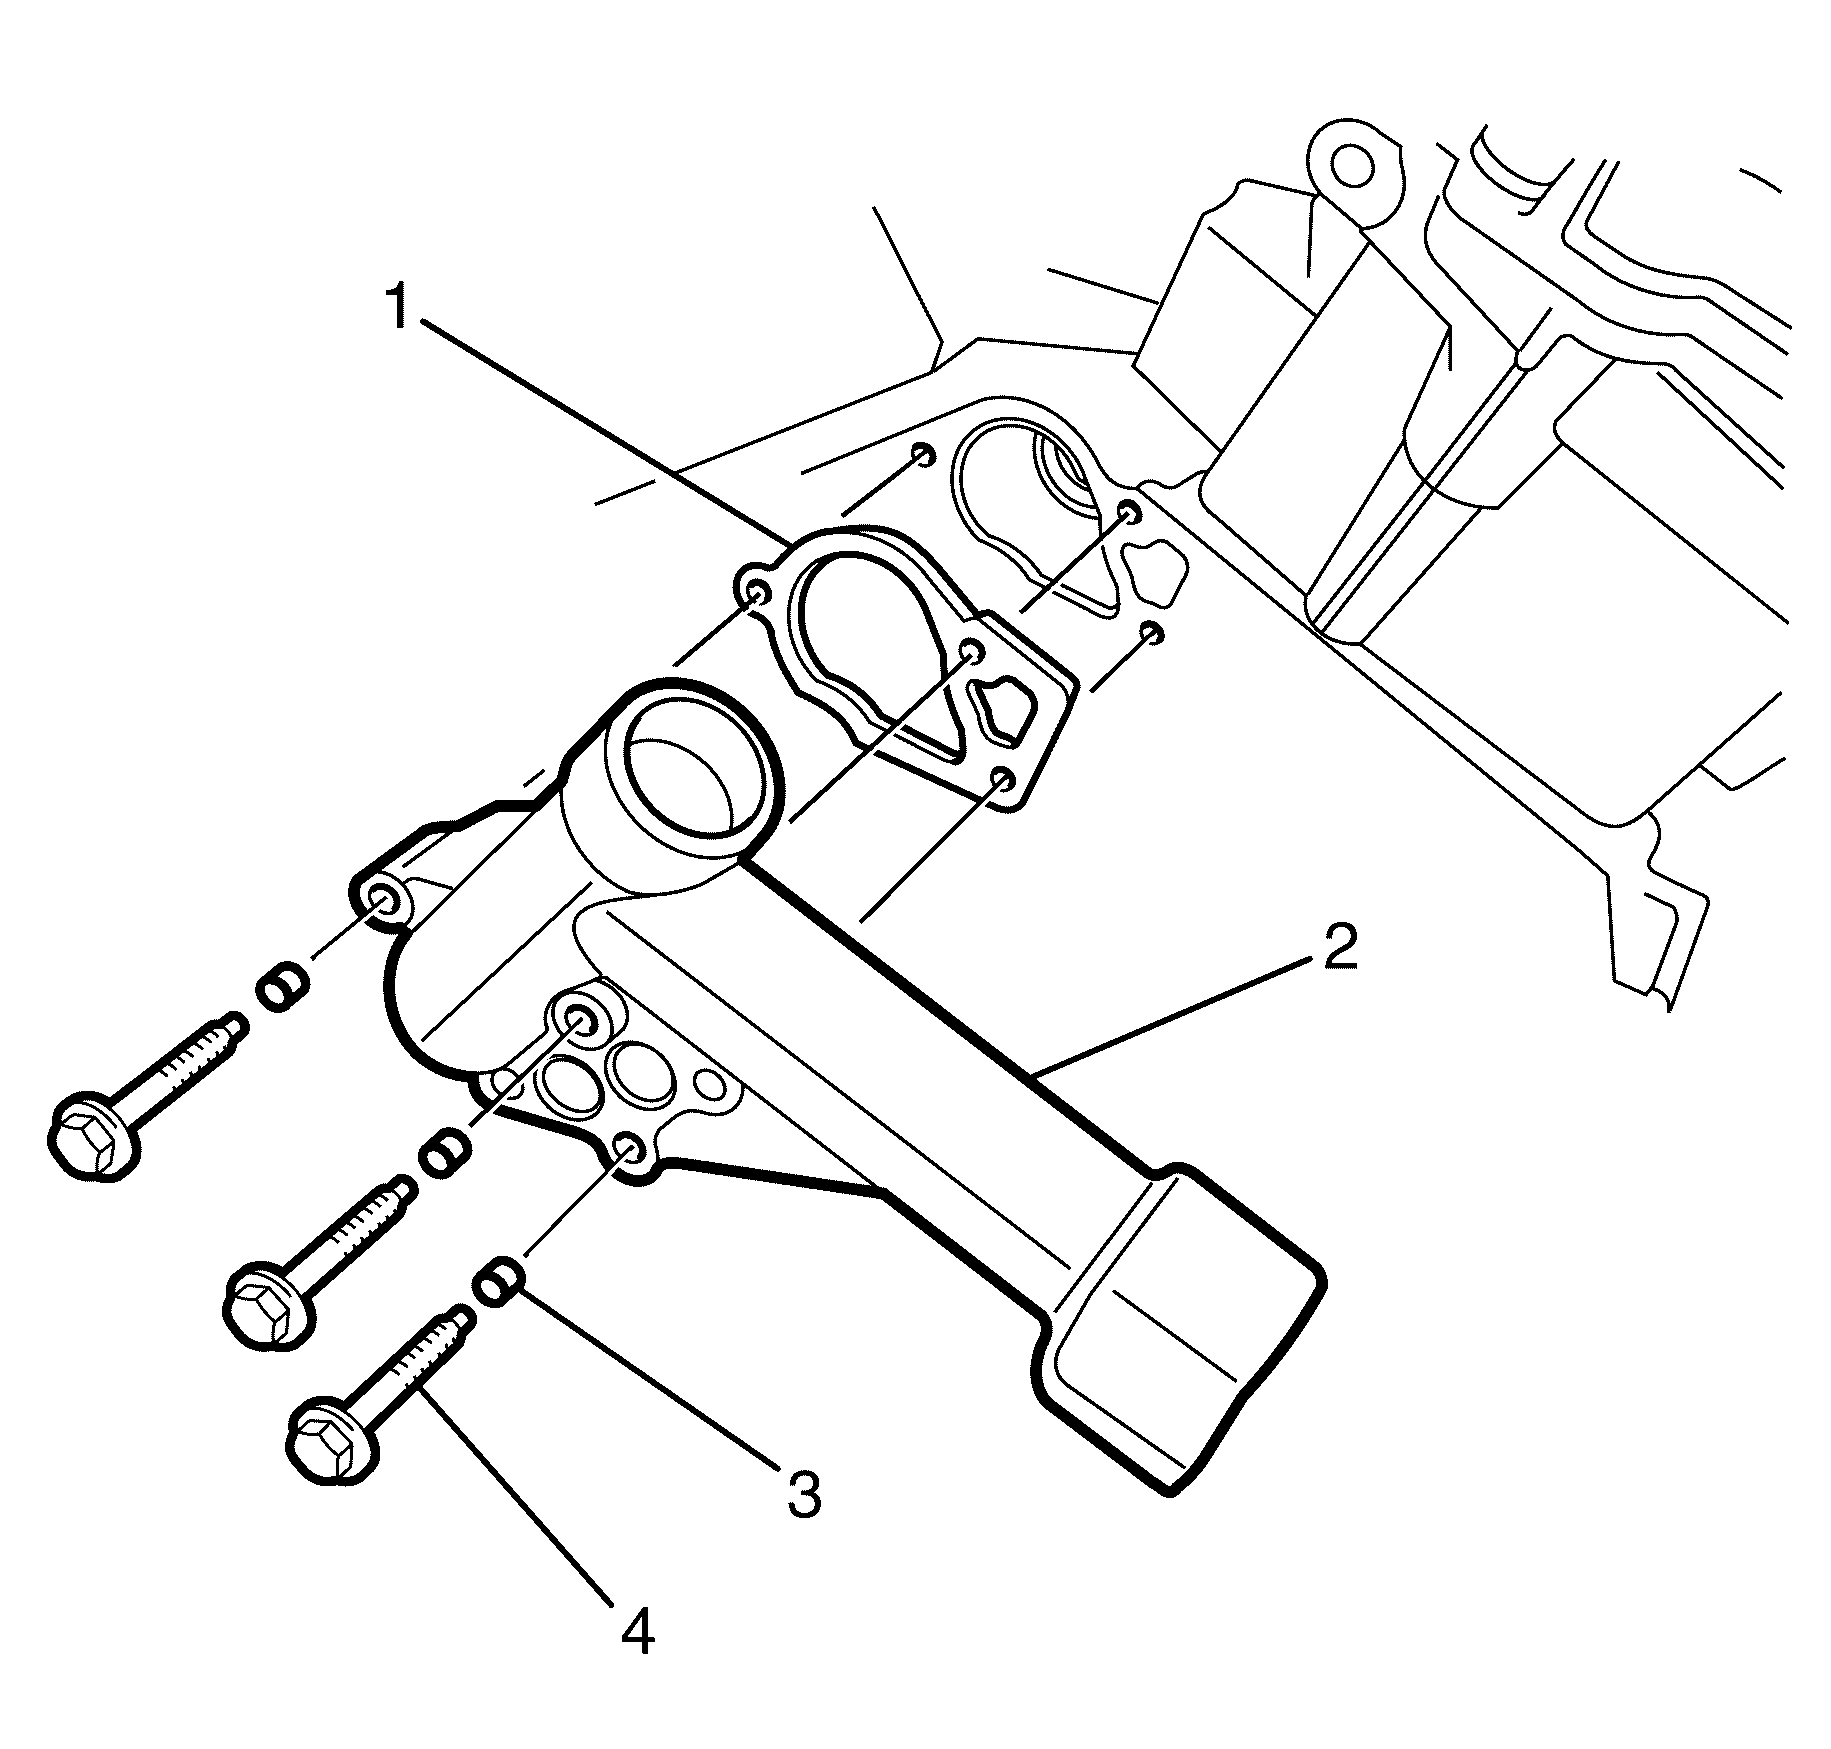
Important: The thermostat housing has one longer bolt which is located in the upper left of the housing.
Important: When replacing the thermostat housing always renew the block gasket (1).
Installation Procedure
- Install the thermostat housing retaining bolts (4) ensuring a new block gasket (1) and rubber grommets (3) has been fitted.
- Install the NEW O-ring seals (6) to the thermostat housing (1).
- Install the heater pipe assembly (4) to the thermostat housing (1) and cylinder head (2).
- Install the heater hose assembly to thermostat housing retaining bolts (5).
- Install the heater hose assembly to right hand cylinder head retaining bolt (3)
- Install the engine harness. Refer to Ignition Coil Replacement - Bank 1 and Ignition Coil Replacement - Bank 2.
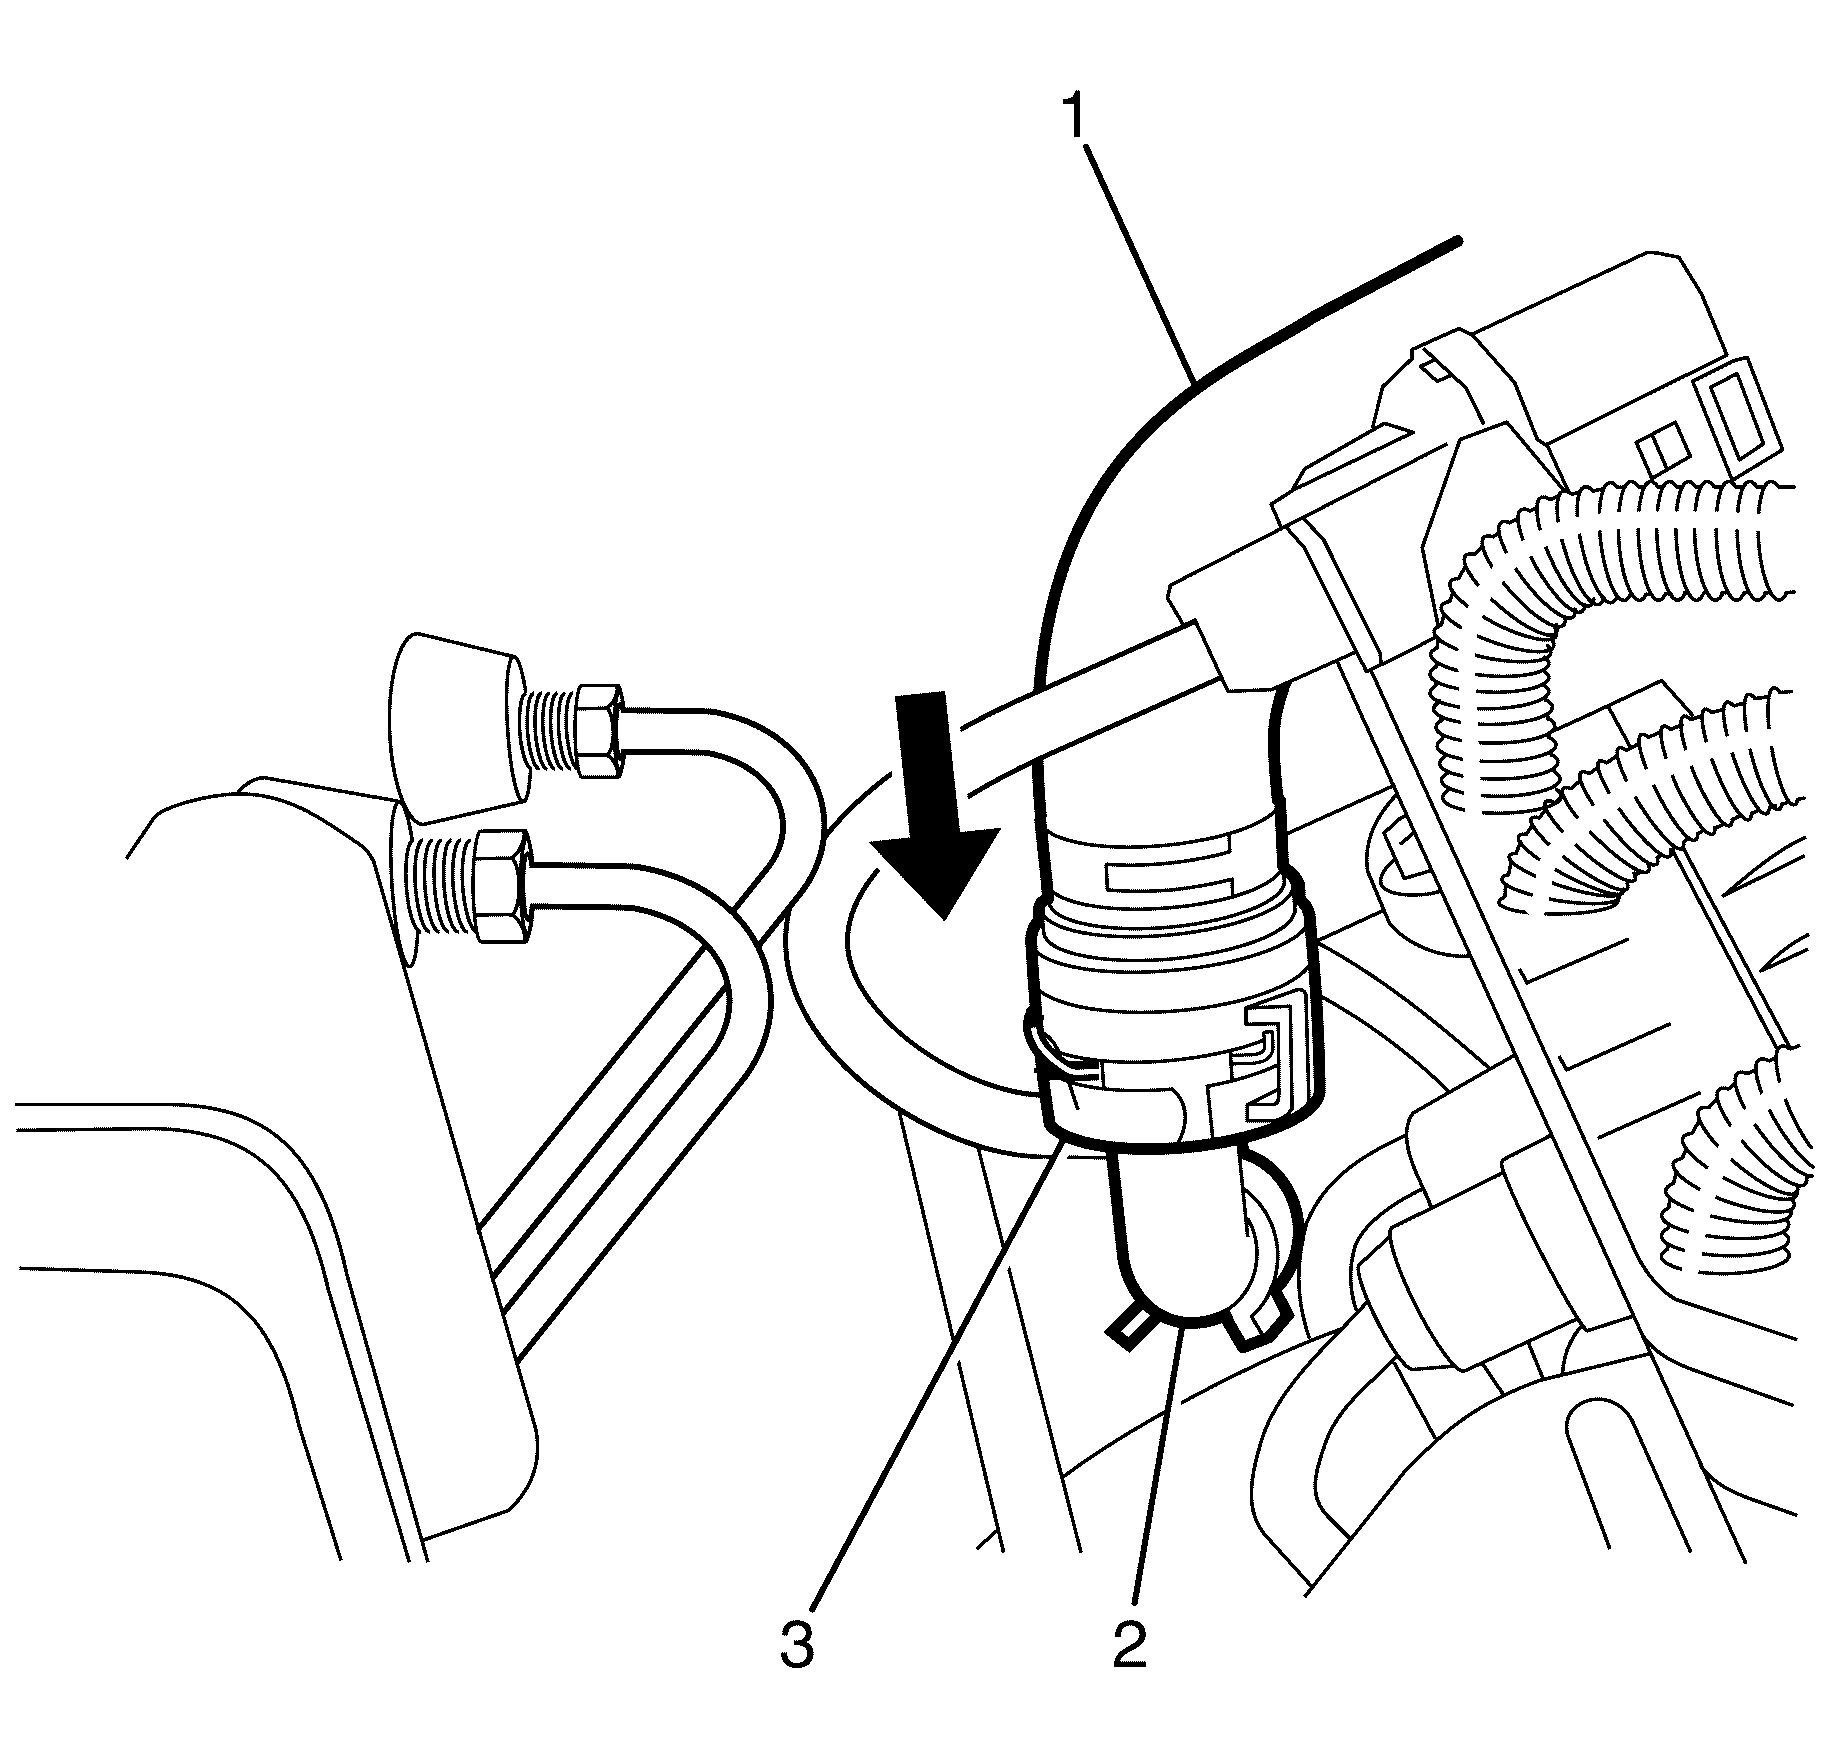
- Attach the heater hose (1) quick connect fitting (3) by pushing the hose onto the heater pipe (2) listen for a audible click to confirm fitting.
- Install the coolant inlet pipe. Refer to Engine Coolant Inlet Pipe Replacement.
- Install the intake manifolds. Refer to Upper Intake Manifold Replacement and Refer to Lower Intake Manifold Replacement.
- Install the air deflector. Refer to Front Air Deflector Replacement.
- Install the air intake duct. Refer to Air Cleaner Inlet Duct Replacement.
- Install the engine cover. Refer to Engine Cover Replacement.
- Install the radiator air baffle and deflector. Refer to Radiator Air Upper Baffle and Deflector Replacement.
- Connect the battery ground cable to the battery. Refer to Battery Negative Cable Disconnection and Connection.
- Fill the cooling system. Refer to Cooling System Draining and Filling.
- Inspect cooling system for leaks.
Notice: Refer to Fastener Notice in the Preface section.
Tighten
Tighten the bolts (4) to 10 N·m (89 lb in).
Notice: Refer to Fastener Notice in the Preface section.
Tighten
Tighten the bolts to 10 N·m (89 lb in).
Tighten
Tighten the bolt to 35 N·m (26 lb ft).
Caution: Refer to Installing Hoses without Twists or Bends Notice in the Preface section.
Caution: Refer to Safety Glasses Caution in the Preface section.
Important: Do NOT separate the upper and lower intake manifolds.
Engine Coolant Thermostat Housing Replacement 3.6L Engine LWB
Removal Procedure
- Disconnect the battery ground cable from the battery. Refer to Battery Negative Cable Disconnection and Connection.
- Remove the engine cover. Refer to Engine Cover Replacement in Engine Mechanical - 3.6L.
- Remove the air intake duct. Refer to Air Cleaner Inlet Duct Replacement.
- Remove the radiator air baffle and deflector. Refer to Radiator Air Upper Baffle and Deflector Replacement in Body Front End.
- Remove the catalytic converter assembly from the vehicle. Refer to Catalytic Converter Replacement - Right Side.
- Lower the transmission by 65mm. Refer to Transmission Replacement.
- Drain the cooling system. Refer to Cooling System Draining and Filling.
- Remove the intake manifolds. Refer to Upper Intake Manifold Replacement and Refer to Lower Intake Manifold Replacement.
- Cover the exposed intake ports.
- Remove the coolant inlet pipe. Refer to Engine Coolant Inlet Pipe Replacement in Engine Cooling.
- Detach the heater hose (1) quick connect fitting by releasing the retaining clip (3) with a suitable screwdriver, from the heater pipe (2).
- Disconnect the heater hoses (1) from the heater pipes (1).
- Disconnect the engine harness to obtain easier access to the heater hose flange and thermostat housing bolts. Refer to Ignition Coil Replacement - Bank 1 and Ignition Coil Replacement - Bank 2.
- Remove the bolt (3) which secures the heater hose assembly (4) to the right hand cylinder head (2).
- Remove the heater hose assembly to thermostat housing (1) retaining bolts (5).
- Remove the heater hose assembly and discard the O-ring seals (6).
- Remove the thermostat housing retaining bolts (4) rubber grommets (3) then remove the thermostat housing (2).
Caution: Refer to Battery Disconnect Caution in the Preface section.
Important: Store used coolant in the correct manner, such as in a used engine coolant holding tank. Do not pour used coolant down a drain. Ethylene glycol antifreeze is a very toxic chemical. Do not dispose of coolant into the sewer system or ground water. This is illegal and ecologically unsound.
Important: Do NOT separate the upper and lower intake manifolds.
Important: Assure material used to cover intake ports is lint free to prevent any foreign matter entering the ports.
Caution: Refer to Safety Glasses Caution in the Preface section.
Important: The thermostat housing has one longer bolt which is located in the upper left of the housing.
Important: When replacing the thermostat housing always renew the block gasket (1).
Installation Procedure
- Install the thermostat housing retaining bolts (4) ensuring a new block gasket (1) and rubber grommets (3) has been fitted.
- Install the heater pipe assembly (4) to thermostat housing (1) retaining bolts ensuring new O-ring seals (6) have been fitted.
- Install the heater pipe assembly (4) to cylinder head (2) retaining bolt (3).
- Install the engine harness. Refer to Ignition Coil Replacement - Bank 1 and Ignition Coil Replacement - Bank 2.
- Attach the heater hose (1) quick connect fitting (3) by pushing the hose onto the heater pipe (2) listen for a audible click to confirm fitting.
- Install the coolant inlet pipe. Refer to Engine Coolant Inlet Pipe Replacement in Engine Cooling.
- Install the intake manifolds. Refer to Upper Intake Manifold Replacement and Refer to Lower Intake Manifold Replacement.
- Install the air deflector. Refer to Front Air Deflector Replacement.
- Install the air intake duct. Refer to Air Cleaner Inlet Duct Replacement.
- Install the engine cover. Refer to Engine Cover Replacement in Engine Mechanical - 3.6L.
- Install the radiator air baffle and deflector. Refer to Radiator Air Upper Baffle and Deflector Replacement in Body Front End.
- Connect the battery ground cable to the battery. Refer to Battery Negative Cable Disconnection and Connection.
- Fill the cooling system. Refer to Cooling System Draining and Filling.
- Inspect cooling system for leaks.
Notice: Refer to Fastener Notice in the Preface section.
Tighten
Tighten the bolts (4) to 10 N·m (89 lb in).
Notice: Refer to Fastener Notice in the Preface section.
Tighten
Tighten the bolts (5) to 10 N·m (89 lb in).
Tighten
Tighten the bolts to 35 N·m (26 lb ft).
Caution: Refer to Installing Hoses without Twists or Bends Notice in the Preface section.
Caution: Refer to Safety Glasses Caution in the Preface section.
Important: Do NOT separate the upper and lower intake manifolds.
Engine Coolant Thermostat Housing Replacement 6.0L Engine
Removal Procedure
- Disconnect the battery ground cable from the battery.
- Ensure engine is below 50 C before removing the coolant pressure cap.
- Remove the radiator air baffle and deflector. Refer to Radiator Air Upper Baffle and Deflector Replacement
- Remove the air intake duct. Refer to Air Cleaner Inlet Duct Replacement
- Raise and support the vehicle. Refer to Lifting and Jacking the Vehicle.
- Drain the coolant into a suitable container. Refer to Cooling System Draining and Filling.
- Lower the vehicle.
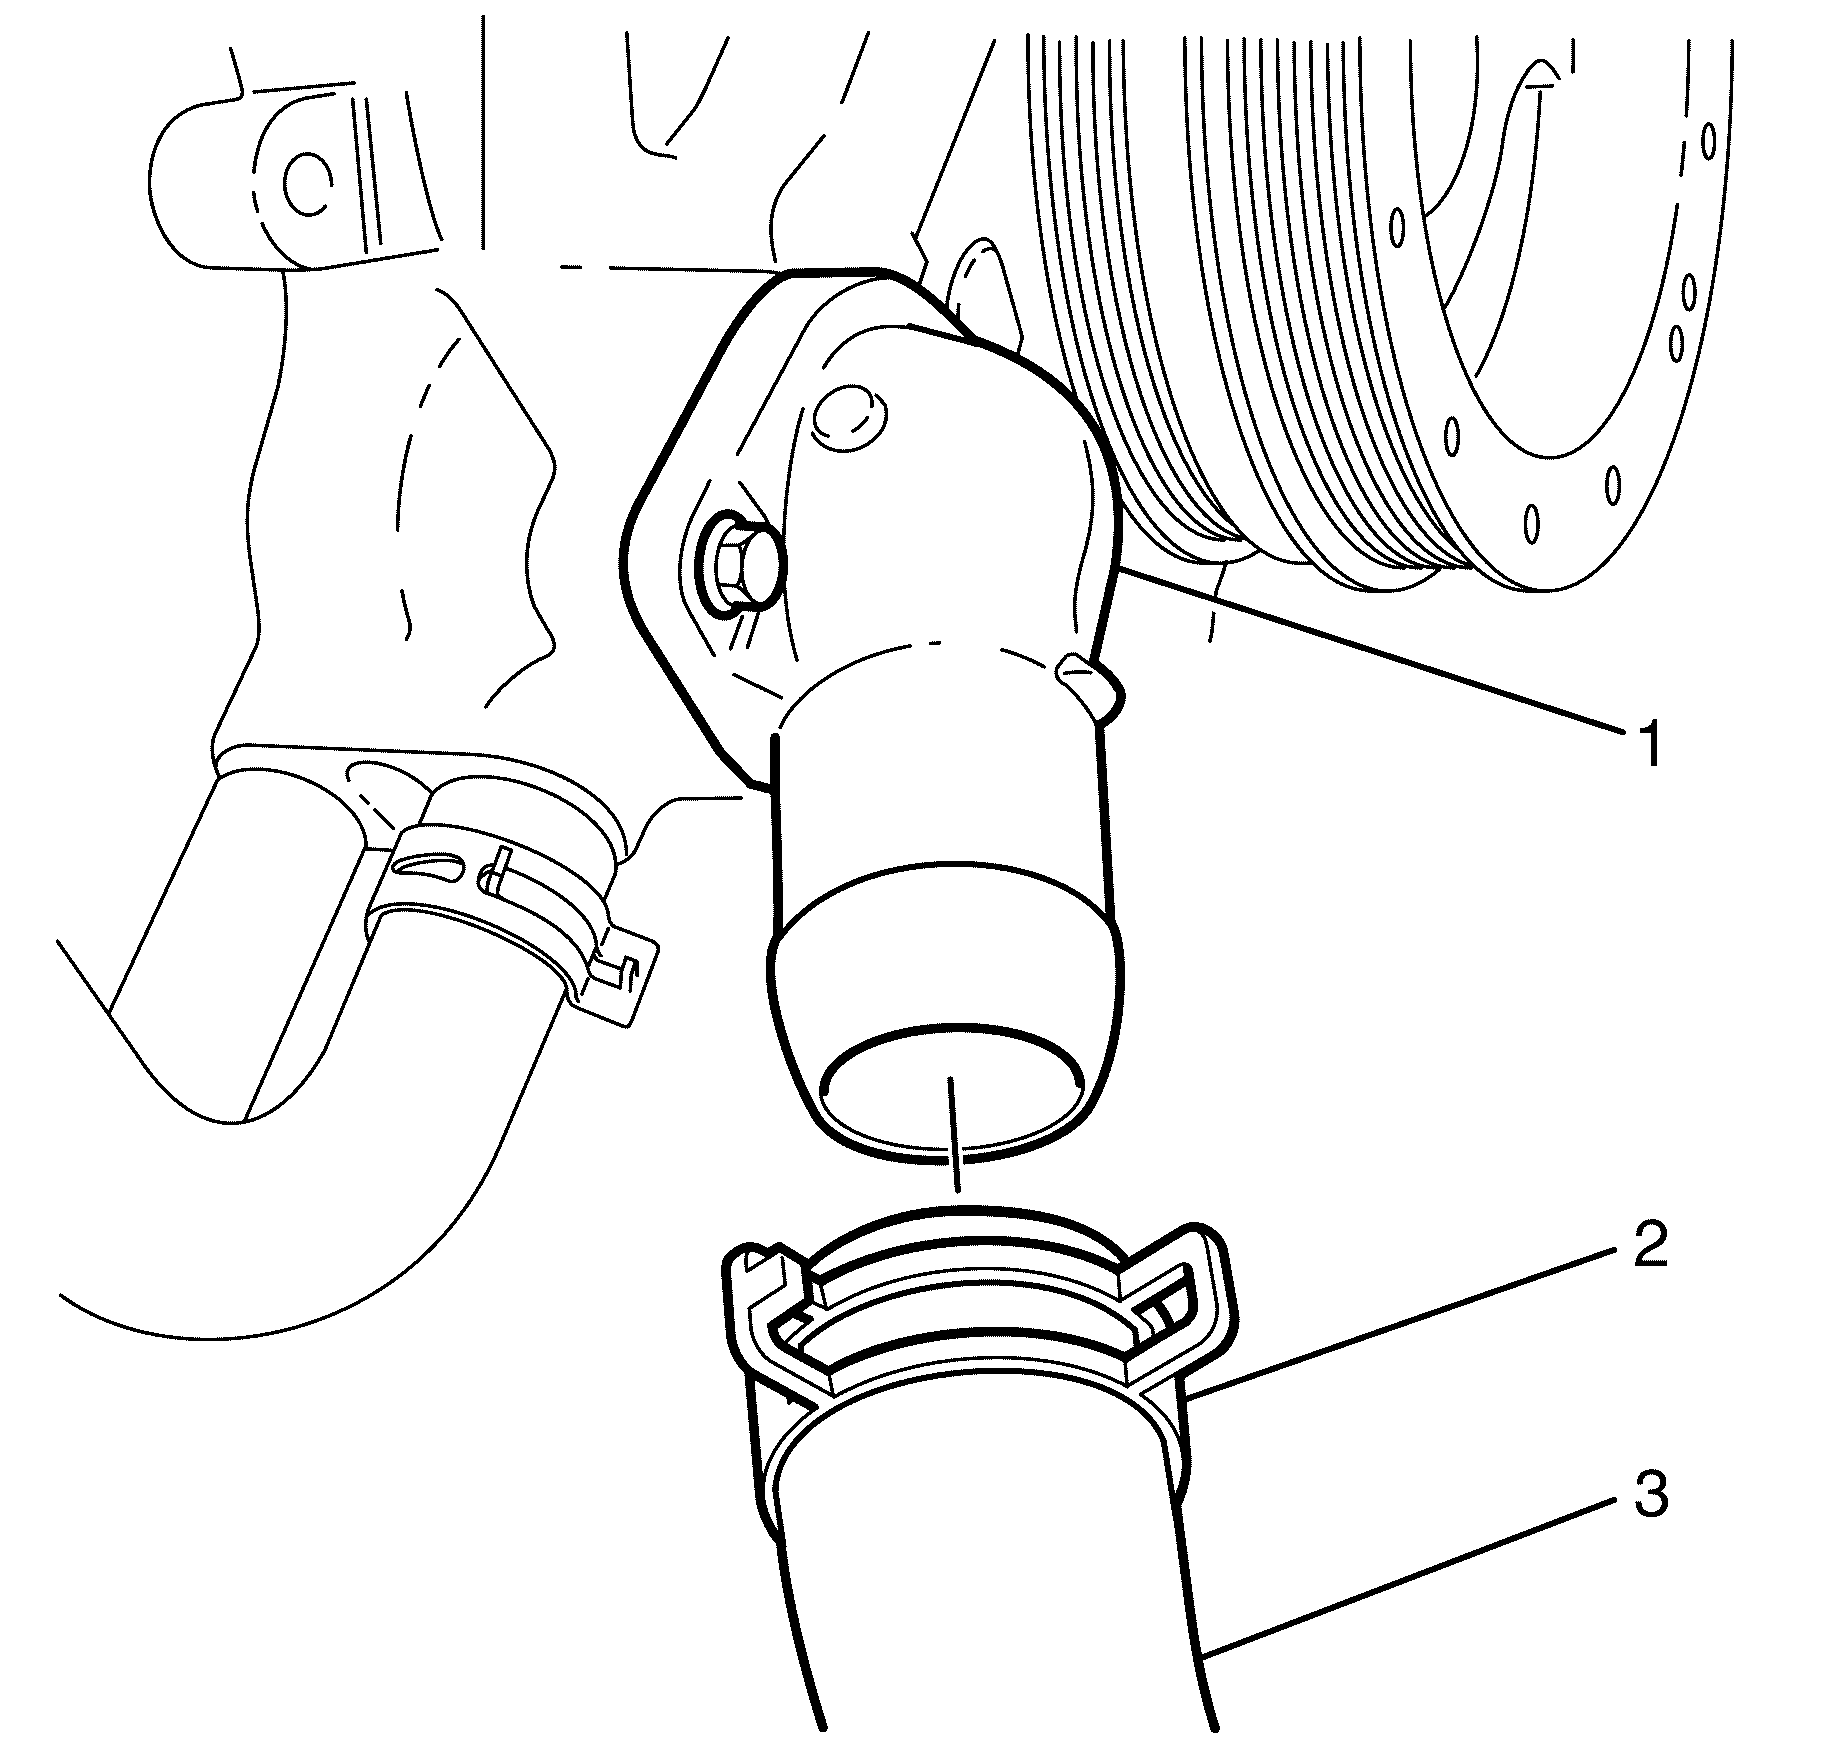
- Release the retaining hose clamp (2) and detach the hose (3) from the thermostat housing end (1).
- Remove the thermostat housing (2) to water pump retaining bolts (1), and remove thermostat housing.
- If the housing is to be replaced, discard the O-ring.
Caution: Refer to Battery Disconnect Caution in the Preface section.
Important: Refer to Battery Negative Cable Disconnection and Connection.
Caution: Refer to Radiator Cap Removal Caution in the Preface section.
Caution: Refer to Safety Glasses Caution in the Preface section.
Caution: Refer to Vehicle Lifting Caution in the Preface section.
Caution: Refer to Safety Glasses Caution in the Preface section.

Installation Procedure
- Install thermostat. Refer to Engine Coolant Thermostat Replacement.
- Ensure all mating surfaces are thoroughly cleaned, using only a fine abrasive material.
- Install the thermostat housing (2).
- Install the thermostat housing to water Pump retaining bolts (1).
- Install the hose (3) to the thermostat housing (1), by opening the retaining hose clamp (2) and securing it over the hose.
- Install the radiator air baffle and deflector. Refer to Radiator Air Upper Baffle and Deflector Replacement
- Install the air intake duct. Refer to Air Cleaner Inlet Duct Replacement
- Fill the cooling system. Refer to Cooling System Draining and Filling.
- Connect the battery ground cable to the battery. Refer to Battery Negative Cable Disconnection and Connection.
- Inspect cooling system for leaks.
Important: Ensure a new O-ring seal is used.
Notice: Refer to Fastener Notice in the Preface section.
Tighten
Tighten the bolts (1) to 14 N·m (124 lb in).
Caution: Refer to Installing Hoses without Twists or Bends Notice in the Preface section.
Caution: Refer to Safety Glasses Caution in the Preface section.
