The Powertrain Control Module (PCM) is designed to maintain exhaust emission levels while maintaining excellent driveability and fuel efficiency. The PCM controls the following operations:
| • | Fuel control |
| • | Ignition Control (IC) |
| • | Knock Sensor (KS) system |
| • | Automatic transmission shift functions |
| • | Manual transmission |
| • | Cruise Control Enable (if so equipped) |
| • | Generator (if so equipped) |
| • | Evaporative Emission (EVAP) Purge |
| • | A/C Clutch Control |
| • | Cooling Fan Control |
| • | Secondary Air Injection (AIR) (if so equipped) |
| • | Exhaust Gas Recirculation (EGR) (if so equipped) |
PCM Function
The PCM supplies a buffered voltage to various sensors and switches. The PCM controls most components with electronic switches which complete a ground circuit when turned ON.
Use of Circuit Testing Tools
Do not use a test lamp in order to diagnose the Powertrain electrical systems unless specifically instructed by the diagnostic procedures. Use the Connector Test Adapter Kit, J 35616-A whenever diagnostic procedures call for probing any connectors.
PCM Service Precautions
The PCM is designed to withstand normal current draws associated with vehicle operations. Avoid overloading any circuit. When testing for opens or shorts, do not ground any of the PCM circuits unless instructed. When testing for opens or shorts, do not apply voltage to any of the PCM circuits unless instructed. Only test these circuits with a digital voltmeter J 39200 , while the PCM connectors remain connected.
Aftermarket (Add-On) Electrical And Vacuum Equipment
Aftermarket (Add-On) Electrical and Vacuum Equipment is defined as any equipment installed on a vehicle after leaving the factory that connects to the vehicle's electrical or vacuum systems. No allowances have been made in the vehicle design for this type of equipment.
Notice: Do not attach add-on vacuum operated equipment to this vehicle. The use of add-on vacuum equipment may result in damage to vehicle components or systems.
Notice: Connect any add-on electrically operated equipment to the vehicle's electrical system at the battery (power and ground) in order to prevent damage to the vehicle.
Add-On electrical equipment, even when installed to these strict guidelines, may still cause the Powertrain system to malfunction. This may also include equipment not connected to the vehicle's electrical system such as portable telephones and radios. Therefore, the first step in diagnosing any Powertrain problem is to eliminate all aftermarket electrical equipment from the vehicle. After this is done, if the problem still exists, diagnose the problem in the normal manner.
Electrostatic Discharge Damage
Notice: In order to prevent possible Electrostatic Discharge damage to the PCM, Do Not touch the connector pins or the soldered components on the circuit board.
Electronic components used in the control systems are often designed in order to carry very low voltage. Electronic components are susceptible to damage caused by electrostatic discharge. Less than 100 volts of static electricity can cause damage to some electronic components. There are several ways for a person to become statically charged. The most common methods of charging are by friction and by induction. An example of charging by friction is a person sliding across a car seat. Charging by induction occurs when a person with well insulated shoes stands near a highly charged object and momentarily touches ground. Charges of the same polarity are drained off leaving the person highly charged with the opposite polarity. Static charges can cause damage. Therefore, it is important to use care when handling and testing electronic components.
Engine Controls Information
The driveability and emissions information describes the function and operation of the PCM.
The engine controls Information contains the following:
| • | Component Locations |
| • | Wiring Diagrams |
| • | PCM Terminal End View and Terminal Definitions |
| • | Powertrain OnBoard Diagnostic (OBD) System Check |
| • | Diagnostic Trouble Code Tables (DTCs) |
The Component System includes the following items:
| • | Component and circuit description |
| • | On-vehicle service for each sub-system |
| • | Functional checks and Diagnostic Tables |
The DTCs also contain diagnostic support information containing circuit diagrams, circuit or system information, and helpful diagnostic information.
Maintenance Schedule
Refer to the General Motors Maintenance Schedule of the appropriate service category for the maintenance that the owner or technician should perform in order to retain emission control performance.
Visual and Physical Underhood Inspection
Perform a careful visual and physical underhood inspection when performing any diagnostic procedure or diagnosing the cause of an emission test failure. This can often lead to repairing a problem without further steps. Use the following guidelines when performing a visual and physical inspection:
| • | Inspect all vacuum hoses for the following conditions: |
| - | Correct routing |
| - | Pinches |
| - | Cuts |
| - | Disconnects |
| • | Inspect all wires in the engine compartment for the following items: |
| - | Proper connections |
| - | Burned or chafed spots |
| - | Pinched wires |
| - | Contact with sharp edges |
| - | Contact with hot exhaust manifolds |
This visual and physical inspection is very important. Preform the inspection carefully and thoroughly.
Basic Knowledge Of Tools Required
Important: Lack of basic knowledge of this powertrain when performing diagnostic procedures could result in incorrect diagnosis or damage to powertrain components. Do not attempt to diagnose a powertrain problem without this basic knowledge.
A basic understanding of hand tools is necessary in order to effectively use this information.
System Status and Drive Cycle For Inspection/Maintenance
The System Status selection is included in the scan tool System Info menu.
Several states require that the I/M (OBD ll system) pass on-board tests for the major diagnostics prior to having a vehicle emission inspection. This is also a requirement to renew license plates in some areas.
Using a scan tool, the technician can observe the System Status (complete or not complete) in order to verify that the vehicle meets the criteria to comply with local area requirements. Using the System Status display, any of the following systems or combination of systems may be monitored for I/M Readiness:
| • | The Catalyst |
| • | The EVAP system |
| • | The HO2S |
| • | The HO2S Heater |
| • | The EGR System |
| • | The AIR system |
Following a DTC info clear, System Status will clear for one or all of these systems. Following a battery disconnect or a PCM replacement, all System Status information will clear.
Important: The System Status display indicates only whether or not the test has been completed. The System Status display does not necessarily mean that the test has passed. If a Failed Last Test indication is present for a DTC associated with one of the above systems, diagnosis and repair is necessary in order to meet the I/M requirement. Verify that the vehicle passes all of the diagnostic tests associated with the displayed System Status prior to returning the vehicle to the customer. Refer to the Typical Drive Cycle table (more than one drive cycle may be needed) to use as a guide to complete the I/M System Status tests.
Diagnostic Time Schedule for I/M Readiness | |
|---|---|
Vehicle Drive Status | What is Monitored? |
Cold Start, coolant temperature less than 50°C (122°F) | -- |
Idle 2.5 minutes in Drive (Auto) Neutral (Man), A/C and rear defogger ON | HO2S Heater, Misfire, Secondary Air, Fuel Trim, EVAP Purge |
A/C off, accelerate to 90 km/h (55 mph), 1/2 throttle. | Misfire, Fuel Trim, Purge |
3 minutes of Steady State - Cruise at 90 km/h (55 mph) | Misfire, EGR, Secondary Air, Fuel Trim, HO2S, EVAP Purge |
Clutch engaged (Man), no braking, decelerate to 32 km/h (20 mph) | EGR, Fuel Trim, EVAP Purge |
Accelerate to 90-97 km/h (55-60 mph), 3/4 throttle | Misfire, Fuel Trim, EVAP Purge |
5 minutes of Steady State Cruise at 90-97 km/h (55-60 mph) | Catalyst Monitor, Misfire, EGR, Fuel Trim, HO2S, EVAP Purge |
Decelerate, no braking. End of Drive Cycle | EGR, EVAP Purge |
Total time of OBD II Drive Cycle 12 minutes | -- |
Primary System Based Diagnostics
There are primary system-based diagnostics which evaluate the system operation and their effect on vehicle emissions. The primary system-based diagnostics are listed below, with a brief description of the diagnostic functionality.
Oxygen Sensor Diagnosis
Diagnose the Fuel Control Heated Oxygen Sensors for the following conditions:
| • | Heater Performance (time to activity on cold start) |
| • | Slow Response |
| • | Response Time (time to switch R/L or L/R) |
| • | Inactive Signal (output steady at bias voltage - approximately 450 mV) |
| • | Signal Fixed High |
| • | Signal Fixed Low |
Diagnose the Catalyst Monitor Heated Oxygen Sensors for the following functions:
| • | Heater Performance (time to activity on cold start) |
| • | Signal fixed low during steady state conditions. |
| • | Inactive Sensor. |
Fuel Control Heated Oxygen Sensors
The main function of the fuel control heated oxygen sensor is to provide the PCM with exhaust stream information in order to allow proper fueling and maintain emissions within acceptable levels. After the sensor reaches the operating temperature, the sensor generates a voltage inversely proportional to the amount of oxygen present in the exhaust gases.
The PCM uses the signal voltage from the fuel control heated oxygen sensors in a closed loop in order to adjust the fuel injector pulse width. While in a closed loop, the PCM can adjust fuel delivery in order to maintain an air to fuel ratio which allows the best combination of emission control and driveability.
If the oxygen sensor pigtail wiring, connector or terminal are damaged, replace the entire oxygen sensor assembly. Do not attempt to repair the wiring, connector, or terminals. In order for the sensor to function properly, the sensor must have a clean air reference provided to it. This clean air reference is obtained by way of the oxygen sensor wires. Any attempt to repair the wires, connectors or terminals could result in the obstruction of the air reference. Any attempt to repair the wires, connectors or terminals could degrade oxygen sensor performance.
Catalyst Monitor Heated Oxygen Sensors
In order to control emissions of Hydrocarbons (HC), Carbon Monoxide (CO), and Oxides of Nitrogen (NOx), the system uses a three-way catalytic converter. The catalyst within the converter promotes a chemical reaction which oxidizes the HC and CO present in the exhaust gas, converting them into harmless water vapor and carbon dioxide. The catalyst also reduces NOx, converting it to nitrogen.
The PCM has the ability to monitor this process using the post heated oxygen sensors. The pre-sensors produce an output signal which indicates the amount of oxygen present in the exhaust gas entering the three-way catalytic converter. The post sensor produces an output signal which indicates the oxygen storage capacity of the catalyst; this in turn indicates the catalyst's ability to convert exhaust gases efficiently. If the catalyst is operating efficiently, the pre HO2S signal will be far more active than that produced by the post HO2S.
In addition to catalyst monitoring, the post heated oxygen sensor has a limited role in controlling fuel delivery. If the post HO2S signal indicates a high or low oxygen content for an extended period of time while in a closed loop, the PCM adjusts the fuel delivery slightly in order to compensate.
Catalyst Monitor Diagnostic Operation
The catalyst monitor diagnostic measures oxygen storage capacity of the catalyst converter. In order to do this, the heated sensors are installed before and after the Three-Way Catalyst (TWC). Voltage variations between the sensors allow the PCM to determine the catalyst emission performance.
As a catalyst becomes less effective in promoting chemical reactions, the catalyst's capacity to store and release oxygen generally degrades. The catalyst monitor diagnostic is based on an correlation between conversion efficiency and oxygen storage capacity.
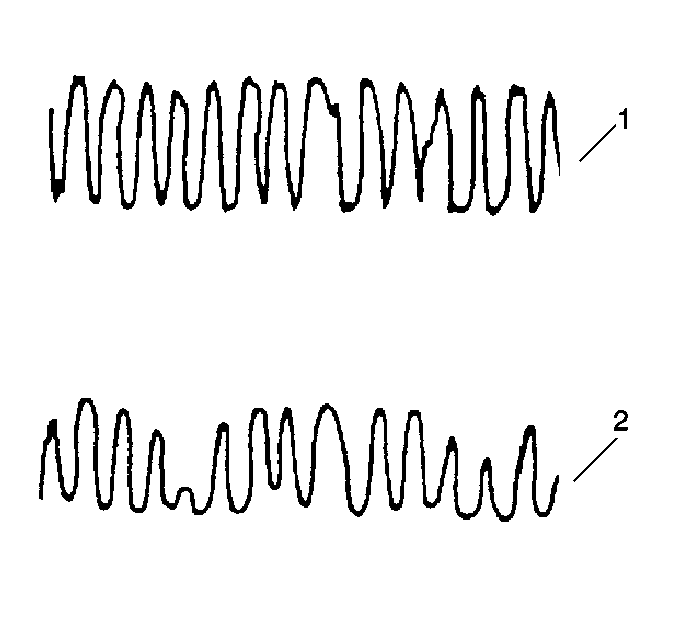
A good catalyst (e.g. 95 % hydrocarbon conversion efficiency) shows a relatively flat output voltage on the post-catalyst heated oxygen sensor (HO2S). A degraded catalyst (65 % hydrocarbon conversion) shows a greatly increased activity in output voltage from the post catalyst HO2S.
The post-catalyst HO2S is used to measure the oxygen storage and release capacity of the catalyst. A high oxygen storage capacity indicates a good catalyst; low oxygen storage capacity indicates a failing catalyst. The TWC and the HO2S must be at operating temperature in order to achieve correct oxygen sensor voltages like those shown in the Post-Catalyst HO2S Outputs graphic.
The catalyst monitor diagnostic is sensitive to the following conditions:
| • | Exhaust leaks |
| • | HO2S Contamination |
| • | Alternative fuels |
Exhaust system leaks may cause the following:
| • | Prevent a degraded catalyst from failing the diagnostic |
| • | Cause a false failure for a normally functioning catalyst |
| • | Prevent the diagnostic from running |
Some of the contaminants that may be encountered are phosphorus, lead, silica, and sulfur. The presence of these contaminants prevent the TWC diagnostic from functioning properly.
Three-Way Catalyst Oxygen Storage Capacity
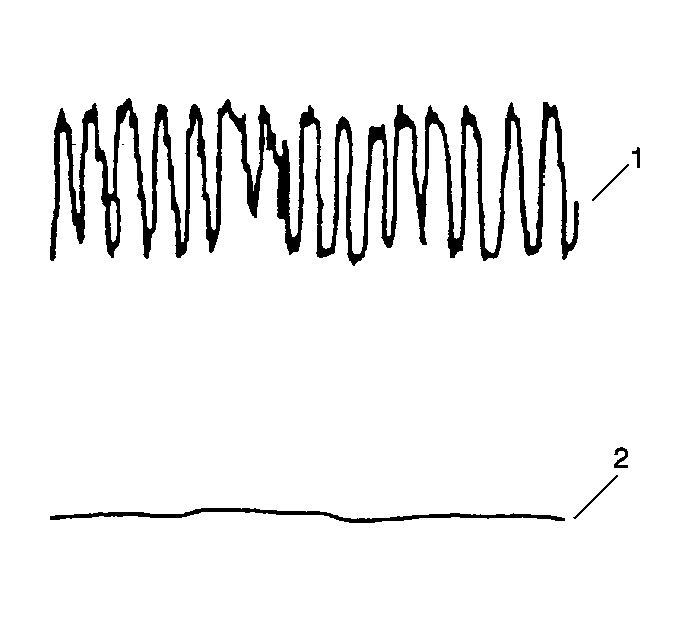
The PCM must monitor the Three-Way catalyst system (TWC) for efficiency. In order to accomplish this, the PCM monitors the pre-catalyst and post-catalyst oxygen sensors. When the TWC is operating properly, the post-catalyst (2) oxygen sensor will have significantly less activity than the pre-catalyst (1) oxygen sensor. The TWC stores oxygen during its normal reduction and oxidation process. The TWC releases oxygen during its normal reduction and oxidation process. The PCM calculates the oxygen storage capacity using the difference between the pre-catalyst and post-catalyst oxygen sensor's voltage levels.
Whenever the voltage levels of the post-catalyst (2) oxygen sensor nears the voltage levels that of the pre-catalyst (1) oxygen sensor, the catalysts efficiency is degraded.
Aftermarket HO2S characteristics may be different from the original equipment manufacturer sensor. This may lead to a false pass or a false fail of the catalyst monitor diagnostic. Similarly, if an aftermarket catalyst does not contain the same amount of cerium as the original part, the correlation between oxygen storage and conversion efficiency may be altered enough to set a false DTC.
Evaporative Emission (EVAP) Purge System Vacuum Switch
The EVAP system uses avacuum switch located in the EVAP purge line between the EVAP canister and the EVAP canister purge valve to detect when purge is occurring. When no purge is commaned, the switch is closed, grounding the 12 volt signal from the PCM indicating NO PURGE . When canister purge is commanded, the EVAP vacuum switch opens the ground circuit indicating PURGE.
Clogging of the canister fresh air vent could allow the purge hose between the switch and canister to trap vacuum with the purge valve closed. This would result in a diagnostic indication of a purge valve stuck open or a vacuum switch failure. Similarly, leaks or blockages in the purge hoses may result in misdiagnosis of the purge valve or vacuum switch.
Misfire Monitor Diagnostic Operation
The misfire monitor diagnostic is based on crankshaft rotational velocity (reference period) variations. The PCM determines crankshaft rotational velocity using the crankshaft position sensor and camshaft position sensor. When a cylinder misfires the crankshaft slows down momentarily. By monitoring the crankshaft and camshaft position sensor signals, the PCM can calculate when a misfire occurs.
For a non-catalyst damaging misfire, the diagnostic is required to monitor a misfire present for between 1000-3200 engine revolutions.
For catalyst damage misfire, the diagnostic responds to the misfire within 200 engine revolutions.
Rough roads may cause false misfire detection. A rough road applies torque to the drive wheels and drive train. This torque can intermittently decrease the crankshaft rotational velocity. The PCM detects this as a false misfire.
On automatic transmission equipped vehicles, the Torque Converter Clutch (TCC) will disable whenever a misfire is detected. Disabling the TCC isolates the engine from the rest of the drive line and minimizes the effect of the drive wheel inputs on crankshaft rotation.
When the TCC has disabled as a result of misfire detection, the TCC will re-enabled after approximately 3200 engine revolutions if no misfire is detected. The TCC remains disabled whenever the misfire is detected, with or without a DTC set. This allows the misfire diagnostic to reevaluate the system.
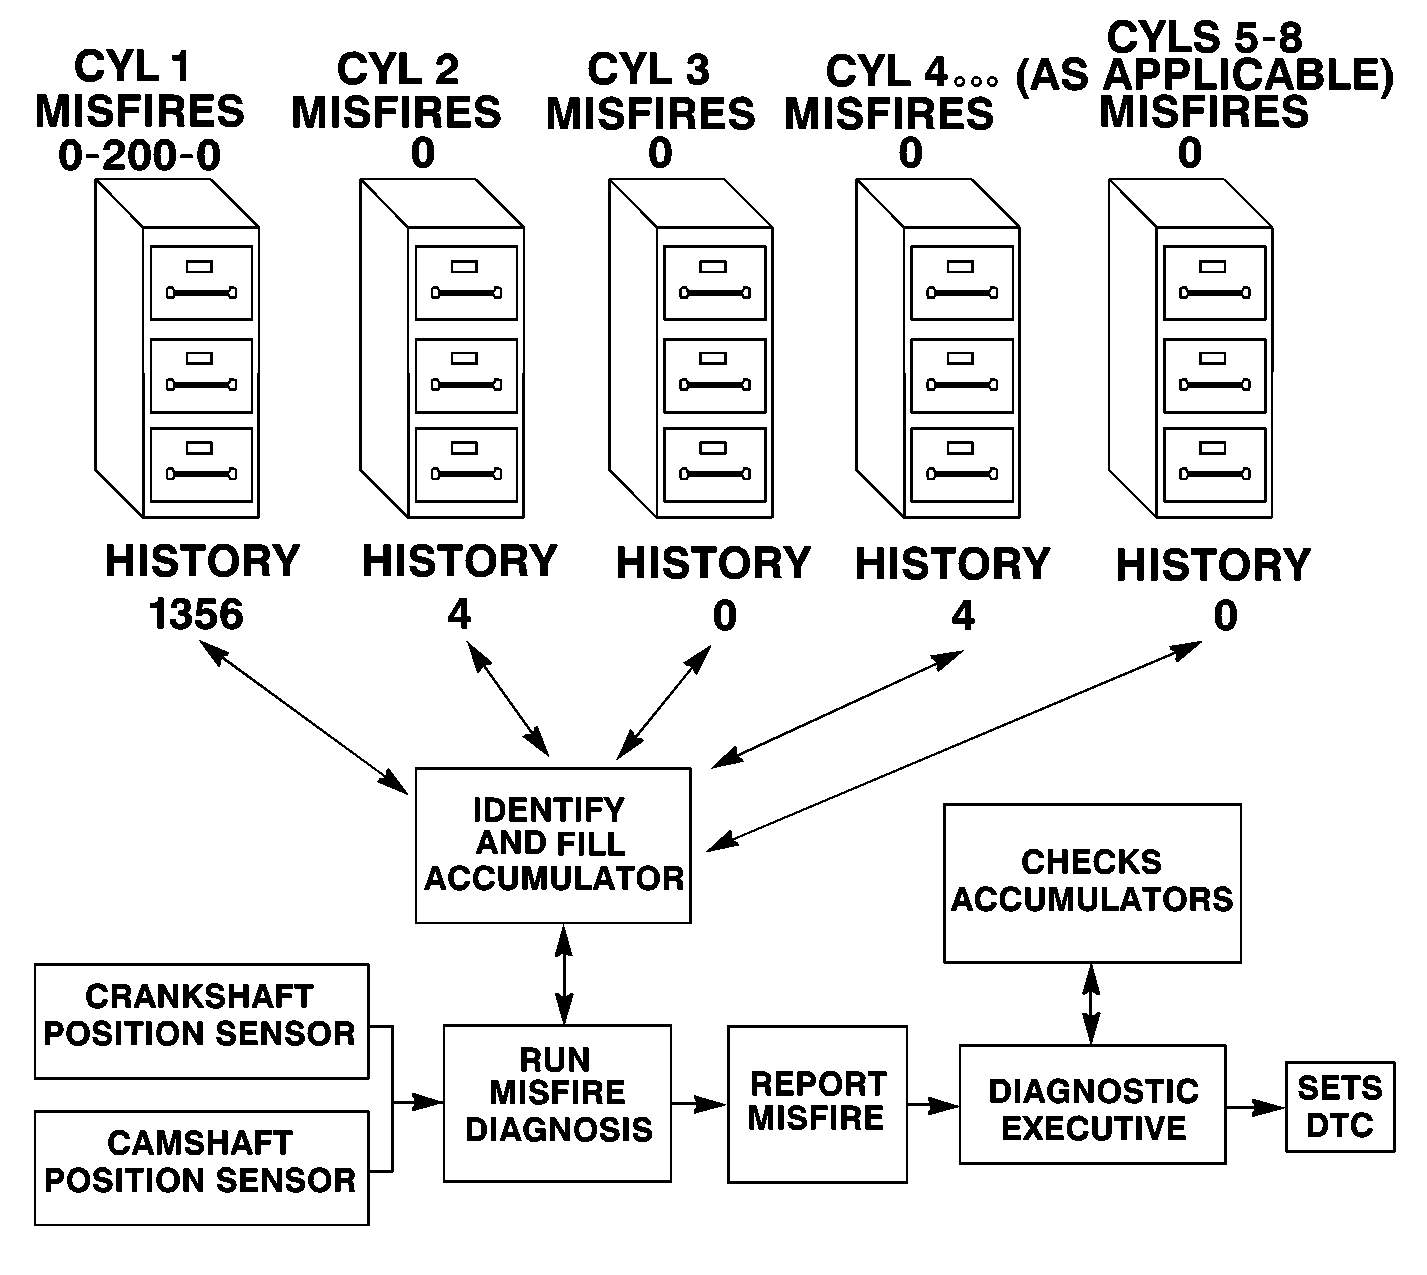
Whenever a cylinder misfires, the misfire diagnostic counts the misfire and notes the crankshaft position at the time the misfire occurred.
A current and a history misfire counter is maintained for each cylinder. The misfire current counters (Misfire Cur #1 - 8) indicate the number of firing events out of the last 200 cylinder firing events which were misfires. The misfire current counters displays real time data without a misfire DTC stored. The misfire history counters (Misfire Hist #1 - 8) indicate the total number of cylinder firing events which were misfires. The misfire history counters displays 0 until the misfire diagnostic has failed and a DTC P0300 is set. Once the misfire DTC sets, the misfire history counters will be updated every 200 cylinder firing events. The Misfire counters graphic illustrates how these misfire counters are maintained.
When crankshaft rotation is erratic, the PCM detects a misfire condition. Because of this erratic condition, the data that is collected by the diagnostic can sometimes incorrectly identify which cylinder is misfiring. The Misfire Counters graphic shows there are misfires counted from more than one cylinder. Cylinder #1 has the majority of counted misfires. In this case, the Misfire Counters would identify cylinder #1 as the misfiring cylinder. The misfires in the other counters were just background noise caused by the erratic rotation of the crankshaft. If the number of accumulated misfires is sufficient for the diagnostic to identify a true misfire, the diagnostic will set DTC P0300 - Misfire Detected.
Use Techline equipment to monitor the misfire counter data on applicable vehicles. Knowing which specific cylinder(s) misfire can lead to the root cause. Using the information in the misfire counters, will identify which cylinder(s) are misfiring. If the counters indicate cylinders number 1 and 4 misfired, look for a circuit or component common to both cylinders.
The misfire diagnostic may indicate a fault due to a temporary fault not necessarily caused by a vehicle emission system malfunction. Examples include the following items:
| • | Contaminated fuel |
| • | Running out of fuel |
| • | Fuel fouled spark plugs |
| • | Basic engine fault |
Fuel Trim System Operation
The Fuel Trim system monitors the averages of short-term and long-term fuel trim values. If these fuel trim values stay at their limits for a calibrated period of time, a malfunction is indicated. The fuel trim diagnostic compares the average of short and long-term fuel trim values. If either value is within the thresholds, a pass is recorded. If either value is outside the thresholds, a rich or lean fuel Trim DTC will set.
Comprehensive Component Monitor Diagnostic
Comprehensive component monitoring diagnostics are required to monitor emissions-related input and output Powertrain components.
Input Components
The PCM monitors the input components for circuit continuity and out-of-range values. This includes performance checking. Performance checking refers to indicating a fault when the signal from a sensor does not seem reasonable (i.e. a Throttle Position (TP) sensor that indicates high throttle position at low engine loads or MAP voltage). The input components may include but are not limited to the following sensors:
| • | The Vehicle Speed (VSS) sensor |
| • | The Accelerator Pedal Position (APP) sensor (if so equipped) |
| • | Mass Air Flow (MAF) sensor |
| • | Intake Air Temperature (IAT) sensor |
| • | Crankshaft Position (CKP) sensor |
| • | Knock Sensor (KS) |
| • | Throttle Position (TP) sensor |
| • | Engine Coolant Temperature (ECT) sensor |
| • | Camshaft Position (CMP) sensor |
| • | Manifold Absolute Pressure (MAP) sensor |
| • | Mass Air Flow (MAF) sensor |
In addition to the circuit continuity and rationality check, the ECT sensor is monitored for its ability to achieve a steady state temperature to enable closed loop fuel control.
Output Components
Diagnose the output components for the proper response to PCM commands. Components where functional monitoring is not feasible will be monitored for circuit continuity and out-of-range values if applicable.
Output components to be monitored include, but are not limited to the following circuits:
| • | Idle Air Control (IAC) Motor |
| • | EVAP system |
| • | Electronic transmission controls |
| • | A/C relay |
| • | Cooling fan relay |
| • | VSS output |
| • | MIL control |
| • | Cruise control inhibit (if so equipped) |
Wiring Harness Service
Replace the wire harnesses with the proper part number replacement. When splicing signal wires into a harness, use the wiring that has high temperature insulation.
Consider the low amperage and voltage levels utilized in the Powertrain control systems. Make the best possible bond at all splices. Use rosin-core solder in these areas.
Molded-on connectors require complete replacement of the connector. Splice a new connector into the harness. Replacement connectors and terminals are listed in Group 8.965 in the Standard Parts Catalog.
For wiring repair, refer to Wiring Repairs .
Connectors and Terminals
In order to prevent shorting between opposite terminals, use care when probing a connector and when replacing terminals. Damage to the components could result.
Always use jumper wires between connectors for circuit checking.
Never probe through Weather-Pack seals.
The connector test adapter kit J 35616-A , or the equivalent, contains an assortment of flexible connectors used to probe terminals during diagnosis. Fuse remover and test tool BT-8616, or the equivalent, is used for removing a fuse and to adapt the fuse holder to a DVM for diagnosis.
Open circuits are often difficult to locate by sight because oxidation or terminal misalignment are hidden by the connectors. Merely wiggling a connector on a sensor, or in the wiring harness may temporarily correct the open circuit. Oxidized or loose connections may cause intermittent problems.
Be certain the type of connector and terminal before making any connector or terminal repair. Weather-Pack and Com-Pack III terminals look similar, but are serviced differently.
