Radio/Audio System Description and Operation Chevrolet
Radio/Audio System Description
Chevrolet radios include the following components and features:
| • | An electronically tuned receiver (ETR) |
| • | A vacuum fluorescent display |
| • | An AM/FM stereo |
| • | Seek and scan tuning |
| • | A digital clock display |
Radio Description
| • | ETR AM/FM Stereo/Cassette |
| • | ETR AM/FM Stereo/Cassette with Theftlock™ |
| • | ETR AM/FM Stereo/Compact Disc with Theftlock™ |
FM Stereo
The following actions occur when a factory-equipped audio system with an FM stereo radio receives an FM stereo broadcast:
| • | The radio switches to stereo operation. |
| • | An indicator on the radio illuminates. |
Stereo operation means that the radio is separating the stereo broadcast back into the two original channels. The two channels are the LEFT channel and the RIGHT channel. Stereo sound is more realistic than non-stereo sound.
FM is normally static-free, but any of the following factors may limit reception:
| • | Terrain |
| • | Atmospheric conditions |
| • | Station strength |
| • | Distance from the transmitter |
Buildings or other obstructions may cause the following conditions:
| • | Momentary static |
| • | Flutter |
| • | Station swapping |
If reception is poor, turning to a different station that is stronger will bring improvement.
AMAX Stereo Certification
All optional radios are AMAX certified. AMAX certified receivers can reproduce the fidelity sound that is transmitted by all AM stations but not received on all AM radios.
AMAX certification includes some of the following improvements:
| • | High fidelity |
| • | Adjustable receiver bandwidth: |
| - | Wide bandwidth for high fidelity |
| - | Narrow bandwidth for cutting out interference |
| • | Noise cancellation |
| • | Full stereo sound |
| • | Reception of more frequencies |
| • | External antenna capability |
The range of most AM stations is greater than FM, especially at night. The longer range can cause stations to interfere with each other. AM is also subject to noise pickup from storms or power lines. AMAX certification reduces many of these types of conditions.
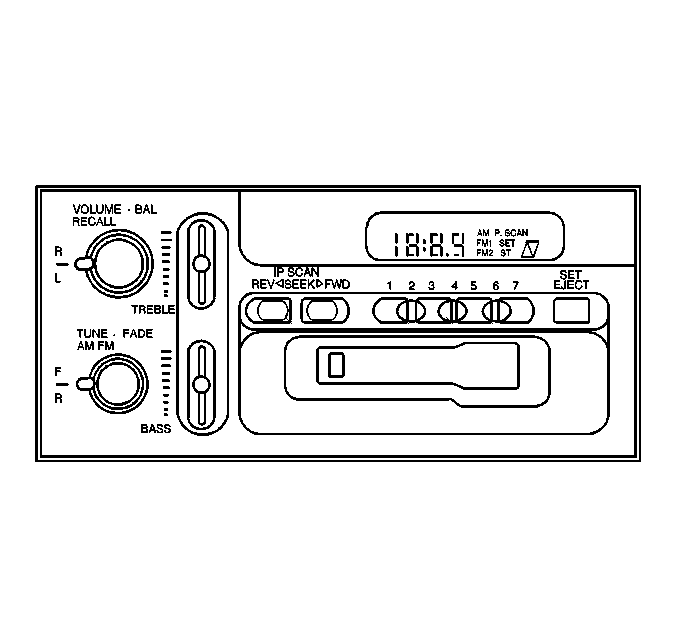
Radio/Audio System Operation-Radio Controls (RPO UNO) - Monsoon® AM-FM Stereo with Compact Disc Player and Automatic Tone Control
Included with the Monsoon® AM-FM Stereo with Compact Disc Player and Automatic Tone Control are 8 speakers and an 8 channel amplifier.
Setting the Clock for Systems with Automatic Tone Control
Press and hold HR until the correct hour appears. Press and hold MN until the correct minute appears.
Playing the Radio
PWR-VOL:
Press this knob in order to turn the system on and off. To increase the volume, turn the knob clockwise, turn the knob counterclockwise in order to decrease volume. The knob is capable of rotating continuously.
RECALL:
Press this button to recall the station being played. If the button is pressed when the ignition is off, the clock will show for a few seconds.
SCV:
The system has a feature called Speed-Compensated Volume (SCV). With SCV, the audio system adjusts automatically to make up for road and wind noise as the car is driven. Set the volume at the desired level. Turn the control ring behind the upper knob clockwise to adjust the SCV. Then, as the car is driven, SCV automatically increases the volume, as necessary, to overcome noise at any particular speed. The volume level should always sound the same as the vehicle is driven. If SCV is not wanted, turn the control all the way down. Each notch on the control ring allows for more volume compensation at faster vehicle speeds.
Finding a Station
AM-FM:
Press this button in order to switch between AM, FM1 and FM2. The display shows your selection.
TUNE:
Press this knob lightly so the knob extends. Turn the knob to choose radio stations. Push the knob back into the stored position when not in use.
SEEK:
Press the right or left arrow in order to go to the next higher or lower station. The sound will mute while seeking.
SCAN:
Press one of the SEEK arrows for two seconds, and SCAN will appear on the display. Use SCAN in order to listen to stations for a few seconds. The radio will go to a station, stop for a few seconds, then go on to the next station. Press SEEK again in order to stop scanning. The sound will mute while scanning.
PUSH-BUTTONS:
The 6 numbered push-button set you return to the favorite stations. There can be up to 18 stations, 6 AM, 6 FM1 and 6 FM2. Perform the following steps:
- Turn the radio on.
- Press AM-FM to select the band.
- Tune in the desired station.
- Press AUTO TONE to select the equalization that best suits the type of station selected.
- Press and hold 1 of the 6 numbered buttons. The sound will mute. When the sound returns, release the button. Whenever you press that numbered button, the station you set will return and the AUTO TONE equalization that you selected will also be automatically selected for that button.
- Repeat the steps for each push-button.
P.SCAN:
Press this button to listen to each of the favorite stations stored on the push-buttons for a few seconds. The radio will scan through each of the stations stored on the radio push-buttons, except those stations with weak reception. The AUTO TONE setting stored for that push-button will be automatically chosen. Press P.SCAN or one of the push-buttons again to stop scanning. P.SCAN will be displayed whenever the tuner is in the P.SCAN mode. The channel number, P1-P6, will appear momentarily just before the frequency is displayed. In FM mode, this function will scan through both FM1 and FM2 preset stations and FM1 or FM2 will appear on the display.
Setting the Tone
BASS:
Press this knob lightly so the knob extends. Turn the knob clockwise in order to increase bass and counterclockwise in order to decrease bass. When you use this control, the radio's AUTO TONE setting will switch to manual and the AUTO TONE display will go blank.
TREB:
Press this knob lightly so the knob extends. Turn the knob clockwise in order to increase treble and counterclockwise in order to decrease treble. When this control is used, the radio's AUTO TONE setting will switch to manual and the AUTO TONE display will go blank. If a station is weak or noisy, decrease the treble.
Push these knobs back into their stored positions when not using them.
AUTO TONE:
This feature allows preset bass and treble equalization settings designed for country/western, classical, news, rock, pop and jazz stations to be preset. C/W will appear on the display when you first press AUTO TONE. Each time you press AUTO TONE, another setting will appear on the display. Press AUTO TONE again after JAZZ appears and the AUTO TONE display will go blank. Tone control will return to the BASS and TREB knobs. Also, if you use the BASS and TREB knobs, control will return to them and the AUTO TONE display will go blank. Use the push-buttons and the AUTO TONE button to program the AUTO TONE for station presets.
Adjusting the Speakers
BAL:
Press this knob lightly so the knob extends. Turn the knob clockwise for the right speakers and counterclockwise for the left speakers. The middle position balances the sound between the speakers.
FADE:
Press this knob lightly so the knob extends. Turn the knob clockwise in order to adjust the sound to the front speakers and counterclockwise in order to adjust the sound to the rear speakers. The middle position balances the sound between the speakers.
Push these knobs into their stored positions when not using them.
Radio/Audio System Operation-Radio Controls (RPO UM6) - AM-FM Stereo with Cassette Tape Player
Included with the AM-FM Stereo with Cassette Tape Player are 4 speakers.
Setting the Clock for Systems without Automatic Tone Control
Press SET. SET will appear on the display for five seconds. Within 5 seconds, press and hold the right arrow on the SEEK button until the correct minute appears. Press and hold the left arrow on the SEEK button until the correct hour appears.
Playing the Radio
VOLUME:
This knob turns the system on and off and controls the volume in order to increase volume and turn the radio on, turn the knob clockwise. Turn it counterclockwise in order to decrease volume and turn the radio off.
RECALL:
Display the time with the ignition off by pressing the RECALL knob. When the radio is playing, press this button to recall the station frequency.
Finding a Station
AM-FM:
Press the lower knob in order to switch between AM, FM1 and FM2. The display shows the selection.
TUNE:
Turn the lower knob in order to choose radio stations.
SEEK:
Press the right or left arrow in order to go to the next higher or lower station and stay there.
PUSH-BUTTONS:
The 4 numbered push-buttons let you return to favorite stations. There can be up to 21 stations, 7 AM, 7 FM1 and 7 FM2. Perform the following steps:
- Turn the radio on.
- Press AM-FM to select the band.
- Tune in the desired station.
- Press SET. SET will appear on the display.
- Press 1 of the 4 numbered buttons, within 5 seconds. Whenever you press that numbered button, the station you set will return.
- Repeat the steps for each push-button.
In addition to the 4 stations already set, up to 3 more stations may be preset on each band by pressing 2 adjoining buttons at the same time. Perform the following steps:
- Tune in the desired station.
- Press SET. SET will appear on the display.
- Press any 2 adjoining push-button at the same time, within 5 seconds. Whenever you press the same buttons, the station you set will return.
- Repeat the steps for each pair of push-button.
P.SCAN:
Press both SEEK arrows and P.SCAN will appear on the display. Use P.SCAN in order to listen to each of your preset stations for a few seconds. The radio will go to the first preset station stored on the push-buttons, stop for a few seconds, then go on to the next preset station. If a preset station has weak reception, P.SCAN will not stop. Press either SEEK arrow or the upper knob in order to stop scanning.
Setting the Tone
BASS:
Slide the lever up or down in order to increase or decrease bass.
TREB:
Slide the lever up or down in order to increase or decrease treble. If a station is weak or noisy, you may want to decrease the treble.
Adjusting the Speakers
BAL:
Turn the control behind the upper knob in order to move the sound to the left or right speakers. The middle position balances the sound between the speakers.
FADE:
Turn the control behind the lower knob in order to move the sound to the front or rear speakers. The middle position balances the sound between the speakers.
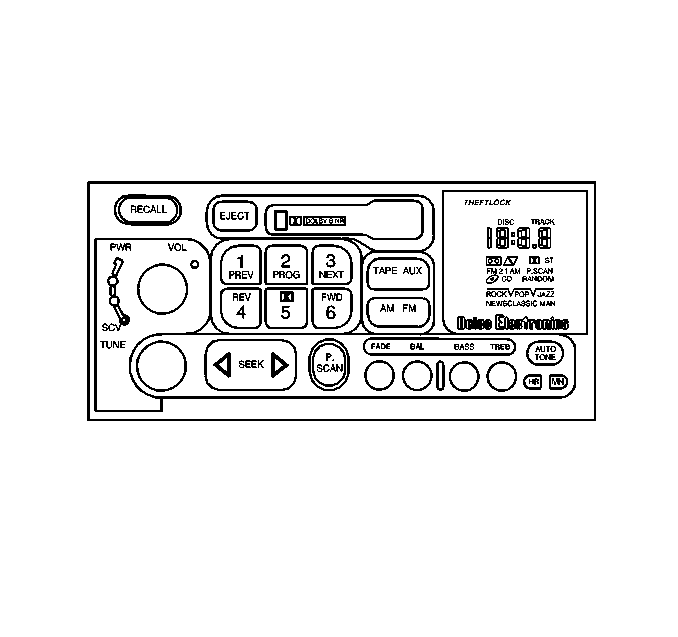
Radio/Audio System Operation-Radio Controls (RPO ULO) - Monsoon® AM-FM Stereo with Cassette Tape Player and Automatic Tone Control
Included with the Monsoon® AM-FM Stereo with Cassette Tape Player and Automatic Tone Control are 8 speakers and an 8-channel amplifier.
Setting the Clock for Systems with Automatic Tone Control
Press and hold HR until the correct hour appears. Press and hold MN until the correct minute appears.
Playing the Radio
PWR-VOL:
Press this knob in order to turn the system on and off. To increase volume, turn the knob clockwise. Turn the knob counterclockwise to decrease volume. The knob is capable of rotating continuously.
RECALL:
Press this button in order to recall the station being played. If you press the button when the ignition is off, the clock will show for a few seconds.
SCV:
The system has a feature called Speed-Compensated Volume (SCV). With SCV, the audio system adjusts automatically to make up for road and wind noise as the car is driven. Set the volume at the desired level. Turn the control ring behind the upper knob clockwise to adjust the SCV. Then, as the car is driven, SCV automatically increases the volume, as necessary, to overcome noise at any particular speed. The volume level should always sound the same as the vehicle is driven. If SCV is not wanted, turn the control all the way down. Each notch on the control ring allows for more volume compensation at faster vehicle speeds.
Finding a Station
AM-FM:
Press this button to switch between AM, FM1 and FM2. The display shows your selection.
TUNE:
Press this knob lightly so the knob extends. Turn the knob to choose radio stations. Push the knob back into the stored position when not in use.
SEEK:
Press the right or left arrow in order to go to the next higher or lower station. The sound will mute while seeking.
SCAN:
Press one of the SEEK arrows for two seconds, and SCAN will appear in the display. Use SCAN to listen to stations for a few seconds. The radio will go to a station, stop for a few seconds, then go on to the next station. Press SEEK again to stop scanning. The sound will mute while scanning.
PUSH-BUTTONS:
The 6 numbered push-buttons let you return to the favorite stations. There can be up to 18 stations, 6 AM, 6 FM1 and 6 FM2. Perform the following steps:
- Turn the radio on.
- Press AM-FM to select the band.
- Tune in the desired station.
- Press AUTO TONE to select the equalization that best suits the type of station selected.
- Press and hold 1 of the 6 numbered buttons. The sound will mute. When it returns, release the button. Whenever you press that numbered button, the station you set will return and the AUTO TONE equalization that you selected will also be automatically selected for that button.
- Repeat the steps for each push-button.
P.SCAN:
Press this button to listen to each of the favorite stations stored on the push-buttons for a few seconds. The radio will scan through each of the stations stored on the radio push-buttons, except those stations with weak reception. The AUTO TONE setting stored for that push-buttons will be automatically chosen. Press P.SCAN or one of the push-buttons again to stop scanning. P.SCAN will be displayed whenever the tuner is in the P.SCAN mode. The channel number , P1-P6, will appear momentarily just before the frequency is displayed. In FM mode, this function will scan through both FM1 and FM2 preset stations and FM1 or FM2 will appear on the display.
Setting the Tone
BASS:
Press this knob lightly so the knob extends. Turn the knob clockwise in order to increase bass and counterclockwise in order to decrease bass. When this control is used, the radio's AUTO TONE setting will switch to manual and the AUTO TONE display will go blank.
TREB:
Press this knob so the knob extends. Turn the knob clockwise in order to increase treble and counterclockwise in order to decrease treble. When this control is used, the radio's AUTO TONE setting will switch to manual and the AUTO TONE display will go blank. If a station is weak or noisy, decrease the treble.
Push these knobs back into their stored positions when not using them.
AUTO TONE:
This feature allows preset bass and treble equalization settings designed for country/western, classical, news, rock, pop and jazz stations to be preset. C/W will appear on the display when you first press AUTO TONE. Each time AUTO TONE is pressed another setting will appear on the display. Press AUTO TONE again after JAZZ appears and the AUTO TONE display will go blank. Tone control will return to the BASS and TREB knobs. Also, if the BASS and TREB knobs are used, control will return to them and the AUTO TONE display will go blank. Use the push-buttons and the AUTO TONE button to program the AUTO TONE for station presets.
Adjusting the Speakers
BAL:
Press this knob lightly so the knob extends. Turn the knob clockwise for the right speakers and counterclockwise for the left speakers. The middle position balances the sound between the speakers.
FADE:
Press this knob lightly so the knob extends. Turn the knob clockwise in order to adjust the sound to the front speakers and counterclockwise in order to adjust the sound for the rear speakers. The middle position balances the sound between the speakers.
Push these knobs back into their stored positions when not using them.
Radio/Audio System Operation-Cassette Tape Player (RPO UM6)
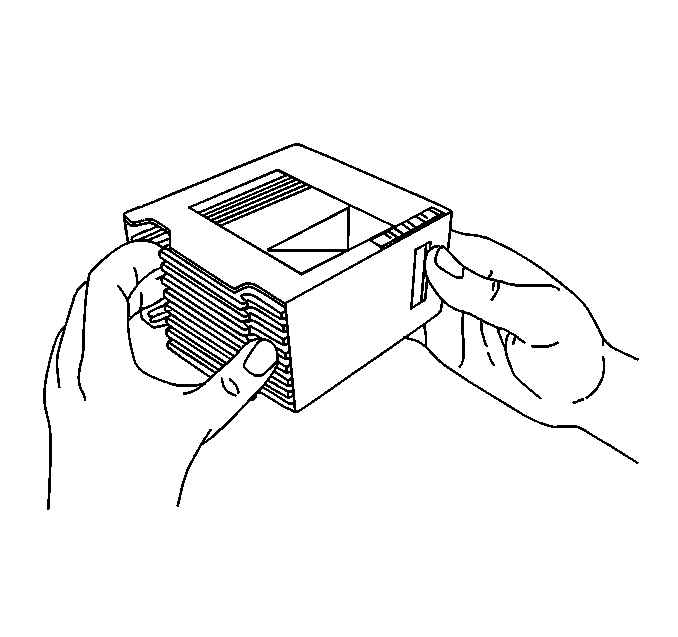
The cassette tape player is built to work best with tapes that are up to 30-45 minutes long on each side. Tapes longer than that are so thin they may not work well in the tape player.
If nothing is heard or only garbled sound is heard, the tape may not be is squarely. Press EJECT to remove the tape and start over.
While the tape is playing, use the VOL, FADE, BAL, BASS and TREB controls just as you do for the radio. Other controls may have different functions when a tape is inserted. The display will show an arrow to show which side of the tape is playing.
REV:
Press the SEEK arrow pointing to the left and the tape will reverse rapidly until you press this button again lightly.
FWD:
Press the SEEK arrow pointing to the right and the tape will rapidly advance until you press this button again lightly.
RECALL:
Press this knob in order to hear the other side of a tape that is playing.
EJECT:
Press this button in order to remove the tape. The radio will play. If a cassette is left in the player while listening to the radio, the cassette may become warm.
CLN:
If this message appears on the display, the cassette tape player needs to be cleaned. the cassette tape player will still play tapes, but the player should be cleaned as soon as possible to prevent damage to the tapes and player. Refer to Cassette Player Care and Cleaning After cleaning the player, press and hold EJECT for 5 seconds to reset the CLN indicator. The radio will display - - - to show the indicator was reset.
Compact Disc (CD) Adapter Kits
It is possible to use a CD adapter kit with this cassette tape player after activating the bypass feature on the tape player.
To activate the bypass feature, use the following steps:
- Turn the ignition to RUN or ACC.
- Turn the radio on.
- Insert the adapter.
- Within 5 seconds, press and hold the REV and FWD buttons at the same time for 3 seconds. The tape symbol on the display will flash, showing that the cut tape detection feature is no longer active.
This override routine will remain active until EJECT is pressed.
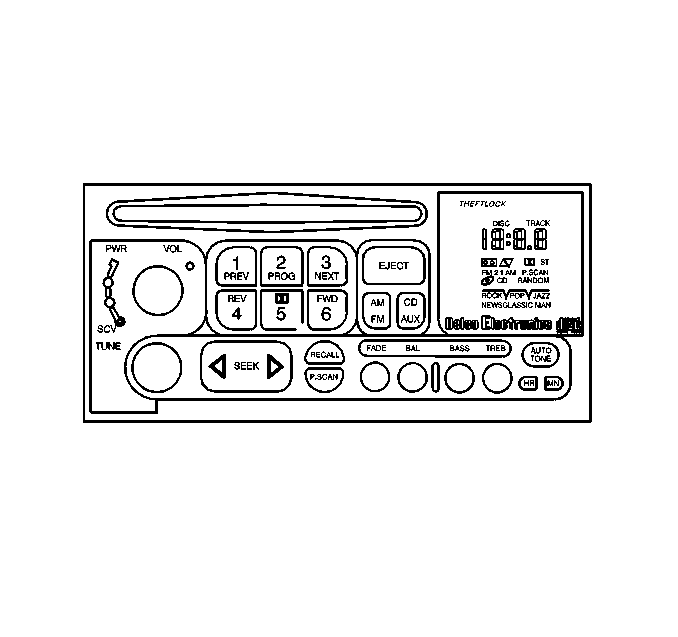
Radio/Audio System Operation-Cassette Tape Player (RPO ULO)
The cassette tape player is built to work best with tapes that are up to 30-45 minutes long on each side. Tapes longer than that are so thin they may not work well in the tape player. If a tape is inserted when the ignition is on but the radio is off, the tape will begin playing. A tape symbol is shown in the center of the graphic display whenever a tape is inserted. When a tape is active, the tape symbol will be accompanied by a direction arrow.
While the tape is playing, use the VOL, AUTO TONE, BAL, FADE, BASS and TREB controls just as you do for the radio. Other controls may have different functions when a tape is inserted. The display will show the tape symbol and an arrow to show which side of the tape is playing.
If you hear nothing or hear just a garbled sound, the tape may not be in squarely. Press EJECT to remove the tape and start over.
The player is able to detect a tight or broker tape, and will eject the tape. The radio will go back to playing the last station selected.
The player automatically senses the cassette for metal or CrO2 and sets the pre-emphasis. Anytime a tape is inserted, the top side is selected to play first.
PREV (1):
Press this button or the left SEEK arrow to go to the previous selection on the tape if the current selection has been playing for less that 8 seconds. If the PREV button is pressed and the current selection has been playing for more than 8 seconds, the tape will go to the beginning of the current selection. The tape must have at least 3 seconds of silence between each selection for PREV or SEEK to work. The tape direction arrow blinks during PREV or SEEK operation. The sound will mute during PREV or SEEK operation. Press this button or one of the SEEK arrows again to return to normal play.
PROG (2):
Press this button in order to play the other side of the tape.
NEXT (3):
Press this button or the right SEEK arrow to go to the next selection on the tape. If you hold the button or press the button more than once, the player will continue moving forward through the tape. The tape must have at least 3 seconds of silence between each selection for NEXT or SEEK to work. The tape direction arrow blinks during NEXT or SEEK operation. The sound will mute during NEXT or SEEK operation. Press this button or one of the SEEK arrows again to return to normal play.
REV (4):
Press this button in order to reverse the tape rapidly. Press REV again in order to return to playing speed. The radio will play the last selected station while the tape reverses.
DOLBY® NOISE REDUCTION (5):
Press the button to reduce background noise. Note that the double-D symbol will appear on the display.
Dolby® Noise Reduction is manufactured under a license from Dolby® Laboratories Licensing Corporation. Dolby® and the double-D symbol are trademarks of Dolby® Laboratories Licensing Corporation.
FWD (6):
Press this button in order to advance quickly to another part of the tape. Press the button again to return to playing speed. The radio will play the last selected station while the tape advances.
AM-FM:
Press this button in order to play the radio when a tape is in the player.
TAPE AUX:
Press this button in order to change to the tape function when the radio is on. The tape symbol with an arrow will appear on the display when the tape is active. If the system is equipped with a remote playback device, pressing this button a second time will allow the remote devise to play.
EJECT:
Press this button in order to remove the tape. The radio will play. EJECT may be activated with either the ignition or radio off. Cassettes may be loaded with the radio off if this button is pressed first. If a cassette tape is left in the player while listening to the radio, the tape may become warm.
CLN:
If this message appears on the display, the cassette tape player needs to be cleaned. the cassette tape player will still play tapes, but the player should be cleaned as soon as possible to prevent damage to the tapes and player. Refer to Cassette Player Care and Cleaning After cleaning the player, press and hold EJECT for 5 seconds to reset the CLN indicator. The radio will display - - - to show the indicator was reset.
Compact Disc (CD) Adapter Kits
You may use a CD adapter kit with this cassette tape player after activating the bypass feature on the tape player.
To activate the bypass feature, use the following steps:
- Turn the ignition to RUN or ACC.
- Turn the radio off.
- Press and hold the TAPE AUX button for 5 seconds. The tape symbol on the display will flash for 2 seconds, indicating the feature is active.
- Insert the adapter. the adapter will power up the radio and begin playing.
This override routine will remain active until EJECT is pressed.
Radio/Audio System Operation-Compact Disc Player (RPO UNO) - Playing a Compact Disc (CD)
Insert a CD partway into the slot, label side up. The player will pull it in. The CD should begin playing. The display will show CD and the CD symbol. If you want to insert a CD with the ignition off, first press RECALL or EJECT.
If driving on a very rough road or if the weather is very hot, the disc may not play and ERR (error) may appear on the display. Press RECALL to take ERR off the display. When things get back to normal, the disc should play.
If the disc comes out, the following conditions may be present:
| • | The CD is upside down. |
| • | The CD is dirty, scratched or wet. |
| • | The air is very humid. If so, wait about an hour and try again. |
PREV (1):
Press this button or the left SEEK arrow in order to go to the previous track if the current selection has been playing for less than 8 seconds. If the PREV button is pressed and the current selection has been playing for more than 8 seconds, the CD will go to the beginning of the current selection. If you hold the button or press PRV more than once, the player will continue moving back through the CD. The sound will mute while seeking.
RDM (2):
Press this button in order to hear the tracks in random, rather than sequential , order. RANDOM will show on the display. Press RDM again in order to turn off the random play. RDM is reset to off when the CD is ejected.
NEXT (3):
Press this button or the right SEEK arrow in order to go to the next track. If you hold the button or press NEXT more than once, the player will continue moving forward through the CD. The sound will mute while seeking.
REV (4):
Press and hold this button in order to quickly reverse within a track. Release REV to play the passage. The counter reading on the display can be used to locate a passage quickly.
FWD (6):
Press and hold this button in order to advance quickly within a track. Release FWD to resume playing. The counter reading on the display can be used to locate a passage quickly.
RECALL
Press this button in order to see which track is playing. Press RECALL again within 5
Radio/Audio System Operation-Compact Disc Player (RPO UNO) - Playing a Compact Disc (CD)
Insert a CD partway into the slot, label side up. The player will pull it in. The CD should begin playing. The display will show CD and the CD symbol. If you want to insert a CD with the ignition off, first press RECALL or EJECT.
If driving on a very rough road or if the weather is very hot, the disc may not play and ERR (error) may appear on the display. Press RECALL to take ERR off the display. When things get back to normal, the disc should play.
If the disc comes out, the following conditions may be present:
| • | The CD is upside down. |
| • | The CD is dirty, scratched or wet. |
| • | The air is very humid. If so, wait about an hour and try again. |
PREV (1):
Press this button or the left SEEK arrow in order to go to the previous track if the current selection has been playing for less than 8 seconds. If the PREV button is pressed and the current selection has been playing for more than 8 seconds, the CD will go to the beginning of the current selection. If you hold the button or press PRV more than once, the player will continue moving back through the CD. The sound will mute while seeking.
RDM (2):
Press this button in order to hear the tracks in random, rather than sequential , order. RANDOM will show on the display. Press RDM again in order to turn off the random play. RDM is reset to off when the CD is ejected.
NEXT (3):
Press this button or the right SEEK arrow in order to go to the next track. If you hold the button or press NEXT more than once, the player will continue moving forward through the CD. The sound will mute while seeking.
REV (4):
Press and hold this button in order to quickly reverse within a track. Release REV to play the passage. The counter reading on the display can be used to locate a passage quickly.
FWD (6):
Press and hold this button in order to advance quickly within a track. Release FWD to resume playing. The counter reading on the display can be used to locate a passage quickly.
RECALL
Press this button in order to see which track is playing. Press RECALL again within 5 seconds to see how long the track has been playing, elapsed time. The track number also appears when you change the volume or when a new track starts to play. Press RECALL a third time and the time of day will be displayed.
AM-FM:
Press this button in order to play the radio when a CD is playing. The CD will stop but remain in the player . The CD icon will disappear off the display.
CD AUX
Press this button to change to the CD function when the radio is on. A CD icon will appear on the display when a CD is in the player, whether the CD is active or not. If the system is equipped with a remote playback devise, pressing this button a second time will allow the remote devise to play.
EJECT:
Press this button in order to remove the CD or stop the CD and switch to the radio. The CD will start at the first track when you reinsert it.
If you turn off the ignition or radio with a CD in the player, the CD will stay in the player. When you turn on the ignition or system, the disc will start playing where the CD was stopped. If you press EJECT but do not remove the CD, the player will pull the CD back in to protect it after about 1 minute. If you leave a CD in the player while listening to the radio, the CD may become warm.
Trunk-Mounted CD Changer
With the optional CD changer, 12 CDs can be played continuously. Normal size discs may be played using the trays supplied in the magazine. The small CDs 8 cm (3.1in) can be played only with specially designed trays.
First load the magazine with CDs before you can play a CD. Each of the 12 trays holds one CD.
Press the button on the back of the magazine and pull gently on one of the trays.
Load the trays from the bottom to the top, placing a CD on the tray label side down. If you load a CD label side up, the CD will not play and an error will occur.
Gently push the tray back into the magazine slot. Repeat this procedure for loading up to 12 CDs in the magazine.
Once the CDs are loaded in the magazine, slide open the door of the CD changer. Push the magazine into the CD changer in the direction of the arrow on top of the magazine.
Close the door by sliding the door all the way to the left. If the door is left partially open, the CD changer will not operate and an error will occur. When the door is closed, the CD changer will begin checking for CDs in the magazine. This will continue for up to 2 minutes depending on the number of CDs loaded.
To eject the magazine from the CD changer, slide the CD changer door all the way open. The magazine will automatically eject. Remember to keep the door closed when possible to keep dirt and dust from getting inside the CD changer.
Whenever a magazine with CDs is loaded in the CD changer, the CD symbol will appear on the radio display. If the CD changer is checking the magazine for CDs the CD symbol will flash on the display until the CD changer is ready to play. When a CD begins playing, a disc and track number will be displayed. The disc numbers are listed on the front of the magazine.
All of the CD functions are controlled by the radio buttons, except for ejecting the magazine.
PREV (1):
Press this button or the SEEK left arrow in order to go to the previous track if the current selection has been playing for less than 8 seconds. If the PREV button is pressed and the current selection has been playing for more than 8 seconds, the CD will go to the beginning of the current selection. If you hold or press this button more than once, the CD changer will continue moving back through the CD. The sound will mute while seeking.
PROG (2):
Press this button in order to select a CD. The CD number and track number will be displayed.
NEXT (3):
Press this button or the SEEK right arrow to go to the next track. If you hold the button or press the button more than once, the CD changer will continue moving forward through the CD. The sound will mute while seeking.
REV (4):
Press and hold this button in order to reverse quickly through a track selection. Release REV to resume playing.
FWD (6):
Press and hold this button in order to advance quickly through a track selection. Release FWD to resume playing.
SEEK
Press the right arrow to seek to the next selection on the CD. Press the left arrow to search for the previous selection on the CD. The sound will mute while seeking.
P.SCAN
Press this button in order to hear the tracks in random, rather than sequential, order. RANDOM will appear on the display. Press P.SCAN again to turn off random play.
TAPE AUX
Press this button if there is a CD loaded in the CD changer and the radio is turned on, to play a CD. Press AM-FM to return to the radio when a CD is playing. Press TAPE AUX to switch between the tape and CD if both are loaded.
CD Changer Errors
If an error occurred while trying to play a CD in the CD changer, the following conditions may have caused the error:
| • | The road is too rough. The CD should play when the road is smoother. |
| • | The CD is dirty, scratched or wet. |
| • | The CD is label side up. If so, load the CD label side down. |
| • | The air is very humid. If so, wait about an hour and try again. |
| • | The CD changer door is open. Completely close the door to restore normal operation. |
| • | An empty magazine is inserted in the CD changer. |
| Try the magazine again with a CD loaded on one of the trays. |
Radio/Audio System Description and Operation Pontiac
Radio/Audio System Description
Pontiac radios include the following components and features:
| • | An electronically tuned receiver (ETR) |
| • | A vacuum fluorescent display |
| • | An AM/FM stereo |
| • | The seek and scan tuning |
| • | A digital clock display |
Radio Description
| • | ETR AM/FM Stereo/Cassette with Graphic Equalizer and Theftlock™ |
| • | ETR AM/FM Stereo/Compact Disc with Graphic Equalizer and Theftlock™ |
FM Stereo
The following actions occur when a factory-equipped audio system with an FM stereo radio receives an FM stereo broadcast:
| • | The radio switches to stereo operation. |
| • | An indicator on the radio illuminates. |
Stereo operation means that the radio is separating stereo broadcast back into the two original channels. The two channels are the LEFT channel and the RIGHT channel. Stereo sound is more realistic than non-stereo sound.
FM is normally static-free, but any of the following factors may limit reception:
| • | Terrain |
| • | Atmospheric conditions |
| • | Station strength |
| • | Distance from the transmitter |
Buildings or other obstructions may cause the following conditions:
| • | Momentary static |
| • | Flutter |
| • | Station swapping |
If reception is poor, turning to a different station that is stronger will bring improvement.
AMAX Stereo Certification
All optional radios are AMAX certified. AMAX certified receivers can reproduce the fidelity sound that is transmitted by all AM stations but not received on all AM radios.
AMAX certification includes some of the following improvements:
| • | High fidelity |
| • | Adjustable receiver bandwidth: |
| - | Wide bandwidth for high fidelity |
| - | Narrow bandwidth for cutting out interference |
| • | Noise cancellation |
| • | Full stereo sound |
| • | Reception of more frequencies |
| • | External antenna capability |
The range of most AM stations is greater than FM, especially at night. The longer range can cause stations to interfere with each other. AM is also subject to noise pickup from storms or power lines. AMAX certification reduces many of these types of conditions.
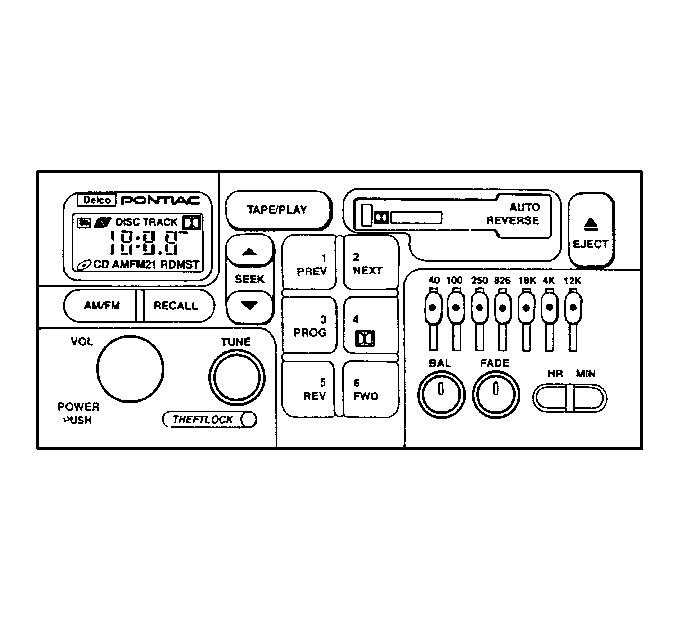
Radio/Audio System Operation-Radio Controls (RPO W53/W55/X2O) - AM-FM Stereo with Compact Disc Player and Equalizer / Monsoon® AM-FM Stereo with Compact Disc Player and Equalizer
If equipped with the AM-FM Stereo with Compact Disc Player and Equalizer, included are 4 speakers.
If equipped with the Monsoon® AM-FM Stereo with Compact Disc Player and Equalizer, included are 8 speakers, convertible only, or 10 speakers, Coupe only, and an 8-channel amplifier.
Setting the Clock
Press and hold HR until the correct hour appears. Press and hold MIN until the correct minute appears. There will be a 2-second delay before the clock goes into time-set mode, and the colon on the display will blink while in this mode.
Playing the Radio
POWER-VOL:
Push this knob in order to turn the system on and off. To increase volume, turn the knob clockwise. Turn the knob counterclockwise in order to decrease volume.
RECALL:
Press this button briefly in order to recall the station being played or to display the clock. If you press the knob when the ignition is off, the clock will show for a few seconds.
Finding a Station
AM/FM:
Press this button in order to switch between AM, FM 1 and FM2. The display shows the selection.
TUNE:
Press this knob lightly so the knob extends. Turn it to choose radio stations. Push the knob back into the stored position when not using it.
SEEK:
Press the up or down arrow in order to go to the next higher or lower station and stay there.
PUSH-BUTTONS:
The 6 numbered push-buttons let you return to the favorite stations. There can be up to 18 stations, 6 AM, 6 FM1 and 6 FM2. Perform the following steps:
- Turn the radio on.
- Press AM/FM to select the band.
- Tune in the desired station.
- Press and hold 1 of the 6 numbered buttons until SET appears on the display. Whenever you press that numbered button, the station that was set will return.
- Repeat the steps for each push-button.
Setting the Tone
EQUALIZER:
A seven-band equalizer is part of your audio system. Slide the levers up to boost or down to reduce frequency range.
Adjusting the Speakers
BAL:
Press this knob lightly so the knob extends. Turn the knob clockwise for the right speakers and counterclockwise for the left speakers. The middle position balances the sound between the right and left speakers.
FADE:
Press this knob lightly so the knob extends. Turn the knob clockwise in order to adjust the sound to the front speakers and counterclockwise for the rear speakers. The middle position balances the sound between the left and right speakers.
Push these knobs into their stored positions when not using them.
Radio/Audio System Operation-Radio Controls (RPO W54/X10) - Monsoon® AM-FM Stereo with Cassette Tape Player and Equalizer
Included with the Monsoon® AM-FM Stereo with Cassette Tape Player and Equalizer are 8 speakers, convertible only, or 10 speakers, coupe only, and a 8 channel amplifier.
Setting the Clock
Press and hold HR until the correct hour appears. Press and hold MIN until the correct minute appears. There will be a 2-second delay before the clock goes into time-set mode, and the colon on the display will blink while in this mode.
Playing the Radio
POWER-VOL:
Push this knob in order to turn the system on and off. To increase volume, turn the knob clockwise. Turn the knob counterclockwise to decrease volume.
RECALL:
Display the time with the ignition off by pressing this button. When the radio is playing, press this knob in order to recall the station frequency.
Finding a Station
AM/FM:
Press this button in order to switch between AM, FM1 and FM2. The display shows the selection.
TUNE:
Press this knob lightly so the knob extends. Turn the knob to choose radio stations. Push the knob back into the stored position when not in use.
SEEK:
Press the up or down arrow in order to go to the next higher or lower station and stay there.
PUSH-BUTTONS:
The 6 numbered push-buttons let you return to the favorite stations. There can be up to 18 stations, 6 AM, 6 FM1 and 6 FM2. Perform the following steps:
- Turn the radio on.
- Press AM/FM to select the band.
- Tune in the desired station.
- Press and hold 1 of the 6 numbered buttons until SET appears on the display. Whenever you press that numbered button, the station that was set will return.
- Repeat the steps for each push-button.
Setting the Tone
EQUALIZER:
A seven-band equalizer is part of the audio system. Slide the levers up in order to boost, or down in order to reduce the frequency range.
Adjusting the Speakers
BAL:
Press this knob lightly so the knob extends. Turn the knob to move the sound to the left or right speakers. The middle position balances the sound between the left and right speakers.
FADE:
Press this knob lightly so the knob extends. Turn the knob to move the sound to the front or right speakers. The middle position balances the sound between the front and rear speakers.
Push these knobs into their stored positions when not using them.
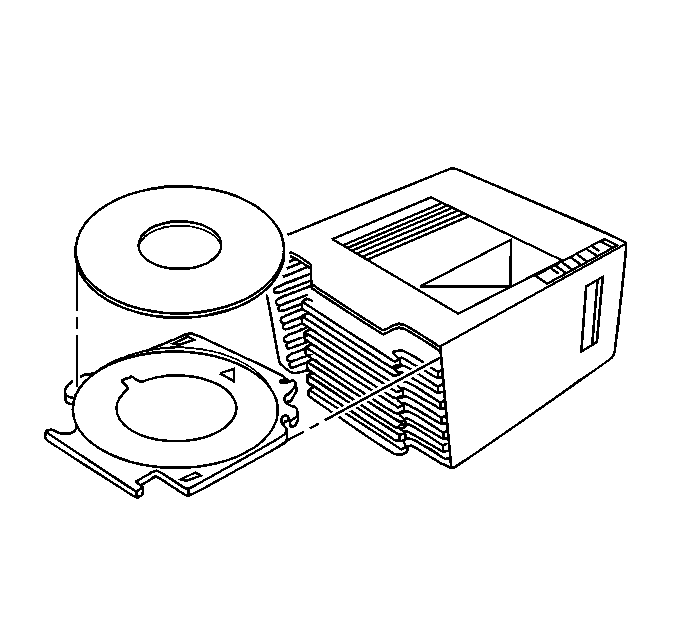
Radio/Audio System Operation-Cassette Tape Player (RPO W54/X1O)
The cassette tape player is built to work best with tapes that are up to 30-45 minutes long on each side. Tapes longer than that are so thin they may not work well in the tape player.
While the tape is playing, use the VOL, FADE and BAL controls just as you do for the radio. The display will show an arrow to show which side of the tape is playing. When the down indicator arrow is lit, selections listed on the bottom side if the cassette are playing. When the up arrow is lit, selections listed on the top side of the cassette are playing. The tape player automatically begins playing the other side when the player reaches the end of the tape.
If E and a number appear on the radio display, the tape won't play because of an error.
| • | E10: The tape is tight and the player cannot turn the tape hubs. Remove the tape. Hold the tape with the open end down and try to turn the right hub counterclockwise with a pencil. Turn the tape over and repeat. If the hubs do not turn easily, the tape may be damaged and should not be used in the player. Try a new tape to ensure that the player is working properly. |
| • | E11: The tape is broken. Try a new tape. |
PREV (1):
Press this button or the SEEK down arrow in order to search for the previous selection on the tape. The tape must have at least 3 seconds of silence between each selection for PREV or SEEK to work. The tape direction arrow blinks during PREV or SEEK operation. Press PREV or the SEEK down arrow to stop searching. The sound will mute during PREV or SEEK operation.
NEXT (2):
Press this button or the SEEK up arrow in order to search for the next selection on the tape. If you hold the button, the player will continue moving forward through the tape. The tape must have at least three seconds of silence between each selection for NEXT or SEEK to work. The tape direction arrow blinks during NEXT or SEEK operation. Press NEXT or the SEEK up arrow to stop searching. The sound will mute during NEXT or SEEK operation.
PROG (3):
Press this button in order to play the other side of the tape.
DOLBY® NOISE REDUCTION (4):
Press this button in order to reduce background noise. Note that the double-D symbol will appear on the display.
Dolby® Noise Reduction is manufactured under a license from Dolby® Laboratories Licensing Corporation. Dolby® and the double-D symbol are trademarks of Dolby® Laboratories Licensing Corporation.
REV (5):
Press this button in order to reverse the tape rapidly. Press REV again in order to return to playing speed. The radio will play the last selected station while the tape reverses. A station may be selected during REV operation by using SEEK or TUNE.
FWD (6):
Press this button in order to advance quickly to another part of the tape. Press this button again in order to return to playing speed. The radio will play the last selected station while the tape advances. A station may be selected during FWD operation by using SEEK or TUNE.
AM-FM:
Press this button in order to play the radio when a tape is in the player.
TAPE/PLAY:
Press this button in order to change to the tape function when the radio is on. The tape symbol with an arrow will appear on the display when the tape is active. To return to playing the radio, press the AM-FM button.
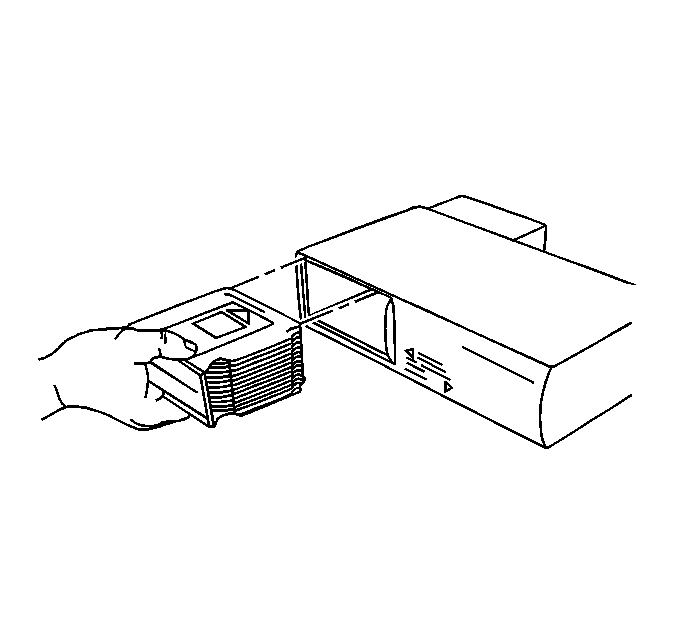
EJECT:
Press this button in order to remove the tape. The radio will play. EJECT may be activated with either the ignition or radio off. Cassettes may be loaded with the radio off if this button is pressed first.
CLN:
If this message appears on the display, the cassette tape player needs to be cleaned. The cassette tape player will still play tapes, but the player should be cleaned as soon as possible to prevent damage to the tapes and player. Refer to Cassette Player Care and Cleaning After cleaning the player, press and hold EJECT for five seconds to reset the CLN indicator. The radio will display - - -to show the indicator was reset.
Compact Disc (CD) Adapter Kits
You may use a CD adapter kit with this cassette tape player after activating the bypass feature on the tape player.
To activate the bypass feature, use the following steps:
- Turn the ignition to RUN or ACC.
- Turn the radio off.
- Press and hold the TAPE/PLAY button for 3 seconds. The tape symbol on the display will flash for 2 seconds, indicating the feature is active.
- Insert the adapter. the adapter will power up the radio and begin playing.
This override routine will remain active until EJECT is pressed.
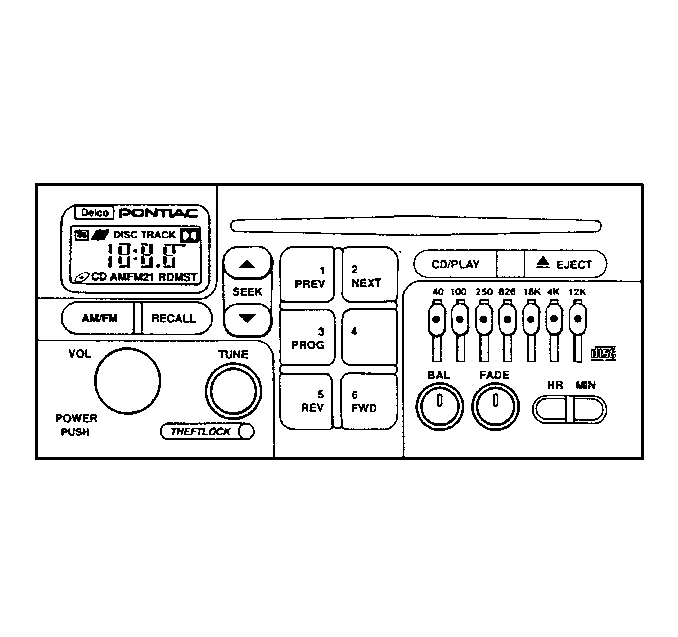
Radio/Audio System Operation-Compact Disc Player (RPO W53/W54/W55/X1O/X2O) - Playing a Compact Disc (CD)
Insert a CD partway into the slot, label side up. The CD player will pull the CD in. If the ignition and the radio are on, the CD will begin playing. If you want to insert a CD when the ignition off, first press EJECT.
If driving on a very rough road or if it's very hot, the CD may not play and E (error) may appear on the display. If the CD comes out, the following conditions may be present:
| • | The CD is upside down. |
| • | The CD is dirty, scratched or wet. |
| • | The air is very humid. If so wait about an hour and try again. |
PREV (1):
Press this button or the SEEK down arrow in order to go to the start of the current track if more than 8 seconds have played. If you hold the button or press the button more than once, the player will continue moving back through the CD.
NEXT (2):
Press this button or the SEEK up arrow in order to go to the next track. If you hold the button or press it more than once, the player will continue moving forward through the CD.
RDM (3):
Press this button in order to hear the tracks in random, rather than sequential, order. The display will show RDM. Press RDM again to turn off random play.
REV (5):
Press and hold this button in order to quickly reverse within a track. Release REV to play the passage. You will hear sound at a reduced volume. The display will show elapsed time.
FWD (6):
Press and hold this button in order to quickly advance within a track. You will hear sound at a reduced volume. The display will show elapsed time.
RECALL
Press this button in order to see which track is playing. Press RECALL again within 5seconds to see how long it has been playing. When a new track starts to play, the track number will also appear. Press RECALL a third time and the time of day will be displayed.
AM-FM:
Press this button in order to play the radio when a CD is playing. The CD will stop but remain in the player.
CD/PLAY:
Press this button in order to change to the CD function when the radio is on.
EJECT:
Press this button in order to remove the CD or stop the CD and switch to the radio. EJECT will work with the radio off.
Trunk-Mounted CD Changer
With the optional CD changer, 12 CDs can be played continuously. Normal size CDs may be played using the trays supplied in the magazine. The small CDs 8 cm (3.1 in) can be played only with specially designed trays.
First load the magazine with CDs before you can play a CD. Each of the 12 trays holds 1 CD.
Press the button on the back of the magazine and pull gently on one of the trays.
Load the trays from the bottom to top, placing a CD on the tray label side down. If you load a CD label side up, the CD will not play and an error will occur.
Gently push the tray back into the magazine slot. Repeat this procedure for loading up to 12 CDs in the magazine.
Once the CDs are loaded in the magazine, slide open the door of the CD changer. Push the magazine into the CD changer in the direction of the arrow on top of the magazine.
Close the door by sliding it all the way to the left. If the door is left partially open, the CD changer will not operate and an error will occur. When the door is closed, the CD changer will begin checking for CDs in the magazine. This will continue for up to 2 minutes depending on the number of CDs loaded.
To eject the magazine from the CD changer, slide the CD changer door all the way open. The magazine will automatically eject. Remember to keep the door closed when possible to keep dirt and dust from getting inside the CD changer.
Whenever a magazine with CDs is loaded into the CD changer, the CD symbol will appear on the radio display. If the CD changer is checking the magazine for CDs the CD symbol will flash on the display until the CD changer is ready to play. When a CD begins playing, a disc and track number will be displayed. The disc numbers are listed on the front of the magazine.
All of the CD functions are controlled by the radio buttons, except for ejecting the magazine.
Playing a CD (RPO W54/X1O)
If the vehicle is equipped with the Monsoon® AM-FM Stereo with Cassette Tape Player and Equalizer, the following buttons are used for the trunk-mounted CD changer.
PREV (1):
Press this button to go back to the start of the current track if more than 8 seconds have played. Press PREV again to go to the previous track on the CD.
NEXT (2):
Press this button in order to advance to the next track on the CD.
PROG (3):
Press this button in order to select the next CD in the magazine. If a CD cannot be played, its number will be skipped when selecting CDs while using the PROG button.
DOLBY® NOISE REDUCTION (4):
Press this button to reduce background noise. Note that the double-D symbol will appear on the display.
Dolby® Noise Reduction is manufactured under a license from Dolby® Laboratories Licensing Corporation. Dolby® and the double-D symbol are trademarks of Dolby® Laboratories Licensing Corporation.
REV (5):
Press and hold this button in order to quickly reverse within a track. As the CD reverses, elapsed time will be displayed to help you find the correct track.
FWD (6):
Press and hold this button in order to quickly advance within a track. As the CD advances, elapsed time will be displayed to help you find the correct track.
RECALL:
Press this button in order to recall what track is currently playing. Press RECALL again within 5 seconds to see how long the track has been playing. When a new track starts to play, the track number will also appear. Press RECALL a third time and the time of day will be displayed.
SEEK:
Press the SEEK down arrow while playing a CD in order to go back to the start of the current track if more than 8 seconds have played. If you press SEEK again, the CD changer will go to previous tracks. Press the SEEK up arrow and the CD will go to the next higher track.
TAPE/PLAY
Press this button in order to play a CD if you have a magazine loaded in the CD changer and the radio is playing. To return to the radio while a CD is playing, press AM-FM. You can also press this button to switch between a cassette tape and CD, if both are loaded.
Playing a CD (RPO W53/W55/X2O)
If the vehicle is equipped with the AM-FM Stereo with Compact Disc Player and Equalizer, the following buttons are used for the trunk-mounted CD changer.
If the vehicle is equipped with the Monsoon® AM-FM Stereo with Compact Disc Player and Equalizer, the following buttons are used for the trunk-mounted CD changer.
PREV (1):
Press this button in order to go back to the start of the current track if more than 8 seconds have played. Press PREV again to go to the previous track on the CD.
NEXT (2):
Press this button in order to advance to the next track on the CD.
RDM (3):
Press this button in order to enter the random play mode. RDM will appear on the display. While in this mode, the tracks on the CDs will be played in random order. If the number 4 preset button or SEEK is pressed while in the random mode, CDs and tracks will be scanned randomly. Press RDM button again in order to turn off the random feature and return to normal operation.
ADV (4):
Press this button in order to select the next CD in the magazine. If a CD cannot be played, its number will be skipped when selecting CDs while using this button.
REV (5):
Press and hold this button in order to quickly reverse within a track. As the CD reverses, elapsed time will be displayed to help you find the correct track.
FWD (6):
Press and hold this button in order to quickly advance within a track. As the CD advances, elapsed time will be displayed to help you find the correct track.
RECALL:
Press this button in order to see what track is currently playing. Press RECALL again within 5 seconds to see how long the track has been playing. When a new track starts to play, the track number will also appear. Press RECALL a third time and the time of day will be displayed.
SEEK:
Press the SEEK down arrow while playing a CD to go back to the start of the current track if more than 8 seconds have played. If you press SEEK again, the CD changer will go to previous tracks. Press the SEEK up arrow and it will go to the next higher track on the CD.
CD/PLAY
Press this button to play a CD if you have a magazine loaded in the CD changer and the radio is playing. To return to the radio while a CD is playing, press AM-FM. Also press this button to switch between a CD in the CD player and a CD in the trunk-mounted CD changer, if both are loaded.
Compact Disc Errors
If E and a number appear on the display, and error has occurred and the CD temporarily cannot play.
The CD changer will send an error message to the receiver to indicate:
| • | E30: CD label side up |
| • | E34: CD changer door open |
| • | E35: CD changer cartridge empty |
If the error occurred while trying to play a CD in the CD player or CD changer, the following conditions may have caused the error:
| • | The road is too rough. The CD should play when the road is smoother. |
| • | The CD is dirty, scratched or wet. |
| • | The CD is label side up. If so, load the CD label side down. |
| • | The air is very humid. If so, wait about an hour and try again. |
| • | The CD changer door is open. Completely close the door to restore normal operation. |
| • | An empty magazine is inserted in the CD changer. |
| Try the magazine again with a CD loaded on one of the trays. |
Radio/Audio System Operation-TheftlockTheft-Deterrent Feature
THEFTLOCK® is designed to discourage theft of the radio. THEFTLOCK® works by using a secret code to disable all radio functions whenever battery power is removed.
The THEFTLOCK® feature for the radio may be used or ignored. If ignored, the system plays normally and the radio is not protected by the feature. If THEFTLOCK® is activated, the radio will not operate if stolen.
When THEFTLOCK® is activated, the radio will display LOC to indicate a locked condition anytime battery power has been interrupted. If the battery loses power for any reason, the radio must be unlocked with the secret code before the radio will operate.
Activating the Theft-Deterrent Feature
The instructions that follow explain how to enter the secret code to activate the THEFTLOCK® system. Read through all nine steps before starting the procedures.
If you allow more than 15 seconds to elapse between any steps, the radio automatically reverts to the time and you must start the procedure over at step 4.
- Write down any three or four digit number from 000-1999.
- Turn the ignition to ACC or RUN.
- Turn the radio off.
- Press the 1 and 4 buttons together. Hold them down until - - - shows on the display. Next use the secret code number which you have written down.
- Press MN and 000 will appear on the display.
- Press MN again to make the last two digits agree with your code.
- Press HR to make the first one or two digits agree with your code.
- Press AM-FM after you have confirmed that the code matches the secret code you have written down. The display will show REP to let you know that you need to repeat steps 5 through 7 to confirm your secret code.
- Press AM-FM and this time the display will show SEC to let you know that your radio is secure. The LED indicator by the volume control will begin flashing when the ignition is turned off.
Unlocking the Theft-Deterrent Feature After a Power Loss
Enter the secret code as follows; pause no more than 15 seconds between steps:
- Turn the ignition on. LOC will appear on the display.
- Press MN and 000 will appear on the display.
- Press MN again to make the last two digits agree with your code.
- Press HR to make the first one or two digits agree with your code.
- Press AM-FM after you have confirmed that the code matches the secret code that is written down. The display will show SEC, indicating the radio is now operable and secure.
If the wrong code is entered eight times, INOP will appear on the display. You will have to wait an hour with the ignition on before you can try again. When you try again, you will only have three chances to enter the correct code before INOP appears.
Disabling the Theft-Deterrent Feature
Enter the secret code as follows; pause no more than 15 seconds between steps:
- Turn the ignition to ACC or RUN.
- Turn the radio off.
- Press the 1 and 4 buttons together. Hold them down until SEC shows on the display.
- Press MN and 000 will appear on the display.
- Press MN again to make the last two digits agree with the code.
- Press HR to make the first one or two digits agree with the code.
- Press AM-FM after you have confirmed that the code matches the secret code that is written down. The display will show - - -, indicating that the radio is no longer secured.
If the code entered is incorrect, SEC will appear on the display. The radio will remain secured until the correct code is entered.
Determining Factory Backup Code
If the security is activated and the radio is disconnected from the battery power, the radio will display LOC. The radio turns ON when the correct unlocking code is entered. If the customer's code is lost or unavailable, refer to the Dealer Communications System Bulletin or call Technical Assistance.
Steering Wheel Controls System Operation
Steering wheel controls, if equipped, enable remote control of the following sound system functions:
| • | PLAY |
| Starts playing the cassette tape player or the compact disc player |
| • | VOL |
| Adjusts the volume of the AM/FM stereo, cassette tape player or the compact disc player |
| • | PRE-SET |
| Presets radio stations |
| • | AM/FM |
| Switches between the AM and the FM bands |
| • | SEEK |
| Seeks the next station, either up or down |
| • | MUTE |
| Mutes the volume of the AM/FM stereo, cassette tape player or the compact disc player. |
Power Antenna System Description
The rear-mounted, telescoping, rod-type antenna fully extends whenever the radio is in use. The antenna retracts when the following conditions exist:
| • | The radio is off. |
| • | The ignition switch is in the OFF position. |
| • | The retained accessory power (RAP) is inactive. |
The antenna mast is attached to a plastic cable that is driven up and down by an electric motor. The motor is automatically shut off by the limit switches when the antenna reaches the full up or full down position.
