SERVICE MANUAL UPDATE-SEC.10 CONV. TOP/SERVICE PROCEDURE

SUBJECT: SERVICE MANUAL UPDATE - SECTION 10-8 CONVERTIBLE TOP (NEW SERVICE SERVICE PROCEDURE)
VEHICLES AFFECTED: 1991 CHEVROLET CAMARO
SERVICE MANUAL ADDITION
SECTION 10-8
The 1991 Chevrolet Camaro Service Manual does not contain service procedures for the convertible top. To service the convertible top perform procedures on the attached pages.
CONVERTIBLE TOP
NOTICE: When fasteners are removed, always reinstall them at the same location from which they were removed. If a fastener needs to be replaced, use the correct part number fastener for that application. If the correct part number fastener is not available, a fastener of equal size and strength (or stronger) may be used. Fasteners that are not reused, and those requiring thread locking compound will be called out. The correct torque value must be used when installing fasteners that require it. If the above conditions are not followed, parts or system damage could result.
CONTENTS
On-Vehicle Service .............................1 Convertible Interior Moldings, Garnishes, and Latch Plates.....................................1 Number One Bow Garnish Molding.......................1 Header Inner Trim Garnish............................2 "A" Pillar Inner Garnish.............................2 Latch Plate .........................................3 Folding Top Operation..................................3 Lowering Top.........................................3 Raising Top..........................................3 Adjustments............................................4 Upstops..............................................4 Downstops............................................5 Watertest and Waterleak Repair.......................5 Folding Top Cover......................................5 Folding Headliner......................................7 Tonneau Panel..........................................9 Tonneau Panel Replacement............................9 Tonneau Panel Secondary Pin and Secondary Receiver Bracket Replacement............10 Number Five Bow Release Handle......................11 Number Five Bow Latch...............................11 Tonneau Panel Latch.................................12 Tonneau Release Solenoid............................12 Seals and Retainers...................................12 Header "A" Pillar Seal..............................12 Side Rail Seal and Retainer.........................13 Main Pillar Seal and Retainer.......................13 Number Five Bow Seal................................14 Tonneau Panel Seal..................................14 Stay Pads.............................................14 Side Stay Pad.......................................14 Rear Stay Pad.......................................15 Roof Bows.............................................16 Number One and Number Two Bow Assembly.......................................16 Number Three Bow Assembly...........................17 Number Four Bow Assembly............................17 Number Five Bow Assembly............................17 Folding Top Stack...................................18 Specifications........................................19
ON-VEHICLE SERVICE
CONVERTIBLE INTERIOR MOLDINGS, GARNISHES, AND LATCH PLATES
Interior moldings are made of plastic and painted to match the interior of the vehicle. The moldings are held on with screws. The latch plates are made of metal and are attached to the header. They retain the top cover to the header.
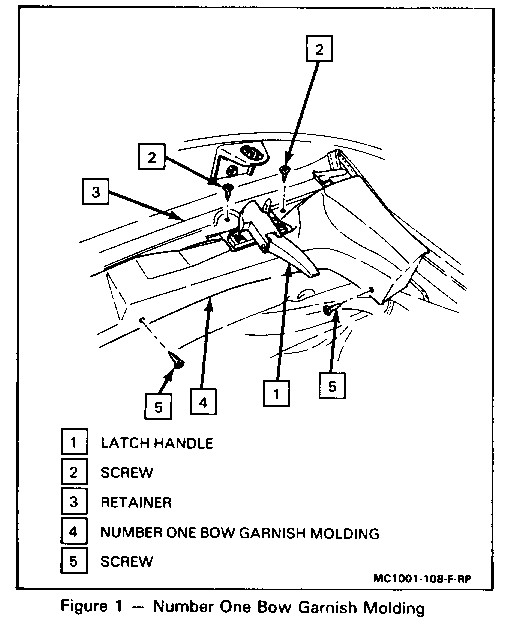
Number One Bow Garnish Molding
Figure 1
[(- -)] Remove or Disconnect ----------------------------
- Unlatch and raise number five bow to its full vertical position.
- Raise tonneau panel to its full vertical position.
- Lower number five bow.
- Unlatch and raise top from the windshield header and fold back halfway.
1. Exposed screws (2).
2. Top cover retainer (3).
[!] Important -------------
Loosen outboard and rear garnish molding screws (5). Then slide number one bow garnish molding (4) back to expose retainer screws (2) previously hidden.
3. Screws (2) remaining on number one bow garnish molding (4).
4. Number one bow garnish molding (4), by sliding out from under retainer (3).
[-) (-] Install or Connect ---------------------------
1. Number one bow garnish molding (4).
2. Screws (2).
- Sandwich tabs of number one bow garnish molding (4) under retainer (3) while tightening the five centermost retainer screws (2).
- Slide number one bow garnish molding (4) over five screws (2).
- Tighten the remaining number one garnish molding screws (5).
3. Top cover retainer (3) to number one bow.
4. Screws (2) remaining on retainer (3).
[!] Important -------------
- Number one bow garnish molding (4) fits over glued portion of headliner front section.
- Fold top to windshield header.
- Raise number five bow to full vertical position.
- Lower and latch tonneau panel.
- Lower and latch number five bow to tonneau panel.
- Lower and latch number one bow to windshield header.
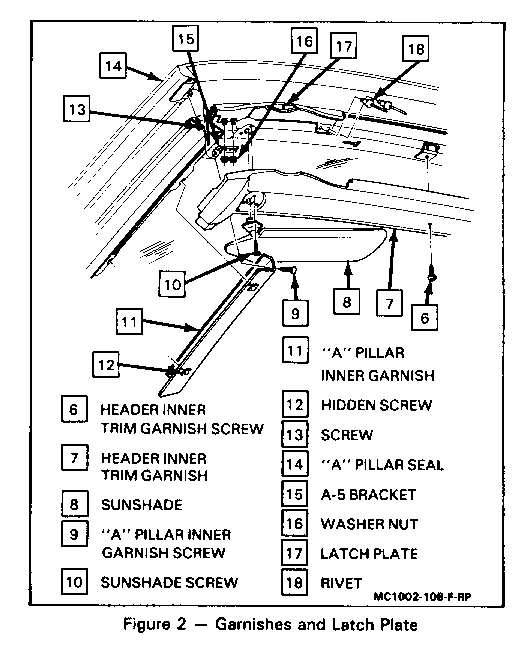
Header Inner Trim Garnish
Figure 2
[(- -)] Remove or Disconnect ----------------------------
1. Sunshade screws (10).
2. Sunshades (8).
3. Header inner trim garnish screws (6).
NOTICE: Use care to prevent garnish from cracking during removal.
4. Header inner trim garnish (7).
- Carefully shift edges rearward and out of latch plate (17).
- Loosen "A" pillar inner garnish screw (9).
- Slide up and out of "A" pillar inner garnish (11).
[(- -)] Install or Connect --------------------------
NOTICE: Use care to prevent garnish from cracking during installation.
1. Header inner trim garnish (7).
- Slide down and into "A" pillar inner garnish (11).
- Tighten "A" pillar inner garnish screw (9).
- Carefully shift edges forward and inside edges of latch plate (17), while slipping upper lip of header inner trim garnish (7) over of header edge.
- Apply sound deadener inside of header inner trim garnish (7) over sunshade screw holes (if it was removed).
2. Header inner trim garnish screws (6).
3. Sunshades (8).
- Place sunshades (8) so screw holes align properly.
[!] Important -------------
The sunshade should be mounted so the larger pivot hole is closest to the front of the vehicle when the sunshade is attached. Check the fit of the sunshade. Screws should fit in evenly with no difficulty.
4. Sunshade screws (10).
"A" Pillar Inner Garnish
Figure 2
[(- -)] Remove or Disconnect ----------------------------
1. "A" pillar inner garnish screw (9).
2. "A" pillar inner garnish (11) by sliding down and off hidden screws (12).
[-) (-] Install or Connect --------------------------
1. "A" pillar inner garnish (11) by sliding up and on hidden screws (12).
2. "A" pillar inner garnish screw (9).
Latch Plate
Figure 2
[(- -)] Remove or Disconnect ----------------------------
1. Header inner trim garnish. Refer to "Header Inner Trim Garnish" in this section.
2. Screw (13) on outboard edge holding "A" pillar seal tab to latch plate (17) by A-5 bracket (15).
3. Washer nuts (16) holding A-5 bracket (15) to outboard end of latch plate (17), detaching sound deadener.
4. A-5 bracket (15).
- Detach sound deadener to gain access to rivets (18).
[!] Important -------------
- Drive out mandrels before drilling to make drilling easier.
5. Inboard rivets (18) by drilling out with 3/16-inch drill bit.
6. Latch plate (17).
[-) (-] Install or Connect --------------------------
1. Latch plate (17).
2. New 3/16-inch rivets (18) along inboard edge.
- Apply sound deadener over rivets (18) after installation (if sound deadener was removed).
3. A-5 bracket (15).
- Align to allow seal tab attachment.
[!] Important -------------
- Short end of bracket bend should bend toward inner garnish and away from header.
4. Washer nuts (16) onto studs holding A-5 bracket (15) to outboard end of latch plate (17).
5. Screw (13) holding "A" pillar seal to latch plate (17) by first screwing through seal tab and then into A-5 bracket end hole.
Apply sound deadener over washer nuts (16) and screw (13) once they are installed (if sound deadener was removed).
6. Header inner trim garnish. Refer to "Header Inner Trim Garnish" in this section.
FOLDING TOP OPERATION
The folding top is manually operated. When the folding top is raised, it attaches to the windshield header in the front and to the tonneau panel in the rear. When the folding top is lowered, it is stored in a top well behind the rear seat. The top well is covered by the tonneau panel.
Lowering Top
CAUTION:
The vehicle must be parked on a level surface with the trunk lid closed before lowering or raising the folding top or tonneau, or damage to the folding top or tonneau and possible personal injury could result.
1. Set the parking brake.
2. Shift the automatic transmission to "P" (park) or the manual trans- mission to "NEUTRAL."
3. Turn the ignition to "RUN" position.
4. Lower the side windows. If battery is discharged and windows won't lower, open the doors.
5. Pull the release lever located on the left side of the tonneau panel to release the number five bow.
6. Raise the number five bow to its vertical position.
7. Push the tonneau panel release switch rearward to release the tonneau panel.
8. Raise the tonneau panel to its vertical position.
9. Lower the number five bow.
NOTICE: Before lowering the folding top, make sure nothing is in the top well, or damage to the folding top and bows could result.
10. Pull each latching handle down and rotate each latch handle outboard to release the folding top from the windshield header.
11. Grasp the front edge of the number one bow; lift upward and rearward.
NOTICE: Avoid jamming the folding top bows against one another or damage to the folding top and bows could result.
12. Slowly bring the folding top rearward until it is all the way down and return the top latch handles to the closed and stowed position.
13. Lower and latch the tonneau panel.
14. Make sure the tonneau panel is latched securely by gently lifting up on both forward ends of the tonneau panel.
NOTICE: Do not sit or place excessive weight on the tonneau panel when the folding top is down, or damage to the tonneau panel could result.
Raising Top
CAUTION:
The vehicle must be parked on a level surface with the deck lid closed before lowering or raising the folding top or tonneau, or damage to the folding top or tonneau and possible personal injury could result.
1. Set the parking brake firmly.
2. Shift the automatic transmission to "P" (park) or the manual trans- mission to "NEUTRAL."
3. Turn the ignition to "RUN" position.
4. Lower the side windows. If battery is discharged and windows won't lower, open the doors.
5. Push the tonneau panel release switch rearward to release the tonneau panel.
6. Raise the tonneau panel to its vertical position.
NOTICE: Do not sit or place excessive weight on the folding top when it is up, or damage to the folding top could result.
7. Grasp the number one bow, lift and slowly raise the folding top to the header.
8. Continue to raise the folding top until it is against the windshield header.
9. Press downward until the guide pins drop into the windshield header.
10. While holding the folding top in place, rotate each latch handle for- ward, securing the folding top to the windshield header and push each handle up to its stowed position.
11. Raise the number five bow to its vertical position.
12. Lower and latch the tonneau panel.
13. Make sure the tonneau panel is latched securely by firmly but gently lifting up on both forward ends of the tonneau panel.
14. Lower the number five bow and align the pin on number five bow into the hole in the tonneau panel. Push downward until pin engages into latch.
ADJUSTMENTS
The folding top linkage includes the number one bow, side roof rails, hinges, connecting links and bows. The top linkage is attached to the body at the rear quarter area by a stationary main pivot bracket. The folding top locks to the windshield header with latches. When the folding top framework does not work correctly, the problem is usually a damaged or misaligned linkage.
For the folding top to work properly, all the folding top parts must be aligned accurately. If damage has occurred. forcing the pivot points out of alignment, it will be difficult to reset the links to the correct dimen- sions by visually realigning them. If the alignment can- not be corrected, the entire subassembly where the affected linkage is, must be replaced. If a pivot bolt or link is broken, it must be replaced.
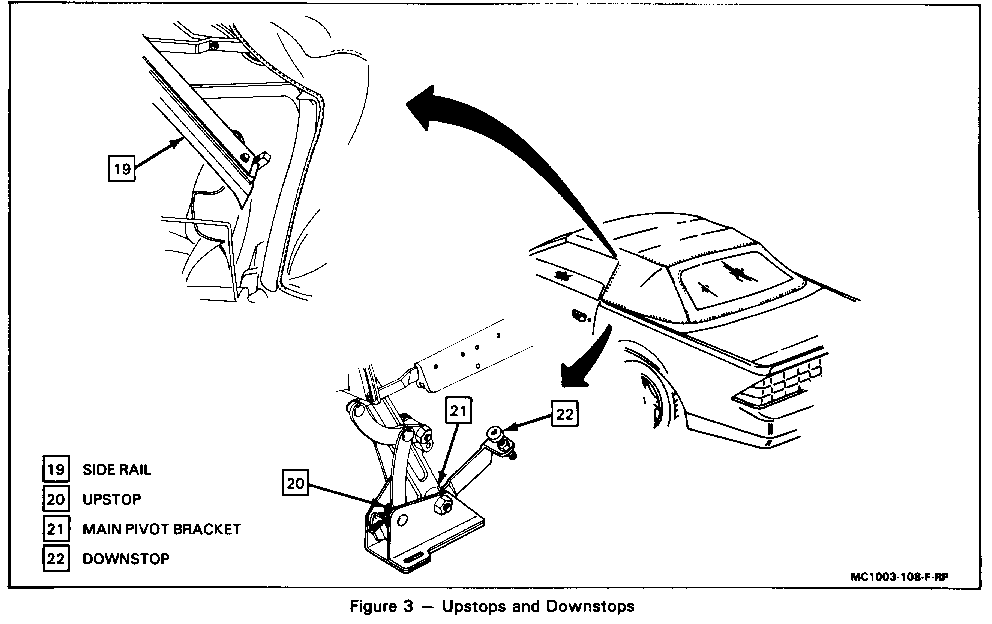
Upstops
Figure 3
The upstops (20) can be adjusted for proper alignment between the top latch guide pins to the windshield header receivers.
Adjust
- Upstops.
- Lower folding top. Refer to "Lowering Top" in this section.
- Loosen upstop jam nuts and turn upstops (20) clockwise.
- Raise and latch the folding top to windshield header.
- Raise number five bow to full vertical position.
- Turn upstops (20) counterclockwise until they contact the folding top linkage.
- Unlatch and lower folding top.
- Tighten upstop jam nuts while holding upstops (20) in position.
- Raise folding top. Refer to "Raising Top" in this section.
Inspect
Alignment of top latch guide pins to the windshield header receivers.
Downstops
Figure 3
The downstops (22) can be adjusted for proper clearance between the rear rail and number four bow when the top is lowered completely.
Adjust
- Downstops (22).
- Raise folding top. Refer to "Raising Top" in this section.
- Loosen downstop jam nuts and adjust downstops (22) as required.
- Tighten downstop jam nuts while holding downstops (22) in position.
- Lower folding top. Refer to "Lowering Top" in this section.
Inspect
- Clearance between the rear rail and the number four bow.
Watertest and Waterleak Repair
For watertest and general waterleak repair procedures, refer to GENERAL BODY SERVICE PROCEDURES (SEC. 10-1) in Service Manual. To replace a leaking weatherstrip seal, refer to "Seals and Retainers" in this section.
FOLDING TOP COVER
Figure 4
[(- -)] Remove or Disconnect ----------------------------
1. Side rail seals and retainers. Refer to "Side Rail Seal and Retainer" in this section.
2. Main pillar seals and retainers. Refer to "Main Pillar Seal and Retainer" in this section.
3. Number one bow garnish molding and retainer. Refer to "Number One Bow Garnish Molding" in this section.
4. Top cover (24) from number one bow adhesive bond and move back to vertical position.
To help loosen top cover (24), apply heat with a heat gun held 25 mm (1 inch) from the adhesive and rotate in a circular motion.
5. Cable screws (31).
6. Headliner from number two and three bows. Refer to "Folding Headliner" in this section. (It is not necessary to remove headliner from number one bow with top folded enough to allow access to retainer screws.)
7. Screws (25 and 27) from underside of number two and number three bow top cover retainers (23 and 26).
8. Number two and number three bow top cover retainers (23 and 26) from pockets in top in top cover (24).
9. Outer quarter flaps (30) separated by seam from main pillar adhesive bond, pulling outer quarter flap (30) from front side of main pillar rail.
- To help loosen quarter flaps (30), apply heat with a heat gun held 25 mm (1 inch) from the adhesive and rotate in a circular motion.
10. Side retention cables (33) from listing pockets.
11. Screws (37).
12. Elastic straps (35), folding top from stack rearward to a number three bow.
13. Number five bow seal from number five bow. Refer to "Number Five Bow Seal" in this section.
14. Black cover rivets (39) from number five bow (29), using a 1/8-inch drill bit.
15. Top cover (24) from number five bow adhesive bond.
- To help loosen top cover (24), apply heat with a heat gun held 25 mm (1 inch) from the adhesive and rotate in a circular motion.
16. Top cover (24) from vehicle.
[-) (-] Install or Connect --------------------------
Use Hughes part number HC-4183, 3M part number 8046 or equivalent adhesive on cover attaching surfaces requiring adhesive.
1. New top cover (24) to vehicle.
2. Side retention cables (33) through listing pockets.
- Check cable ends for proper locations.
- Square top cover (24) to top stack frame; check for evenness of quarter flap positions to main pillar rail.
- Fold top cover (24) to windshield header.
3. Top cover (24) to number five bow (29) using adhesive on surfaces of both.
- Raise number five bow (29) to full vertical position.
Important
---------
- Attach outer flap to number five bow (29) applying adhesive to inside of outer flap and number five bow (29). Glue one-half of top cover (24) to number five bow (29) first, checking for evenness by lowering number five bow (29). Length of material overhanging edges should be uniform. Continue pressing surface of flap until it adheres. Repeat procedure if necessary, until both sides are done evenly.
- Trim excess fabric from number five bow (29) evenly at seal channel to allow attachment of number five bow seal (36) later.
4. New 1/8-inch by 3/16-inch black aluminum cover rivets (39).
5. Cable screws (31).
- Lower and latch tonneau cover.
- Lower and latch number five bow (29).
- Raise number one bow (34) off of header.
6. Number five bow seal. Refer to "Number Five Bow Seal" in this section.
7. Elastic straps (35) inside of number five bow seal (36) to link arms.
8. Screws (37).
9. Quarter flaps (30) separated by seam to main pillar rails.
- Lower number five bow (29).
- Fold inner quarter flaps to inside of main pillar rails.
- Fold outer quarter flaps around outside of main pillar rails to forward edge using adhesive on flaps and rails.
[!] Important -------------
- Attach quarter flaps (30) to main pillar rails applying adhesive to inside of outer flap and inside forward surfaces of main pillar rail. Continue pressing surfaces of quarter flaps (30) until they adhere. Seams must be aligned with forward edge of rail evenly on both rails. Trim excess material after using adhesive to join to center channel edge.
10. Number two and number three bow top cover retainers (23 and 26) to top cover listing pockets.
- Raise number five bow (29).
- Raise tonneau cover and lower number five bow (29).
- Slide the number two and number three bow top cover retainers (23 and 26) into pockets, if not already in place, and align screw holes.
11. Screws (25 and 27) to underside of number two and number three bows.
12. Headliner to number three and number two bows. Refer to "Folding Headliner" in this section.
13. Top cover (24) to number one bow (34).
- Latch top to windshield header and pull top cover (24) straight forward at seams over number one bow (34) to desired fullness.
- While maintaining tension on the top cover (24) over number one bow (34), make pencil mark on outer surface along forward edge of number one bow (34).
- Unlatch top from the windshield header and lower the top halfway.
- Pull top cover (24) 6 mm (1/4-inch) past reference mark over number one bow (34) and attach it to number on bow (34) by first attaching cover side flaps (38).
- Fold cover side flaps (38) around number one bow (34) using adhesive on both cover and bow surfaces.
- Fold top cover (24) over number one bow (34) along edge and over cover side flap (38) using adhesive on both cover and bow surfaces.
[!] Important -------------
- Attach top cover (24) to number one bow (34) starting at center, working toward each end to pull out wrinkles. Then lower and latch top to check for proper tension. If additional tension is needed, repeat step 14 and pull cover farther forward.
- Trim off excess material along number one bow (34).
14. Number one bow garnish molding and retainer. Refer to "Number One Bow Garnish Molding" in this section.
15. Main pillar seals and retainers. Refer to "Main Pillar Seal and Retainer" in this section.
16. Side rail seals and retainers. Refer to "Side Rail Seal and Retainer" in this section.
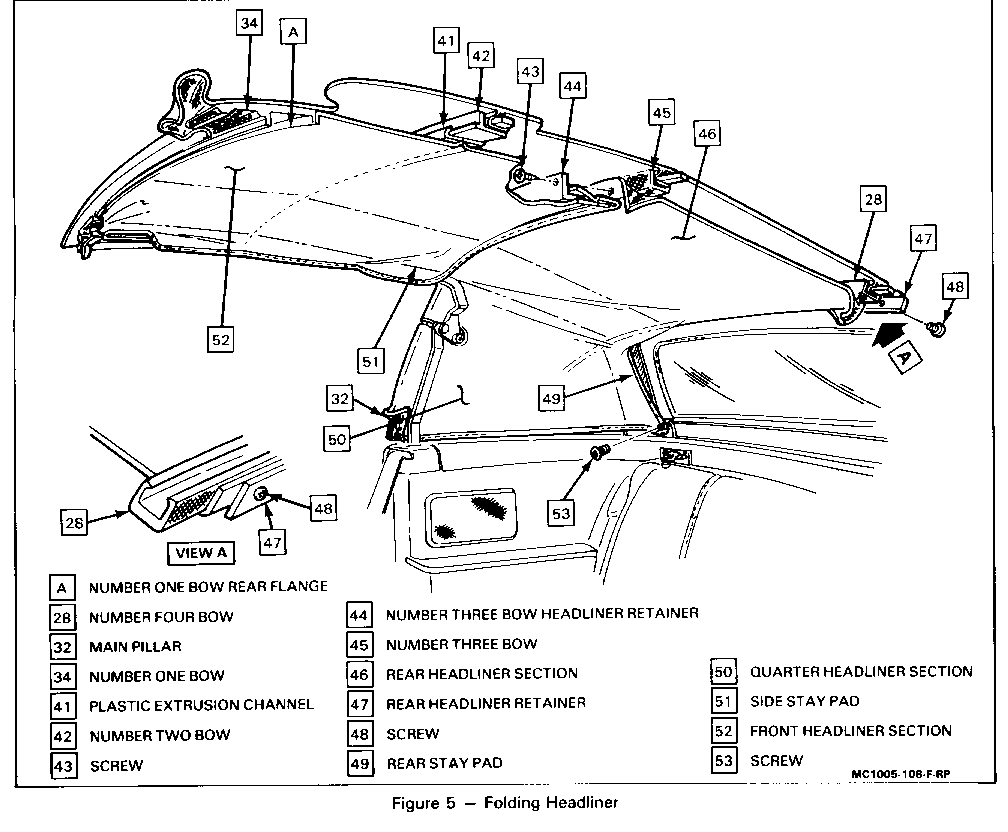
FOLDING HEADLINER
Figure 5
[(- -)] Remove or Disconnect ----------------------------
1. Main pillar seals and retainers. Refer to "Main Pillar Seal and Retainer" in this section.
2. Quarter headliner section (50) from main pillar (32) by breaking front- side adhesive bond.
- To help loosen quarter headliner section (50), apply heat with a heat gun held 25 mm (1 inch) from the adhesive and rotate in a circular
3. Number one bow garnish molding. Refer to "Number One Bow Garnish Molding" in this section.
4. Front headliner section (52) carefully from number one bow adhesive bond.
- To help loosen front headliner section (52), apply heat with a heat gun held 25 mm (I inch) from the adhesive and rotate in a circular motion.
NOTICE: Be careful not to damage or distort plastic extrusion panel during removal.
5. Front headliner section (52) from number two bow (42), carefully prying off plastic extrusion channel (41).
6. Screws (43).
7. Front headliner section (52) from number three bow (45).
- Front headliner section (52) attaches to front side of number three bow (45) while seam aligns with rear bottom edge.
8. Rear headliner section (46) from number three bow adhesive bond.
- To help loosen rear headliner section (46), apply heat with a heat gun held 25 mm (1 inch) from the adhesive and rotate in a circular motion. Carefully pull from front side of number three bow (45).
9. Quarter headliner section (50) from main pillar (32) through link arms to interior. Raise number five bow to full vertical position.
10. Screws (53) from rearmost hole of number five bow rear stay pad bracket.
11. Screws (48).
12. Rear headliner retainer (47) from rear side of number four bow (28). Raise number five bow to full vertical position.
13. Rear headliner section (46) from number four bow adhesive bond.
- To help loosen rear headliner section (46), apply heat with a heat gun held 25 mm (1 inch) from the adhesive and rotate in a circular motion.
14. Rear headliner section (46).
[-) (-] Install or Connect --------------------------
Use Hughes part number HC-4183, 3M part number 8046 or equivalent adhesive on headliner attaching surfaces.
- Raise number one bow (34) to header and latch.
- Raise number five bow to full vertical position.
1. Rear headliner section (46).
2. Screws (53) attaching corners of rear headliner section (46) with headliner inner side facing back, to rearmost holes of number five bow rear stay pad bracket.
- Lower tonneau cover and latch.
- Lower number five bow and latch.
3. Rear headliner section (46) to number four bow (28), inner side facing up, using adhesive.
[!] Important -------------
- Attach rear headliner section (46) to number four bow (28) starting at center, working toward each end forward to pull out wrinkles.
- Apply adhesive to length of rearside of number four bow (28) and portion of rear headliner section (46) being attached.
- Align screw holes.
4. Rear headliner retainer (47), aligning with screw holes on back side of number four bow (28).
5. Screws (48).
[!] Important -------------
- Avoid contact with backlite. If necessary unlatch and raise number five bow temporarily to make headliner adhesive attachment and screw in retainer. Immediately lower number five bow and latch when finished to continue procedure with proper tension on headliner.
6. Rear headliner section (46) to number three bow (45).
[!] Important -------------
- Attach headliner to bow starting at center, working toward each end forward to pull out wrinkles.
- Apply adhesive to length of front side of number three bow (45) and portion of rear headliner section (46) being attached.
- Align holes.
- Tuck quarter headliner section (50) between link arms and around main pillar front edge.
7. Front headliner section (52) to number three bow (45).
[!] Important -------------
Rear end of front headliner section (52) is designed so number three bow headliner retainer (44) overlaps and attaches to number three bow (45). Replacement front headliner sections (52) and number three bow headliner retainers (44) are supplied separately; number three bow headliner retainer (44) must be slid into pocket of front headliner section (52) with adhesive applied evenly prior to attachment to number three bow (45). Align number three bow headliner retainer (44) to front side screw holes seam and align to rear edge of number three bow (45) inner side facing up.
8. Screws (43).
9. Front headliner section (52) to number two bow (42).
- Align front of front headliner section (52) to number one bow screw holes and space plastic extrusion channel (41) length evenly along number two bow (42).
- Press one edge of open plastic extrusion channel (41) onto number two bow (42) and then attach remaining edge by pressing firmly.
[!] Important -------------
- Plastic extrusion channel (41) should snap on along full length of number two bow (42). If plastic extrusion channel (41) fails to snap on, use pliers without contacting front headliner section (52) or top cover material.
10. Front headliner section (52) to number one bow (34).
- Align screw holes.
[!] Important -------------
- Attach front headliner section (52) to number one bow (34) starting at center, working toward each end and pulling front headliner section (52) forward to pull out wrinkles.
- Apply adhesive to rear side of number one bow flange and portion of front headliner section (52) being attached.
- Attach front headliner section (52) to number one bow (34) at an even depth of material.
11. Quarter headliner section (50) to front side of main pillar (32), using adhesive on both.
- Press quarter headliner section (50) in evenly.
[!] Important -------------
- Top cover must be attached before main pillar retainers and seals are attached.
12. Main pillar rctainers and seals. Refer to "Main Pillar Seal and Retainer" in this section.
13. Number one bow garnish molding. Refer to "Number One Bow Garnish Molding" in this section.
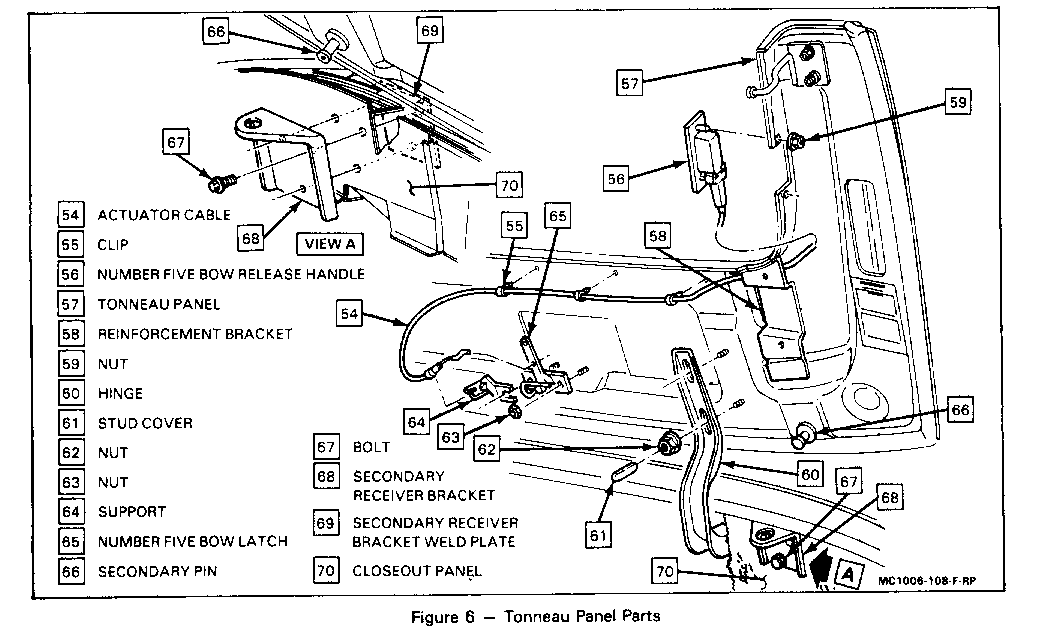
TONNEAU PANEL
The tonneau panel covers the top well when the folding top is raised. The number five bow attaches to, the number five bow latch on the tonneau panel. The tonneau panel latches at the sides and is held onto hinges with nuts.
Tonneau Panel Replacement
Figure 6
[(- -)] Remove or Disconnect -----------------------------
- Protect nearby body panels.
- Release and raise tonneau panel (57) to its vertical position.
CAUTION:
A helper must support the tonneau panel while the hinge nuts are being removed, or the tonneau panel may fall causing damage to the tonneau panel and body panels and possible personal injury.
- Support the tonneau panel (57).
1. Hinge nuts (62).
2. Tonneau panel (57) with a helper.
[-) (-] Install or Connect --------------------------
- Protect nearby body panels.
1. Tonneau panel (57) to hinges (60) with a helper.
CAUTION:
A helper must support the tonneau panei while the hinge nuts are being installed, or the tonneau panel may fall causing damage to the tonneau panel and body panels and possible personal injury.
2. Hinge nuts (62).
- Lower tonneau panel (57).
Adjust
- Tonneau panel (57) forward and rearward as necessary.
- Loosen hinge nuts (62).
- Slide tonneau panel (57) forward or rearward on hinge (60).
- Tighten hinge nuts (62).
Tonneau Panel Secondary Pin and Secondary Receiver Bracket Replacement
Figure 6
The tonneau panel (57) includes secondary pins (66) and secondary receiver brackets (68). They are used as a safety feature to prevent the tonneau panel (57) from moving out of position during an accident. The shoulder harness would not work properly during an accident if it did not include this feature and the tonneau panel (57) would not be prevented from sliding forward and causing possible injury to a passenger. When the tonneau panel is closed, the secondary pins (66) fit into the spaces provided by the holes in the secondary receiver brackets (68). There is one of each on both sides of the tonneau panel (57).
Secondary Pins
Figure 6
[(- -)] Remove or Disconnect ----------------------------
- Release and raise the number five bow.
- Release and raise the tonneau panel (57).
- Secondary pin (66) by unscrewing.
- NOTICE: A threaded washer is attached to the secondary pin. Do not remove it from the secondary pin. Replace the entire secondary pin assembly if either part is damaged.
[-) (-] Install or Connect --------------------------
NOTICE: See "Notice" on page 1 of this section.
[!] Important -------------
- All parts must be aligned and installed in proper functioning order. The tonneau panel must open and close properly and without interference. Torque all fasteners and adjustments to specifications and check repeatedly for proper latching, opening and shutting.
- Secondary pin (66).
Tighten
- Secondary pin (66) to 42 N-m (31 lb. ft.).
- Lower and latch the tonneau panel (57).
- Lower and latch the number five bow.
Secondary Receiver Brackets
Figure 6
[(- -)] Remove or Disconnect ----------------------------
- Open the deck lid and remove the one piece carpet section from the rear- side of the top well closeout panel (70) by pulling gently.
[!] Important -------------
- The weld plate contains weld nuts. Once the bolts are removed from the secondary receiver bracket side, the weld plate will become loose and fall freely from its position. Before removing, secure the weld plate with tape to its position at the rear side of the top well closeout panel for installation later. Make sure the bolt holes are aligned.
- Tape the secondary receiver bracket weld plate (69) in position securely.
- Close the deck lid.
- Release and raise the number five bow.
NOTICE: Do not attmept to raise the tonneau panel while the deck lid is raised or damage will result.
- Release and raise the tonneau panel (57).
1. Bolts (67).
2. Secondary receiver bracket (68) from secondary receiver bracket weld plate (69).
[-) (-] Install or Connect --------------------------
NOTICE: All parts must be aligned and installed in proper functioning order. The tonneau panel must open and close properly and without interfer- ence. Torque to the required specification on all fasteners and adjustments and check repeatedly for proper latching, opening and shutting.
NOTICE: See "Notice" on page 1 of this section.
1. Secondary receiver bracket (68).
NOTICE: The secondary receiver bracket weld plate should be aligned and attached securely to the bolts.
2. Bolts (67) through secondary receiver bracket (68) and closeout panel (70) and into weld nuts.
Tighten
- Bolts (67) to 29 N-m (21 lb. ft.).
- Lower and latch the tonneau panel (57).
- Lower and latch the number five bow.
- Raise deck lid.
Inspect
- Secondary receiver bracket weld plate (69).
- Remove tape.
3. Carpet section.
- Wedge into place.
NOTICE: Do not let carpet section become tangled in deck lid or tonneau panel moving parts.
- Close deck lid.
Number Five Bow Release Handle
Figure 6
[(- -)] Remove or Disconnect ----------------------------
- Release and raise number five bow to its vertical position.
- Release and raise tonneau panel (57) to its vertical position.
1. Actuator cable (54) from number five bow latch (65) and cable support (64).
NOTICE: Be careful not to damage clips (55) while removing.
2. Clips (55) supporting actuator cable (54).
3. Actuator cable (54) out through reinforcement bracket (58).
4. Nuts (59).
5. Number five bow release handle (56).
[-) (-] Install or Connect --------------------------
1. Number five bow release handle (56).
2. Nuts (59).
3. Actuator cable (54) through reinforcement bracket (58).
4. Clips (55) around actuator cable (54) and align to mounting holes.
5. Clips (55) with actuator cable (54).
- Press clips (55) in firmly.
6. Actuator cable (54) to cable support (64) and number five bow latch (65).
- Lower tonneau panel (57) and latch.
- Lower number five bow and latch.
Number Five Bow Latch
Figure 6
[(- -)] Remove or Disconnect ----------------------------
- Unlatch and raise number five bow to its vertical position.
- Unlatch and raise tonneau panel (57) to its vertical position.
1. Actuator cable (54) from number five bow latch (65) and support (64).
2. Latch nuts (63).
3. Number five bow latch (65).
[-) (-] Install or Connect --------------------------
1. Number five bow latch (65).
2. Latch nuts (63).
3. Actuator cable (54) to number five bow latch (65) and support (64).
- Lower and latch tonneau panel (57).
- Lower and latch number five bow.
Tonneau Panel Latch
Figure 7
[(- -)] Remove or Disconnect ----------------------------
1. Quarter trim panel. Refer to REAR QUARTERS (SEC. 10-7) in Service Manual.
2. Cable (76) from latch mount plate (73).
3. Latch screws (71).
4. Tonneau panel latch (72).
[-) (-] Install or Connect --------------------------
1. Tonneau panel latch (72).
2. Latch screws (71).
3. Cable (76) to latch mount plate (73).
4. Quarter trim panel. Refer to REAR QUARTERS (SEC. 10-7) in Service Manual.
Adjust
Tonneau panel latch (72) to give correct tonneau panel alignment at front corners.
- Loosen latch screws (71).
- Slide tonneau panel latch (72) up or down as necessary.
- Tighten latch screws (71).
Tonneau Release Solenoid
Figure 7
[(- -)] Remove or Disconnect ----------------------------
1. Quarter trim panel. Refer to REAR QUARTERS (SEC. 10-7) in Service Manual.
2. Cable (76) from latch mount plate (73).
3. Cable retainer screws (74).
4. Cable retainers (75) from cable (76).
5. Wire connector (79).
6. Solenoid screws (77).
7. Solenoid (78).
[-) (-] Install or Connect --------------------------
1. Solenoid (78).
2. Solenoid screws (77).
3. Cable retainers (75) to cable (76).
4. Cable retainer screws (74).
5. Cable (76) to latch mount plate (73).
6. Wire connector (79).
7. Quarter trim panel. Refer to REAR QUARTERS (SEC. 10-7) in Service Manual.
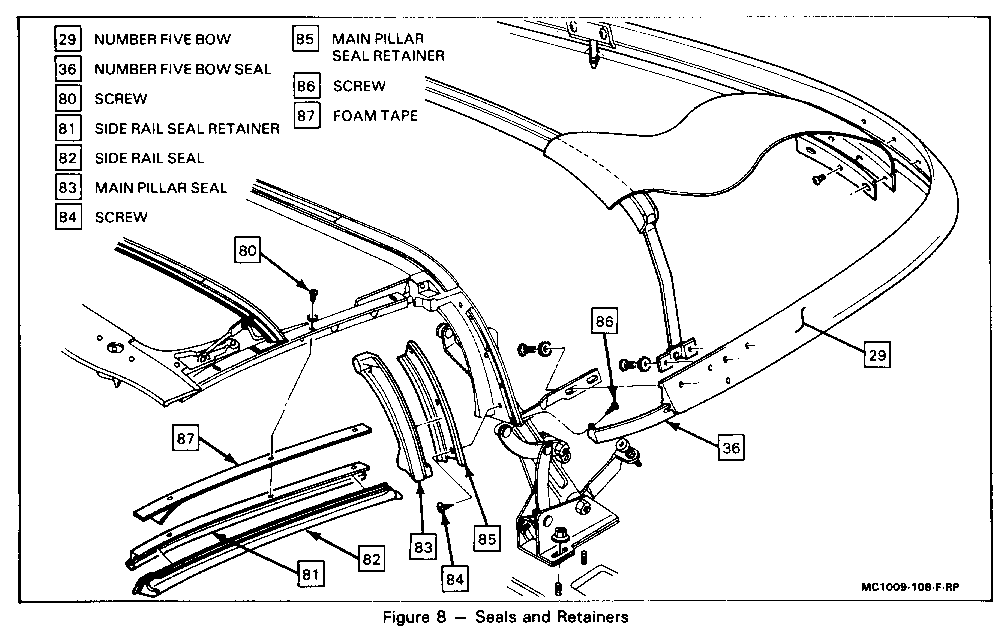
SEALS AND RETAINERS
The folding top seals are attached to the retainers with 3M or equivalent weatherstrip adhesive. The header "A" pillar seal and number five bow seal also have screws. The side rail seals and main pillar seal have removable retainers. The tonneau panel seal is attached to the tonneau panel with double-coated adhesive tape.
Header "A" Pillar Seal
Figure 2
[(- -)] Remove or Disconnect ----------------------------
1. Header inner trim garnish. Refer to "Header Inner Trim Garnish" in this section.
2. Screws (13).
3. Header "A" pillar seal (14).
- Grasp header "A" pillar seal (14) and pull gently while inserting a flat-bladed tool between the header "A" pillar seal (14) and the seal retainer.
- Use a suitable release agent or heat gun to help break the adhesive bond if necessary.
[-) (-] Install or Connect --------------------------
1. Header "A" pillar seal (14).
- Scrape excess adhesive from the seal retainer.
- Apply a continuous bead of black weatherstrip adhesive into the seal retainer.
- Press the header "A" pillar seal (14) into the seal retainer.
2. Screws (13).
3. Header inner trim garnish. Refer to "Header Inner Trim Garnish" in this section.
Side Rail Seal and Retainer
Figure 8
[(- -)] Remove or Disconnect ----------------------------
1. Side rail seal (82).
- Grasp side rail seal (82) and pull gently while inserting a flat-bladed tool between the side rail seal (82) and side rail seal retainer (81).
- Use a suitable release agent or a heat gun to help break the adhesive bond if necessary.
2. Side rail seal retainer screws (80).
3. Side rail seal retainer (81).
[-) (-] Install or Connect --------------------------
- Scrape excess adhesive from the side rail seal retainer (81).
1 . Side rail seal retainer foam tape (87), if necessary.
- Align with screw holes.
2. Side rail seal retainer (81).
3. Side rail seal retainer screws (80).
4. Weatherstrip adhesive to side rail seal retainer (81).
5. Side rail seal (82) into side rail seal retainer (81 using a flat-bladed tool.
Main Pillar Seal and Retainer
Figure 8
[(- -)] Remove or Disconnect ----------------------------
1. Main pillar seal (83).
- Grasp main pillar seal (83) and pull gently while inserting a flat-bladed tool between the main pillar seal (83) and the main pillar seal retainer (85).
- Use a suitable release agent or a heat gun to help break the adhesive bond if necessary.
2. Main pillar seal retainer screws (84).
3. Main pillar seal retainer (85).
[-) (-] Install or Connect --------------------------
- Scrape excessive adhesive from the main pillar seal retainer (85).
1. Main pillar seal retainer (85).
2. Main pillar seal retainer screws (84).
3. Black weatherstrip adhesive to main pillar seal retainer (85).
4. Main pillar seal (83) into main pillar seal retainer (85) using a flat-bladed tool.
Number Five Bow Seal
Figure 8
[(- -)] Remove or Disconnect ----------------------------
- Unlatch and raise number five bow (29) to its full vertical position.
- Unlatch and raise tonneau panel.
- Number five bow seal screws (86).
- Grasp number five bow seal (36) and pull gently while inserting a flat-bladed tool between the number five bow seal (36) and the number five bow (29).
- Use a suitable release agent or a heat gun to help break the adhesive bond if necessary.
[-) (-] Install or Connect --------------------------
- Scrape excessive adhesive from the number five bow (29).
1. Black weatherstrip adhesive to number five bow (29).
2. Number five bow seal (36) to number five bow (29) using a flat-bladed tool if necessary.
3. Number five bow seal screws (86).
- Lower and latch tonneau cover.
- Lower and latch number five bow (29).
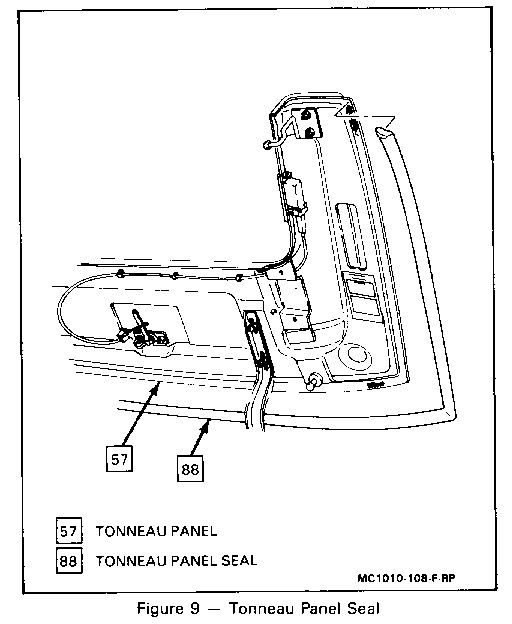
Tonneau Panel Seal
Figure 9
[(- -)] Remove or Disconnect ----------------------------
- Tonneau panel seal (88) from tonneau panel (57).
- Raise tonneau panel (57).
- Grasp tonneau panel seal (88) and gently pull to remove.
Clean
- Adhesive from tonneau panel (57).
1. Double-coated adhesive tape to the tonneau panel seal (88).
2. Tonneau panel seal (88) to tonneau panel (57).
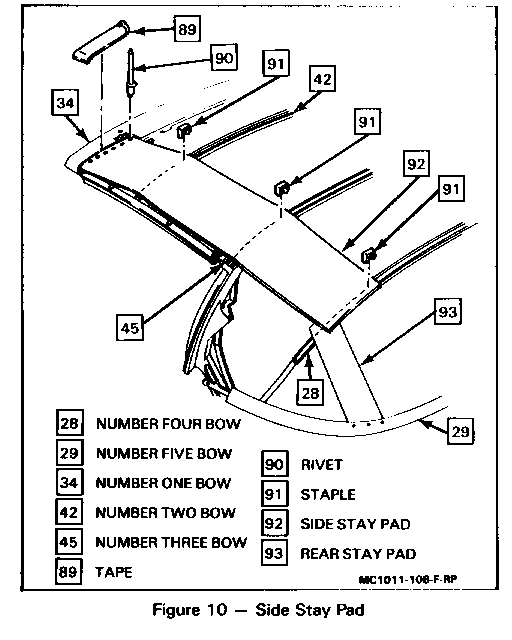
STAY PADS
The stay pads help keep the roof bows aligned. The stay pads are attached to the bows with aluminum rivets and stainless steel staples. The rear stay pad is attached to the number five bow with a bracket. The folding top cover must be removed from the number one bow before the side stay pads can be serviced. Use transfer marks to locate position of pads when reattaching or attaching new pads.
Side Stay Pad
Figure 10
[(- -)] Remove or Disconnect ----------------------------
1. Folding top cover from all except the number five bow. Refer to "Folding Top Cover" in this section.
2. Tape (89) from over rivets (90).
3. Rivets (90) from number one bow (34) using a 1/8-inch drill bit.
4. Staples (91) from bow tack strips.
- Not location and spacing of staples.
5. Side stay pad (92).
[!] Important -------------
Place the old side stay pad (92) on the new side stay pad (92) and mark the edges and holes of the old side stay pad (92) on the new side stay pad (92) for reference later.
[-) (-] Install or Connect --------------------------
1. Side stay pad (92) onto number four bow (28).
- Align side stay pad positions to transfer marks to assure proper tension and even spacing of side stay pads (92) to bows.
- Latch number one bow (34).
- Lower and latch tonneau cover.
- Lower number five bow 29 .
- Place side stay pad (92) on top of all bows.
- Align with rivet and staple positions.
2. Staples (91) to number four bow tack strip.
3. Side stay pad (92) to number one bow (34).
4. Rivets (90) to number one bow (34).
- Use 1/8-inch by 3/16-inch aluminum rivets (90) in original holes.
5. Tape (89) over rivets (90).
- Latch folding top to the windshield header.
- Latch number five bow (29) to tonneau panel.
6. Side stay pad (92) to number three and number two bows (45 and 42).
7. Staples (91) to number three bow tack strip connecting side stay pad (92).
8. Staples (91) to number two bow tack strip connecting side stay pad (92).
9. Folding top cover. Refer to "Folding Top Cover" in this section.
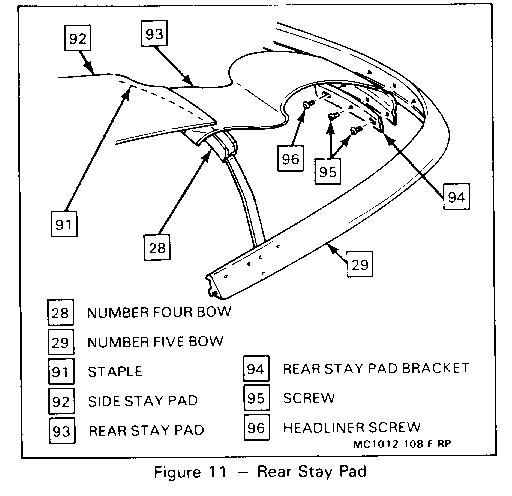
Rear Stay Pad
Figures 5 and 11
[(- -)] Remove or Disconnect ----------------------------
- Unlatch number five bow (29) and raise to its vertical position.
1. Screws (48) without contacting backlite.
2. Rear headliner retainer (47) from number four bow (28) without contacting backlite.
3. Rear headliner section (46) from number four bow adhesive bond without tearing rear headline section (46).
- To help loosen rear headliner section (46), apply heat with a heat gun held 25 mm (1 inch) from the adhesive and rotate in a circular motion.
4. Headliner screws (96).
5. Rear headliner section (46) from rear stay pad bracket (94). Move number four bow (28) rearward without contacting backlite.
6. Staples (91) from number four bow tack strip on side stay pad (92).
[!] Important -------------
- Mark the location of the side stay pad (92) on the number four bow (28).
7. Side stay pad (92) from number four bow (28).
8. Staples from number four bow tack strip on rear stay pad (93).
9. Rear stay pad screws (95) from rear stay pad bracket (94).
10. Rear stay pad (93) from rear stay pad bracket (94) and number four bow (28).
[!] Important -------------
- Place the old rear stay pad (93) on the new rear stay pad (93) and mark the edges and holes of the old rear stay pad (93) on the new rear stay pad (93) for reference later.
[-) (-] Install or Connect --------------------------
1. Rear stay pad (93) to rear stay pad bracket (94) and number four bow (28).
- Align pad positions to transfer marks to assure proper tension and even spacing of pad to bows.
2. Rear stay pad screws (95) to rear stay pad bracket (94).
3. Staples (91) to rear stay pad (93) on number four bow (28).
- Align to original holes and attach to tacking strip.
4. Side stay pad (92) to number four bow (28).
5. Staples (91) to side stay pad (92) on number four bow (28).
- Align to original holes and attach to tacking strip.
6. Rear headliner section (46) to rear stay pad bracke (94).
7. Headliner screws (96).
8. Rear headliner section (46) to number four bow (28).
- Align holes of rear headliner section (46) with screw holes.
- Apply adhesive to rear headliner section (46) and number four bow (28) and attach from center to sides evenly.
- Push number four bow (28) forward into original position.
- Lower number five bow (29) to check evenness of rear headliner section (46) alignment.
- Raise number five bow (29).
9. Rear headliner retainer (47) to number four bow (28) without contacting backlite.
10. Screws (48).
- Lower and latch tonneau cover.
- Lower and latch number five bow (29).
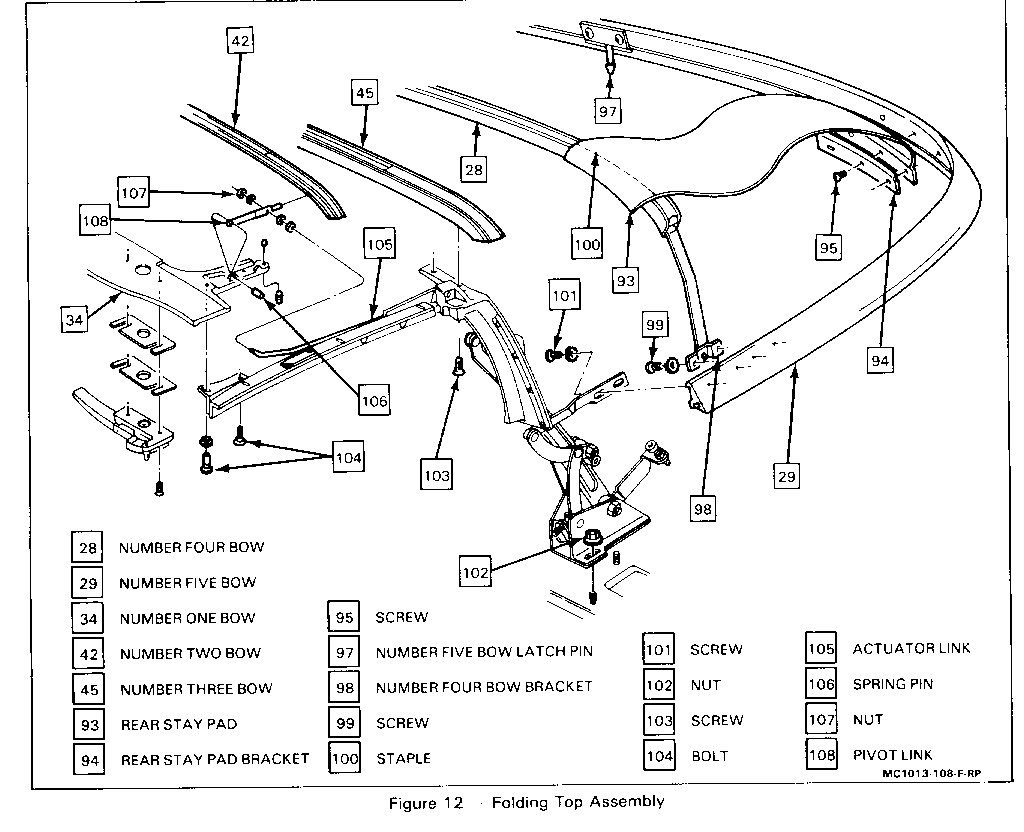
ROOF BOWS
The roof bows run from one outboard side of the vehicle to the other. The roof bows hold the folding top cover and keep its shape. The roof bows are attached to the side rails, main pillars and main pivot brackets with nuts and bolts.
Number One and Number Two Bow Assembly
Figures 4, 10 and 12
[(- -)] Remove or Disconnect ----------------------------
- Lower side windows.
1. Number one bow garnish molding. Refer to "Number One Bow Garnish Molding" in this section.
2. Top cover from number one bow. Refer to "Folding Top Cover" in this section.
3. Headliner with plastic extrusion attached from number one and number two bows. Refer to "Folding Headliner" in this section.
4. Top cover from number two bow. Refer to "Folding Top Cover" in this section.
5. Retention cable screws (31) of number one bow (34).
6. Side stay pads, marking their locations, from number one and number two bows. Refer to "Side Stay Pad" in this section.
7. Bolts (104).
8. Number one bow (34).
9. Nuts (107).
10. Number two bow actuator link (105) from number one bow pivot link (108).
11. Number one and number two bow assembly from top.
Disassemble
- Number one bow (34) from number two bow (42).
- Remove spring pins (106) of number one bow pivot links (108) by driving out from number one bow (34).
- Mark thread location on number one bow pivot links (108).
- Remove number one bow pivot links (108) from number two bow (42) by unscrewing the links.
Assemble
- Number one bow (34) to number two bow (42).
- Attach number two bow (42) to number one bow pivot links (108) by screwing the pivot links (108) into the number two bow (42).
- Screw in to depth of transfer mark.
- Drive spring pin (106) into number one bow pivot link attachment and connect to number one bow (34).
[-) (-] Install or Connect --------------------------
1. Number one bow pivot links (108) to number two bow actuator links (105).
- Attach number one and number two bow assembly to top stack.
2. Nuts (107).
3. Number one bow (34).
4. Bolts (104).
5. Side stay pads to original positions on number one and number two bows. Refer to "Side Stay Pad" in this section.
6. Retention cable screws (31) of number one bow (34), through and exiting listing pockets of top cover and attaching to underside of number one bow (34).
7. Top cover to number one and number two bows. Refer to "Folding Top Cover" in this section. Lower the number one bow (34) and latch.
8. Headliner with plastic extrusion attached to underside of number two bow and number one bow. Refer to "Folding Headliner" in this section.
9. Number one bow garnish molding. Refer to "Number One Bow Garnish Molding" in this section.
Number Three Bow Assembly
Figures 5, 10 and 12
[(- -)] Remove or Disconnect ----------------------------
- Unlatch number five bow (29) and raise to its vertical position.
- Unlatch and raise tonneau cover to its vertical position.
- Lower number five bow (29).
- Unlatch and raise number one bow (34).
- Fold top cover back to expose the front headliner section (52).
1. Headliner from number two and number three bows and main pillar. Refer to "Folding Headliner" in this section.
2. Top cover from number three bow. Refer to "Folding Top Cover" in this section.
3. Staples (91) of side stay pads (92) from number three bow tack strips.
4. Side stay pads (92) from number three bow (45).
- Mark location of side stay pads (92).
5. Number three bow screws (103).
6. Number three bow (45).
[-) (-] Install or Connect --------------------------
1. Number three bow (45).
2. Number three bow screws (103).
3. Side stay pads (92) to original positions on number three bow (45).
- Staples to number three bow tack strips.
4. Top cover to number three bow. Refer to "Folding Top Cover" in this section.
- Lower and latch number one bow (34).
- Raise number five bow (29).
- Lower and latch tonneau cover.
- Lower and latch number five bow (29).
5. Headliner to number two and number three bows and main pillar. Refer to "Folding Headliner" in this section.
Number Four Bow Assembly
Figure 12
[(- -)] Remove or Disconnect ----------------------------
1. Unlatch number five bow (29) and raise to its vertical position.
- NOTICE: Be careful not to scratch the backlite. Pull number four bow gently rearward for easier access.
2. Side stay pads, marking their locations, from number four bow. Refer to "Side Stay Pad" in this section.
3. Rear stay pads, marking their locations, from number four bow. Refer to "Rear Stay Pad" in this section.
4. Rear headliner section from number four bow. Refer to "Folding Headliner" in this section.
5. Screws (99) from number four bow (28).
6. Number four bow (28).
[-) (-] Install or Connect --------------------------
[!] Important -------------
- Without removing the top cover, the following order of procedures is the best method for installation.
- Raise number five bow (29).
1. Number four bow (28).
2. Screws (99) to number four bow (28).
3. Rear stay pads to original positions on number four bow. Refer to "Rear Stay Pad" in this section.
4. Side stay pads to original positions on number four bow. Refer to "Side Stay Pad" in this section.
[!] Important -------------
- Take care to position headliner in the correct place.
5. Rear headliner section to number four bow. Refer to "Folding Headliner" in this section.
- Lower and latch number five bow (29).
Number Five Bow Assembly
Figure 12
[(- -)] Remove or Disconnect ----------------------------
1. Number five bow seal. Refer to "Number Five Bow Seal" in this section.
2. Folding top cover from number five bow. Refer to "Folding Top Cover" in this section.
3. Refer to "Rear Stay Pad" in this section.
4. Number four bow screws (99).
5. Number five bow screws (101).
6. Number five bow (29).
[-) (-] Install or Connect --------------------------
1. Number five bow (29).
2. Number five bow screws (101).
Inspect
- Number five bow latch pin (97) to make sure number five bow latch pin (97) is aligned properly with number five bow latch.
Adjust
- Number five bow screws (101), if necessary, to align number five bow latch pin (97) and number five bow latch.
3. Number four bow screws (99).
4. Rear stay pads and brackets to number five bow. Refer to "Rear Stay Pad" in this section.
5. Folding top cover to number five bow. Refer to "Folding Top Cover" in this section.
6. Number five bow seal. Refer to "Number Five Bow Seal" in this section.
FOLDING TOP STACK
Figure 12
[(- -)] Remove or Disconnect ----------------------------
- Release and raise number five bow (29) to its vertical position.
- Release and raise tonneau panel to its vertical position.
1. Nuts (102).
- Unlatch folding top stack from windshield header.
2. Folding top assembly from vehicle with the aid of a helper.
[-) (-] Install or Connect --------------------------
NOTICE: See "Notice" on page 1 of this section.
1. Folding top stack assembly to vehicle with the aid of a helper.
- Latch folding top to windshield header.
2. Nuts (102).
Tighten
- Nuts (102) to 10 N-m (89 lb. in.).
- Lower and latch tonneau panel.
- Lower and latch number five bow (29).

General Motors bulletins are intended for use by professional technicians, not a "do-it-yourselfer". They are written to inform those technicians of conditions that may occur on some vehicles, or to provide information that could assist in the proper service of a vehicle. Properly trained technicians have the equipment, tools, safety instructions and know-how to do a job properly and safely. If a condition is described, do not assume that the bulletin applies to your vehicle, or that your vehicle will have that condition. See a General Motors dealer servicing your brand of General Motors vehicle for information on whether your vehicle may benefit from the information.
