T-TOP SEALING STRIPS- PARTS & PROCEDURE

SUBJECT: T-TOP SEALING STRIPS - AWNINGS (NEW PLASTIC REPLACEMENT PARTS, AND PROCEDURES)
VEHICLES AFFECTED: 1982-91 F-CARS
APPLTCATTON: 1991 (Prior to VIN Breakpoints Below) And Earlier F styles (1982-91) With T-Tops (CC 1 Option).
Chevrolet - ML177649 Pontiac - ML242070
1991 model F style vehicles equipped with removable twin lift off panels (CC1 option) built after the above VIN breakpoints will have a plastic sealing strip (commonly called an awning) on the panel.
These parts (GM # 10165498-99, right and left) may be used to service past model vehicles by using the following materials and procedure:
Materials Required:
- #320 or #400 Grit Sandpaper
- Dominion/American Sure Seal Adhesion Aids #XPPP or #SXPP
- 3M #08011,(or equivalent) adhesive
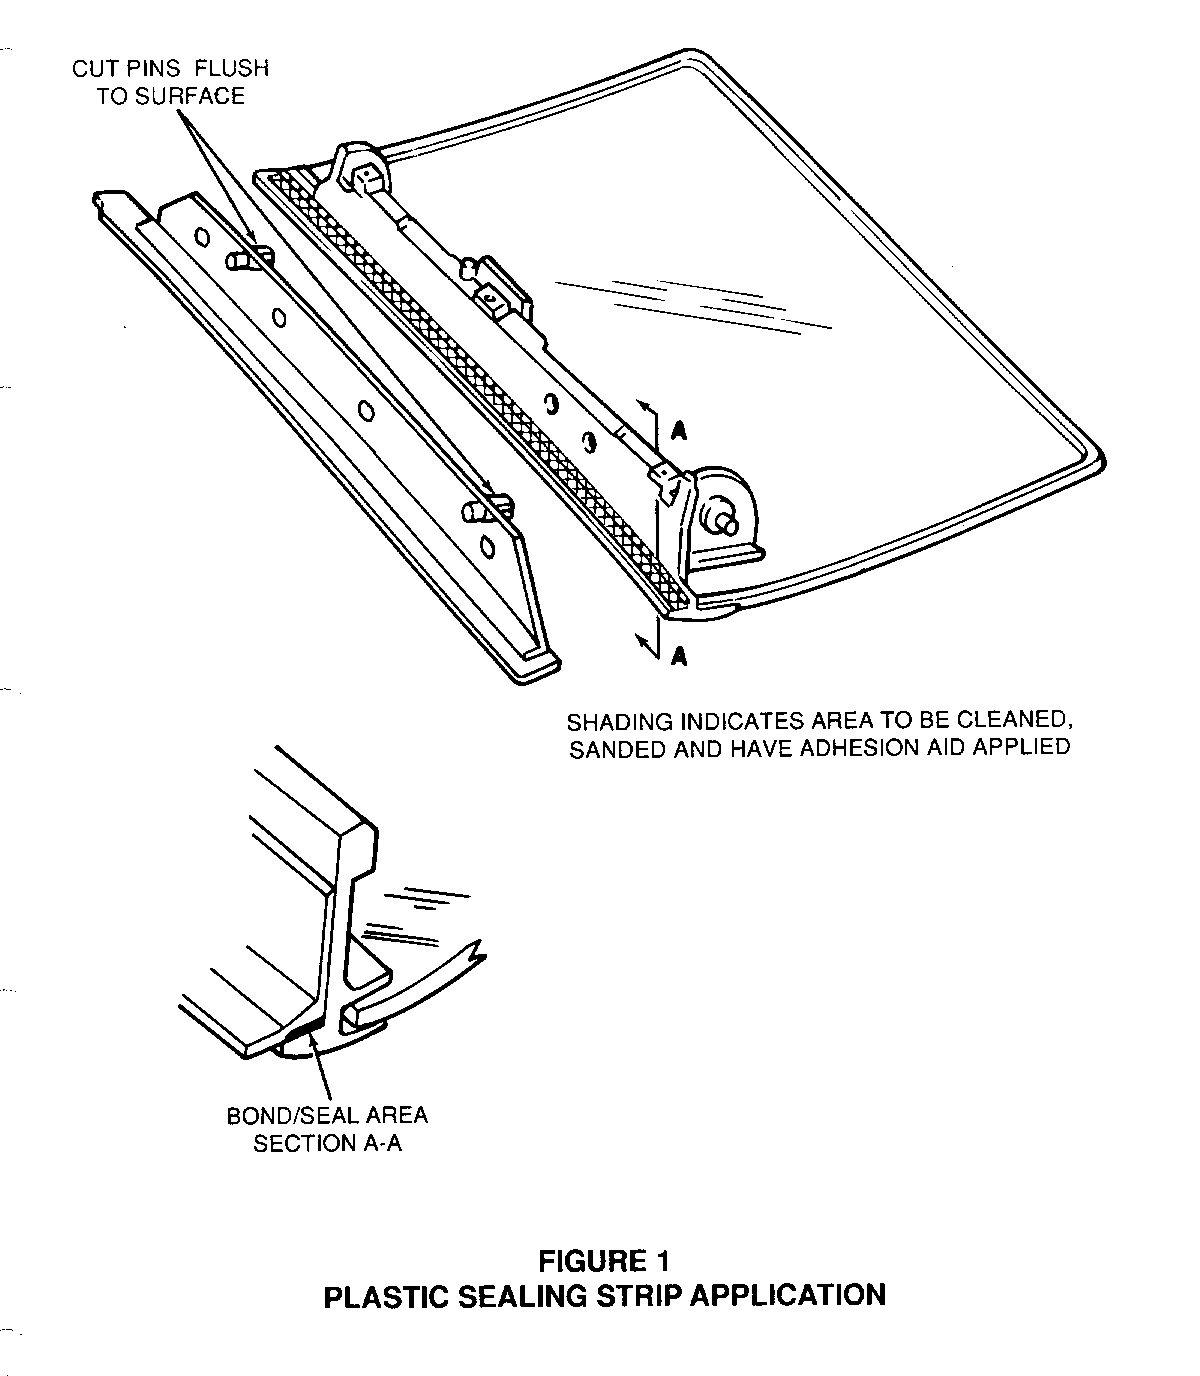
Procedure: Refer to Figure 1 ----------------------------
1. Remove the roof panel and place upside down on a clean work surface.
2. Remove the garnish moulding and handle.
3. Carefully remove the weatherstrip from the retainer, in order to prevent tearing of the part.
4. Remove the four retainer screws and the retainer.
5. Remove the original rubber sealing strip and discard.
6. Using adhesive cleaner, remove ALL traces of original butyl sealer from the plastic support panel.
7. Using #320 to #400 grit sandpaper, rough up the sealing surface of the plastic support panel and remove sanding dust with clean cloth or air.
8. Apply a light coating of Dominion/American Sure Seal #XPPP or #SXPP Adhesion Aid to the sealing surface and allow to dry 5 to 10 minutes.
9. Using a utility or razor knife, remove the two plastic locating pins from the new sealing strip. Cut the pin-s off flush to the surface.
10. Remove the release paper from the sealing tape, carefully centre the part on the panel and press into place over the entire length of the part.
11. Reinstall the weatherstrip retainer to the panel using the previous screw head marks as locators.
Note: It may be necessary to drill new holes for the retainer attaching screws if original holes are stripped.
12. Loosely install the handle to the panel and install the panel on the vehicle.
13. Apply a bead of 3M # 08011, or equivalent to the outboard edge of the retainer, install the weatherstrip to the retainer and position the butt joints for proper contact.
14. Remove the handle, install the garnish moulding and reinstall the handle.
Use the most applicable Labour Operation and Time from the Canadian Labour Time Guide,
General Motors bulletins are intended for use by professional technicians, not a "do-it-yourselfer". They are written to inform those technicians of conditions that may occur on some vehicles, or to provide information that could assist in the proper service of a vehicle. Properly trained technicians have the equipment, tools, safety instructions and know-how to do a job properly and safely. If a condition is described, do not assume that the bulletin applies to your vehicle, or that your vehicle will have that condition. See a General Motors dealer servicing your brand of General Motors vehicle for information on whether your vehicle may benefit from the information.
