SERVICE MANUAL UPDATE WINDSHIELD WIPER DIAGNOSIS

VEHICLES AFFECTED: 1989 W-CAR AND 1987-90 CHEVROLET L-CAR
Information has been developed to provide complete windshield wiper diagnosis in Section 8A for the following Service Manuals. Note that these pages affect both standard and Pulse Windshield Wiper Systems.
1989 W-CAR
Year Service Manual Pages ---- -------------- ----- 1989 Buick Regal 8A-91-9 through 8A-91-12
1989 Oldsmobile Cutlass Supreme 8A-91-9 through 8A-91-12
i989 Pontiac Grand Prix 8A-91-9 through 8A-91-12
1987-1990 L-Car
1987-1990 Chevrolet Corsica/Beretta 8A-90 and 8A-91
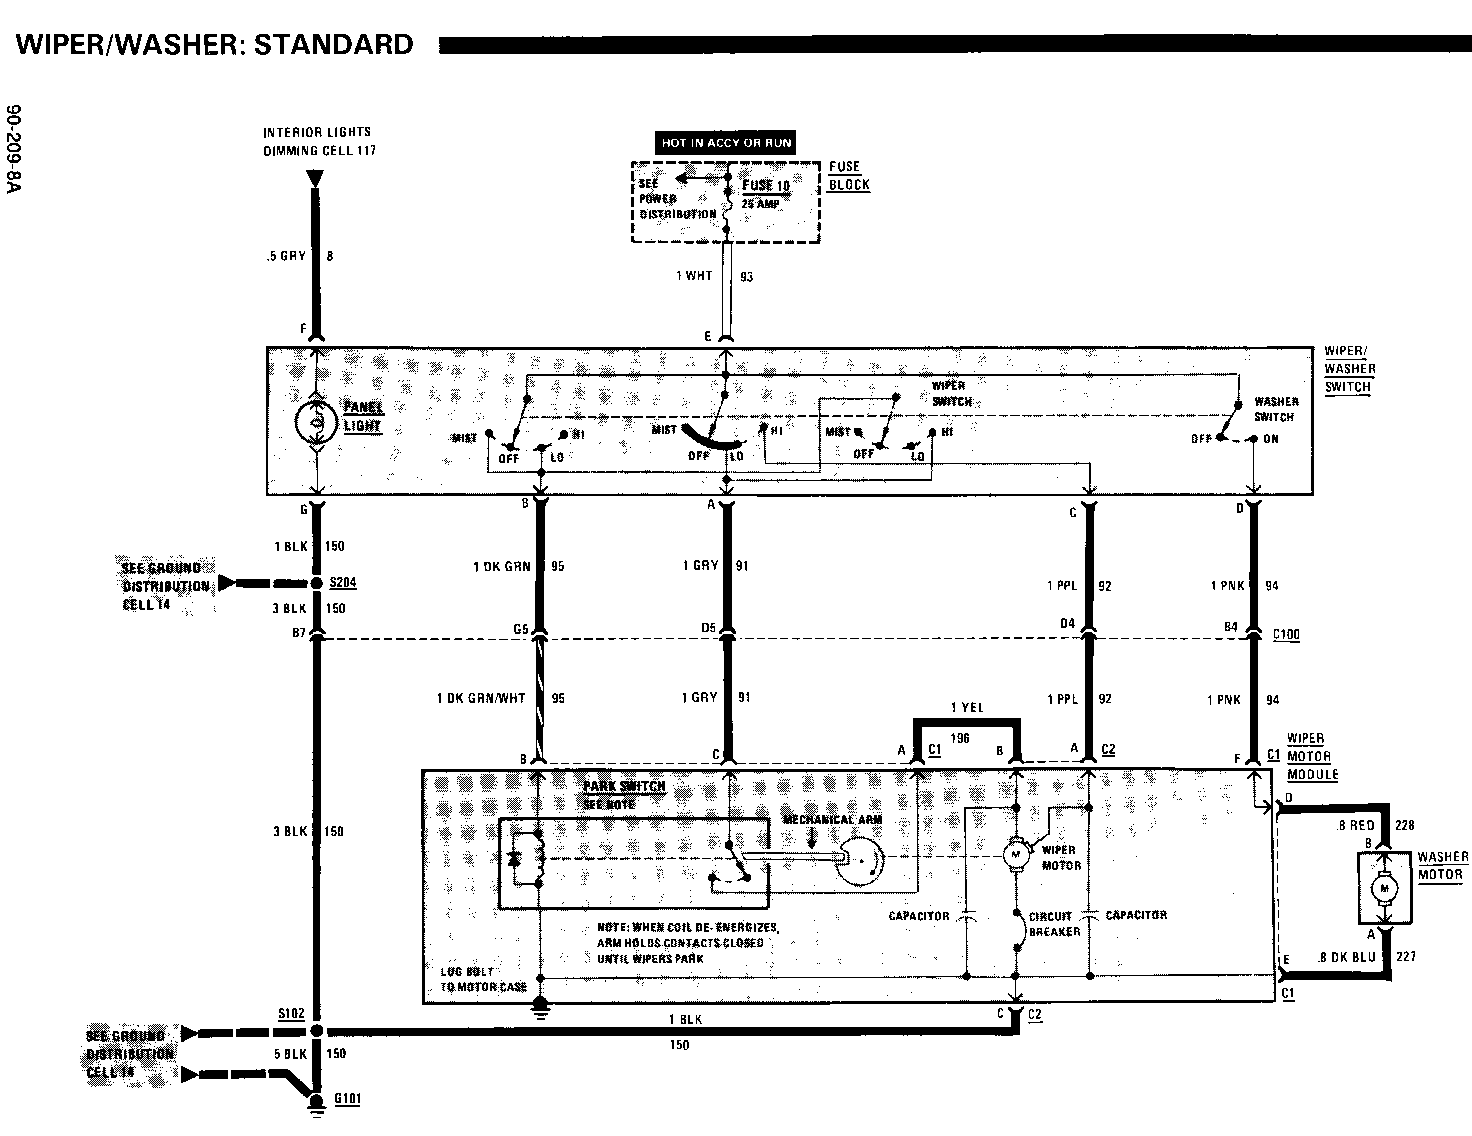
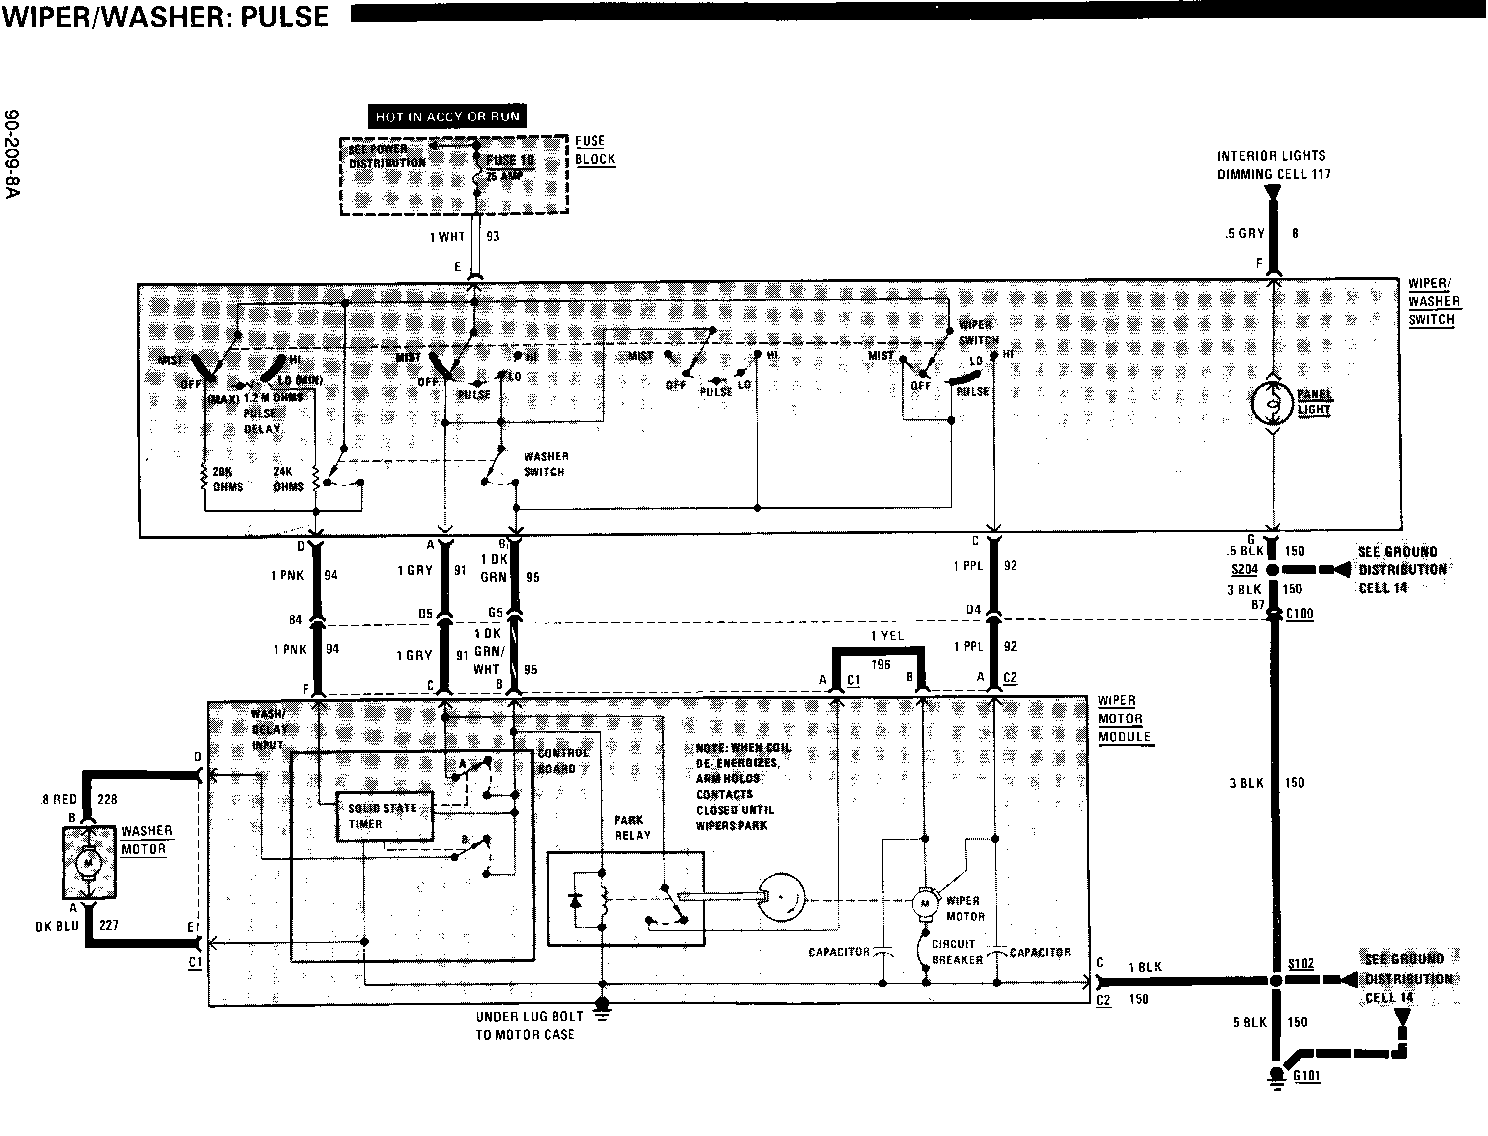
The Wiper/Washer schematics and diagnostics in Section 8A-90 and 8A-91 for both the standard and pulse wiper systems contain inaccurate information. Two wires were transposed on the schematics. Please use the following schematic and diagnostic pages when diagnosing an electrical concern with the wiper/washer systems in the 1987, 1988, 1989 and 1990 Chevrolet L Cars.
TROUBLESHOOTING HINTS
Try the following checks before doing the System Check.
1. Check Fuse 10 by visual inspection.
2. If the Wiper Motor runs, but the wiper blades do not, check the wiper linkage at the wiper crank arm.
3. Check that the Wiper Motor Module connectors are mated correctly.
4. If Wipers cycle in and out of PARK position in HI, and do not operate in LO or MIST, check YEL (196) wire for an open (see schematic).
5. If the Washer does not operate, check that:
-Washer reservoir is filled. -Hoses are not pinched or kinked. -Hoses are correctly attached. -Nozzles are not clogged.
6. If wipers work in LO, but n6t in MIST, replace the Wiper/Washer switch.
SYSTEM CHECK
Use the System Check Table as a guide to normal operation.
Refer to System Diagnosis for a list of symptoms and diagnostic steps.
SYSTEM CHECK TABLE
ACTION NORMAL OPERATION
Hold Washer Switch Washer sprays the ON for one or two windshield as long seconds as Washer Switch is held ON Wipers run at low speed and continue to run in LO after wash cycle is completed
Turn Wiper Switch Wipers return to to OFF PARK position
Turn the Wiper Wipers run Switch to LO continuously at low speed Turn the Wiper Wipers run Switch to HI continuously at high speed
Turn the Wiper Wipers return to the Switch to OFF PARK position at low speed
SYSTEM DIAGNOSIS
Do the tests listed for your symptom in the Symptom Table below.
Tests follow the Symptom Table.
SYMPTOM DO TEST
Wipers do not A: Wiper/Washer operate in any mode Switch Battery Voltage Test B: Wiper Motor Module Input Voltage Test
Wipers will not shut B: Wiper Motor off Module Input VoltageTest
Wipers run at low B: Wiper Motor speed only Module Input Voltage Test
Wipers cycle in B: Wiper Motor and out of park Module Input in HI or OFF Voltage Test
C: Wiper Motor Module Resistance Test
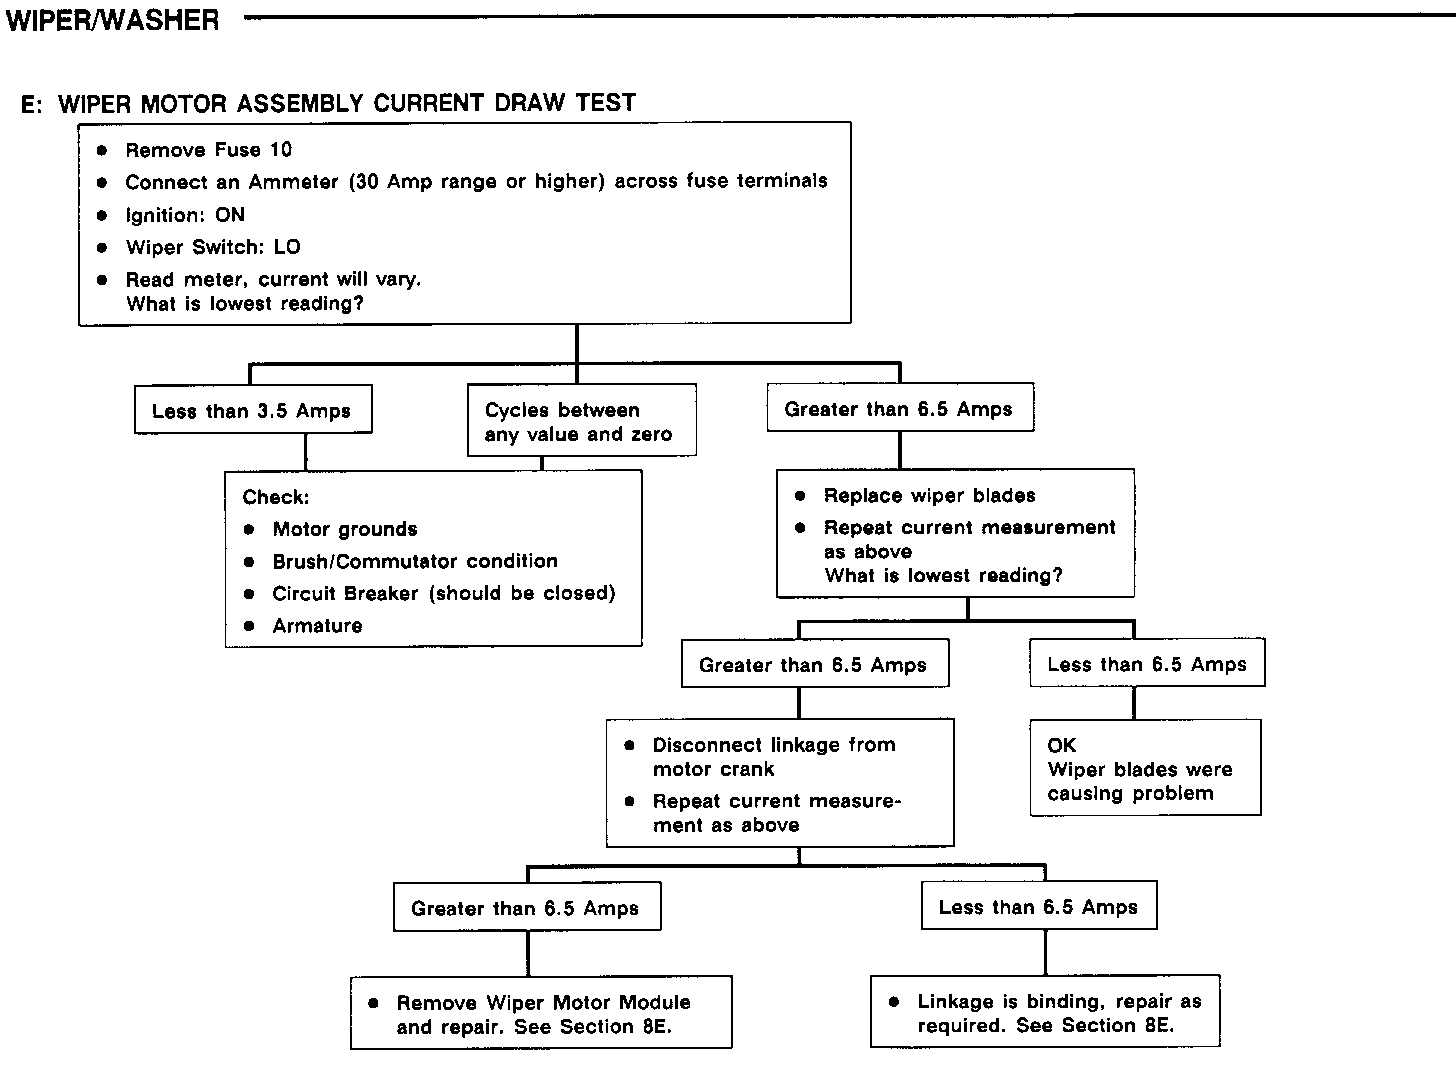
Washers do not D: Washer Motor operate properly Voltage Test Wipers operate E: Wiper Motor very slowly or Module intermittently Current Draw Test
Wipers do not F: Mechanical park Inspection
Wipers cycle in and Replace Park out of park in OFF Switch, referto and operate in LO Section 8E
A: WIPER SWITCH ASSEMBLY BATTERY VOLTAGE TEST
Measure: VOLTAGE
At: WIPER/WASHER SWITCH ASSEMBLY CONNECTOR (Disconnected)
Condition:
Ignition Switch: ACCY
Measure Correct For Diagnosis Between Voltage ------- ------- ------------- E (WHT) Battery See 1 & Ground
If the voltage is correct, do test B.
1. Check WHT (93) wire for an open. If wire is OK, check the Fuse 10.
B: WIPER MOTOR MODULE INPUT VOLTAGE TEST
Measure: VOLTAGE
At: WIPER MOTOR MODULE CONNECTORS C1 & C2 (Disconnected)
Conditions:
Ignition Switch: ACCY Wiper Switch: MIST, LO
Measure Correct For Between Voltage Diagnosis ------- ------- --------- C1/C (GRY) & Ground Battery See 1
C1/C (GRY) Battery See 2 C2/C (BLK)
C1/B (DK. GRN/WHT) & Battery See 3 Ground
C2/A (PPL) 0 volts See 4 & Ground
Wiper Switch: OFF
C1/C (GRY) & Ground Battery See 4
C1/B (DK GRN/WHT)& 0 volts See 4 Ground
C2/A (PPL) 0 volts See 4 & Ground
Wiper Switch: HI
C1/C (GRY) & Ground 0 volts See 4
C1/B (DK GRN/WHT) & 0 volts See 4 Ground
C2/A (PPL) Battery See 5 & Ground
If all voltages are correct and Wiper Motor does not turn, do test E.
1. Check GRY (91) wire for an open. If OK, replace the Wiper Switch Module.
2. Check BLK (150) wire for an open.
3. Check DK GRN/WHT (95) wire for an open. If OK, replace the Wiper/Washer Switch.
4. Replace the Wiper/Washer Switch.
5. Check PPL (92) wire for an open. If OK, replace the Wiper/Washer Switch.
C: WIPER MOTOR MODULE RESISTANCE TEST
Measure: RESISTANCE
AT: WIPER MOTOR MODULE CONNECTORS C1 & C2 (Disconnected)
Conditions:
Ignition Switch: OFF Wiper Switch: OFF
Measure Correct For Between Resistance Diagnosis -------- ----------- --------- C1/C (GRY) & C1/B Infinite See 1 (DK GRN/ WHT)
C2/B (YEL) Less than & 0.5 ohms See 2 C1/A(YEL)
Wiper Switch: HI, LO, MIST
C1/C (GRY) & C1/B Less than See 1 (DK GRN/ 0.5 ohms WHT)
If all measurements are correct, check for proper operation of Latch Arm and Drive Pawl.
1. Check GRY (91) and DK GRN/WHT (95) wires for shorts to ground, to each other or for opens.
2. Check YEL (196) wire for an open.
D: WASHER MOTOR VOLTAGE TEST (TABLE 1)
Measure: VOLTAGE
AT: WIPER MOTOR MODULE CONNECTORS C1 (Disconnected)
Conditions:
Ignition Switch: ACCY Washer Switch: OFF
Measure Correct For Between Voltage Diagnosis ------- ------- --------- F (PNK) 0 volts See 1 & Ground
Washer Switch: ON (hold)
F (PNK) Battery See 2 & Ground
If voltages are correct but Washer Motor does not run, go to Table 2.
1. Replace Wiper/Washer Switch.
2. Check PNK (94) wire for open. If wire is OK, replace Wiper/Washer Switch.
D: WASHER MOTOR VOLTAGE TEST (TABLE 2)
Measure: VOLTAGE
AT: WASHER MOTOR CONNECTOR (Disconnected)
Conditions:
Ignition Switch: ACCY Washer Switch: ON (hold)
Measure Correct For Between Voltage Diagnosis ------- -------- ---------- B (RED) & Battery See 1 A (DK BLU)
If both voltages are correct, replace the Washer Motor. See Section 8E for procedure.
1. Repair open in RED (228) or DK BLU (227) wire or internal wiring of Wiper Motor Module.
F. MECHANICAL INSPECTION
Remove Wiper Motor cover. Turn Wiper Switch to RUN. Observe spring loaded Latch Arm and Drive Pawl which rotates with big gear. Turn Wiper Switch to OFF. Latch Arm should spring out and catch Drive Pawl to shift to Park. (See 8E for view.)
If Latch Arm doesn't spring out, replace the Park Switch (See 8E).
If Latch Arm does spring out, check for a bent Pawl or shaft endplay. See 8E for repair procedure.
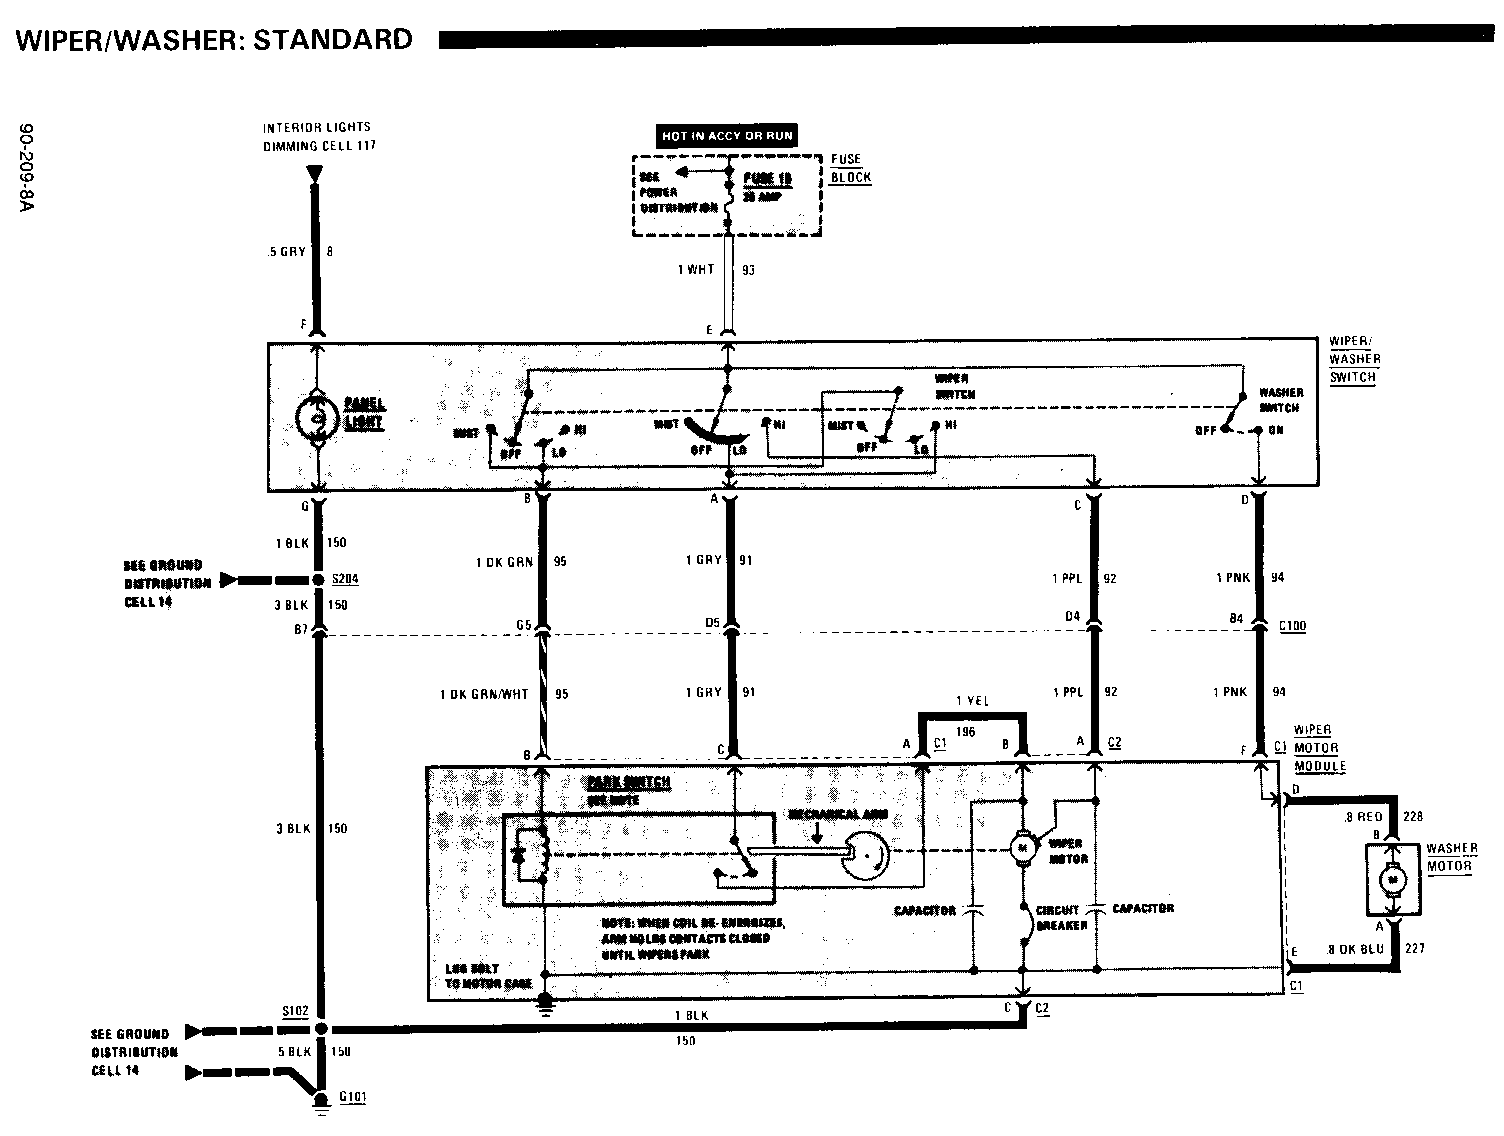
CIRCUIT OPERATION
Wiper
When the Wiper Switch is in LO, battery voltage is applied to the Park Switch coil through the DK GRN and DK GRN/WHT wires and to the Park Switch contacts through the GRY wire. The Park Switch closes its contacts, which supplies battery voltage to the Wiper Motor through the YEL (196) wire. The motor operates at low speed.
When the Wiper Switch is turned to the OFF position, the Park Switch coil is de-energized. This causes the mechanism to shift the Wipers toward the depressed Park position. When the depressed Park position is reached, the Park Switch opens the motor circuit, stopping the Wipers.
With the Wiper Switch in HI, battery voltage is applied directly to the Wiper Motor, at terminal A, without passing through the Park Switch contacts. Terminal A is connected to a separate Wiper Motor brush for high speed operation. The Park Switch coil remains energized in the HI position because of the voltage that is present at the low speed Wiper Motor brush when voltage is applied to the high speed brush. The current path from the low speed brush to the Park Switch coil is completed through the Wiper Switch Module.
The Wiper Motor is protected by a circuit breaker. The circuit breaker opens if the Wipers are blocked (by ice on the windshield, for example). The circuit breaker resets automatically when it cools.
Washer
The Washer Motor is energized whenever the Washer Switch is pressed and runs as long as the Washer Switch is closed. Battery voltage is applied through the Washer Switch and the PNK wire to the Washer Motor.
Pressing the Washer Switch will also move the Wiper Switch to the LO position to start the Wipers. The Wipers must be turned off manually after the wash cycle.
Mist
When the Wiper/Washer Switch is moved to the MIST position and released, the wipers make one sweep at low speed and return to park. Circuit operation is the same as that of low speed.
TROUBLESHOOTING HINTS
Try the following checks before doing the System Check.
1. Check the Fuse 10 by visual inspection.
2. Check that the Wiper Motor Module connectors are mated correctly.
3. If Wipers cycle in and out of Park Position in HI, and do not operate in LO, MIST or PULSE, check YEL (196) wire for an open (see schematic).
4. If the Wiper Motor runs but the wiper blades do not, check the wiper linkage at the wiper crank arm.
5. If the Washer does not operate, check that:
-Washer reservoir is filled. -Hoses are not pinched or kinked. -Hoses are correctly attached. -Nozzles are not clogged.
6. If Wipers work in LO, but not in MIST, replace the Wiper/Washer Switch.
SYSTEM CHECK
Use the System Check Table as a guide to normal operation.
Refer to System Diagnosis for a list of symptoms and diagnostic steps.
SYSTEM CHECK TABLE ACTION NORMAL OPERATION
Ignition in ACCY or Washer sprays the RUN, hold Washer windshield and Switch for less than continues to spray 1 second for 2 1/2 seconds after switch is released
Wipers run at low speed and continue for approximately six seconds after spray cycle is completed, then return to PARK
Turn Wiper Switch Wipers make one to PULSE complete stroke, (Delay Mode) then pause for 0 to 25 seconds before making the next stroke The delay time is adjusted by turning the Wiper Switch through the delay range
With Wiper Switch Washer sprays the in PULSE, push windshield as long Washer Switch to as the Washer ON for one or two Switch is held ON seconds Wipers run at low speed during spray period and continue for approximately six seconds after the spray cycle Wipers return to pulse mode
Turn Wiper Switch Wipers run to LO continuously at low speed Turn Wiper Switch Wipers run at a to HI faster speed
Turn Wiper Switch Wipers return to the to OFF PARK position at low speed
SYSTEM DIAGNOSIS
Do the tests listed for your symptom in the Symptom Table below.
Tests follow the Symptom Table
SYMPTOM DO TEST
Wipers do not A: Wiper/Washer operate in any mode Switch Battery Voltage Test B: Wiper Motor Module Input Voltage Test E: Wiper Motor Module Current Draw Test No delay in PULSE, B: Wiper Motor mode or PULSE Module Input mode does not Voltage Test operate correctly D: Wiper/Washer Pulse Control Resistance Test
Wipers will not B: Wiper Motor shut off Module Input Voltage Test
Wipers run at low B: Wiper Motor speed only (no high Module Input speed) Voltage Test
Washer will not B: Wiper Motor operate or runs Module Input continuously Voltage Test G: Washer Motor Voltage Test Wipers cycle in and Replace Park Switch. out of park in OFF Refer to Section 8E and operate in LO Wipers cycle in and B: Wiper Motor out of park in HI Module Input Voltage Test C: Wiper Motor Module Resistance Test Wipers do not park F: Mechanical Inspection
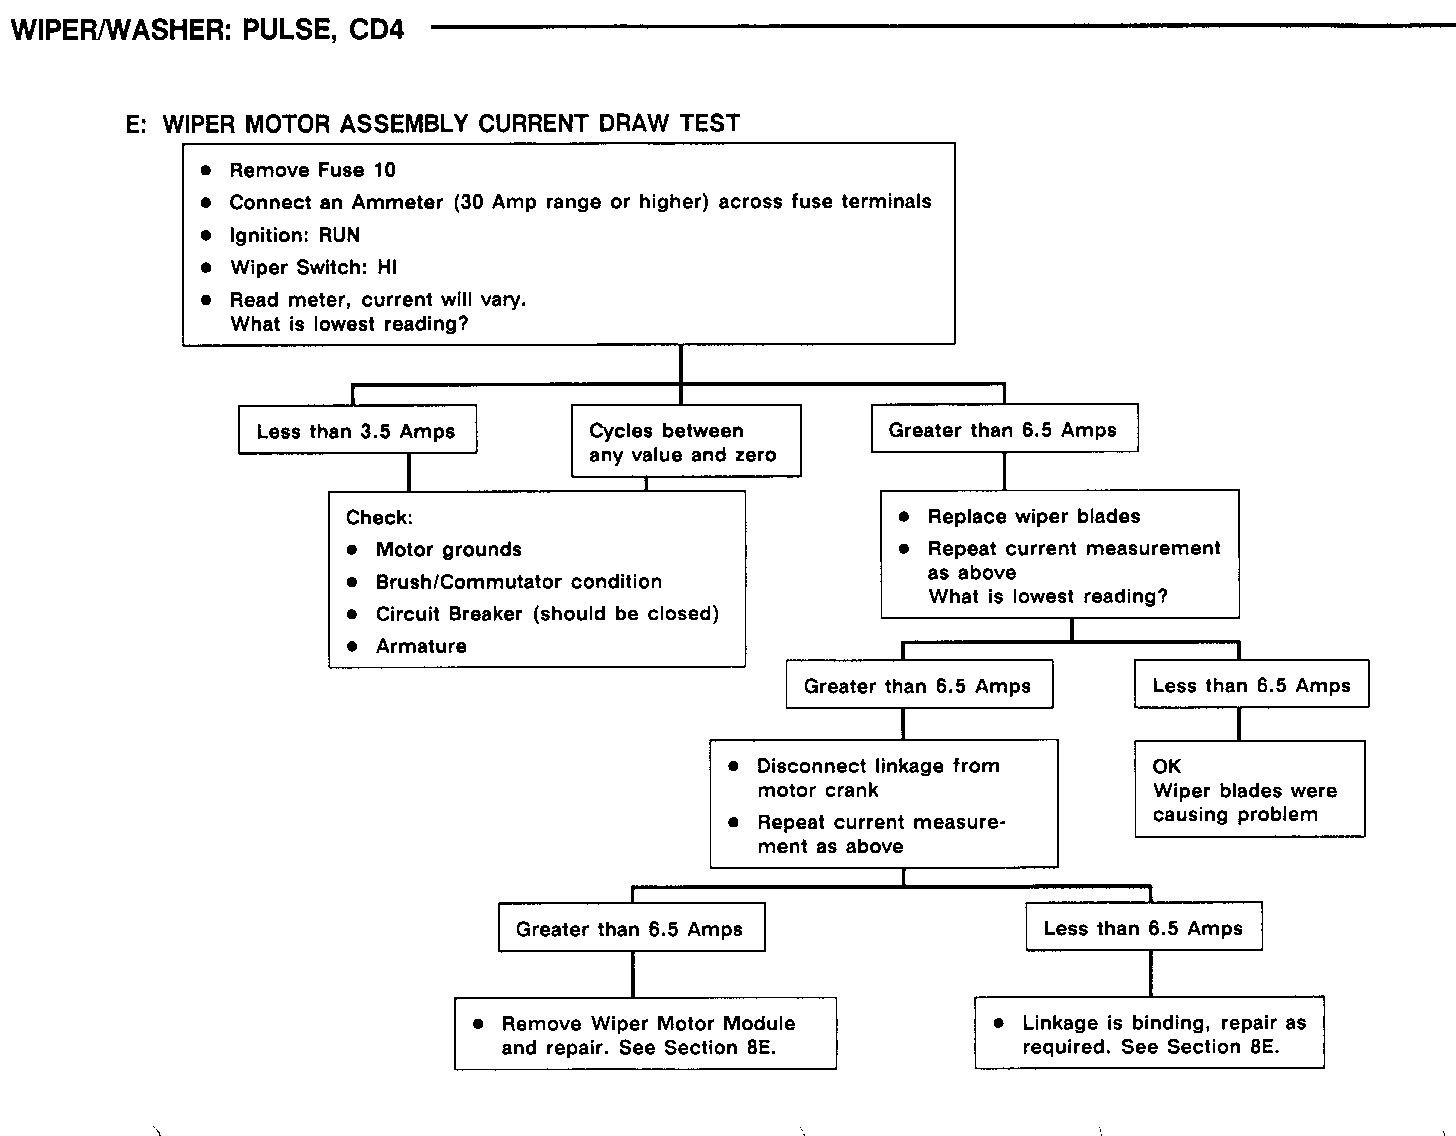
Wipers operate E: Wiper Motor very slowly or Module Current intermittently Draw Test
Wipers stay in delay Replace Cover during wash cycle Assembly. Refer to Section 8E.
A: WIPER /WASHER SWITCH BATTERY VOLTAGE TEST
Measure: VOLTAGE At: WIPER/WASHER SWITCH CONNECTOR (Disconnected)
Condition:
Ignition Switch: ACCY
Measure Correct For Diagnosis Between Voltage ------- ------- ------------- E (WHT) Battery See 1 & Ground
If the voltage is correct, return to Symptom Table.
1. Check Fuse 10 and WHT (93) wire for an open.
B: WIPER MOTOR MODULE INPUT VOLTAGE TEST
Measure: VOLTAGE
At: WIPER MOTOR MODULE CONNECTORS C1 & C2 (Disconnected)
Conditions:
Ignition Switch: ACCY Wiper Switch: OFF
Connect Correct For Between Voltage Diagnosis ------- ------- --------- C2/A (PPL) 0 volts See 1 & Ground
C1/C (GRY) Battery See 1 & Ground
C1/B (DK GRN/WHT) 0 volts See 2 & Ground
C1/F (PNK Battery See 2 & Ground
Wiper Switch: MIST
C2/A (PPL) 0 volts See 1 & Ground
CI/C (GRY) Battery See 2 & Ground
C1/B (DK GRN/WHT) Battery See 2 & Ground
C1/F (PNK) Battery See 2 & Ground
Wiper Switch: PULSE
C2/A (PPL) 0 volts See 1 & Ground
C1/C (GRY) & Ground 0 volts See 1
C1/B (DK GRN/WHT) Battery See 2 & Ground
C1/F (PNK) & Ground Battery See 2
Wiper Switch: LO
C2/A (PPL) 0 volts See & Ground C1/C (GRY) Battery See 2 & Ground
C1/B (DK GRN/WHT) Battery See 2 & Ground
C1/ (PNK) Battery See 2 & Ground
Wiper Switch: HI
C2/A (PPL) & Ground Battery See 2
C1/C (GRY) & Ground 0 volts See 2
C1/B (DK GRN/WHT) 0 volts See 1 & Ground
C1/F (PNK) & Ground Battery See 2
Wiper Switch: OFF & Washer Switch ON
C2/A (PPL) 0 volts See 1 & Ground
C1/C (GRY) & Ground Battery See 2
C1/B (DK GRN/WHT) Battery See 2 & Ground
C1/F(PNK) & Ground Battery See 2
If all measurements are correct and the Wiper Motor is on all the time, replace the Cover Assembly. Refer to Section 8E. Otherwise return to the Symptom Table.
1. Check associated wiring for a short to voltage. If wiring is good, replace the Wiper/Washer Switch.
2. Check associated wiring to the Wiper/Washer Switch for an open or short to ground. If wiring is good, replace the Wiper/Washer Switch.
C: WIPER MOTOR MODULE RESISTANCE TEST
Measure: RESISTANCE
AT: WIPER MOTOR MODULE CONNECTORS C1 & C2 (Disconnected)
Conditions:
Ignition Switch: OFF Wiper Switch: Hi Negative Battery Terminal (Disconnected)
Measure Correct For Between Resistance Diagnosis ------- ---------- ---------
C1/B (DK Less than GRN/WHT) & 0.5 ohms See 1 C1/C (GRY)
Wiper Switch: OFF,PULSE
C1/B (DK GRN/WHT) & Infinite See 1 C1/C (GRY)
C1/A (YEL) Less than & C2/B 0.5 ohms See 2 (YEL)
C1/A (YEL) Infinite See 3 & Ground
If all measurements are correct, check for proper operation of the Park Switch Latch Arm and the Drive Pawl.
1. Check DK GRN/WHT (95) and GRY (91) wires for a short to ground, to each other or opens. If wires are OK, replace Wiper/Washer Switch.
2. Repair open in YEL (196) wire.
3. Repair short to ground in YEL (196) wire.
D: PER/WASHER PULSE CONTROL RESISTANCE TEST
Measure: RESISTANCE
AT: WIPER MOTOR MODULE CONNECTORS C1 (Disconnected)
Conditions:
Ignition Switch: OFF Negative Battery Terminal (Disconnected) Wiper Switch: LO
Measure Correct For Between Resistance Diagnosis ------- ---------- --------- B (DK Approxi- GRN/WHT) mately 24 See 1 & F (PNK) K ohms
Move Wiper Switch through delay range to the maximum delay position
B (DK GRN/ Resistance in- See 1 WHT) & F creases to ap- (PNK) proximately 1.2 megohms
If both resistances are correct, but the pulse mode does not operate, replace Cover Assembly. See Section 8E for replacement procedures.
1. Check PNK (94) and DK GRN/WHT (95) wires for an open. If wires are OK, replace Wiper Switch Assembly.
F: MECHANICAL INSPECTION
1. Remove Wiper Motor Cover.
2. Reconnect motor without cover.
3. Turn Wiper Switch to LO.
4. Observe spring loaded Latch Arm and Drive Pawl which rotates with big gear.
5. Turn Wiper Switch to OFF.
Does Latch Arm spring out and catch Drive Pawl to shift to Park? (See 8E for view).
If Latch Arm doesn't spring out, replace the Park Switch (See 8E)
If Latch Arm doesn't spring out, check for a bent Pawl or shaft endplay. See 8E for re- pair procedures.
G: WASHER MOTOR VOLTAGE TEST
Measure: VOLTAGE
AT: WASHER MOTOR CONNECTOR (Disconnected)
Conditions:
Ignition Switch: ACCY Washer Switch: ON (hold)
Measure Correct For Between Voltage Diagnosis ------- ------- --------- B (RED) & Battery See 1 A (DK BLU)
Washer Switch: OFF
B (RED) & 0 volts See 2 A (DK BLU)
If the voltage is correct, replace Washer Motor. See Section 8E for removal and replacement procedures.
1. Check RED (228) and DK BLU (227) wires for an open. If wires are OK, check terminal control between Park Switch and Cover Assembly. If contact is good, replace Cover Assembly.
2. Check RED (228) for a short to Battery. If wire is OK, replace Cover Assembly.
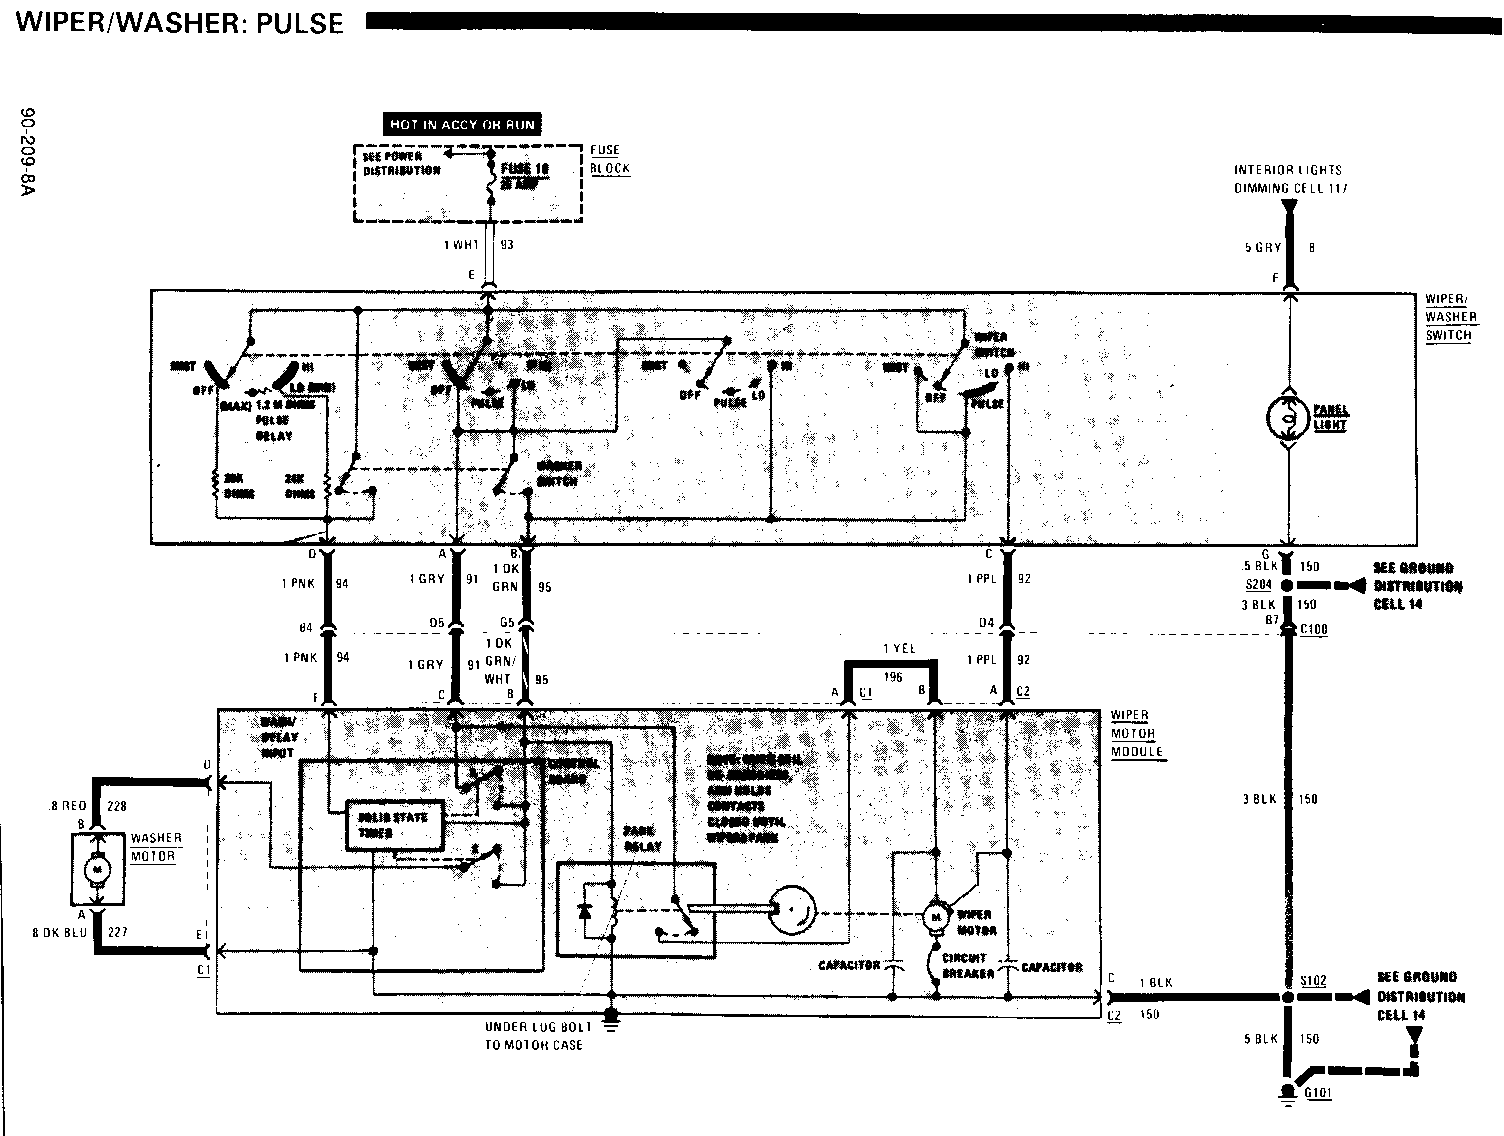
CIRCUIT OPERATION
In addition to the features of a conventional (non-pulse) wiper system (low and high speed), the pulse-type Windshield Wiper/Washer System includes an operating mode in which the Wipers make single strokes with an adjustable time interval between strokes. The time interval is controlled by a Solid State Timer in the Wiper Motor Module. The duration of the delay interval is determined by the delay rheostat in the Wiper Switch Module.
The Wiper Motor is protected by a Circuit Breaker. If the Wipers are blocked (by snow or ice for example) the Circuit Breaker will open the circuit. The Circuit Breaker resets automatically when it cools.
Pulse Operation
With the Wiper/Washer Switch in PULSE, battery voltage is applied to the Wiper Motor Module at terminal B of connector C1 through the DK GRN/WHT wire. Voltage is also applied to terminal F through the PNK wire and the pulse delay resistor in the Wiper Switch Module. The battery voltage at terminal B energizes the Park Switch Coil which closes its contacts. In response to the voltage at terminal F, the Solid State Timer momentarily closes contact A on the Cover Assembly which applies battery voltage at terminal B to the contacts of the Park Switch, starting the Wipe, Motor.
A mechanical arm (end of sweep input) operates contacts on the Cover Assembly, which cause contact A to open when the Wipers have completed their sweep. Since the Park Switch Coil remains energized, the Wipers do not park but remain just above the park position until the Cover Assembly closes contact A again to start another sweep.
The length of delay time between sweeps is controlled by the variable Pulse Delay resistor. The delay is adjustable from 0 to 25 seconds.
Low Speed
With the Wiper Switch in LO, battery voltage is applied at the Wiper Motor Module connector C1, terminals B and C through the DK GRN/ WHT and GRY wires. The Park Switch Coil is again energized and battery voltage is applied to the Park Switch contacts and the Wiper Motor, which runs continuously.
High Speed
With the Wiper Switch in the HI position, battery voltage is applied directly to the Wiper Motor, at terminal A, without passing through the Park Switch contacts. Terminal A is connected to a separate Wiper Motor brush for high speed operation. The Park Switch coil remains energized in the HI position because of the voltage that is present at the low speed Wiper Motor brush when voltage is applied to the high speed brush. The current path from the low speed brush to the Park Switch coil is completed through the Wiper/Washer Switch. An open in this circuit will cause the wipers to be inoperative in LO and cycle in and out of park in HI and possibly prevent LO speed operation.
Washer
When the Washer Switch is held ON, battery voltage is applied to the Cover Assembly through the PNK and DK GRN/WHT wires. The Park Switch Coil is energized by the battery voltage at terminal B of connector C1. The Cover Assembly turns on the Washer and Wiper Motors by closing contacts A and B. The Cover Assembly turns the Wiper Motor off approximately six seconds after it interrupts power to the Washer Motor. If the Wipers had been in PULSE, LO or HI, they would return to that operation after the wash cycle.
Mist
When the control is moved to MIST and released, the Wipers make one sweep at low speed and return to park. The circuit operation is the same as that of LO.
General Motors bulletins are intended for use by professional technicians, not a "do-it-yourselfer". They are written to inform those technicians of conditions that may occur on some vehicles, or to provide information that could assist in the proper service of a vehicle. Properly trained technicians have the equipment, tools, safety instructions and know-how to do a job properly and safely. If a condition is described, do not assume that the bulletin applies to your vehicle, or that your vehicle will have that condition. See a General Motors dealer servicing your brand of General Motors vehicle for information on whether your vehicle may benefit from the information.
