LEAD/PULL, TORQUE/MEMORY STEER (STEERING WHEEL OFF CENTER)

Subject: LEAD/PULL, TORQUE/MEMORY STEER, STEERING WHEEL OFF CENTER
Model and Year: 1982-92 CAVALIER, CORSICA, AND BERETTA -----------------------------------------------------------------------------
THIS BULLETIN CANCELS AND SUPERSEDES DEALER SERVICE BULLETIN NO. 9O-3O4-3B, DATED AUGUST 1990. THE 1992 MODEL YEAR HAS BEEN ADDED AS WELL AS CORRECTED INFORMATION LISTED IN STEPS 6 AND 7. ALL COPIES OF 9O-3O4-3B SHOULD BE DISCARDED.
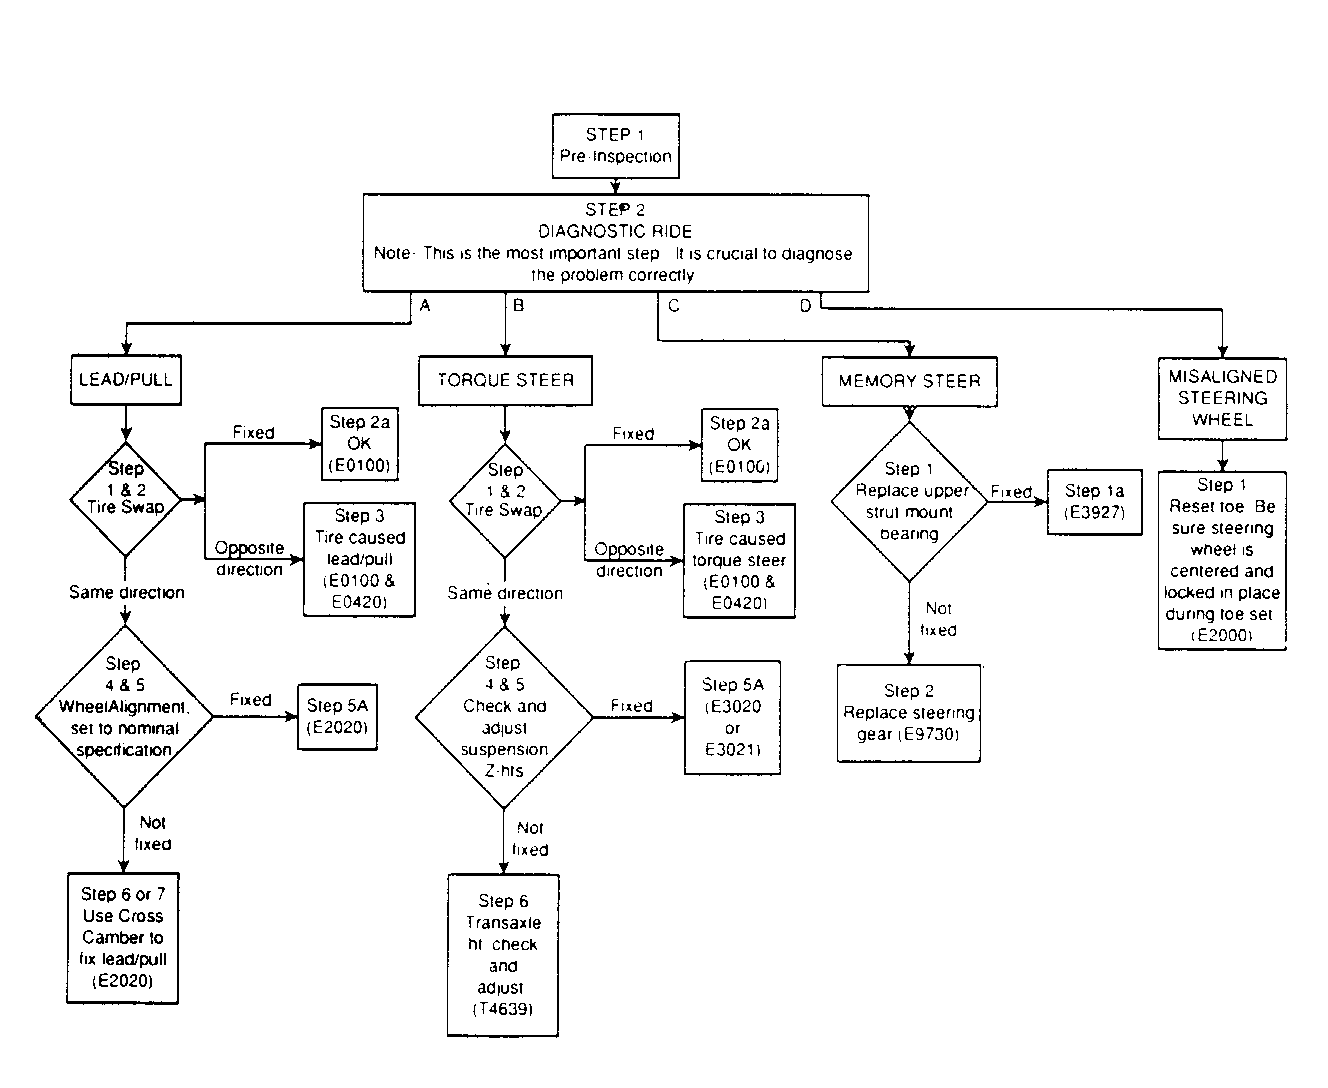
The following diagnostic and repair information has been developed and compiled to assist dealer service personnel in their efforts to diagnose and correct vehicles exhibiting lead/pull, torque steer, memory steer, steering wheel off-center, and/or unusual tire wear conditions. A flow chart which will be helpful in understanding the logic of the diagnostic and repair procedures is included (Figure 3).
DEFINITIONS
Lead: On a smooth, flat road with the transaxle in neutral, the vehicle does not require a noticeable torque input to the steering wheel to maintain a straight path. However, with hands removed from the steering wheel, the vehicle drifts to the left or right.
Pull: On a smooth, flat road with the transaxle in neutral, the vehicle requires a noticeable torque input to the steering wheel to maintain a straight path. A pull requires noticeable input to correct.
Note: "Leads" and "pulls" are different terms for the same condition. Lead refers to the path deviation (usually a lane change in .2 miles or less); pull refers to the torque at the steering wheel required to maintain a straight path (more than .3 N.m or 2.7 lbs. in.).
Torque Steer: On a smooth, flat road the vehicle has a left or right steering force that is eliminated when the transaxle is placed in neutral. The magnitude of the steering force is usually (but not always) dependent on the amount of applied engine torque. Torque steer at constant highway speed is frequently mistaken for leads/pulls.
Memory Steer: On a smooth, flat road the vehicle exhibits a slight lead/pull condition when the vehicle is returned to a neutral or straight ahead position after completion of a turning maneuver. This condition is always noted as being in the same direction as the last turning maneuver (after a right turn, the vehicle leads or pulls to the right; after a left turn, the vehicle leads or pulls to the left), and may vary in degree right to left. This condition is most noticeable with the driver's hands off the steering wheel.
Steering Wheel Angle: The "levelness" of the steering wheel when following a straight path. Steering wheel should appear to be level with the instrument panel when going straight ahead, and within +/- 5 degrees when measured on an alignment machine.
DIAGNOSTIC PROCEDURES
Step 1
Check Tires.
A. Same size?
B. Same brand?
C. Equally worn?
D. Abnormally worn or damaged?
E. Same tire pressure (within 1 psi)?
Record any problems noted in tire inspection.
Step 2
PERFORM DIAGNOSTIC RIDE ON SMOOTH, FLAT (CROWN-FREE) ROAD. It is important to repeat road test in each direction to eliminate crosswind effects. Road crown and crosswind induced leads/pulls are normal. The following steps should be followed to properly identify the complaint condition:
A. Drive the vehicle on a straight, smooth, flat (crown-free) road surface at 40-60 mph (64 km/h to 97 km/h). Shift the transaxle to neutral and allow the vehicle to coast. Momentarily release the steering wheel and note if there is a change in direction in travel.
CAUTION:
THE DRIVER'S HANDS SHOULD NOT BE MOVED FROM THE STEERING POSITION DURING THE MOMENTARY RELEASE OF THE STEERING WHEEL. IMPROPER VEHICLE CONDITION MIGHT CAUSE PATH DEVIATION. UNCORRECTED BY DRIVER STEERING, THIS MIGHT RESULT IN A COLLISION AND PERSONAL INJURY.
A deviation from straight direction in neutral indicates a lead/pull. Proceed to lead/pull corrective action procedure.
B. If no change in direction occurs in neutral, place the transaxle in drive and lightly accelerate from 40 mph to 60 mph while momentarily releasing the steering wheel.
CAUTION:
THE DRIVER'S HANDS SHOULD NOT BE MOVED FROM THE STEERING POSITION DURING THE MOMENTARY RELEASE OF THE STEERING WHEEL. IMPROPER VEHICLE CONDITION MIGHT CAUSE PATH DEVIATION. UNCORRECTED BY DRIVER STEERING, THIS MIGHT RESULT IN A COLLISION AND PERSONAL INJURY.
A noticeable deviation from a straight path in drive indicates a torque steer. Proceed to torque steer corrective action procedure.
C. With the vehicle stopped, steer left to full lock, then straighten wheel, but do not go past straight-ahead position. Lightly accelerate to 40 mph (64 km/h). Does the vehicle pull to the left throughout the acceleration? Repeat the procedure to the right. Does the vehicle now pull to the right?
If the vehicle leads/pulls in the same direction as the last maneuver, the vehicle is exhibiting a "memory steer" condition. Another indication of "memory steer" is a noticeable difference in effort required for left- to-right vs right-to-left lock-to-lock turns while the vehicle is stopped. Proceed to memory steer corrective action procedure.
D. If none of the above conditions exist, but the steering wheel is not "centered", proceed to steering wheel angle corrective action.
CORRECTIVE ACTION PROCEDURES
Lead/Pull --------- 1 . Put vehicle on hoist.
A. Visually inspect for damaged front and/or rear suspension or steering components.
B. Check for obvious brake drag.
C. Swap left front tire/wheel assembly with right front tire/wheel assembly. Cross only the front tires/wheels. Do not perform a standard or modified 'X' rotation.
2. Re-ride the vehicle.
A. If the vehicle is fixed, OK. Labor operation EO100.
B. If the vehicle torque steers in the opposite direction from the original complaint, the problem is most likely to be tire related. Proceed to step 3.
C. If the vehicle leads/pulls in the same direction, proceed to step 4.
3. Tire/wheel rotation for lead/pull.
A. Swap LF tire/wheel with LR tire/wheel and re-ride.
B. If vehicle is fixed, replace LR tire (tire that was originally on RF). If vehicle is not fixed replace RF tire (tire that was originally on LF.)
C. Re-ride to confirm fix. Labor operations EO100 and EO420.
4 Wheel alignment. Be sure alignment rack calibration is up to date. Note all before and after readings and record them on the repair order. This information will be requested if Technical Assistance is contacted, and will be helpful in Engineering analysis.
A. Check camber and reset to nominal specification.
B. Note, do not adjust caster settings. Caster cannot be adjusted. If caster is found to be out of specification, re-check on another machine, and verify calibration of current machine. If caster is still out of specification, see miscellaneous note #4. If still out of specification, contact Technical Assistance so Engineering can be notified see "miscellaneous Note #5 before calling T.A.S.
5. Re-ride vehicle.
A. If vehicle is fixed, OK. Labor operation E2020.
B. If vehicle pulls to left, proceed to step 6.
C. If vehicle pulls to right, proceed to step 7.
6. Reset camber for a lead/pull to the left.
A. Set the RF camber to a "+" value (no more than + 1.00 degree).
B. Set the LF camber to a "-" value (no more than - 1.00 degree).
C. Total cross camber (left minus right) should be no more than 2 degrees.
D. Re-ride. If not fixed, contact Technical Assistance.
7. Reset camber for a lead/pull to the right.
A. Set the RF camber to a value (no more than - 1.00 degree).
B. Set the LF camber to a value (no more than + 1.00 degree),
C. Total cross camber (left minus right) should be no more than 2 degrees.
D. Re-ride. If not fixed, contact Technical Assistance.
Torque Steer
1. Put vehicle on hoist.
A. Visually inspect for damaged front and/or rear suspension or steering components.
B. Check for obvious brake drag.
C. Swap left front tire/wheel assembly with right front tire/wheel assembly. Cross only the front tires/wheels. Do not perform a standard or modified 'X' rotation.
2. Re-ride the vehicle.
A. If the vehicle is fixed, OK.
B. If the vehicle torque steers in the opposite direction from the original complaint, the problem is most likely to be tire related. Proceed to step 3.
C. If the vehicle torque steers in the same direction, proceed to step 4.
3. Tire/wheel rotation for torque steer.
A. Swap LF tire/wheel assembly with LR tire/wheel and re-ride.
B. If vehicle is fixed, replace LR tire (tire that was originally on RF). If vehicle is not fixed replace RF tire (tire that was originally on LF.)
C. Re-ride to confirm fix. Labor operations EO100 and EO420.
4. Measure front suspension "Z" heights as specified in Service Manual.
One method of taking this measurement is to stretch a string tightly between the grease fittings on the bottom of the ball joints and measure the distance up from the string to the bottom surface of the suspension support.
If the side-to-side difference is greater than 6 mm (1/4 inch), correct the "Z" heights to equal settings. "Z" height can be increased by installing a new service replacement spring that is one part number "stronger" (or more if required) than the original equipment spring. Each subsequent spring code will result in approximately 8 mm (3/8 inch) diff- erence in "Z" height from the previous code.
5. Re-ride the vehicle.
A. If the vehicle is fixed, OK. Labor operation E3020 or E3021.
B. If the vehicle still torque steers, proceed to next step.
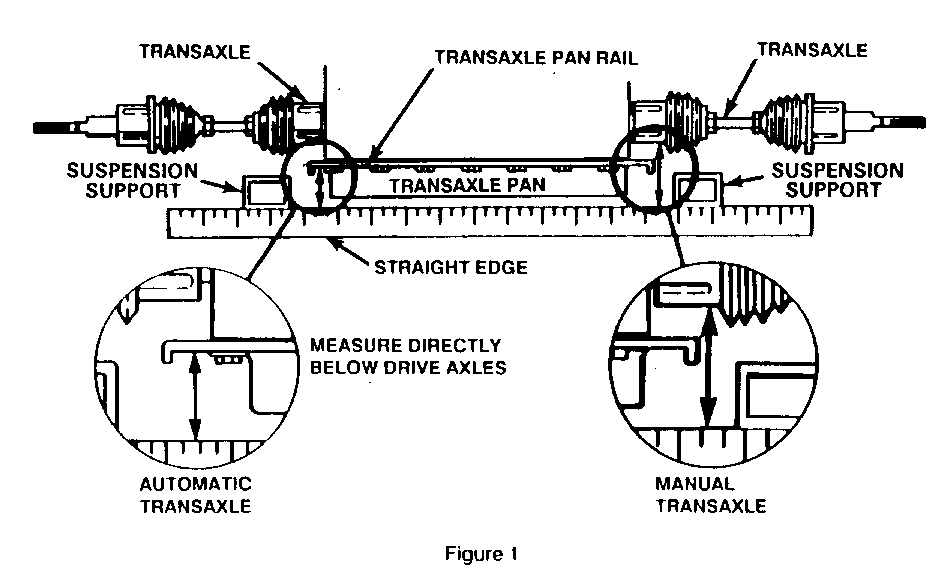
6. Measure transaxle heights-see Figure 1.
Side-to-side transaxle heights should be equal. If side-to-side differences are greater than 6 mm (1/4 inch), follow the engine shake-down procedure below:
A. Loosen the engine/transaxle to body mounts.
B. Start the vehicle and shift from reverse to drive slowly three times to re-settle the engine/transaxle assembly.
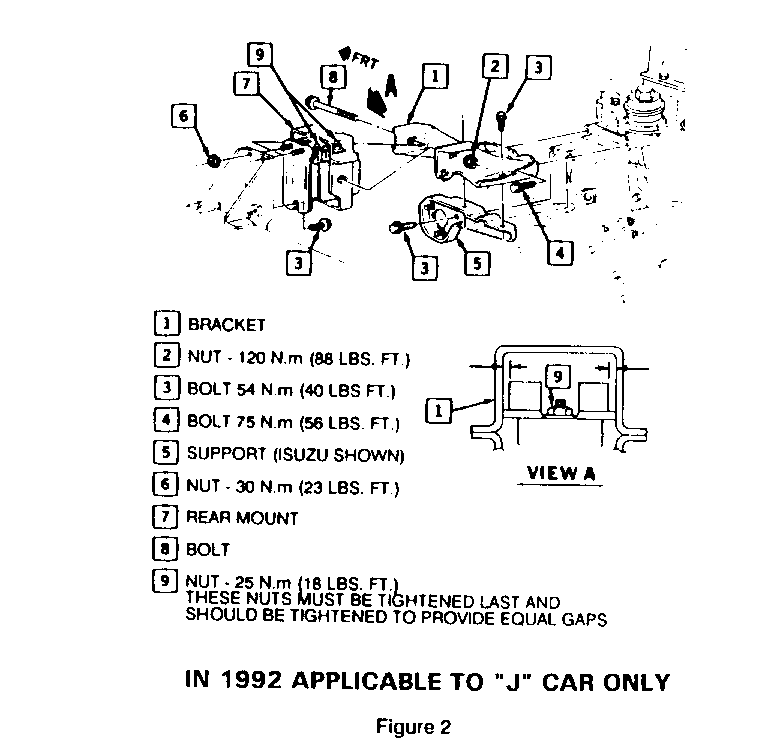
C. Block vehicle wheels and apply park and service brakes. With an assistant watching the engine, make sure the transmission mount is not grounded against the stop in drive. If so, shift the mount until the rubber stop is not contacting the mount with the engine in drive. Refer to Figure 2. (1992 "J" car only).
D. Re-tighten all engine and transaxle mounts to body.
E. Check to see if the engine/transaxle is not level by measuring as described above. If it is not level, shim engine/transaxle mounts to raise the side with the lowest reading, using appropriate wheel alignment shim stock. Labor operation T4639.
7. Re-ride the vehicle
A. If the vehicle is fixed, OK.
B. If the vehicle still torque steers, contact Technical Assistance.
Memory Steer
1. Replace upper strut mount/bearing assemblies following procedure in Service Manual. See 'Miscellaneous notes #9.
2. Re-ride the vehicle.
A. If the vehicle is fixed, OK. Labor operation E3927.
B. If the vehicle still exhibits memory steer, the steering gear may have high friction and should be replaced. See miscellaneous notes #9. Labor operation E9730.
Steering Wheel Angle Not 'Centered' ----------------------------------- Reset toe-in with steering wheel locked in 'centered' position.
Confirm that steering wheel is straight. Labor operation E2000.
Other Corrective Action Procedures
Check ball joints for binding or sticking by raising the vehicle on a hoist, and disconnect the tie rods.
Move the tires back and forth and feel for any binding or sticking. If any is felt, the ball joint(s) may need to be replaced.
MISCELLANEOUS NOTES
1. Poor alignment will not cause vibration complaints.
2. Toe-in does not affect leads/pulls or torque steer. It only affects steering wheel angle and tire wear.
3. Camber and caster values should not change during vehicle shipment.
4. Some caster adjustments may be made using the following procedure, which utilizes available tolerance in fastener holes. Do not file or elongate any body sheet metal.
A. Loosen the 6 suspension support bolts on the side needing adjustment.
B. Using a pry bar or other appropriate tool, adjust the suspension support forward to increase caster, or rearward to decrease caster.
C. Tighten the 6 suspension support bolts while holding the suspension support in the desired position.
D. Loosen the 3 strut mount fasteners in the engine compartment and move the top of the strut rearward to increase caster or forward to decrease caster.
5. Never modify body sheet metal to adjust caster or camber on J/N/L vehicles. There is not enough structure or inside spring clearance to do so.
6. Always confirm calibration of alignment machine before calling Technical Assistance.
7. Try a known good set of tires on a continual problem vehicle before calling Technical Assistance. This will rule out tires as a cause of the problem.
8. If it is necessary to call Technical Assistance, please have the following information ready to give to the Technical Assistance Engineer:
A. Nature of complaint - What the customer complained about, mileage, and whether it is a torque steer, lead/pull, memory steer, or steering wheel off center.
B. Last calibration date of alignment rack, type of equipment and model number.
C. Tire size and brand, and condition of tires.
D. Before and after alignment readings.
E. 'Z' heights.
F. Call only after attached procedure(s) has been performed.
9. For vehicles still under warranty, please use correct labor operation codes for what has been done, and keep records (before/after measurements, customer concern, etc).
E01 00 is the labor operation number used for warranty claims for front tire swaps because of lead/pull or torque steer concerns.
E2020 is the labor operation number used for warranty claims for tow adjust. Correct repair is to reset front wheel individual and sum tow while locking the steering wheel in correct level position. Do not use E2020 to claim a toe adjust. Remember that a toe adjust will not correct torque steer or leads/pulls; it only corrects excessive tire wear and steering wheel angle.
10. Do not claim an alignment labor operation in addition to another labor operation that requires (and includes labor time for) an alignment. The labor time for the alignment is either included in the labor operation or will be added to the labor operation. A good example of this is a strut replacement. The times for a camber check should be added, but an E2020 should not be claimed in addition to the strut change code.
11. Whenever possible in unusual or difficult-to-resolve cases, keep all defective parts and information for possible Engineering analysis. This includes defective tires, steering gears, strut mounts, and any other involved parts.
12. Whenever possible, record before and after measurements of caster, camber, toe, and suspension 'Z' heights. This will speed up the resolution of these problems.
General Motors bulletins are intended for use by professional technicians, not a "do-it-yourselfer". They are written to inform those technicians of conditions that may occur on some vehicles, or to provide information that could assist in the proper service of a vehicle. Properly trained technicians have the equipment, tools, safety instructions and know-how to do a job properly and safely. If a condition is described, do not assume that the bulletin applies to your vehicle, or that your vehicle will have that condition. See a General Motors dealer servicing your brand of General Motors vehicle for information on whether your vehicle may benefit from the information.
