INSTALLATION OF PASSIVE FRONT SEAT BELT ASSEMBLY

Model and Year: 1989 CORSICAS
TO: ALL CHEVROLET DEALERS
This bulletin is issued to address those owners of 1989 Corsicas who may comment on front shoulder belt discomfort because of webbing tension on vehicles built prior to the following VIN numbers.
Linden E192546 Wilmington Y187447
Templates included with this bulletin should be duplicated for future use as required.
New parts are available from GMSPO with the following numbers:
Part Number Color ----------- ----- 12398836-7 Very Dark Saphire -209 12398838-9 Med. Beechwood -669 12398840-1 Garnet Red -789 12398842-3 Med. Dark Gray -829 10144360 (Plunger Cable Assembly) (2 Per Car)
Parts are currently available from GMSPO.
Restraint System Operation
The comfort feature allows the occupant to adjust the shoulder belt to relieve shoulder belt tension. The occupant can readjust the comfort feature during vehicle operation. Whenever the occupant's door is opened, the comfort feature is automatically cancelled so the webbing can fully retract to the stowed position. This is controlled by the plunger located on the door.
During normal operation, the retractors remain unlocked while the vehicle is being operated. When the vehicle decelerates or changes direction abruptly, the belt(s) are locked in position by a pendulum that causes a locking bar to engage the cog of the retractor mechanism.
Procedure
1. Remove currently installed front seat belt system (See Service Manual Section 10-10).
Installation
1. Obtain comfort feature passive lap and shoulder belt kit. The kit contains right and left retractors and two cable plunger assemblies.
2. Remove door trim pads (See Service Manual Section 10-5 Figure 5).
3. It may be necessary to drill out the two lower rivets that hold the front door trim pad support to the door inner panel. (For access to lower nut on retractor assembly.)
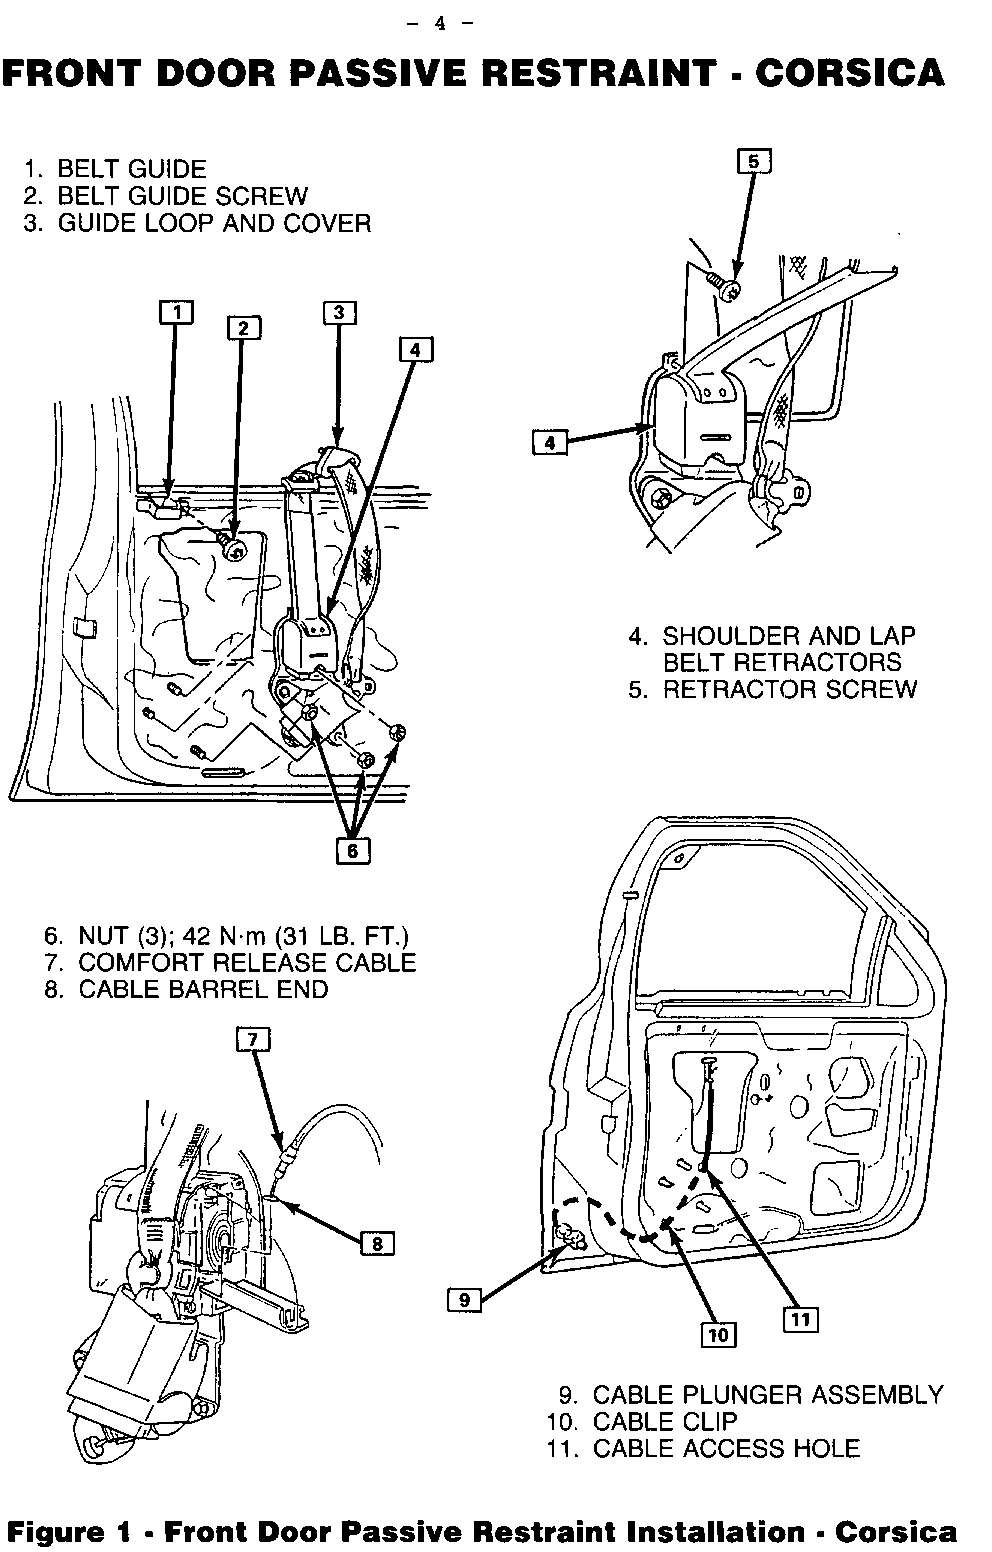
4. Remove guide loop and retainer.
5. Remove (3) 15 mm retractor nuts and #30 torx screw under vertical guide.
IMPORTANT: Door used in 1989 may or may not have plunger access holes in the door lock pillar facing. If vehicle has a door with the plunger access hole, a dust cover was installed by the plant. For vehicles with an access hole in the door facing, skip steps 6-9 and proceed with step 10.
Window should be lowered 6" from closed position to allow for drill clearance.
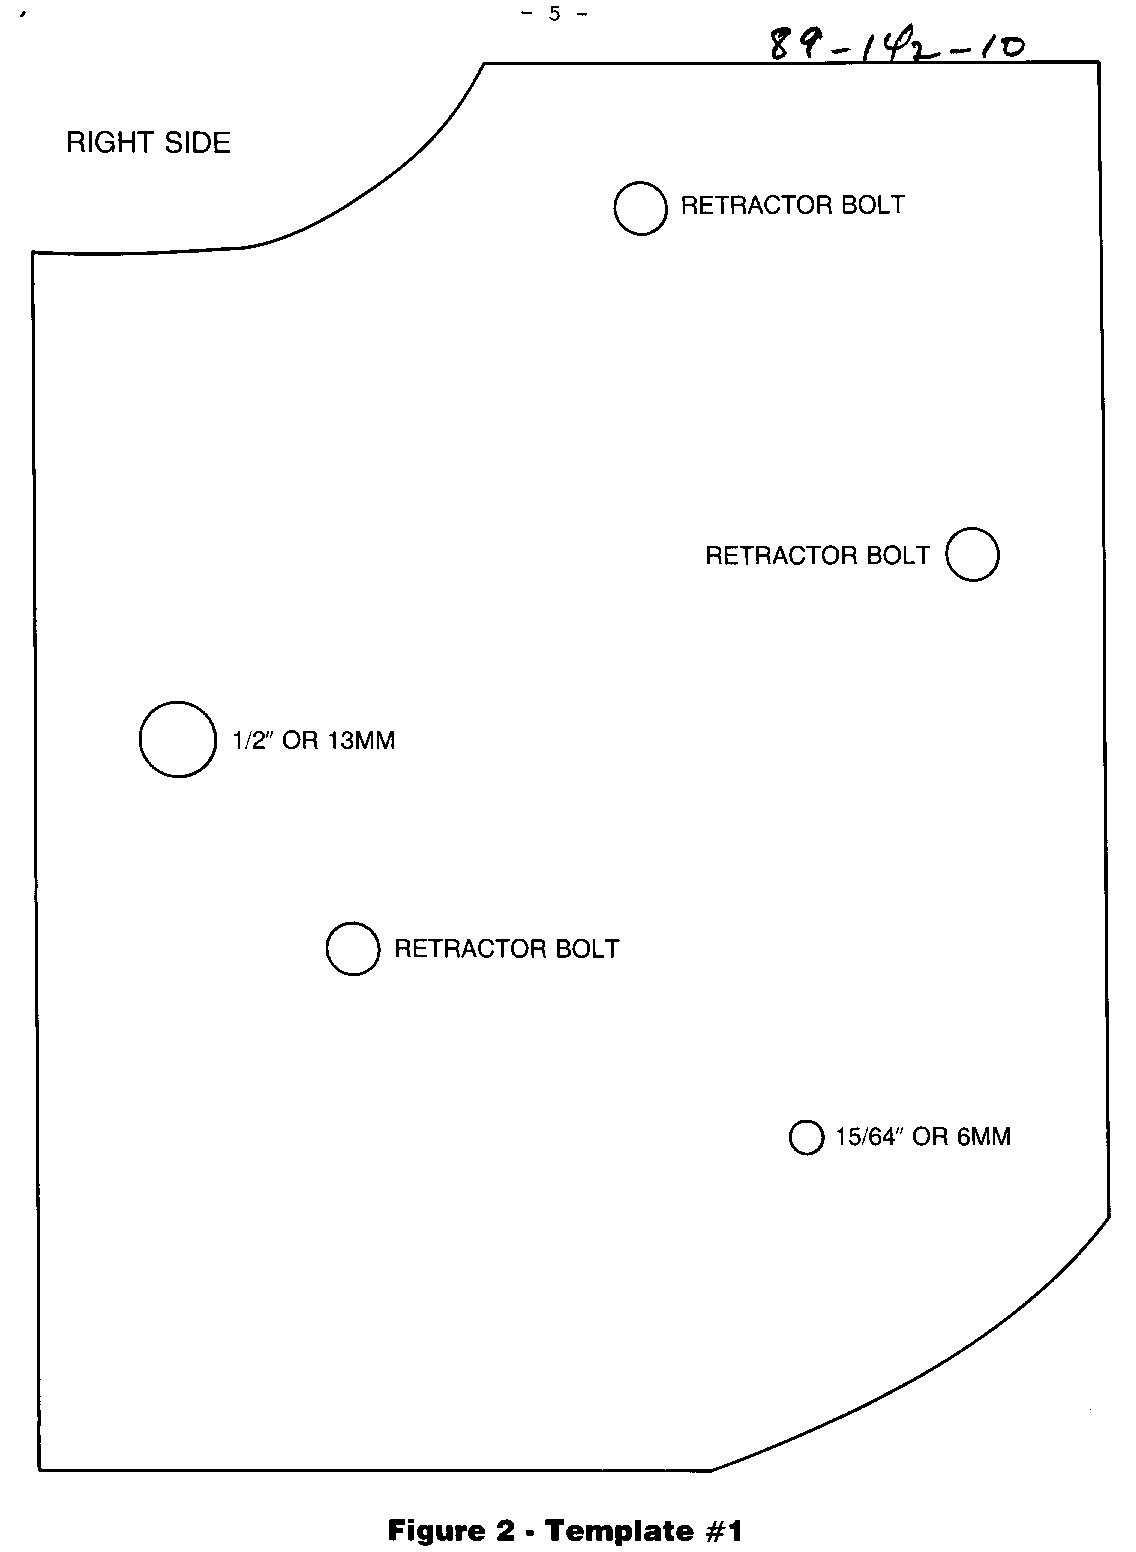
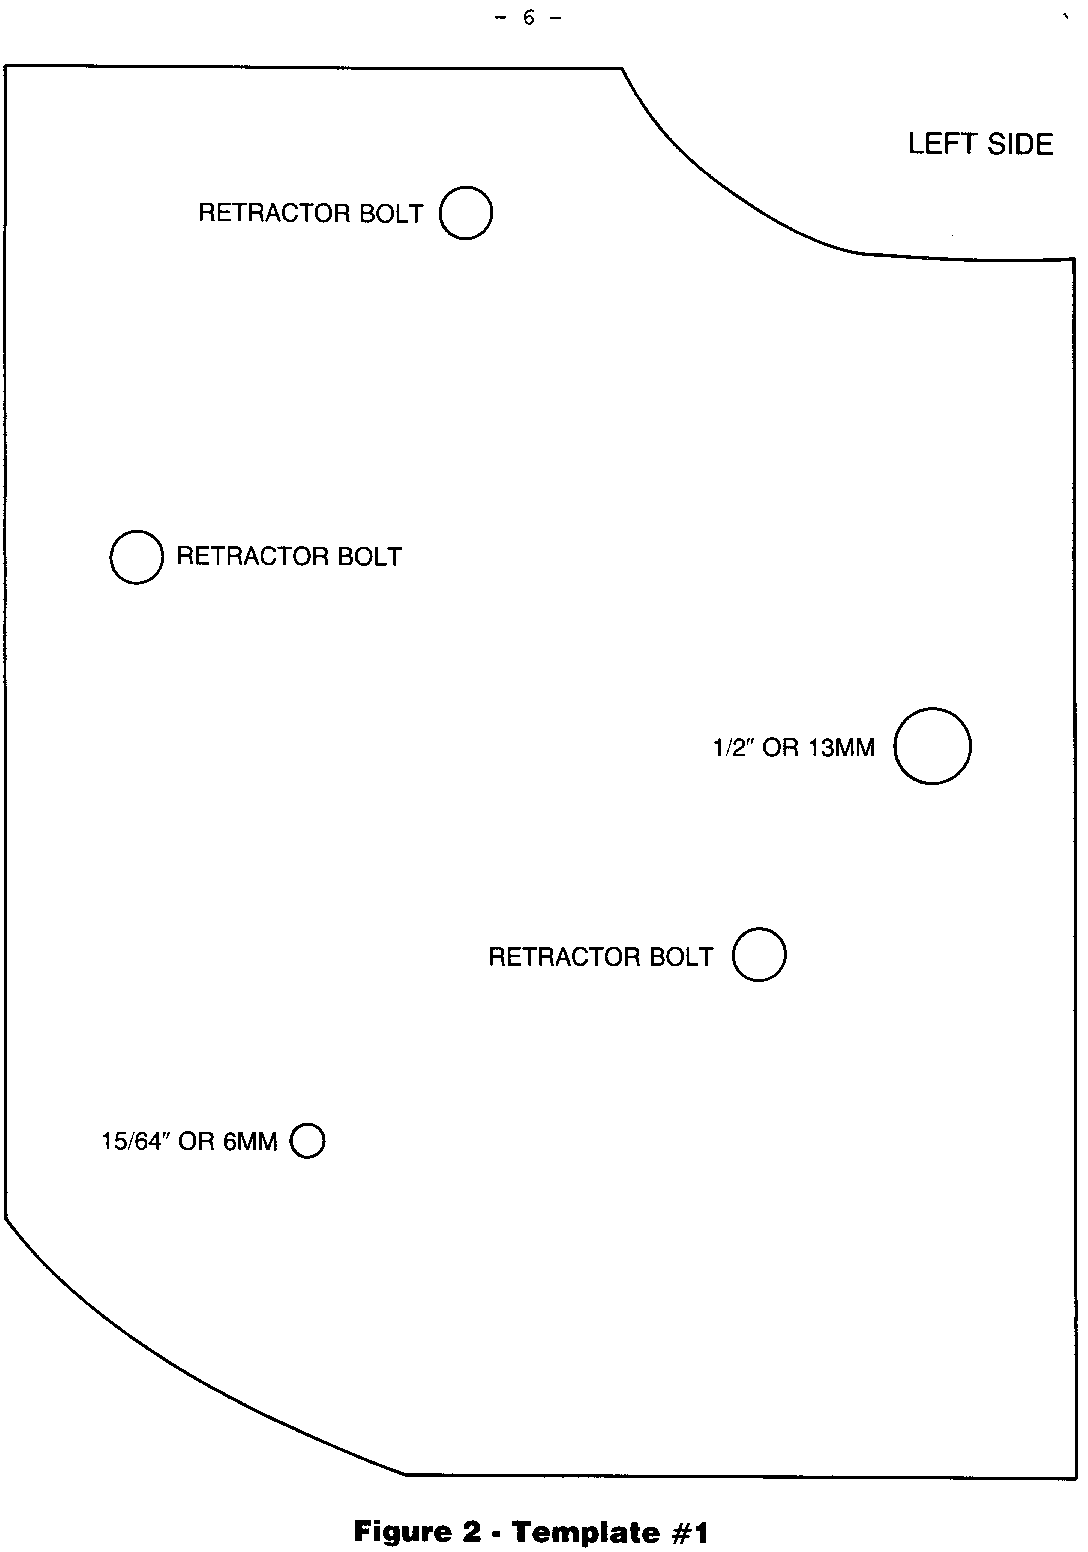
6. Position template #1 (Figure 2) on inner panel (align holes with retractor studs). Drill cable clip attaching hole (15/64" or 6 mm drill) and cable access hole (1/2" or 13 mm drill).
IMPORTANT: Drill carefully so as not to damage plastic air deflector.
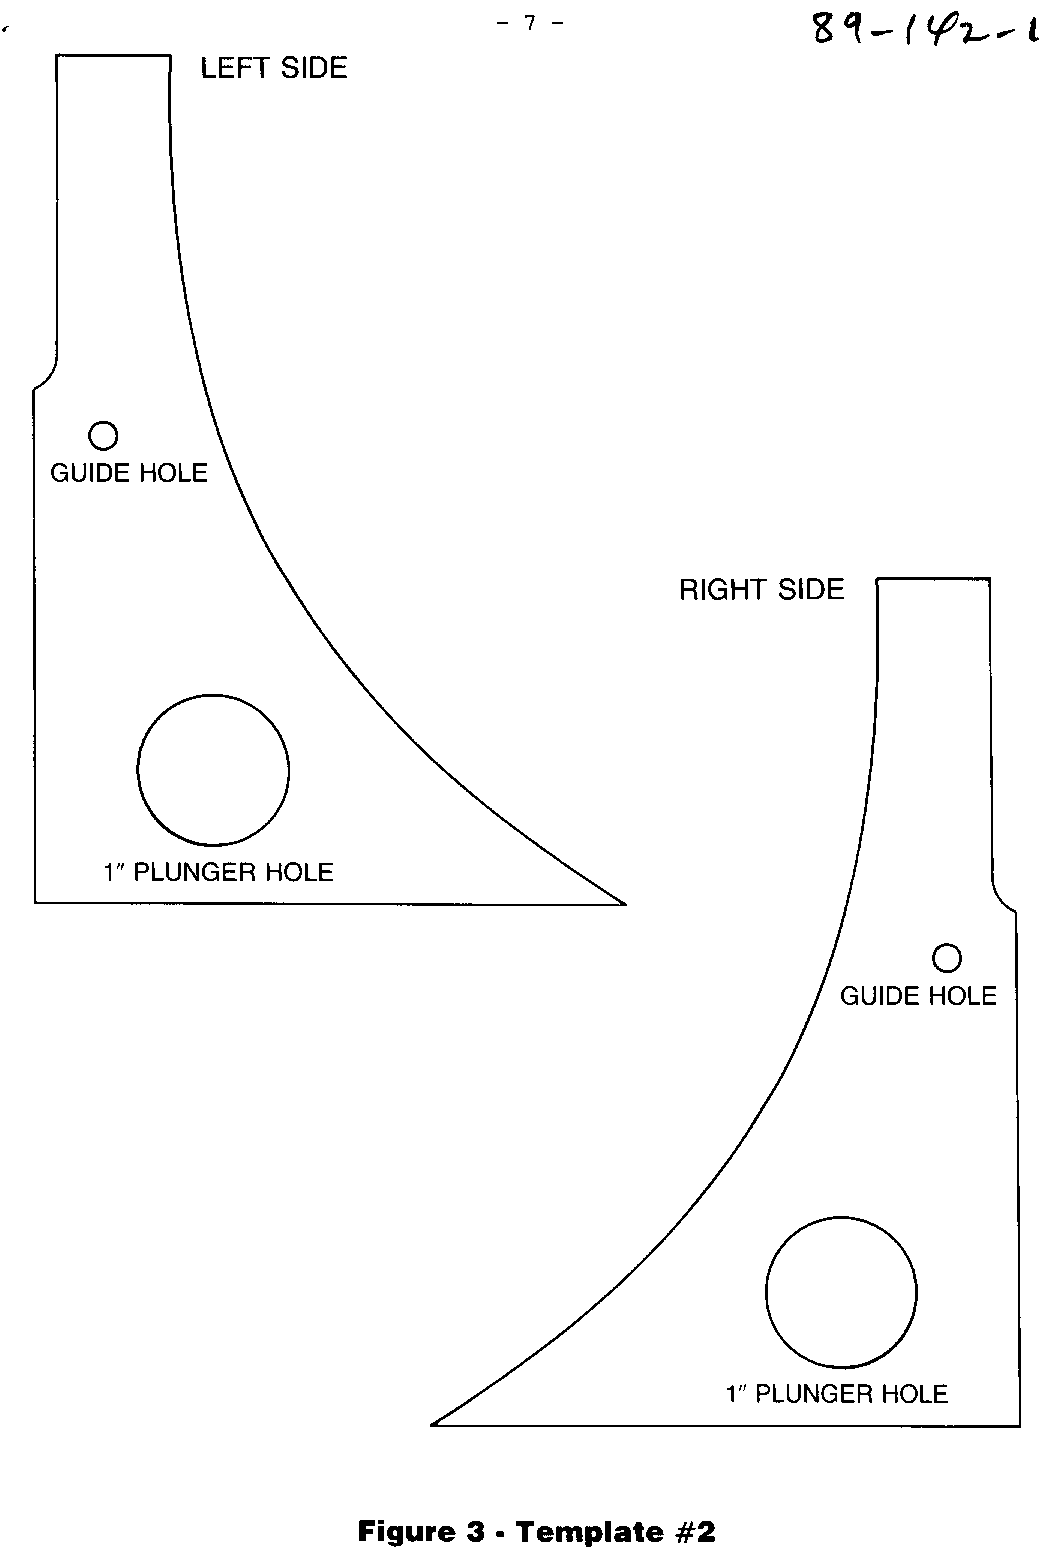
7. Remove lower bumper on door facing. Position template #2 (Figure 3) on door facing align hole in template with bumper hole. Align template to contour of door facing.
8. Mark, center punch plunger hole and place a piece of clay on the punch hole. Close door and check alignment with depression in center pillar facing. Drill 1" (one) inch hole.
9. Deburr and treat bare metal with conditioner, primer and paint.
IMPORTANT: After drilling, vacuum metal chips from door to prevent rusting.
10. Insert cable through plunger opening.
NOTICE: WHEN INSTALLING CABLE USE CAUTION, IF CABLE IS KINKED PLUNGER OPERATION WILL BE AFFECTED.
11. Feed cable through cable access hole in the inner panel.
12. Insert cable clip in clip attaching hole in the inner panel.
13. Press in plunger assembly to engage clips behind door inner panel.
14. Install retactor and (3) nuts. Torque nuts to 42 N.m (31 lb.ft.).
15. Install #30 torx screw in top of retractor.
16. Install guide loop and nut. Torque nut to 23 N.m (17 lb. ft.).
17. Connect cable barrel end to retractor making sure barrel is fully engaged retractor door.
18. Check cable during window operation cycle for proper clearance.
19. Close door and check comfort operation.
20. Seal air defector at cable access and clip holes with caulking compound.
21. Install door trim pads (See Service Manual Section 10-5 Figure 5).
Labor Op: T1425 Labor Time: 1.8 Hours (Both Sides)
***************************************************************************** *STG DISCLAIMER*
"THE TEMPLATE DISPLAYED IN THIS SERVICE PUBLICATION IS NOT INTENDED FOR USE" (Please refer to the actual publication for an accurate "TEMPLATE" to use in this service procedure.) *****************************************************************************
General Motors bulletins are intended for use by professional technicians, not a "do-it-yourselfer". They are written to inform those technicians of conditions that may occur on some vehicles, or to provide information that could assist in the proper service of a vehicle. Properly trained technicians have the equipment, tools, safety instructions and know-how to do a job properly and safely. If a condition is described, do not assume that the bulletin applies to your vehicle, or that your vehicle will have that condition. See a General Motors dealer servicing your brand of General Motors vehicle for information on whether your vehicle may benefit from the information.
