Lower Bearing and Steering Column Jacket Replacement Column Shift Lean Shaft
Tools Required
J 21854-01 Pivot Pin Remover
Removal Procedure
- Disable the SIR system. Refer to SIR Disabling and Enabling in SIR.
- Remove the steering column from the vehicle. Refer to Steering Column Replacement .
- Remove the turn signal multifunction switch. Refer to Turn Signal Multifunction Switch Replacement .
- Remove the ignition lock cylinder case. Refer to Ignition Lock Cylinder Case Replacement .
- Remove the tilt spring assembly only. Refer to Steering Column Tilt Spring Replacement .
- Remove the linear shift and the automatic shift lock control. Refer to Linear Shift Assembly Replacement .
- Inspect the steering column for accident damage. Refer to Steering Column Accident Damage Inspection .
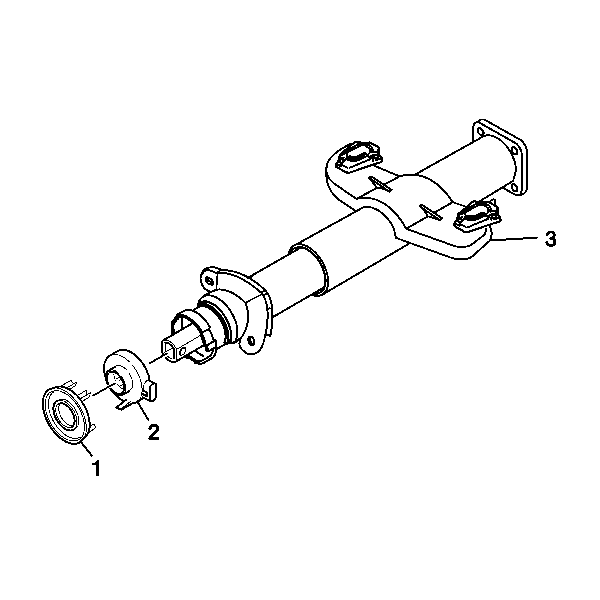
- Remove the sensor retainer (1) from the steering column jacket assembly (3).
- Remove the steering shaft position sensor (2) from the steering column jacket assembly (3).
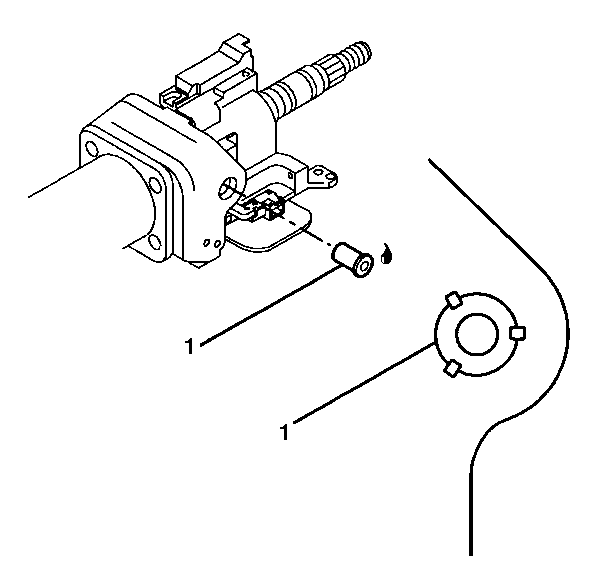
- Gently pull the adapter and bearing assembly (1) from the steering shaft assembly.
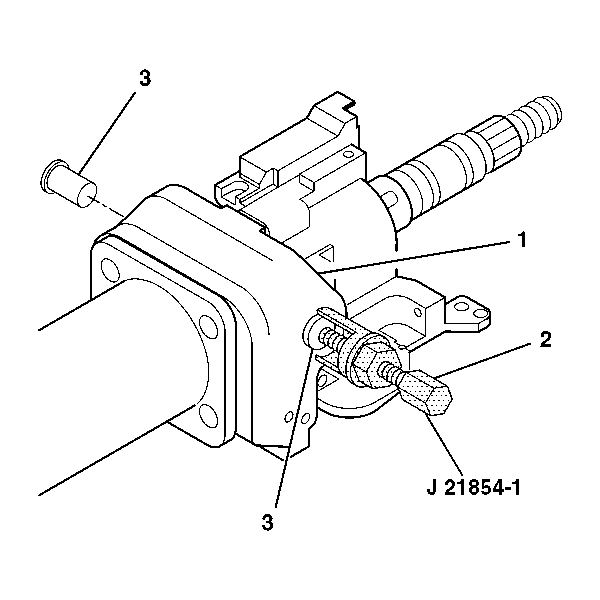
- Remove the 2 pivot pins (3) from the steering column tilt head assembly (1) by using J 21854-01 .
- Install the tilt lever into the steering column tilt head assembly (1).
- Pull back on the tilt lever and at the same time pull the steering column tilt head assembly (1) down and away from the steering column.
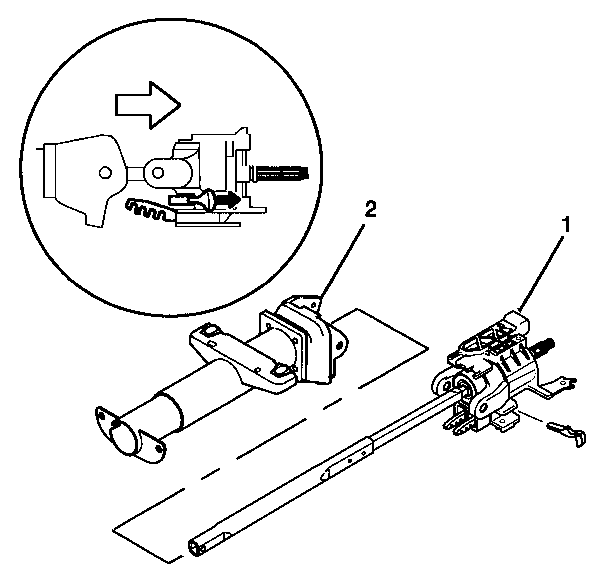
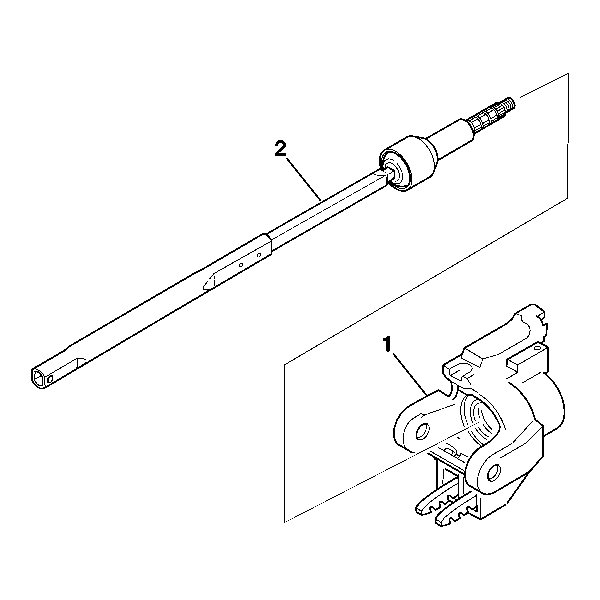
- Remove the steering column tilt head assembly (1) with the steering column shaft assembly from the steering column jacket assembly (2).
- Remove the tilt lever.
- Remove the steering column shaft assembly (2) from the steering column tilt head assembly (1).
- Remove the upper bearing assembly.
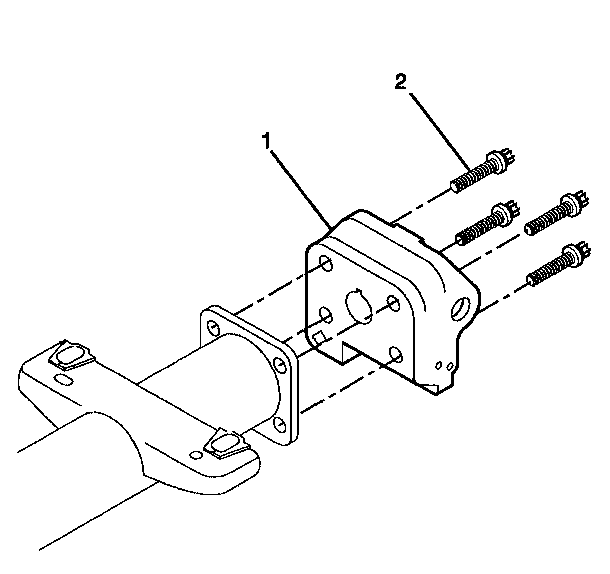
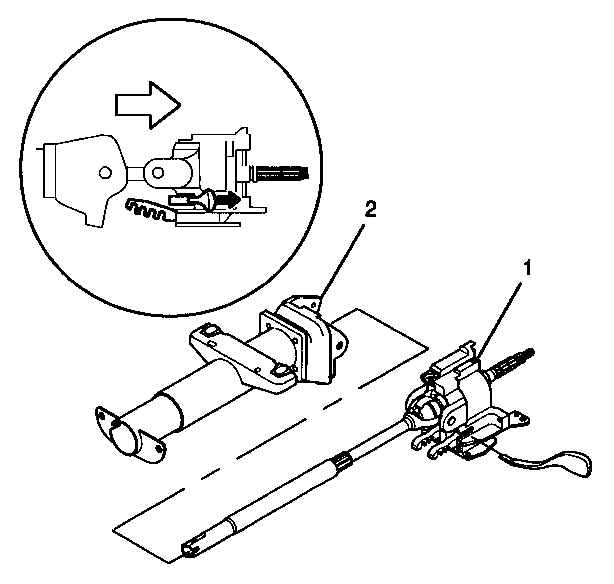
- Remove the 4 TORX® head screws (2) from the steering column support assembly (1).
- Discard the 4 TORX® head screws.
- Remove the steering column support assembly (1) from the steering column jacket assembly.
Caution: Refer to SIR Caution in the Preface section.
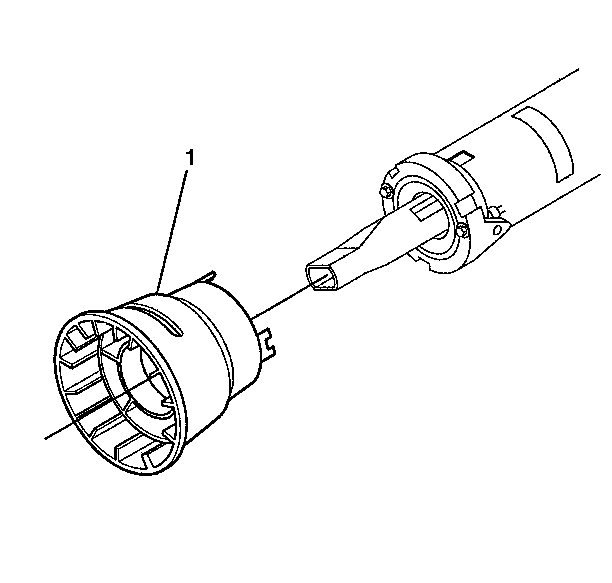
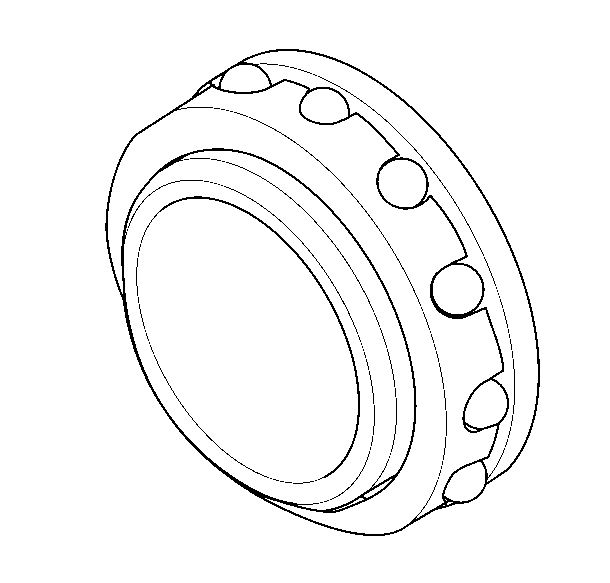
If the cage and balls separate from the adapter and bearing assembly, you may install them back together in the installation procedure.
Installation Procedure
- Attach the steering column support assembly (1) to the steering column jacket assembly (3) with 4 TORX® head screws (2).
- Install the upper bearing assembly.
- Install the steering column shaft assembly (2) into the steering column tilt head assembly (1).
- Install the steering column shaft assembly with the steering column tilt head assembly (1) into the steering column jacket assembly (2).
- Maneuver the tilt knob and push the steering column tilt head assembly (1) up towards the steering column in order to lock the steering wheel lock shoes in place.
- Lubricate the pivot pins (1) with GM P/N 12346293 (Canadian P/N 992723).
- Firmly seat each pivot pin (1) into the steering column tilt head assembly.
- Stake the steering column support assembly in 3 locations around each pivot pin.
- If necessary, install the balls (2) into the cage (3).
- Install the race (1) into the ball and cage assembly.
- Install the race, cage and balls into the adapter and bearing assembly (2).
- Install the adapter and bearing assembly (1) onto the steering column jacket assembly by performing the following steps:
- Install the steering shaft position sensor (2) onto the steering column jacket assembly (3).
- Install the sensor retainer (1) onto the steering column jacket assembly (3).
- Install the linear shift and the automatic transmission shift lock control only. Refer to Linear Shift Assembly Replacement .
- Install the tilt spring only. Refer to Steering Column Tilt Spring Replacement .
- Install the turn signal multifunction switch. Refer to Turn Signal Multifunction Switch Replacement .
- Install the ignition lock cylinder case. Refer to Ignition Lock Cylinder Case Replacement .
- Install the steering column into the vehicle. Refer to Steering Column Replacement .
- Enable the SIR system. Refer to SIR Disabling and Enabling in SIR.
Notice: Refer to Fastener Notice in the Preface section.
Important: Replace the steering column support assembly (1) if the steering column support assembly (1) has been staked 3 times.
Tighten
Tighten the screws to 17 N·m (13 lb ft).
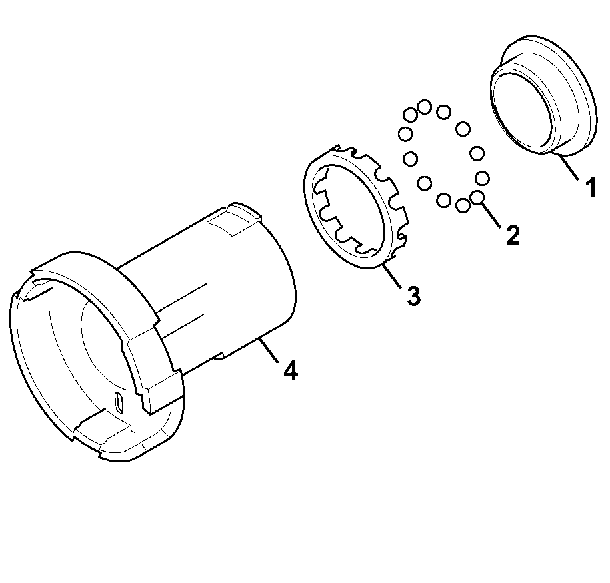
Important: Verify that all 12 balls are present and that NO foreign debris is present in the inner race, cage, balls or outer race. The orientation of the cage MUST be as shown to install properly.
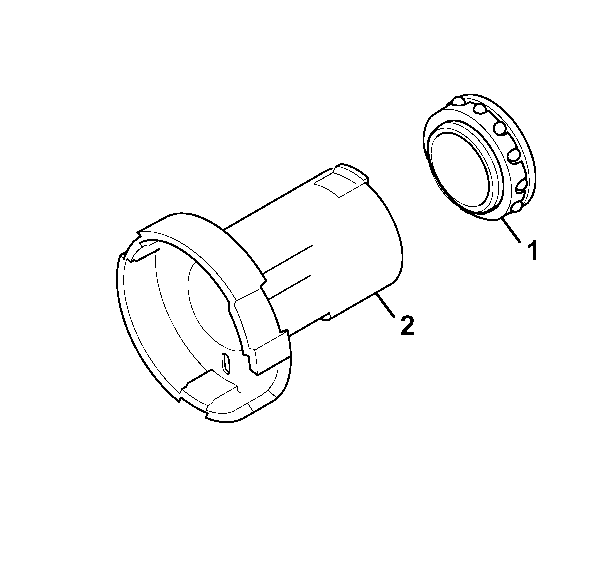
| 12.1. | Align the tab on the adapter and bearing assembly (1) with the slot in the steering column jacket assembly. |
| 12.2. | Push the adapter and bearing assembly (1) onto the steering column shaft assembly until the tab snaps into the slot. |
Lower Bearing and Steering Column Jacket Replacement Floor Shift Lean Shaft
Tools Required
J 21854-01 Pivot Pin Remover
Removal Procedure
- Disable the SIR system. Refer to SIR Disabling and Enabling in SIR.
- Remove the steering column from the vehicle. Refer to Steering Column Replacement .
- Remove the turn signal multifunction switch. Refer to Turn Signal Multifunction Switch Replacement .
- Remove the ignition lock cylinder case. Refer to Ignition Lock Cylinder Case Replacement .
- Remove the tilt spring only. Refer to Steering Column Tilt Spring Replacement .
- Inspect the steering column for accident damage. Refer to Steering Column Accident Damage Inspection .
- Gently pull the adapter and bearing assembly (1) from the steering shaft assembly.
- Remove the 2 pivot pins (3) from the steering column tilt head assembly (1) by using J 21854-01 .
- Install the tilt knob into the steering column tilt head assembly (1).
- Pull back on the tilt knob and at the same time pull the steering column tilt head assembly (1) down and away from the steering column.
- Remove the steering column tilt head assembly (1) with the steering shaft assembly from the steering column support assembly (2).
- Remove the tilt knob.
- Remove the steering shaft assembly (2) from the steering column tilt head assembly (1).
- Remove the upper bearing assembly.
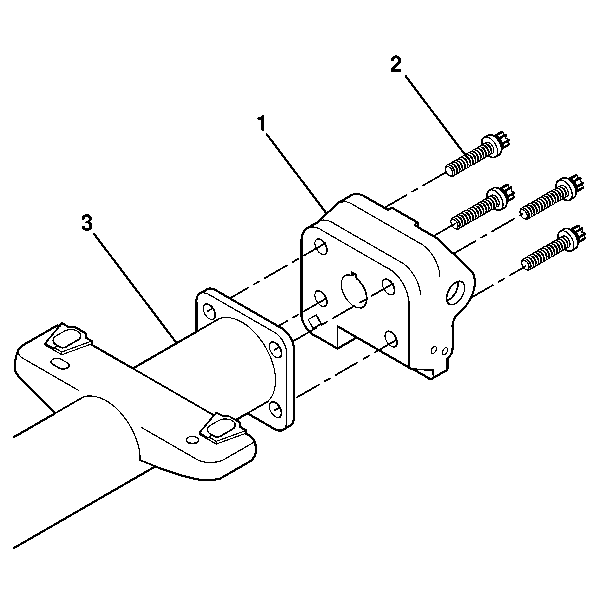
- Remove the 4 TORX® head screws (2) from the steering column support assembly (1).
- Discard the 4 TORX® head screws.
- Remove the steering column support assembly (1) from the steering column jacket assembly.
Caution: Refer to SIR Caution in the Preface section.
If the cage and balls separate from the adapter and bearing assembly, you may install them back together in the installation procedure.
Installation Procedure
- Attach the steering column support assembly (1) to the steering column jacket assembly with 4 new TORX® head screws (2).
- Install the upper bearing assembly.
- Install the steering column shaft assembly (2) into the steering column tilt head assembly (1).
- Install the steering column shaft assembly with the steering column tilt head assembly (1) into the steering column support assembly (2).
- Move the tilt knob and push the steering column tilt head assembly up towards the steering column in order to lock the steering wheel lock shoes in place.
- Lubricate the pivot pins (1) with GM P/N 12346293 (Canadian P/N 992723).
- Firmly seat each pivot pin (1) into the steering column tilt head assembly.
- Stake the steering column support assembly in 3 locations around each pivot pin (1).
- If necessary, install the balls (2) into the cage (3).
- Install the race (1) into the ball and cage assembly.
- Install the race, cage and balls into the adapter and bearing assembly (2).
- Install the adapter and bearing assembly (1) onto the steering column jacket assembly by performing the following steps:
- Install the tilt spring only. Refer to Steering Column Tilt Spring Replacement .
- Install the ignition lock cylinder case. Refer to Ignition Lock Cylinder Case Replacement .
- Install the turn signal multifunction switch. Refer to Turn Signal Multifunction Switch Replacement .
- Install the steering column into the vehicle. Refer to Steering Column Replacement .
- Enable the SIR system. Refer to SIR Disabling and Enabling in SIR.
Notice: Refer to Fastener Notice in the Preface section.
Important: Replace the steering column support assembly if the steering column support assembly has been staked 3 times.
Tighten
Tighten the screws to 17 N·m (13 lb ft).
Important: Replace the steering column support assembly if the steering column support assembly has been staked 3 times.
Important: Verify that all 12 balls are present and that NO foreign debris is present in the inner race, cage, balls or outer race. The orientation of the cage MUST be as shown to install properly.
| 12.1. | Align the tab on the adapter and bearing assembly (1) with the slot in the steering column jacket assembly. |
| 12.2. | Push the adapter and bearing assembly (1) onto the steering column shaft assembly until the tab snaps into the slot. |
