SMU - Revised Upper Control Arm Replacement

| Subject: | Revised Upper Control Arm Replacement |
| Models: | 2003-2006 Cadillac Escalade Models |
| 2003-2006 Chevrolet Avalanche, Silverado, Suburban, Tahoe Models |
| 2003-2006 GMC Sierra, Yukon Models |
| 2003-2006 HUMMER H2 |
This bulletin is being issued to revise the Upper Control Arm Replacement procedure in the Front Suspension sub-section of the Service Manual. Please replace the current information in the Service Manual with the following information.
The following information has been updated within SI. If you are using a paper version of this Service Manual, please make a reference to this bulletin on the affected page.
Use of special tool J 42188-B eliminates the need to remove the wheel drive shaft on 4WD models.
Upper Control Arm Replacement (Escalades, Avalanche, Silverado, Sierra, Suburban, Tahoe, Yukons)
Tools Required
J 42188-B Ball Joint Separator
Removal Procedure
- Raise and support the vehicle. Refer to Lifting and Jacking the Vehicle in General Information.
- Remove the tire and wheel. Refer to Tire and Wheel Removal and Installation in Tires and Wheels.
- Disconnect the electronic suspension control (ESC) link rod from the sensor, if equipped. Refer to Front Position Sensor Link Assembly - Electronic Suspension in Electronic Suspension Control.
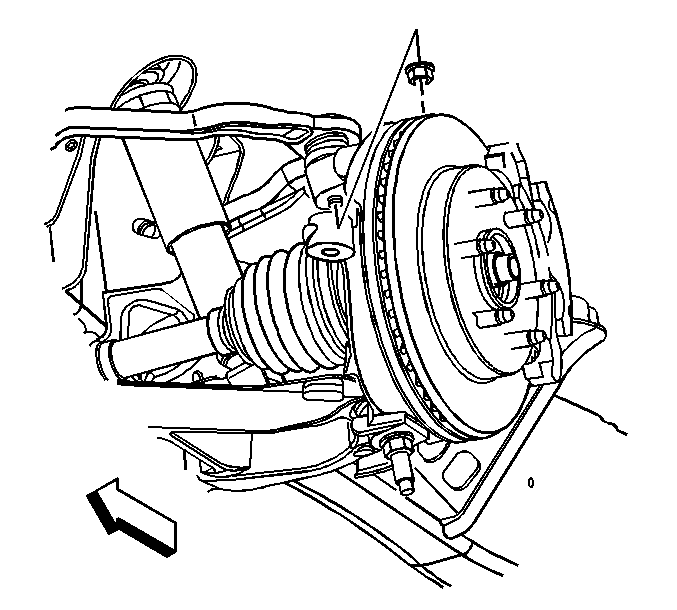
- Remove the retaining bolt for the brake hose and the wheel speed sensor brackets.
- Remove the upper ball joint retaining nut.
- Disconnect the upper control arm from the steering knuckle using the J 42188-B .
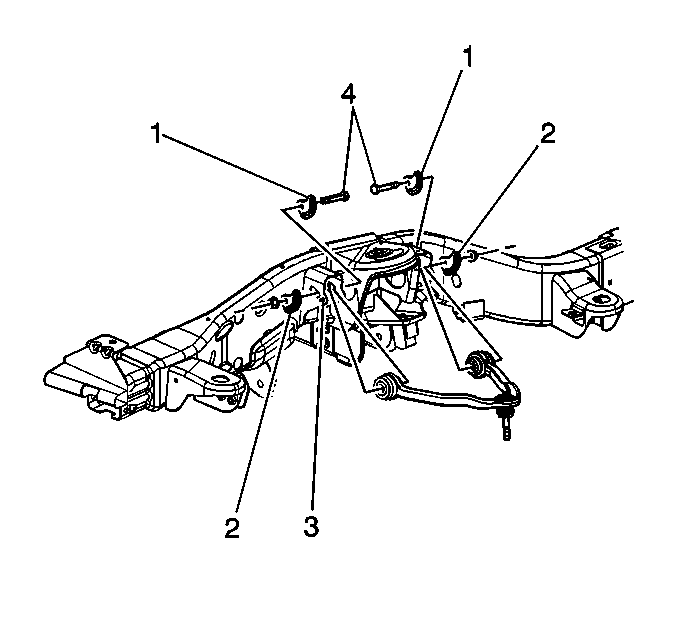
- Remove the upper control arm nuts and the adjustment cams (2) for the 15 Series 2WD, 4WD, and 25/35 Series 2WD.
- Remove the upper control arm bolts (4) for the 15 Series 2WD, 4WD, and 25/35 Series 2WD.
- Remove the upper control arm nuts and the adjustment cams (2) for the 25/35 Series 4WD.
- Remove the upper control arm bolts (4) for the 25/35 Series 4WD.
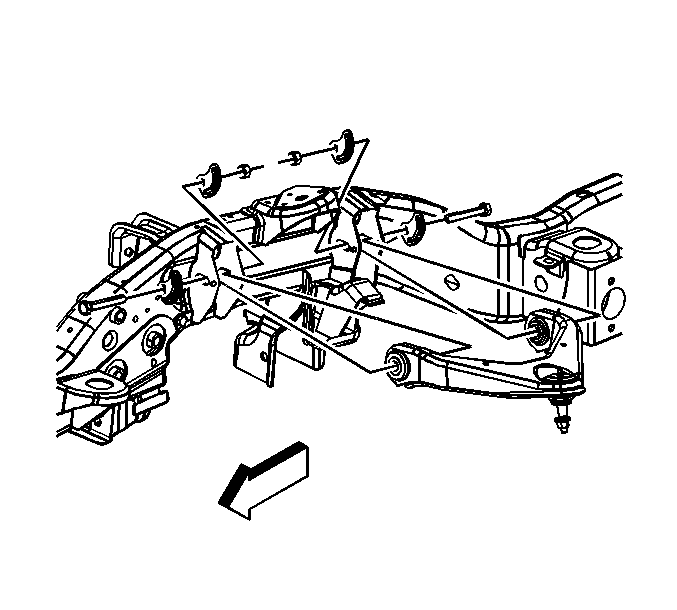
- Remove the upper control arm.

Installation Procedure
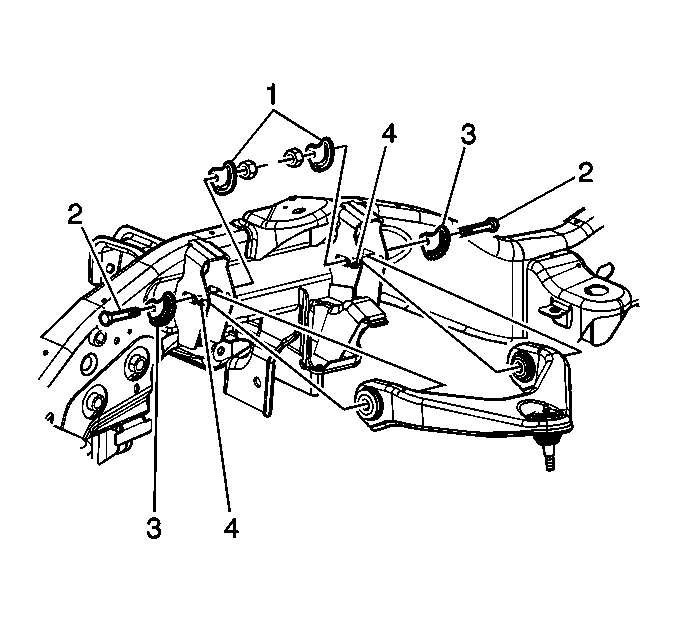
- Install the upper control arm.
- Install the upper control arm bolts (4) for the 25/35 Series 4WD.
- Install the upper control arm nuts and the adjustment cams (2) 25/35 Series 4WD.
- Install the upper control arm bolts (4) for the 15 Series 2WD, 4WD, and 25/35 Series 2WD.
- Install the upper control arm nuts and the adjustment cams (2) for the 15 Series 2WD, 4WD, and 25/35 Series 2WD.
- Connect the upper control arm to the steering knuckle .
- Install the new nut to the upper ball joint stud.
- Install the retaining bolts for the brake hose and wheel speed sensor brackets.
- Connect the ESC link rod to the sensor, if equipped. Refer to Front Position Sensor Link Assembly Replacement - Electronic Suspension in Electronic Suspension Control.
- Install the tire and wheel. Refer to Tire and Wheel Removal and Installation in Tires and Wheels.
- Remove the safety stands.
- Lower the vehicle.
- Verify the wheel alignment. Refer to Measuring Wheel Alignment in Wheel Alignment.
Notice: Refer to Fastener Notice in Cautions and Notices.
Tighten
Tighten the nuts to 190 N·m (140 lb ft).
Tighten
Tighten the nuts to 190 N·m (140 lb ft).
Tighten
Tighten the nut to 50 N·m (37 lb ft).
Tighten
Tighten the bolts to 9 N·m (80 lb in).
Upper Control Arm Replacement (H2)
Tools Required
J 42188-B Ball Joint Separator
Removal Procedure
- Raise and support the vehicle. Refer to Lifting and Jacking the Vehicle in General Information.
- Remove the tire and wheel. Refer to Tire and Wheel Removal and Installation in Tires and Wheels.
- Remove the retaining bolt for the brake hose and the wheel speed sensor brackets.
- Remove the nut at the upper ball joint. Discard the nut.
- Disconnect the upper control arm from the steering knuckle using the J 42188-B .
- Remove the upper control arm nuts and the adjustment cams.
- Remove the upper control arm.
Installation Procedure
- Install the upper control arm.
- Install the upper control arm bolts.
- Connect the upper control arm to the steering knuckle .
- Install the new nut to the upper ball joint stud.
- Install the retaining bolts for the brake hose and wheel speed sensor brackets.
- Install the tire and wheel. Refer to Tire and Wheel Removal and Installation in Tires and Wheels.
- Lower the vehicle.
- Verify the wheel alignment. Refer to Wheel Alignment Specifications in Wheel Alignment.
Notice: Refer to Fastener Notice in Cautions and Notices.
Tighten
Tighten the nuts to 190 N·m (140 lb ft).
Tighten
Tighten the nut to 50 N·m (39 lb ft).
Tighten
Tighten the bolts to 9 N·m (80 lb in).
